Those small circular pods flush-mounted in your front and rear bumpers have a deceptively simple job: emit a sound pulse, listen for the echo, and calculate how far away the nearest obstacle is. Ultrasonic sensors are the backbone of modern parking systems and an increasingly important part of the ADAS (Advanced Driver Assistance Systems) ecosystem — fitted to virtually every new vehicle sold today because sound waves, unlike cameras, work just as reliably in rain, darkness, and fog. This guide explains how automotive ultrasonic sensors work, what they connect to, how to identify when they’re failing, and what it costs to fix them.
Quick Answer
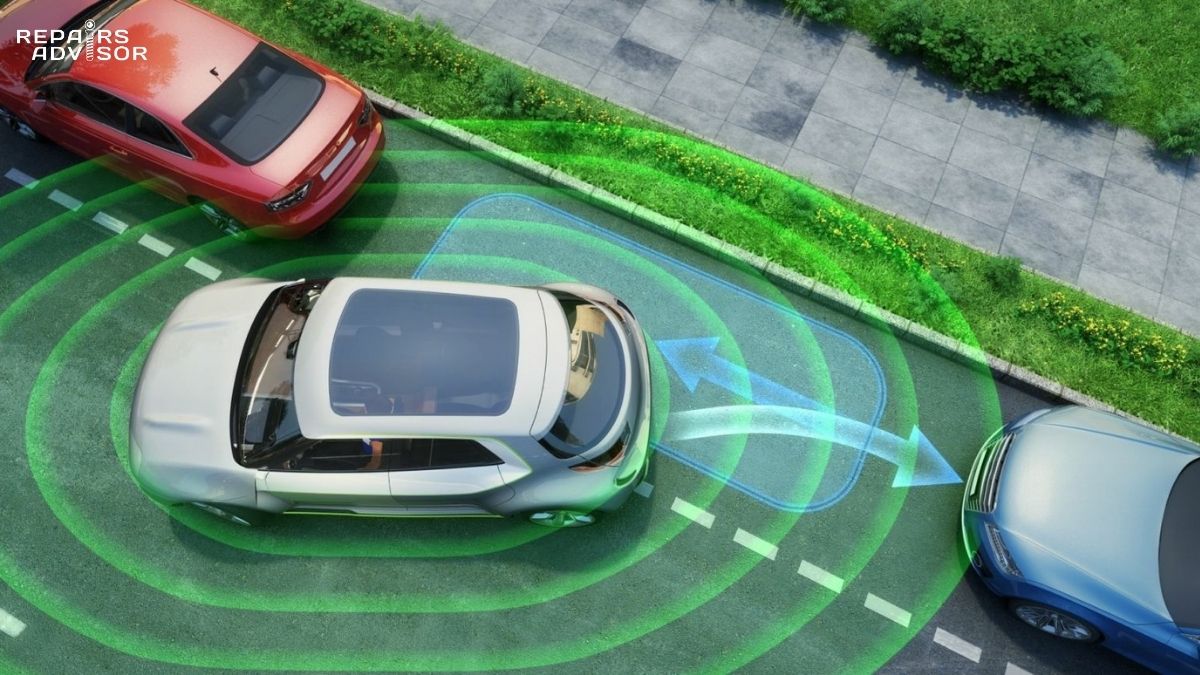
Automotive ultrasonic sensors are proximity detection devices mounted in vehicle bumpers that emit high-frequency sound pulses (typically 40–70 kHz) and measure the time it takes for the echo to return, calculating distance to nearby objects. Detection range is approximately 0.2–5 metres, making them ideal for low-speed parking and manoeuvring scenarios. They feed parking distance control (PDC), automatic emergency braking, blind spot monitoring, and automated park assist systems — and most fault symptoms, including constant beeping or failed detection, trace back to a dirty, damaged, or misaligned sensor face.
What Are Automotive Ultrasonic Sensors?
An automotive ultrasonic sensor is an electromechanical proximity device that uses high-frequency sound waves to detect objects and measure distance. The operating principle is called time-of-flight (TOF): the sensor emits a short ultrasonic pulse, the pulse reflects off any nearby object, and the sensor measures how long the echo takes to return. Since the speed of sound in air is known (approximately 340 m/s at 20°C), the distance to the object can be calculated precisely.
The frequencies used are well above human hearing — typically 40 kHz for standard parking sensors, up to 70 kHz in newer high-resolution systems. A useful way to understand this is bat echolocation: bats navigate in complete darkness using the same basic physics, emitting ultrasonic chirps and interpreting the returning echoes. Automotive sensors do the same thing, just with consistent electronic precision rather than biological machinery.
Practical detection range runs from around 0.2 metres (the minimum dead zone close to the sensor face) out to roughly 5 metres, though most parking applications use the 0.5–2.5 metre zone most intensively. This short-range focus sets ultrasonic sensors apart from automotive radar sensors, which are designed for long-range detection at highway speeds, and from automotive camera systems, which provide visual data but require computational processing to interpret distance. Ultrasonic sensors give a simple, reliable distance number — which is exactly what parking systems need.
Key Components Inside an Ultrasonic Sensor
From the outside, a parking sensor looks like a small cylinder capped with a flat face. Inside is a precisely engineered assembly of three main elements.
Piezoelectric Transducer
The core of every ultrasonic sensor is a piezoelectric ceramic disc — typically lead zirconate titanate (PZT). Piezoelectric materials generate voltage when mechanically deformed, and deform mechanically when voltage is applied. This means the same disc can both transmit (voltage applied → disc vibrates → emits sound wave) and receive (incoming sound wave → disc vibrates → generates voltage). Most automotive sensors use a single transducer element doing both jobs in rapid alternation: emit the pulse, then switch to receive mode to listen for the echo.
The resonant frequency of this disc determines the sensor’s operating frequency. Standard automotive sensors resonate at 40 kHz; higher-frequency designs (up to 70 kHz) achieve better angular resolution and can detect smaller objects like bollards and curb edges more accurately.
Signal Processing Electronics
Raw echo signals are noisy. Wind turbulence, road noise, rain, and reflections from the ground surface all create false signals that would trigger constant alerts if left unfiltered. On-board signal processing electronics apply bandpass filtering (accepting only echoes at the expected frequency), amplitude thresholding (rejecting weak echoes below a set level), and time-gating (ignoring echoes that arrive too early or too late to represent valid obstacles).
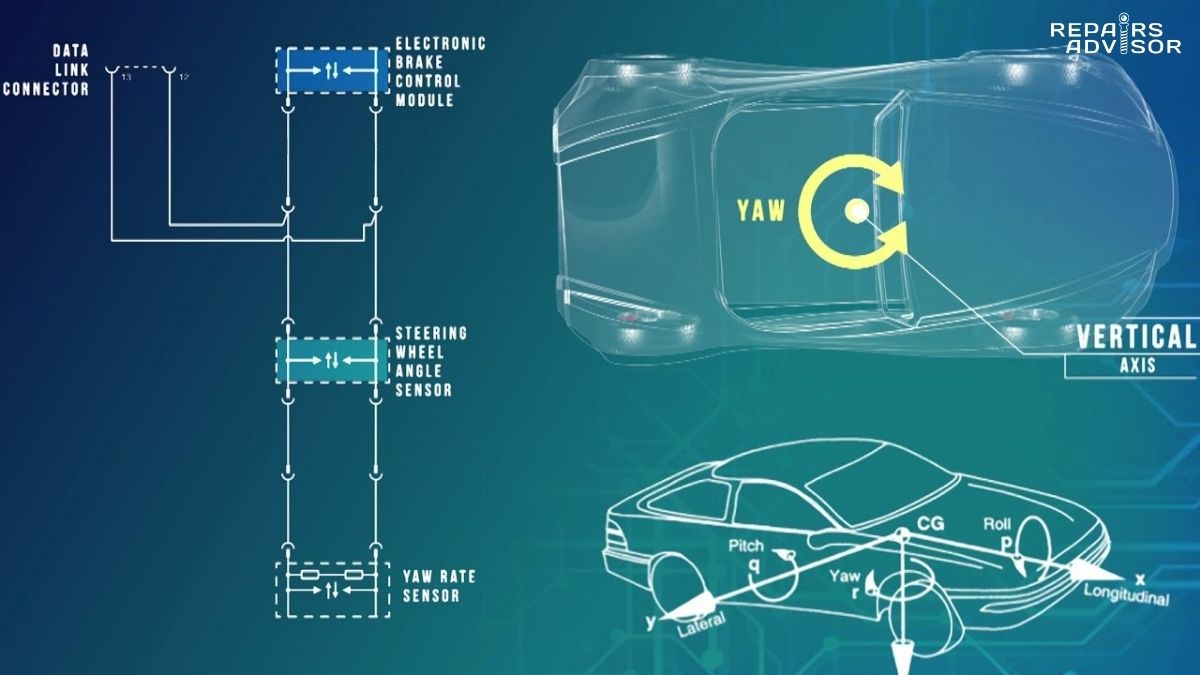
Temperature compensation is also handled here. The speed of sound varies with air temperature — at 0°C it’s around 331 m/s; at 30°C, approximately 349 m/s. A sensor calibrated for one temperature would calculate incorrect distances at another. Modern sensors include a temperature input (often from the vehicle’s ambient temperature sensor) and adjust the distance calculation accordingly. The digital output travels to the vehicle’s Park Distance Control (PDC) module via LIN bus or CAN bus — the same communication networks that connect other vehicle electronics.
Sensor Housing and Mounting
The cylindrical housing is typically 18–22 mm in diameter, designed to press-fit or clip into a matching hole drilled or moulded into the bumper cover. An O-ring seal around the body prevents water and road debris from reaching the electronics. Most factory-fitted sensors are supplied painted to match the vehicle’s body colour — an important detail because paint thickness directly affects the transducer’s ability to vibrate. If paint cracks, bubbles, or is applied too thickly during a respray, sensor performance degrades noticeably. The housing typically carries an IP67 ingress protection rating, meaning it can withstand temporary immersion — though sustained submersion or high-pressure washing directly at the sensor face can eventually cause problems.
How the Detection Cycle Works Step by Step
Understanding the detection cycle helps diagnose problems and set realistic expectations about what sensors can and cannot detect.
Step 1 — Trigger: The PDC system activates automatically when reverse gear is selected (rear sensors) or when vehicle speed drops below a threshold — typically 10–15 km/h — for front sensors. Some vehicles allow manual activation via a button.
Step 2 — Emission: Each transducer fires a short ultrasonic burst, typically 200–300 microseconds in duration. On a four-sensor rear array, sensors fire sequentially (not simultaneously) to avoid cross-interference between adjacent sensors.
Step 3 — Propagation: The sound pulse expands outward in a cone-shaped beam. The beam angle is typically ±45° to ±60° horizontally and ±25° vertically — wide enough to cover meaningful obstacle coverage from each sensor position, but narrow enough to maintain spatial specificity.
Step 4 — Echo reception: When the pulse strikes a solid object, it reflects back. The transducer switches to receive mode after the emission pulse ends and listens for the returning echo. Objects that absorb rather than reflect sound — heavy snow banks, thick acoustic foam — can reduce detection reliability.
Step 5 — Distance calculation: Distance = (speed of sound × elapsed time) ÷ 2. The division by 2 accounts for the round-trip nature of the measurement. At 340 m/s, an echo arriving 5.88 milliseconds after emission indicates an obstacle 1 metre away.
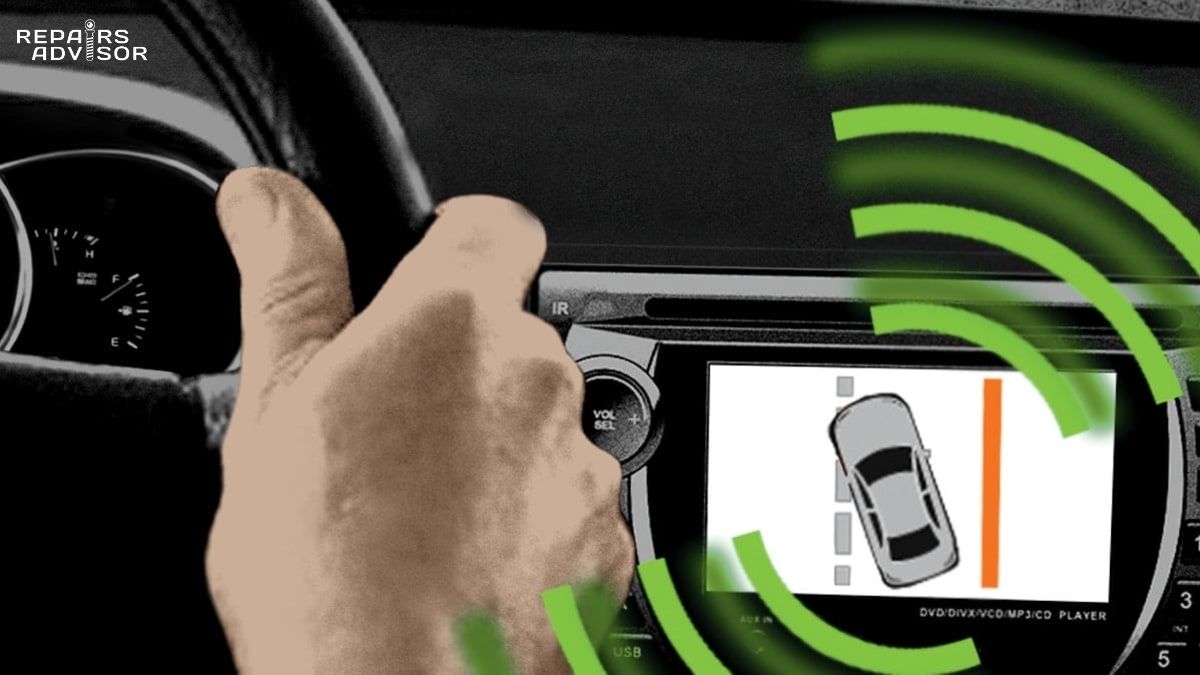
Step 6 — Alert generation: The PDC module maps the distances from all active sensors and compares them to programmed alert zones. Typical zones are: far (150–250 cm, slow beep), medium (80–150 cm, faster beep), near (30–80 cm, rapid beep), and critical (under 30 cm, continuous tone or display alert).
One important limitation is the minimum detection distance, also called the dead zone. Sensors need a brief recovery period after emitting before they can receive an echo — this creates a blind zone of approximately 15–25 cm directly in front of the sensor face. Objects closer than this may not trigger an alert at all. This is why automated parking assist systems use multiple overlapping sensor arrays — to minimise these dead zones through redundancy.
Where Ultrasonic Sensors Are Used in Modern Vehicles
Ultrasonic sensors started in bumpers and are now spreading throughout the vehicle. Here’s where they appear in current production vehicles.
Parking Distance Control and Park Assist
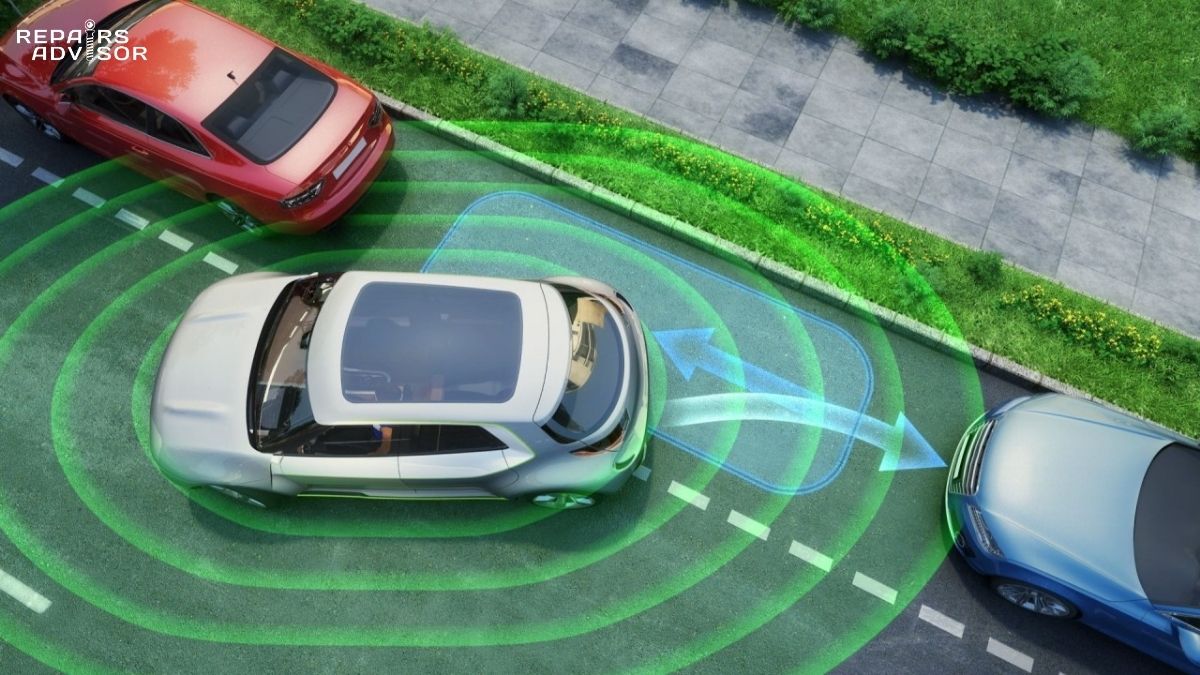
PDC is the original application — and still the most widespread. A standard configuration uses four rear sensors spaced across the rear bumper, providing overlapping coverage across the full width of the vehicle. Premium configurations add four front sensors and, in some cases, corner sensors near the wheels for kerb detection. The system provides progressive audible alerts as the vehicle closes on an obstacle, with the beep interval shortening until it becomes a continuous tone at approximately 25–30 cm.
Automated park assist takes this further: the vehicle uses 8–12 ultrasonic sensors to scan for a suitable parking space while driving slowly past, then takes control of the steering (and in fully automated systems, the brakes and throttle) to execute the parking manoeuvre. The sensor array provides continuous near-field feedback throughout the manoeuvre. You can read more about how this works mechanically in our guide to how parking assist systems work.
Automatic Emergency Braking at Low Speeds
Camera and radar sensors handle AEB at highway speeds, but they have a near-field limitation — objects very close to the vehicle may fall into blind spots. Below about 15 km/h, ultrasonic sensors fill this gap, providing the near-field obstacle data that triggers low-speed AEB for pedestrians, cyclists, or bollards directly in front of or behind a moving vehicle. This is particularly relevant in car park and reversing scenarios. Our detailed guide covers how automatic emergency braking works across the full sensor stack.
Blind Spot Monitoring and Rear Cross-Traffic Alert
Ultrasonic sensors mounted at the rear corners of the bumper (and sometimes at the base of A-pillars for front coverage) can detect vehicles approaching in adjacent lanes. When the turn signal is activated and a vehicle is present in the blind zone, the system alerts the driver via mirror indicators or an audible warning. Rear cross-traffic alert uses the same rear-corner sensors to detect vehicles approaching from the side when reversing out of a parking space — a scenario where the driver has minimal rearward visibility. More detail on the full system is in our guide to how blind spot monitoring works.
In-Cabin Occupant Detection
A more recent application uses short-range ultrasonic sensors inside the cabin to detect passenger presence — particularly relevant for rear seat occupant detection systems mandated by new safety regulations. These sensors can detect breathing movement and, in some implementations, heartbeat, which enables child-in-vehicle alerts when the vehicle is locked with a passenger remaining inside. This application is expanding rapidly in 2024–2025 model year vehicles across European and North American markets.
Ultrasonic vs Radar vs Camera vs LiDAR: Understanding the Sensor Ecosystem
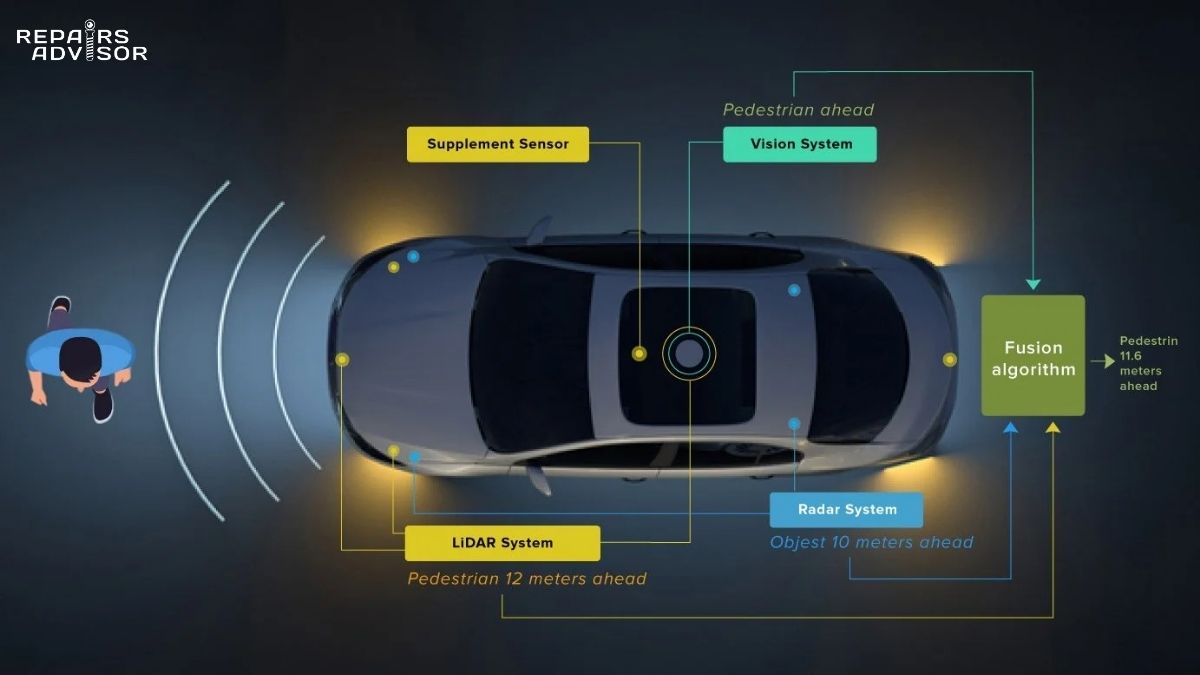
No single sensor technology does everything well. Modern ADAS relies on a combination of sensor types, each contributing where it performs best. Understanding the tradeoffs explains why ultrasonic sensors remain essential even as radar and camera technology advance.
Ultrasonic sensors excel at short-range detection (0.2–5 m) in low-speed scenarios. They work reliably in rain, darkness, and heavy fog — conditions that significantly degrade camera performance. They provide a clean distance number without the computational overhead of image processing. Their main limitation is range: they cannot detect objects at highway distances, and they provide distance-only data with no information about object type or shape.
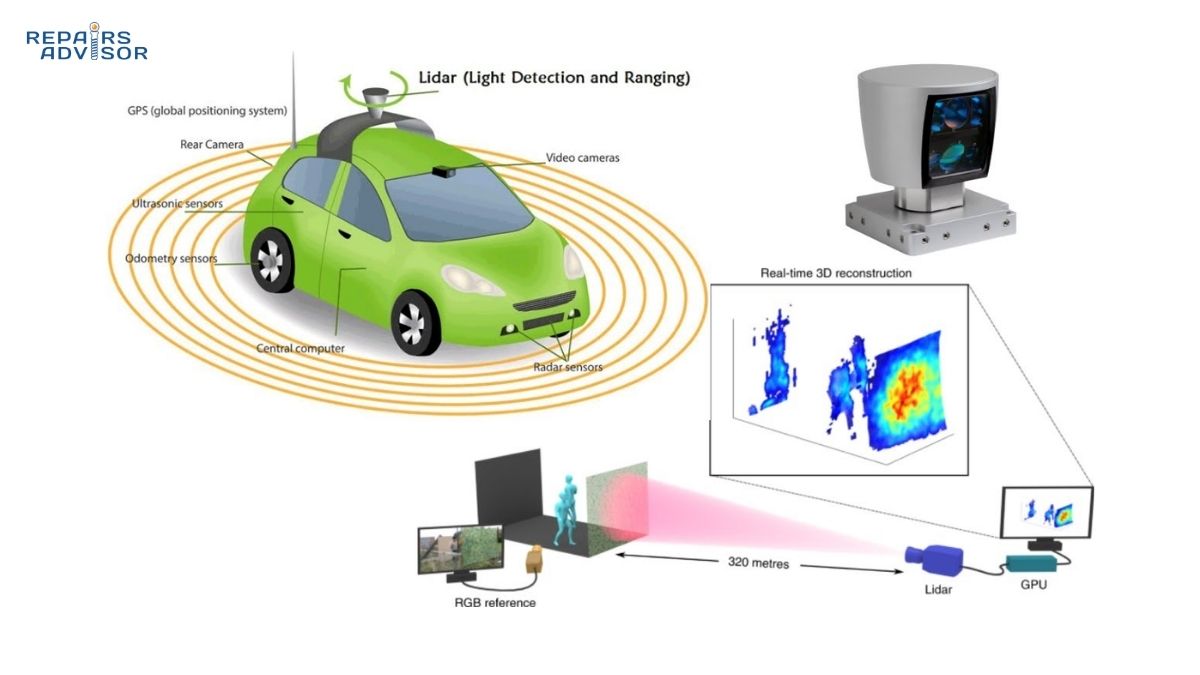
Automotive radar handles long-range detection (up to 200 m) across all speeds and weather conditions, and can measure both distance and relative velocity. It’s the primary sensor for adaptive cruise control and highway-speed AEB. Radar struggles with near-field precision — below about 0.5 m, ultrasonic sensors are more reliable. Camera systems provide rich visual data including object classification (pedestrian vs vehicle vs sign), but require significant processing and perform poorly in low light and adverse weather without additional hardware. Automotive LiDAR generates precise 3D point clouds at medium-to-long range, but remains expensive and is currently found mainly in higher-end autonomous and semi-autonomous platforms.
The reason vehicles use all of these technologies in combination is that each covers the other’s weaknesses. This is the concept of sensor fusion — where data from multiple sensor types is combined by the ADAS control system to build a complete, reliable picture of the vehicle’s surroundings. Ultrasonic sensors occupy the near-field layer of this sensor stack — a role no other technology replaces as cost-effectively.
Common Ultrasonic Sensor Problems and Symptoms
Most parking sensor issues fall into two categories: false alerts (constant beeping when nothing is there) and missed detection (no alert when something clearly is there). Both have predictable causes.
False Alarms — Constant Beeping With No Obstacle
The most common cause is contamination on the sensor face. Mud, road grime, ice, heavy snow, or even thick tree pollen can partially block or scatter the emitted sound wave, causing the sensor to interpret the distorted echo as a nearby obstacle. This is particularly common after muddy off-road driving, in winter conditions, or after pressure washing (which can force moisture behind the sensor seal).
Paint-related faults are also common in older vehicles. If the paint on the sensor face cracks or bubbles — often caused by thermal cycling or physical chips — the transducer’s resonance frequency shifts slightly, producing inconsistent output. In some documented cases, simply sanding the cracked paint layer off the sensor face restored normal function.
Sensor mounting height matters too. Sensors installed too low on the bumper (common on some aftermarket kits) pick up the ground surface as a continuous obstacle. The resulting constant beeping from the moment reverse is selected is a strong sign the sensors are aimed too steeply downward. Standard mounting height is approximately 45–65 cm from the ground.
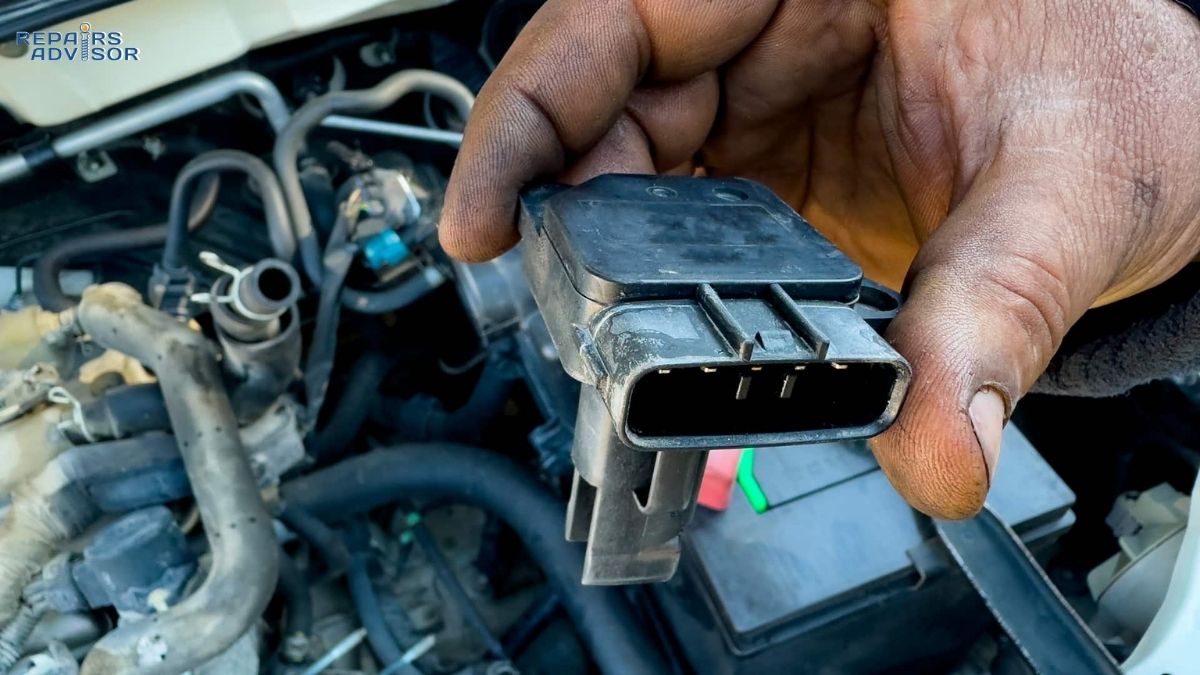
Electrical faults — particularly corroded connectors or intermittent wiring — can cause a sensor to output a constant false signal. If cleaning makes no difference, check the electrical connector at the rear of the sensor for signs of green corrosion or pushed-back terminals.
No Alert — Sensor Not Detecting Objects
When a sensor fails to alert despite a solid obstacle being present, start with the sensor face. Contamination is again the first suspect — a sensor face completely caked with dried mud or ice will produce no usable echo. Clean it and retest before assuming an electrical fault.
Physical damage is the second check. Even minor impacts that dent or crack the sensor housing can damage the internal transducer element. Run your finger across the sensor face — it should be smooth and flat. Any deformation suggests transducer damage. A simple field test: with the vehicle in reverse and the handbrake applied, place a fingertip lightly on the sensor face. A functioning sensor produces a faint buzzing vibration. No vibration means no signal — the sensor is dead and needs replacement.
If multiple sensors fail simultaneously, the issue is more likely upstream — the PDC control module, a blown fuse in the sensor circuit, or a communication fault on the LIN/CAN bus. This is where an OBD scan tool becomes valuable: many PDC systems store specific fault codes that identify which sensor zone has failed.
Intermittent Faults
Faults that come and go are often temperature-related. Extreme cold affects the piezoelectric element’s resonance characteristics, and ice can mechanically stress the sensor housing. Water ingress through a damaged O-ring can cause intermittent shorts that clear when the sensor dries out. CAN or LIN bus communication errors — which produce U-code diagnostic trouble codes like the U0001 high-speed CAN communication fault — can cause the PDC module to lose contact with individual sensors intermittently.
Diagnosing Ultrasonic Sensor Faults: What You Can and Can’t Do
The right approach to ultrasonic sensor diagnosis depends on your skill level and the nature of the fault. Most symptom investigation is accessible to intermediate DIY owners; replacement is feasible on most vehicles; but calibration and module-level diagnosis belong with a professional.
For Intermediate DIY Owners
Start with a thorough visual inspection of each sensor face — look for cracks, chips, paint issues, impact damage, or contamination. Clean with mild soap and water or a soft damp cloth. Compressed air can clear debris from the gap between sensor and bumper housing. Then run the field test described above (fingertip vibration check with vehicle in reverse).
If you have an OBD scan tool that reads body/chassis codes, scan for active and stored fault codes. Most PDC systems generate B-code (body) or U-code (network) faults when a sensor circuit fails. A single sensor code points to a sensor or wiring fault at that specific location; multiple simultaneous sensor codes point to a module or bus fault.
Single sensor replacement is within reach for most intermediate DIYers on vehicles where the sensor is accessible from behind the bumper without full bumper removal. The procedure is straightforward: disconnect the electrical connector, rotate or unclip the sensor from its mount, press the new sensor in, reconnect. The challenge is matching the sensor exactly — diameter, frequency, connector type, and colour must match the OEM specification.
For Professional Technicians
A multimeter confirms supply voltage (typically 12V at the sensor connector), ground continuity, and signal line integrity. An oscilloscope can verify the echo waveform quality — a degraded transducer produces a noticeably deformed waveform even if it’s still technically functioning. OEM-level scan tools provide PDC module live data, individual sensor output levels, and system self-test routines that basic aftermarket scanners may not access.
When Professional Service Is Required
After sensor replacement on certain vehicles — particularly those from BMW, Volkswagen, and Toyota advanced trims — the PDC module requires recalibration or coding via a dealer-level diagnostic tool to recognise the new sensor. Skipping this step can result in persistent fault codes or incorrect distance readings even from a perfectly functional new sensor. Bumper removal (required on many vehicles for proper sensor access) itself is a job that risks scratching or cracking the bumper cover without the right trim tools.
Any fault involving the central ADAS control module, or cases where the AEB or adaptive cruise control system is affected by the sensor fault, warrants professional diagnosis. These systems interact with braking and steering — incorrect calibration has safety consequences.
Important: Ultrasonic sensors are safety-critical ADAS components. A sensor that appears to work but produces inaccurate distance data can fail to alert during a genuine collision risk. If you’re uncertain about the accuracy of your parking system after repairs, have a qualified technician verify it before relying on it in traffic. Vehicle-specific repair documentation for your make is available at Repairs Advisor car manuals.
Replacement Costs and What to Expect
Ultrasonic sensor replacement is one of the more straightforward ADAS-related repairs in terms of cost and access — with some vehicle-specific exceptions.
Parts cost for a single sensor runs $30–$60 for a quality aftermarket unit; OEM sensors range $50–$130 depending on brand. Full aftermarket kits (4–8 sensors plus control module) run $80–$250. Labour is the variable factor. On vehicles where sensors are accessible from behind the bumper with a trim tool and a free hand, labour is typically 0.5–1.0 hours per sensor. On vehicles requiring full bumper removal — which includes some European models and certain Asian market vehicles — labour can reach 2–3 hours, pushing the total installed cost for a single sensor to $300–$400 or more.
Total installed cost guidance: $150–$300 for a straightforward single rear sensor replacement; $280–$500 for front-and-rear combined on a standard vehicle; $400–$600+ for vehicles requiring bumper removal or post-installation coding. Independent repair shops typically charge $80–$140 per hour; dealerships $120–$180 per hour.
DIY feasibility is moderate. Physical sensor replacement is accessible with basic hand tools on most vehicles. The main risks are incorrect sensor specification (wrong frequency or connector type creates PDC faults), bumper damage from improper trim removal, and skipped recalibration causing persistent error codes. If your vehicle’s repair manual indicates coding or calibration is required after sensor replacement, factor that dealership or specialist visit into the project budget before starting. Manufacturer-specific procedures are documented in the service manuals available for BMW, Toyota, Volkswagen, and many other makes.
The Future of Automotive Ultrasonic Sensors
Ultrasonic sensors are a growth market despite being a mature technology. The global automotive ultrasonic technologies market is valued at roughly $5–6 billion in 2024 and is projected to grow at 6–8% annually through the early 2030s, driven by ADAS mandates, EV adoption, and the expansion toward autonomous driving capabilities.
The European Union’s General Safety Regulation now mandates blind spot detection, automatic emergency braking, and parking assist in all new vehicles sold in the EU — directly expanding the sensor count per vehicle. North American safety standards are trending in the same direction. The result is that vehicles increasingly carry 8–12 ultrasonic sensors as standard rather than as premium options.
Technology development is focused on improved signal processing — AI-enhanced algorithms that better distinguish genuine obstacles from environmental noise have improved detection accuracy meaningfully in recent OEM implementations. Weather-resistant housings are reducing the performance gap in heavy rain and snow. In-cabin occupant sensing is expanding from high-end models into mainstream vehicles. And sensor fusion platforms that tightly integrate ultrasonic data with camera, radar, and LiDAR inputs are improving the overall coherence and reliability of ADAS perception systems across all driving speeds and scenarios.
Keeping Your Ultrasonic Sensors Working
Automotive ultrasonic sensors are one of those technologies that quietly do a lot of work without asking for much attention — until they stop working. The physics is elegant: emit a sound pulse, measure the echo, calculate the distance. The reliability in adverse conditions is unmatched for near-field detection. And the failure modes are usually predictable: start with the sensor face, then the connector, then the module, and calibrate after any replacement on vehicles that require it.
For most intermediate DIY owners, cleaning and single-sensor replacement are well within reach. For anything involving the ADAS control module, PDC recalibration, or a fault that’s affecting emergency braking or stability systems, professional diagnosis is the right call. The sensor is inexpensive; an uncorrected calibration error causing a missed collision warning is not. Understanding how your vehicle’s sensor systems interact is a good foundation — and having the right service documentation for your specific make and model makes every diagnostic and repair step clearer. Explore manufacturer-specific repair manuals at Repairs Advisor.
Automotive Ultrasonic Sensors: Frequently Asked Questions
Parking sensors baffling you with random beeps, or wondering whether that new vehicle you’re looking at actually needs all those bumper sensors? These are the questions that come up most often about automotive ultrasonic sensors — answered directly, with the level of detail that actually helps.
Quick Answer
Automotive ultrasonic sensors use high-frequency sound pulses (40–70 kHz) to detect nearby objects at short range (0.2–5 metres). Most issues — constant beeping, missed detections, rain-triggered alerts — trace back to a dirty sensor face or minor wiring fault and can be resolved without professional help. Anything involving the PDC control module or post-replacement calibration requires a qualified technician.
How many ultrasonic sensors does my car have?
It depends on the trim level and how the vehicle was optioned. A basic rear parking distance control (PDC) setup uses four sensors spaced across the rear bumper. Adding front PDC brings the total to eight. Vehicles with automated park assist or 360° surround sensing typically run ten to twelve sensors — four rear, four front, and two or four at the bumper corners to cover the side approach zones.
If you’re not sure what your specific vehicle has, the quickest check is the owner’s manual under “parking sensors” or “PDC.” Alternatively, engage reverse on a flat clear surface and slowly move your hand toward each bumper — a working sensor will trigger a beep as your hand enters its detection cone. Any sensor position that doesn’t respond at all either isn’t fitted or has failed.
Do ultrasonic sensors only work in reverse, or are they always active?
Rear sensors activate automatically when reverse gear is selected — that’s the standard behaviour on virtually all PDC systems. Front sensors typically activate when the vehicle drops below a speed threshold, usually 10–15 km/h, so they engage during slow forward manoeuvring in car parks and tight spaces rather than running continuously at all speeds.
Most vehicles also have a manual override button that lets you activate the front sensors at any speed or disable the system temporarily — your owner’s manual will confirm what’s available on your trim level. In fully automated park assist systems, all sensors are active throughout the manoeuvre regardless of gear selection.
Why do my parking sensors beep in rain or wet conditions?
This is one of the most common complaints about ultrasonic parking systems, and it has a straightforward explanation. Heavy rain creates a curtain of water droplets in front of the sensor face, and some of that water reflects the ultrasonic pulse back toward the sensor before it reaches any solid obstacle. The PDC module interprets these early-return echoes as a close object, triggering a false alert.
Modern sensors include rain-rejection filtering in their signal processing, but heavy downpours — particularly sheet rain in tropical conditions — can overwhelm this filtering. Driving through a car wash can have the same effect. There’s usually nothing wrong with the sensor itself; the alerts should stop once conditions dry out. If rain-triggered false alerts are persistent and disruptive, some vehicles allow the PDC sensitivity threshold to be adjusted via the in-car menu or an OBD coding tool. A qualified technician can advise on whether this is possible for your specific make and model.
Can cold weather or frost affect my parking sensors?
Yes, in two ways. First, ice or compacted snow sitting directly on the sensor face blocks the ultrasonic beam and prevents proper detection — the same mechanism as mud contamination. In freezing conditions, moisture that has crept behind a damaged sensor seal can freeze, mechanically stressing the housing or transducer. Second, the speed of sound changes with temperature — at 0°C it’s approximately 331 m/s versus 340 m/s at 20°C — though modern sensors compensate for this automatically using the vehicle’s ambient temperature sensor, so the distance calculation itself remains accurate.
The practical fix for frost or ice on sensors is the same as clearing ice from the rest of the vehicle: gentle defrosting with a scraper or warm water (not boiling — thermal shock can crack sensor housings). Never blast a frozen sensor directly with high-pressure hot water. Once the face is clear, sensors typically resume normal operation immediately.
How do I clean parking sensors properly?
Ultrasonic sensor faces are durable but not indestructible. The correct approach is soft and gentle: a damp cloth with mild car shampoo or washing-up liquid, wiped carefully across the face and around the housing gap. For stubborn dried mud or road grime, soak briefly with a wet cloth before wiping — don’t scrape. Compressed air from a can or airline works well to clear debris from the gap between the sensor body and bumper without touching the face.
What to avoid: abrasive pads or polishing compounds (scratch the face and alter resonance), pressure washers aimed directly at sensors (can force water past the O-ring seal), and solvent-based cleaners (can degrade the plastic housing over time). After a cleaning session, test the system on a clear surface before relying on it — occasionally a cleaning session dislodges a marginal connector, and it’s better to discover that in your driveway than in a car park.
Why is only one parking sensor beeping — or only one side alerting?
A single-sensor fault most commonly points to one of three things: physical damage to that specific sensor (check the face for cracks, chips, or deformation from a minor impact), contamination on that sensor face only (mud splash, paint overspray, or bird droppings affecting just that position), or a failed electrical connector at the rear of that sensor.
The PDC module monitors each sensor independently. When one sensor drops off the network, many vehicles display a warning symbol on the dash and may emit a specific fault beep pattern distinct from the normal proximity alert. Running an OBD scan tool that reads body codes (B-codes) often identifies the exact sensor position that’s dropped out, which saves time during inspection. If the sensor face is clean and undamaged and the connector is firmly seated, the sensor itself has likely failed and needs replacement. A single sensor replacement is a manageable DIY task on most vehicles where the sensor is accessible from behind the bumper without removing it — consult your vehicle’s service manual for the specific procedure.
Can paint affect parking sensor performance?
Yes — and this is a more common issue than most owners realise, particularly after accident repairs or full vehicle resprays. Ultrasonic sensors work by vibrating a piezoelectric disc, and the paint on the sensor face forms part of the acoustic interface. If paint is applied too thickly, it damps the transducer’s vibration and reduces detection sensitivity. If existing paint cracks, bubbles, or flakes — often due to thermal cycling or stone chips — the altered surface causes inconsistent reflections that trigger false alerts.
If a vehicle is being resprayed, it’s worth telling the body shop that sensors need to be either masked off or repainted with a single thin coat to OEM specification. Some sensor manufacturers specify a maximum paint thickness (often around 100–150 microns) for the sensor face. If you’re experiencing post-respray false alerts or detection gaps at positions where sensors were painted over, that’s the likely cause. In some cases the paint can be carefully sanded back and the sensor will function normally again; in others, replacement is necessary. Manufacturer-specific guidance is available in the service documentation at Repairs Advisor car manuals.
Do ultrasonic sensors work at highway speeds?
Not usefully, and they’re not designed to. Ultrasonic sensors have a maximum practical detection range of around 5 metres and are optimised for the 0.5–2.5 metre zone relevant to parking and low-speed manoeuvring. At 100 km/h, 5 metres represents approximately 0.18 seconds of travel — not enough warning to be useful for any collision avoidance scenario.
Highway-speed safety functions — adaptive cruise control, lane departure warning, high-speed automatic emergency braking — rely on automotive radar and camera systems with much longer detection ranges. At high speeds, most PDC systems are automatically deactivated to prevent constant false triggering from road surface reflections and passing vehicles. The transition between ultrasonic (near-field, low speed) and radar/camera (long-range, all speeds) is managed seamlessly by the vehicle’s sensor fusion system.
What’s the difference between ultrasonic and electromagnetic parking sensors?
Ultrasonic sensors, as covered throughout this guide, emit sound pulses and measure echoes. They require holes drilled or moulded into the bumper for mounting and are visible as small circular pods. They detect virtually any solid object — walls, bollards, pedestrians, vehicles, shopping trolleys — regardless of material.
Electromagnetic sensors work differently: they generate a low-frequency electromagnetic field that wraps around the rear bumper. When a conductive object (typically a metal vehicle) enters and distorts this field, the system alerts the driver. The key advantage is invisible installation — electromagnetic sensors mount behind the bumper skin without any holes or visible hardware, making them popular for prestige vehicles where aesthetics matter. The significant limitation is that they only reliably detect metallic objects; plastic bollards, concrete walls, pedestrians, and cyclists may not trigger a response. For all-object detection, ultrasonic remains the superior technology. Most factory-fitted systems use ultrasonic for this reason.
Can I add ultrasonic sensors to a car that didn’t come with them?
Yes. Aftermarket parking sensor kits are widely available, ranging from basic four-sensor beeper systems ($40–$120) to advanced front-and-rear systems with display screens and app connectivity ($150–$400). Wired systems require drilling holes in the bumper for sensor mounting and routing wires to a control unit and beeper or display — a job that takes two to four hours with basic tools and a wiring diagram. Wireless systems use a battery-powered transmitter in the bumper and eliminate the wiring run, though they introduce battery maintenance and occasionally connectivity issues.
The main technical considerations for a retrofit: sensor diameter must match the holes you drill or plan to drill (18 mm and 22 mm are the two common standards), sensors should be installed at 45–65 cm from the ground to avoid false ground detection, and the control unit power feed should come from the reverse light circuit so the system activates automatically in reverse. Fitting aftermarket sensors to a vehicle with existing ADAS systems requires care — connecting incorrectly to the factory wiring can generate fault codes or interfere with existing electronics. A professional installer with vehicle-specific knowledge is advisable if the vehicle has integrated ADAS.
How long do parking sensors last?
Factory-fitted ultrasonic sensors are designed for the life of the vehicle under normal conditions. Most sensors carry an IP67 rating (temporary submersion protection) and are tested for thermal cycling across the full operating temperature range. A well-maintained sensor on a well-maintained vehicle can last fifteen years or more without issues.
Lifespan shortens most quickly through physical damage (stone chips, low-speed impacts, pressure washer abuse), water ingress through a cracked housing or degraded O-ring seal, and connector corrosion — particularly on vehicles used in areas with heavy road salt. Aftermarket sensors vary considerably in durability; budget-end units with thin housing walls and minimal sealing are noticeably less durable than OEM or quality aftermarket equivalents. If you’re replacing a failed sensor, matching the specification to OEM quality pays off in longevity.
Do ultrasonic sensors need calibration after replacement?
This is vehicle-dependent, and getting it wrong causes frustration. On many mainstream vehicles — particularly older platforms or simpler PDC systems — a new sensor that matches the OEM specification (correct frequency, connector type, and impedance) will be recognised by the PDC module automatically and no calibration is required beyond basic testing.
However, on vehicles with integrated ADAS platforms — including many BMW, Volkswagen Group, and Toyota models with advanced safety packages — the PDC module must be told that a new sensor has been fitted via a dealer-level or specialist diagnostic tool. Without this coding step, the module may continue reporting the old sensor as faulty, or the system may not trust the new sensor’s output. Some platforms also require the sensor’s position within the array to be confirmed during setup. Before replacing a sensor yourself, check your vehicle’s service documentation to determine whether post-replacement coding is listed as a required step. If it is, factor in a visit to a dealer or independent specialist with the appropriate diagnostic software — this typically adds $50–$150 to the job but ensures the system functions correctly. The full procedure for your specific make is covered in the vehicle service manual, available through Repairs Advisor car repair manuals.