Your engine’s knock sensor is one of those components you never think about—until it fails. This small but mighty sensor acts as your engine’s early warning system, constantly listening for destructive combustion problems that can turn a healthy engine into a pile of expensive scrap metal in minutes. Understanding how this critical sensor works, recognizing when it’s failing, and knowing how to address problems can save you thousands of dollars in engine repairs.
Modern engines operate at the edge of combustion efficiency, extracting maximum power while maintaining fuel economy and meeting strict emissions standards. The knock sensor makes this possible by detecting abnormal combustion patterns and allowing the engine management system to make instantaneous adjustments. In this comprehensive guide, we’ll explore the science behind knock sensors, how they protect your engine, common failure symptoms, diagnostic procedures, and replacement considerations.
Whether you’re a DIY enthusiast trying to diagnose a check engine light, a professional mechanic seeking deeper technical knowledge, or simply curious about how your vehicle works, this article will provide valuable insights into one of the most important sensors in your engine bay.
What Is Engine Knock?
Before we can understand knock sensors, we need to understand what they’re detecting. Engine knock—also called detonation, pre-ignition, or pinging—represents one of the most destructive conditions that can occur inside your engine.
Understanding Normal Combustion
In a properly functioning engine, combustion is a carefully controlled process. The ignition system fires a spark plug at precisely the right moment, igniting the compressed air-fuel mixture. This creates a single flame front that propagates outward from the spark plug in a smooth, controlled burn. The expanding gases push the piston downward, converting chemical energy into mechanical motion.
The timing of this ignition is critical. Fire the spark too early, and the expanding gases fight against the piston as it’s still moving upward during the compression stroke. Fire it too late, and you waste energy by burning fuel when the piston is already moving downward. Modern engines adjust this timing thousands of times per minute based on sensor inputs.
When Combustion Goes Wrong
Engine knock occurs when a secondary ignition point develops within the combustion chamber, creating a second flame front. Instead of one smooth, controlled burn starting from the spark plug, you now have two or more flame fronts that collide with each other. When these pressure waves meet, they create the distinctive metallic “ping” or “knock” that gives this condition its name.
This secondary ignition can happen for several reasons. In a high-compression engine or when using low-octane fuel, the extreme pressure and temperature in the combustion chamber can cause the unburned portion of the air-fuel mixture to spontaneously ignite before the spark plug fires. Carbon deposits on the piston crown or cylinder head can create hot spots that trigger premature ignition. A lean air-fuel mixture burns hotter and increases knock probability. Even incorrect ignition timing that fires the spark plug too early can create conditions conducive to knock.
The Destructive Power of Knock
The pressure waves created by knock aren’t just noise—they’re hammering your engine’s internal components with tremendous force. Each knock event creates localized pressure spikes that can exceed normal combustion pressures by 50% or more. These pressure waves hammer against pistons, cylinder walls, and the head gasket, causing microscopic damage with each occurrence.
Over time, persistent knock can crack pistons, erode cylinder walls, blow head gaskets, and even damage the crankshaft and connecting rods. In severe cases, a phenomenon called “super knock” or low-speed pre-ignition can develop in direct-injection turbocharged engines, causing catastrophic engine failure in seconds. Understanding how combustion works helps explain why these pressure waves are so destructive.
How Knock Sensors Work: The Technical Details
The knock sensor is an elegant solution to a complex problem. Rather than trying to prevent all conditions that might cause knock, modern engines use the sensor to detect knock the instant it begins and adjust engine parameters to eliminate it.
Piezoelectric Technology Explained
At the heart of every knock sensor lies a piezoelectric crystal—a material that exhibits the piezoelectric effect discovered by Pierre and Jacques Curie in 1880, with theoretical work later recognized with a Nobel Prize. The piezoelectric effect is beautifully simple: when you mechanically stress (squeeze, compress, or bend) certain crystalline materials, they generate a small electrical voltage. Conversely, applying voltage to these materials causes them to change shape.
Inside a knock sensor, a piezoelectric element is positioned so that vibrations from the engine block compress it. Each vibration creates a tiny voltage pulse. The stronger the vibration, the larger the voltage pulse. This converts mechanical vibrations into electrical signals that the engine’s computer can process.
The genius of this design is its tuning. Knock sensors are engineered to be most sensitive to a specific frequency range—typically 5 to 15 kilohertz—which corresponds to the frequency of knock vibrations. Normal engine vibrations occur at different frequencies, so the sensor can distinguish between the normal operational “hum” of the engine and the destructive high-frequency vibrations caused by knock. This frequency selectivity is achieved through the physical dimensions of the piezoelectric element and the resonant characteristics of the sensor housing.
Sensor Location and Mounting
Knock sensor placement is critical for proper operation. The sensor must be in direct mechanical contact with the engine block to “feel” the vibrations traveling through the metal. Most engines mount the knock sensor on the side of the engine block or cylinder head, strategically positioned to detect knock from all cylinders.
On four-cylinder engines, you’ll typically find a single knock sensor mounted between cylinders 2 and 3, or sometimes between cylinders 1 and 2. This central location allows it to detect knock from any cylinder. Larger engines present more challenges. V6 and V8 engines usually employ two knock sensors—one for each cylinder bank—to ensure accurate detection across all cylinders. Some high-performance engines use even more sensors for cylinder-specific knock detection.
The mounting bolt serves a dual purpose: it holds the sensor in place and ensures proper mechanical coupling to the engine block. This is why torque specifications are so critical. Over-tighten the sensor, and you can damage the piezoelectric element or strip the threads. Under-tighten it, and the sensor won’t properly detect vibrations, leading to false readings. Most knock sensors require torque specifications between 15 and 25 Newton-meters, though you should always verify your vehicle’s specific requirements.
Signal Processing and ECU Integration
When the knock sensor detects a vibration, it generates a small AC voltage signal—typically just a few hundred millivolts. This signal travels through shielded wiring (to prevent electromagnetic interference) to the Engine Control Module (ECM or ECU). The shielding is crucial because the signal is so small that electrical noise from other components could overwhelm it.
Inside the ECU, sophisticated signal processing occurs. The incoming signal passes through a band-pass filter that eliminates frequencies outside the knock range. An amplifier boosts the signal to a level the ECU’s analog-to-digital converter can process. The ECU then analyzes both the amplitude (strength) and frequency of the signal.
Here’s where it gets clever: the ECU knows what “normal” looks like for your specific engine under current operating conditions. It continuously compares incoming knock sensor signals against this baseline. The ECU considers engine speed (from the crankshaft position sensor), engine load, throttle position, and camshaft position to establish what vibrations should look like. When the sensor signal exceeds the expected threshold with the characteristic frequency of knock, the ECU knows it’s detecting genuine knock rather than normal engine noise.
The response time is remarkably fast. From the moment knock occurs to when the ECU begins corrective action typically takes less than 50 milliseconds—faster than the blink of an eye. This rapid response is essential because knock damage accumulates quickly.
Engine Response to Knock Detection
When the ECU determines that knock is occurring, it has several tools at its disposal to eliminate it. The primary response is to retard (delay) the ignition timing. By firing the spark plug slightly later, the ECU ensures that peak combustion pressure occurs later in the power stroke, when the piston is moving downward and cylinder pressure is lower. This reduces the likelihood of the remaining air-fuel mixture auto-igniting.
Timing retard is typically implemented in small increments—usually 2 to 4 degrees initially, with the ability to retard up to 10 degrees or more if knock persists. The ECU retards timing on a cylinder-by-cylinder basis if your engine has individual coil-on-plug ignition, allowing it to address knock in specific cylinders without unnecessarily reducing efficiency in cylinders that aren’t knocking.
Beyond timing adjustments, the ECU may also enrich the air-fuel mixture slightly. A richer mixture burns cooler, reducing the likelihood of knock. On turbocharged engines, the ECU may reduce boost pressure to lower cylinder pressures and temperatures. Systems with variable valve timing can adjust valve timing to change the effective compression ratio.
Once knock stops, the ECU doesn’t immediately return to optimal timing. Instead, it gradually advances the timing in small steps, constantly monitoring the knock sensor. If knock returns, the ECU immediately retards timing again. This continuous optimization allows the engine to run at the most aggressive timing possible without knock—maximizing power and efficiency while protecting the engine.
Common Knock Sensor Failure Symptoms
Knock sensor failures manifest in several distinct ways. Recognizing these symptoms helps you diagnose problems before they escalate into expensive engine damage.
1. Check Engine Light Illumination
The most common and obvious symptom of knock sensor failure is an illuminated check engine light on your dashboard. When the ECU detects that the knock sensor circuit isn’t functioning correctly—whether due to an open circuit, short circuit, or signal that’s out of the expected range—it stores a diagnostic trouble code and illuminates the warning light.
Here’s the tricky part: the check engine light might indicate either a failed knock sensor or actual engine knock that a working sensor is detecting. This is why proper diagnosis is essential. You can’t just assume the sensor is bad and replace it without verifying the root cause. We’ll cover diagnostic procedures in detail shortly.
The diagnostic codes stored by the ECU provide valuable clues. Codes P0325 through P0328 specifically relate to knock sensor circuit problems, while codes like P0300 through P0312 indicate misfires that might be causing or caused by knock. If you see a knock sensor code, use an OBD-II scanner to read it—don’t just guess. Understanding OBD codes is fundamental to accurate diagnosis.
2. Audible Engine Knocking
If you hear a metallic pinging, clicking, or rattling sound from your engine—especially during acceleration, under load, or when climbing hills—you’re hearing engine knock. This sound is most noticeable during moderate to heavy acceleration and often becomes louder as engine speed increases.
The sound occurs because a failed knock sensor can’t detect knock, so the ECU continues to run aggressive ignition timing even when knock is present. Without the sensor’s feedback, the engine has no way to protect itself. Every ping you hear represents potential damage to pistons, cylinder walls, and other internal components.
It’s important to distinguish knock from other engine noises. Knock typically has a higher-pitched, sharper sound than the deeper rumble of a rod knock or the ticking of a valve train problem. The sound correlates with engine load—it gets worse under acceleration and may disappear at idle or during deceleration. If you’re unsure whether you’re hearing knock, have a professional mechanic evaluate it before continuing to drive the vehicle.
3. Reduced Engine Performance
When a knock sensor fails, the ECU typically responds by implementing a “limp mode” or conservative timing strategy to protect the engine. This means retreating to a safe ignition timing map that sacrifices performance for reliability. The result is noticeably reduced power and acceleration.
You’ll feel this most acutely during acceleration, particularly when merging onto highways or climbing steep grades. The engine may feel sluggish or unresponsive to throttle inputs. Maximum speed may be reduced. On turbocharged engines, boost pressure might be limited, further reducing performance.
This performance reduction isn’t a malfunction—it’s the ECU doing its job. Without reliable knock sensor data, the ECU assumes the worst-case scenario and protects your engine by running conservative settings. While frustrating, this protective strategy prevents the catastrophic engine damage that would occur if the ECU continued running aggressive timing without knock detection capability.
Professional mechanics and experienced DIYers can sometimes observe this on a scan tool by watching ignition advance values. You’ll see timing values that are significantly retarded compared to normal operation, even when engine load would typically warrant more advanced timing.
4. Poor Fuel Economy
Conservative ignition timing imposed by a failed knock sensor directly impacts fuel economy. When ignition timing is retarded, combustion occurs later in the power stroke when the piston is already moving downward. This means you’re extracting less mechanical work from the same amount of fuel—effectively wasting energy.
Additionally, the ECU might enrich the air-fuel mixture as a protective measure, further increasing fuel consumption. The combination of retarded timing and rich mixture can reduce fuel economy by 10 to 20 percent or even more in severe cases.
You’ll notice this as reduced miles per gallon on longer trips or increased frequency of fill-ups. The decrease might be gradual if the sensor is slowly degrading, or sudden if it fails completely. Keep in mind that many factors affect fuel economy, so this symptom alone doesn’t confirm a knock sensor problem—but in combination with other symptoms, it’s a strong indicator.
5. Engine Misfire
A faulty knock sensor can cause engine misfires, though this symptom is less common than the others. When the ECU implements very conservative timing to compensate for lack of knock sensor data, the ignition timing can become so retarded that combustion becomes inefficient or incomplete. This results in a misfire condition where one or more cylinders aren’t burning their air-fuel charge properly.
You’ll experience this as a rough idle, hesitation during acceleration, or a noticeable shake or vibration from the engine. The ECU will typically store misfire codes (P0300 for random misfires, or P0301 through P0312 for specific cylinder misfires) in addition to the knock sensor code. The engine may also exhibit reduced power and increased emissions.
Misfires can also damage your catalytic converter if unburned fuel enters the exhaust system, so this symptom requires prompt attention. Spark plugs and ignition coils are common causes of misfires, but don’t overlook the knock sensor if you’re seeing both knock sensor codes and misfire codes simultaneously.
Diagnostic Trouble Codes Related to Knock Sensors
When a knock sensor problem occurs, the ECU stores specific diagnostic trouble codes (DTCs) that help identify the nature of the failure. Understanding these codes is crucial for accurate diagnosis.
Common OBD-II Codes
The primary knock sensor-related codes are part of the P032X and P033X families for Bank 1 and Bank 2 respectively:
P0325 – Knock Sensor Circuit Malfunction (Bank 1, Sensor 1): This code indicates a problem with the electrical circuit of the knock sensor on Bank 1. It could be caused by a faulty sensor, damaged wiring, corroded connector, or even an ECU problem. The code tells you there’s an electrical issue but doesn’t specify whether it’s the sensor itself or supporting components.
P0326 – Knock Sensor Range/Performance (Bank 1, Sensor 1): This code means the sensor is providing a signal, but that signal is outside the expected range or doesn’t perform as anticipated. The sensor might be mechanically damaged, improperly installed (wrong torque), or experiencing intermittent electrical problems. Engine mechanical issues like worn bearings can also trigger this code by creating abnormal vibration patterns.
P0327 – Knock Sensor Low Input (Bank 1, Sensor 1): This code indicates the knock sensor signal voltage is too low or weak. Common causes include an open circuit in the wiring, poor electrical connections, a failing sensor with reduced output, or excessive engine noise that masks the knock sensor signal. Some vehicles set this code if the signal remains consistently near zero voltage.
P0328 – Knock Sensor High Input (Bank 1, Sensor 1): The opposite of P0327, this code means the sensor signal voltage is too high or strong. This can result from a short circuit in the wiring (particularly a short to voltage), a failing sensor providing excessive output, or damaged connectors causing resistance changes in the circuit.
V6 and V8 engines with two cylinder banks use codes P0330 through P0334 for Bank 2 sensors, following the same pattern as the Bank 1 codes above.
Interpreting Multiple Codes
When diagnosing knock sensor problems, pay attention to the combination of codes present. A single knock sensor code with no other issues often points to a sensor or wiring problem. However, multiple codes can tell a different story.
If you see knock sensor codes alongside multiple misfire codes (P0300 for random misfires or cylinder-specific codes), the misfires might be causing abnormal vibrations that the knock sensor is detecting, or conservative timing from a failed sensor might be causing the misfires. Codes related to fuel pressure sensors or oxygen sensors alongside knock sensor codes might indicate a lean condition that’s causing actual knock rather than a sensor failure.
Professional diagnosis involves clearing the codes, driving the vehicle to see which codes return, and using live data from a scan tool to observe sensor behavior in real-time. This process helps distinguish between a failed sensor and an actual engine problem the sensor is detecting.
Causes of Knock Sensor Failure
Understanding why knock sensors fail helps with both diagnosis and prevention. These sensors are generally reliable, but several factors can lead to premature failure.
Physical Damage
Physical damage is one of the most common causes of knock sensor failure. The sensor is bolted directly to the engine block, where it’s exposed to extreme temperatures, constant vibration, and sometimes impact from road debris or maintenance work. The piezoelectric crystal inside the sensor can crack or fracture from excessive vibration or mechanical shock, rendering it useless.
Improper installation is a frequent culprit. If a technician over-torques the mounting bolt, it can crack the sensor housing or damage the piezoelectric element. Cross-threading during installation can destroy both the sensor and the mounting hole in the engine block—an expensive mistake. Conversely, insufficient torque means the sensor doesn’t properly couple to the engine block, leading to weak signals and P0326 range/performance codes.
Age-related wear also takes its toll. The piezoelectric crystal can degrade over time, especially in engines that run hot or experience frequent thermal cycling. Most knock sensors last 100,000 miles or more, but high-stress applications or extreme operating conditions can shorten their lifespan.
Electrical Issues
Electrical problems account for a significant percentage of knock sensor codes. The most common issue is connector corrosion. The knock sensor connector is typically located low on the engine block where it’s exposed to road spray, water from rain or car washes, and salt in winter climates. Over time, moisture infiltrates the connector, corroding the terminals and creating high resistance or open circuits.
Wiring harness damage is another frequent problem. Rodents sometimes chew on wiring, particularly in vehicles that sit unused for extended periods. The wiring harness can also suffer from abrasion where it rubs against engine components, eventually wearing through the insulation and creating shorts. Mechanics sometimes accidentally damage wiring during other repairs, particularly when working around the intake manifold or exhaust system.
The knock sensor circuit uses shielded wiring to prevent electromagnetic interference from other vehicle systems. If this shielding is damaged, interference from spark plug wires, ignition coils, or the alternator can corrupt the sensor signal, leading to false readings or intermittent codes.
Environmental Factors
Environmental conditions accelerate knock sensor degradation. Engine oil leaks above the sensor can drip onto the connector, contaminating it and causing corrosion. Road salt in northern climates aggressively attacks electrical connectors, creating corrosion that increases resistance or causes open circuits.
Extreme temperature cycling stresses both the sensor and its wiring harness. Modern engines often run hotter than older designs to improve efficiency and reduce emissions. This constant heat exposure, followed by cooling when the engine is off, creates expansion and contraction cycles that can fatigue wires and connectors over time.
Some vehicles position the knock sensor where it’s particularly vulnerable to environmental damage—near the bottom of the engine where road debris impacts it, or adjacent to exhaust components where extreme heat accelerates degradation. Poor placement decisions during engine design can significantly reduce sensor lifespan.
Diagnosing a Faulty Knock Sensor
Proper diagnosis distinguishes between a failed knock sensor and actual engine knock, preventing unnecessary parts replacement while ensuring you address the real problem.
Step 1: Read Diagnostic Codes
Begin diagnosis by connecting an OBD-II scanner to your vehicle’s diagnostic port and reading any stored trouble codes. Note not just the code numbers but also the freeze frame data that accompanies them. Freeze frame data captures engine operating conditions when the code was set—engine speed, load, temperature, and fuel trim values. This information provides context about when and under what conditions the problem occurs.
Check for pending codes as well as stored codes. A pending code means the ECU detected a condition that might trigger a code but wants to verify it over multiple drive cycles before officially setting it. This can provide early warning of developing problems.
After noting all codes and freeze frame data, don’t immediately clear them. Drive the vehicle and see if the codes return immediately, after warm-up, under load, or only in specific conditions. This behavior tells you whether the problem is constant or intermittent—critical information for effective diagnosis.
Step 2: Visual Inspection
Locate the knock sensor on your engine block. Consult a service manual or online resources specific to your vehicle if you’re unsure where to find it. Common locations include the side of the engine block between cylinders, under the intake manifold, or on the cylinder head.
Carefully inspect the sensor for physical damage. Look for cracks in the housing, impact damage, or signs of oil leaks. Check the electrical connector for corrosion, pushed-out pins, or damage. Wiggle the connector gently—it should be firmly secured to the sensor. A loose connection often causes intermittent codes.
Trace the wiring harness from the sensor back toward the ECU as far as you can see it. Look for obvious damage like cuts, abrasions, or melted insulation. Check for areas where the harness might rub against sharp edges or hot components. Look for evidence of rodent damage—chewed insulation or nests built near the wiring.
Verify that the sensor mounting bolt is present and appears properly tightened. If someone previously worked on the sensor, they might not have reinstalled it to the correct torque specification. A loose sensor won’t detect knock properly and will set P0326 range/performance codes.
Step 3: Electrical Testing
Safety First: Disconnect the battery negative terminal before performing resistance tests to avoid damaging the ECU or creating short circuits.
Using a digital multimeter set to measure resistance (ohms), disconnect the knock sensor electrical connector and measure resistance across the sensor terminals. Most knock sensors show resistance between 4 and 6 megohms (4,000,000 to 6,000,000 ohms), though specifications vary by vehicle. If you read infinite resistance (open circuit) or very low resistance (short circuit), the sensor is faulty.
Next, check wiring continuity. With the sensor still disconnected, measure resistance from each pin in the sensor connector to the corresponding pin in the ECU connector. You should see very low resistance (less than 1 ohm for good wiring). High resistance indicates corrosion or damaged wiring. Infinite resistance means an open circuit somewhere in the harness.
For a functional test, reconnect the sensor and set your multimeter to measure AC voltage (if your meter has an AC millivolt range, use it). Connect the meter leads to the knock sensor terminals. Have an assistant tap gently on the engine block near the sensor with a small wrench or socket while you watch the meter. You should see voltage spikes when the tapping creates vibrations. The stronger the tap, the larger the voltage spike. No voltage change indicates a dead sensor.
Advanced Testing Tip: Professional technicians sometimes use an oscilloscope to visualize the knock sensor waveform, which provides much more detailed information about sensor behavior than a simple voltmeter can show. If you have access to an oscilloscope, look for a clean AC waveform that increases in amplitude when you tap the engine block.
Step 4: Live Data Monitoring
If you have access to an advanced scan tool (not just a simple code reader), you can monitor the knock sensor signal in real-time while the engine is running. This is one of the most valuable diagnostic techniques because it shows you exactly what the ECU is seeing from the sensor.
With the engine idling, the knock sensor should show a relatively stable baseline reading—typically a low voltage that represents the normal vibrations of a running engine. The specific voltage varies by vehicle, but it should be consistent and within the range specified in your service manual.
Now have an assistant gently tap on the engine block near the sensor while you watch the scan tool data. The knock sensor voltage should spike immediately in response to each tap. If the sensor doesn’t respond or responds weakly, it’s likely faulty. If it responds appropriately to tapping, the sensor itself is probably fine, and you might have an actual knock condition or a different engine problem triggering the code.
Some advanced scan tools can also show you ignition timing data. If you see the timing being significantly retarded (reduced) compared to specifications for your engine’s operating conditions, this indicates the ECU is responding to knock—either from a working sensor detecting real knock or from a failed sensor causing the ECU to implement protective timing.
Professional mechanics with oscilloscopes can perform even more detailed analysis, viewing the actual waveform from the knock sensor and comparing it to known-good examples. This level of diagnosis can distinguish between different types of sensor failures and even detect problems with engine mechanical condition based on vibration patterns.
Knock Sensor Replacement Cost and Process
When diagnosis confirms knock sensor replacement is necessary, understanding costs and the replacement process helps you make informed decisions about DIY versus professional service.
Replacement Cost Breakdown
Knock sensor parts cost varies significantly by vehicle. Generic aftermarket sensors for common vehicles might cost as little as $40, while OEM sensors for luxury or performance vehicles can exceed $200. Most mainstream vehicles fall in the $60 to $120 range for quality aftermarket sensors.
Labor cost is where expenses can escalate dramatically because sensor accessibility varies wildly by vehicle design. On some engines, the knock sensor is easily accessible on the side of the engine block, requiring only 30 to 60 minutes for replacement. In these cases, labor might cost $75 to $150 at typical shop rates.
Other engines hide the knock sensor under the intake manifold, requiring 2 to 3 hours of labor as the technician must remove the manifold to access the sensor. This can push labor costs to $300 to $400 or more. V6 and V8 engines often have two knock sensors, potentially doubling parts costs (though labor usually doesn’t double since the technician already has everything disassembled).
Total replacement costs typically range from $200 to $600 for most vehicles, with luxury brands and difficult-to-access sensors pushing toward the higher end or beyond. Always get quotes from multiple shops—prices vary significantly, and a shop with experience on your specific vehicle might complete the job more efficiently.
Labor Time Factors
Sensor location is the primary determinant of labor time. Knock sensors mounted on the external surface of the engine block are straightforward to replace—remove one electrical connector, unscrew one bolt, clean the mounting surface, install the new sensor to proper torque, reconnect the connector, clear codes, and test. Experienced technicians complete this in under an hour.
Sensors hidden under the intake manifold present a completely different challenge. The technician must disconnect throttle cables or electronic throttle bodies, fuel lines, vacuum hoses, various sensors and actuators, and multiple mounting bolts before lifting the intake manifold off the engine. After replacing the sensor, everything must be carefully reinstalled with new gaskets, proper torque specifications, and verification that all connections are secure. This job can easily consume an entire afternoon.
Some engines place knock sensors in especially difficult locations—behind engine mounts, above the starter motor, or in other positions that require removing substantial components for access. Always ask your shop to explain why labor costs are high on your specific vehicle before authorizing work. A reputable shop will provide detailed explanation of what’s involved.
DIY vs Professional Replacement
DIY knock sensor replacement can save significant money if the sensor is accessible and you have basic mechanical skills and tools. For an easily accessible sensor, you need only basic hand tools: a socket set, ratchet, extensions, and critically, a torque wrench. The job is straightforward: disconnect the battery, unplug the sensor, remove the old sensor, clean the mounting surface, install the new sensor to specification, reconnect everything, and clear codes.
However, several factors favor professional replacement. If the sensor is under the intake manifold, DIY becomes significantly more complex. You’ll need intake manifold gaskets, possibly throttle body gaskets, and familiarity with your specific engine’s intake removal procedure. Mistakes during reassembly can cause vacuum leaks, coolant leaks, or other problems that cost more to fix than you saved doing it yourself.
Professional replacement also comes with benefits beyond labor. Reputable shops warranty their work, so if the repair doesn’t solve the problem or the new sensor fails prematurely, they’ll address it at no additional cost. They have access to technical service bulletins that might reveal common related problems on your vehicle. They can verify that the repair solved the issue through proper testing before returning your vehicle.
If you’re uncertain about your mechanical skills, lack the proper tools (especially a torque wrench), or the sensor is in a difficult location, professional replacement is the wise choice. The peace of mind and warranty protection often justify the additional cost.
Replacement Steps Overview
For those tackling DIY replacement on an accessible sensor, here’s the basic process:
- Disconnect the battery: Remove the negative terminal to prevent short circuits and protect the ECU.
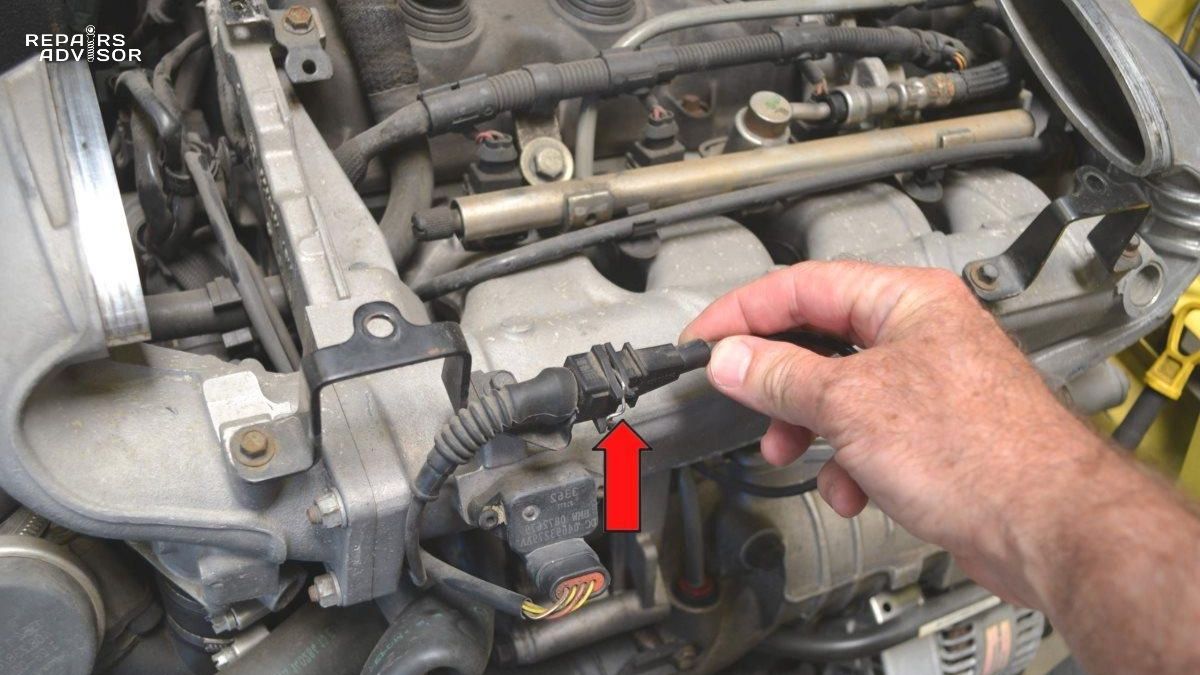
- Locate the sensor: Find the knock sensor on your engine block. Take photos before disassembly to aid reassembly.
- Disconnect the electrical connector: Press the release tab and carefully pull the connector straight off the sensor. Don’t yank on the wires.
- Remove the mounting bolt: Use the appropriate socket (often 22mm) to unscrew the sensor. Note the torque specification in your service manual—you’ll need it for installation.
- Remove the old sensor: Carefully pull the sensor out. It should come free easily once the bolt is removed.
- Clean the mounting surface: Use a clean rag to wipe the mounting surface on the engine block. Remove any old gasket material, dirt, or oil. The new sensor needs clean metal contact for proper operation.
- Install the new sensor: Hand-thread the new sensor into place. Make sure it threads smoothly without resistance. If it binds, stop and verify you’re not cross-threading.
- Torque to specification: Use your torque wrench to tighten the sensor to the manufacturer’s specification. This is critical—too tight damages the sensor, too loose causes poor detection. Typical specs range from 15 to 25 Nm (11 to 18 ft-lbs), but verify your specific vehicle’s requirements.
- Reconnect the electrical connector: Push the connector firmly onto the sensor until you hear or feel it click into place.
- Reconnect the battery: Reinstall the negative terminal.
- Clear codes: Use an OBD-II scanner to clear stored diagnostic codes.
- Test drive: Drive the vehicle through various conditions—idle, light acceleration, heavy acceleration, highway speeds. Monitor for the check engine light. If possible, use a scan tool to verify the knock sensor is providing a signal and ignition timing is responding appropriately.
Critical Safety Warning: Always torque the knock sensor to the exact specification in your vehicle’s service manual. Over-torquing can crack the sensor housing or damage the threads in your engine block—potentially requiring expensive thread repair. Under-torquing causes false readings because the sensor isn’t properly coupled to the engine block. When in doubt, err slightly on the side of less torque rather than more, then verify with a scan tool that the sensor is working properly.
Prevention and Maintenance Tips
While knock sensors are generally reliable, several practices extend their lifespan and prevent premature failure.
Fuel Quality Matters
Using the correct octane fuel for your engine is one of the best ways to prevent knock sensor problems and protect your engine. Octane rating measures fuel’s resistance to knock—higher octane fuel can withstand more compression and heat before auto-igniting.
Always use the minimum octane rating specified by your vehicle’s manufacturer. This information is on a sticker inside your fuel door and in your owner’s manual. For most economy vehicles, regular 87-octane fuel is fine. Turbocharged, supercharged, and high-compression naturally aspirated engines typically require premium 91 or 93-octane fuel. Using lower octane than specified invites knock, forcing the knock sensor and ECU to constantly retard timing—reducing performance and fuel economy while putting extra stress on the sensor.
Conversely, using higher octane than specified doesn’t benefit most vehicles. If your car is designed for regular fuel, premium won’t provide more power or better fuel economy. Save your money unless you’re experiencing knock on the recommended fuel, which might indicate other engine problems requiring diagnosis.
Avoid consistently using the absolute minimum octane if you live in a hot climate or frequently drive in demanding conditions. Fuel retailers sometimes sell fuel that barely meets the advertised octane rating. In summer heat or at high elevations, that minimum-spec fuel might allow knock to develop, working your knock sensor harder than necessary.
Regular Maintenance Prevents Problems
Preventive maintenance significantly reduces knock risk and sensor stress. Old, worn spark plugs can cause hot spots in the combustion chamber that trigger knock. Replace spark plugs at the manufacturer’s recommended intervals—typically every 30,000 to 100,000 miles depending on plug type.
A dirty air filter restricts airflow, potentially creating a lean condition that burns hotter and increases knock probability. Check your air filter regularly and replace it when it becomes dirty—usually every 15,000 to 30,000 miles, or more frequently in dusty conditions.
Regular oil changes prevent carbon deposits from building up on piston crowns and cylinder heads. These deposits create hot spots that can trigger knock. Fresh oil also helps your oil pressure sensor provide accurate readings, ensuring proper lubrication system function.
Cooling system maintenance is critical because overheating promotes knock. Ensure your coolant is fresh (replace every 30,000 to 60,000 miles or per manufacturer specifications), and the cooling system is functioning properly. A partially clogged radiator or failing water pump can cause localized hot spots that increase knock tendency.
Driving Habits Impact Sensor Life
How you drive affects both knock occurrence and knock sensor longevity. Avoid lugging the engine—trying to accelerate in too high a gear at low RPM. This creates high cylinder pressures at low engine speeds, the perfect recipe for knock. Downshift before accelerating hard, keeping engine speed in the power band where combustion is more stable.
Don’t consistently run your engine at redline or under maximum load, especially with marginal fuel quality. While modern engines can handle it occasionally, constant high-stress operation increases the probability of knock and puts continuous demand on the knock sensor system.
In cold weather, allow your engine to warm up slightly before driving hard. Cold engines run rich and may have uneven fuel distribution, increasing knock risk. You don’t need to idle for minutes—modern engines warm up faster under light load—but avoid wide-open throttle acceleration until coolant temperature reaches at least 160°F (71°C).
Inspection During Service
Have your mechanic inspect knock sensor wiring during routine maintenance, especially if your vehicle is more than five years old or has over 75,000 miles. They can check for corrosion in the connector, damaged wiring insulation, or oil leaks that might threaten the sensor.
If you live in an area with harsh winters and road salt, ask your mechanic to spray the knock sensor connector with dielectric grease or electrical connection protector. This helps seal out moisture and prevent corrosion. Some mechanics do this routinely, but it doesn’t hurt to request it specifically.
Address check engine lights promptly rather than driving for weeks or months with the light on. Sometimes a knock sensor code indicates not a failed sensor but an actual knock condition that will damage your engine if ignored. Even if the sensor itself is faulty, driving with conservative timing for extended periods reduces your fuel economy and engine performance unnecessarily.
Advanced Knock Sensor Technology
As engines become more sophisticated and operate at increasingly aggressive parameters, knock sensor technology evolves to keep pace.
Multiple Sensor Systems
Modern V6 and V8 engines almost universally employ at least two knock sensors—one for each cylinder bank. This redundancy ensures that knock in any cylinder is detected quickly. Some high-performance engines take this further with individual knock sensors for each cylinder or pair of cylinders, allowing extremely precise knock detection and cylinder-specific ignition timing control.
The advantage of multiple sensors extends beyond redundancy. By comparing signals from different sensors, the ECU can determine which cylinder or group of cylinders is experiencing knock and adjust timing for only those cylinders. This maintains optimal performance in cylinders that aren’t knocking while protecting those that are.
BMW’s S85 V10 engine used in the E60 M5, for example, employed sophisticated multi-sensor knock detection as part of its ability to produce 500 horsepower while maintaining reasonable reliability. Each cylinder bank had multiple sensors providing redundant detection coverage, allowing the engine to run aggressive timing when conditions permitted while providing immediate protection when knock developed.
Next-Generation Sensors
The automotive industry is developing cylinder pressure sensors that directly measure combustion pressure inside each cylinder. These sensors provide far more information than traditional knock sensors, detecting not just knock but also misfire, variations in compression between cylinders, and combustion quality. Some manufacturers already use these sensors on production engines.
Ferrari filed patents for predictive knock detection systems that monitor cylinder air pressure and temperature to predict when knock is likely to occur—before it actually happens. Rather than reacting to knock after it begins, these systems proactively adjust ignition timing and fuel delivery to prevent knock from ever developing. This allows engines to run at the absolute edge of knock without crossing over into actual knock events.
Advanced signal processing algorithms are also improving traditional knock sensor capabilities. By analyzing not just the presence of knock but also its intensity and frequency characteristics, modern ECUs can distinguish between light knock (which might be acceptable briefly) and severe knock (which requires immediate aggressive timing retardation). This nuanced response optimizes the balance between performance and protection.
Performance Tuning Considerations
If you’re considering performance modifications to your vehicle, understand that knock sensor function becomes even more critical. Increased boost pressure, modified compression ratios, aggressive ignition timing maps, and turbocharger upgrades all increase knock risk.
Aftermarket engine management systems must properly integrate knock sensor signals. A tuner who ignores or improperly calibrates knock detection is setting your engine up for catastrophic failure. Reputable performance tuners spend significant time on the dyno carefully establishing knock thresholds and verifying that the engine management system responds appropriately.
Some performance enthusiasts install aftermarket knock detection systems that provide audible alerts or visual warnings when knock occurs. While these don’t replace the factory knock sensor (which is integrated into engine management and provides automatic protection), they give drivers real-time feedback about engine health during aggressive driving.
Modified engines should use even higher quality fuel than stock engines. If your modified engine has significantly increased power, the fuel that was acceptable stock might allow knock under the higher cylinder pressures. Many tuners recommend one octane grade higher than stock requirements as a safety margin, especially for turbocharged applications.
When to Consult a Professional
While some knock sensor diagnosis and replacement is DIY-friendly, certain situations demand professional expertise.
Situations Requiring Expert Help
If you hear persistent knocking sounds even after replacing the knock sensor, stop driving the vehicle and seek professional diagnosis immediately. The knocking might be caused by severe engine damage, worn bearings, or other serious mechanical problems unrelated to the knock sensor. Continuing to drive can cause catastrophic engine failure.
Multiple related diagnostic codes—especially combinations like knock sensor codes plus multiple misfire codes, fuel system codes, or oxygen sensor codes—suggest a complex problem requiring systematic professional diagnosis. The knock sensor code might be a symptom rather than the cause of the issue.
If the knock sensor is located under the intake manifold or in another difficult-to-access location and you lack the skills, tools, or confidence to tackle the job, professional replacement is worth the cost. Mistakes during intake manifold removal can cause vacuum leaks, coolant leaks, or other problems that cost more to fix than the original repair.
Performance-modified engines with knock issues require tuners who understand the specific modifications and can adjust engine management appropriately. Don’t attempt DIY knock sensor diagnosis on a heavily modified engine without proper equipment and knowledge.
What Professionals Can Do
Professional technicians have access to diagnostic equipment unavailable to most DIY enthusiasts. Automotive oscilloscopes allow detailed analysis of knock sensor waveforms, revealing subtle problems that basic multimeters miss. Professional-grade scan tools provide more comprehensive live data than consumer-level code readers, showing information like individual cylinder misfires, fuel trims, and knock retard values that aid diagnosis.
Shops have access to technical service bulletins (TSBs) that document known issues with specific vehicle models. Your knock sensor code might be part of a larger pattern affecting your vehicle model, with a factory-approved repair procedure or updated parts. Shops subscribing to professional repair information services can quickly identify these issues.
Comprehensive engine analysis can rule out mechanical problems. If you have actual engine knock rather than a sensor issue, professionals can perform compression tests, leak-down tests, and other diagnostics to determine the root cause. They can also verify that the fuel injection system is delivering the correct amount of fuel and that MAP sensors and throttle position sensors are providing accurate data to the ECU.
Finally, professional repairs typically include warranties—usually at least 12 months or 12,000 miles for parts and labor. If the repair doesn’t solve the problem or the new sensor fails prematurely, you’re protected. This warranty coverage often justifies the additional cost over DIY repair, especially on a critical component like the knock sensor.
Professional Consultation Strongly Recommended: If you hear persistent knocking sounds that don’t resolve after knock sensor replacement, or if you see rapidly increasing knock sensor codes after replacement, stop driving immediately and have the vehicle towed to a professional shop. These symptoms suggest severe engine problems that will cause catastrophic damage if you continue operating the vehicle. The cost of a tow and professional diagnosis is trivial compared to a complete engine replacement.
Conclusion
The knock sensor is a perfect example of a small component with enormous importance. This unassuming sensor—using elegant piezoelectric technology to convert vibrations into electrical signals—stands guard over your engine, detecting destructive knock in milliseconds and allowing the ECU to make protective adjustments before damage occurs. Modern engines operate at aggressive parameters that would have destroyed older engines within hours if not for the protection provided by knock sensors.
Understanding how knock sensors work, recognizing failure symptoms, and knowing how to diagnose problems empowers you to maintain your vehicle more effectively. Whether you’re a DIY enthusiast capable of replacing an easily accessible sensor yourself or someone who relies on professional service, understanding the knock sensor’s role helps you make informed decisions about diagnosis and repair.
The check engine light with a knock sensor code is your engine’s plea for attention. Don’t ignore it, and don’t just clear the code hoping it won’t return. Proper diagnosis determines whether you have a failed sensor requiring replacement or an actual engine problem that the sensor is correctly detecting. Either situation demands prompt attention to protect your engine from expensive damage.
With proper maintenance—quality fuel, regular service, and responsible driving habits—your knock sensor should provide many years of reliable service. When replacement does become necessary, accurate diagnosis followed by proper replacement to correct torque specifications ensures your engine continues receiving the protection it needs.
Remember: the $200 to $600 cost of knock sensor diagnosis and replacement is a bargain compared to the $4,000 to $8,000 cost of repairing an engine damaged by undetected knock. This small sensor is one of the best investments in engine longevity that modern automotive technology provides.
Related Articles
- How Engine Management Systems Work: ECU and Sensor Networks
- How Ignition Systems Work: Spark Generation and Timing
- How Mass Air Flow Sensors Work: Intake Measurement
- How MAP Sensors Work: Manifold Pressure
- How Throttle Position Sensors Work: Pedal Input
- How Oxygen Sensors Work: Exhaust Analysis
- How Fuel Pressure Sensors Work: Injection Control
- How Fuel Injection Systems Work: Precision Fuel Delivery
- Code P0300: Random/Multiple Cylinder Misfire Detected
- How Crankshaft Position Sensors Work: Engine Timing
- How Camshaft Position Sensors Work: Valve Timing
- All You Need To Know About OBD Codes And How To Read Codes

