The fuel pressure sensor is one of the smallest components in your engine bay, yet it carries an outsized responsibility. Measuring fuel rail pressure in real time and feeding that data to the engine control unit, it sits at the heart of every fuel delivery decision your engine makes — from cold starts to wide-open throttle. When it fails, the consequences show up quickly: rough idle, hard starting, a hesitant throttle, or an unexpected check engine light that sends you reaching for a scan tool. Understanding how the sensor works, what it looks like when it goes wrong, and how to diagnose it accurately can save you from chasing expensive misdiagnoses in an area of the vehicle where getting it wrong really counts.
Quick Answer
The fuel pressure sensor (also called the fuel rail pressure sensor) measures pressure inside the fuel rail and sends a voltage signal to the ECU, which uses that data to control fuel injection timing and quantity. A failing sensor typically triggers codes P0190–P0193 and produces symptoms including rough idle, poor acceleration, hard starting, engine stalling, and reduced fuel economy. Diagnosis starts with scan tool live data comparing desired versus actual pressure; replacement costs $150–$350 including parts and labour, with the sensor itself ranging from $40–$120.
What a Fuel Pressure Sensor Does — and Why It Matters
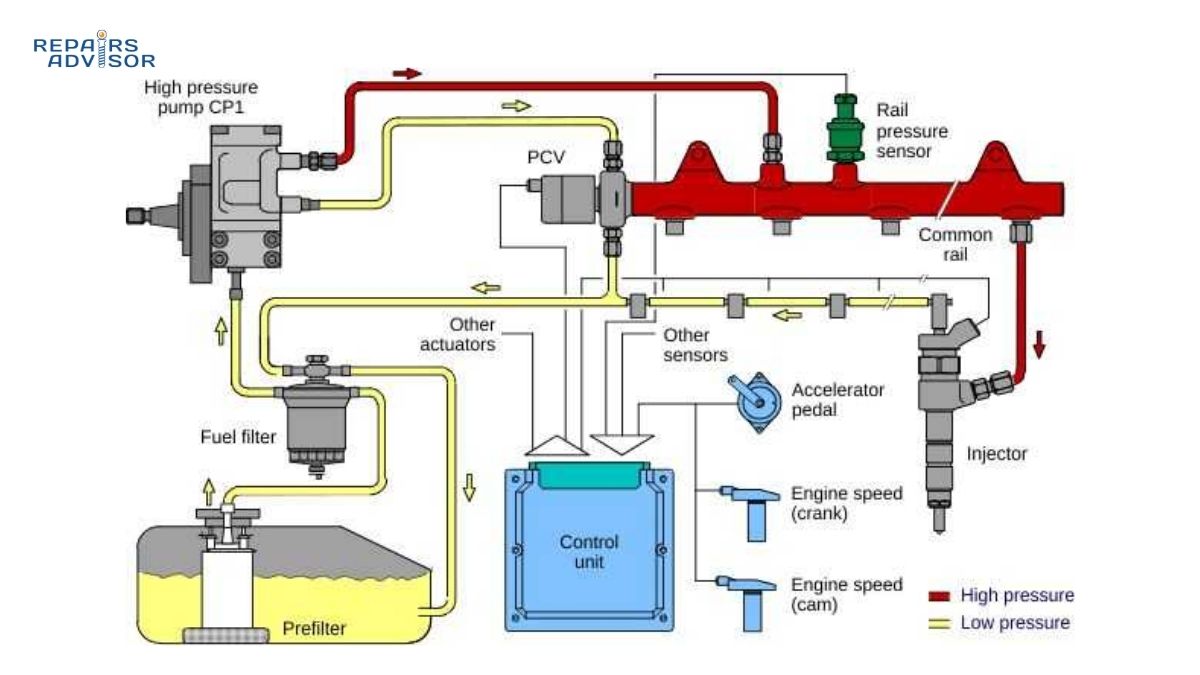
Modern fuel injection systems operate on a principle of closed-loop pressure control. The high-pressure pump continuously delivers fuel into the rail; the ECU monitors actual pressure via the sensor and adjusts pump output or the pressure regulator to keep rail pressure at its target value. This happens continuously across the entire rev range, adapting in milliseconds to changing loads, temperatures, and driving demands.
The fuel pressure sensor is the “eyes” of this system — it reports what rail pressure actually is. The fuel pressure regulator is the “muscle” that physically adjusts it. This distinction matters enormously when diagnosing problems: a faulty sensor can produce every symptom of a pressure regulation problem, even when actual fuel pressure is perfectly fine. The engine management system is making decisions based on what the sensor tells it — if that information is wrong, every downstream response will be wrong too.
Think of it this way: if the sensor falsely reports low pressure, the ECU responds by commanding the pump to work harder or increasing injector pulse width. The engine may flood with fuel it doesn’t need. Conversely, if the sensor falsely reads high pressure, the ECU cuts back fuel delivery, creating a lean condition that causes misfires, hesitation, or a no-start. The engine behaves as if the fuel system is broken even when the hardware is perfectly healthy.
How the Sensor Works: Piezoresistive Technology Explained
The fuel pressure sensor uses a principle called piezoresistance to convert mechanical pressure into an electrical signal. Inside the housing sits a silicon diaphragm — a precisely engineered wafer that bends in response to fuel pressure pressing against it. As the diaphragm deflects, the electrical resistance of the silicon changes proportionally. A signal conditioning circuit converts this resistance change into a voltage output, typically ranging from 0.5 volts at minimum pressure to 4.5 volts at maximum.
Three wires connect the sensor to the ECU: a 5-volt reference voltage supply, a ground, and the signal return wire that carries the pressure-dependent voltage reading back. The ECU interprets this voltage and maps it to a pressure value using calibration data stored in its memory. Temperature compensation circuitry within the sensor accounts for the fact that silicon resistance changes with heat — without it, readings would drift significantly as the engine warms up.
Operating pressure ranges vary considerably depending on fuel system type. Conventional multi-port fuel injection (MPFI) systems run at modest rail pressures — typically 40–60 psi (2.7–4.1 bar). Petrol direct injection (GDI) systems require dramatically higher pressure to inject fuel directly into the combustion chamber, with high-pressure rails operating at up to 2,900 psi (200 bar) or more. Common rail diesel systems push further still, with rail pressures reaching 30,000 psi in modern heavy-duty applications. The sensors across these systems share the same operating principle but are engineered to very different pressure and durability specifications.
Sensor Location and System Types
Where to Find the Fuel Pressure Sensor
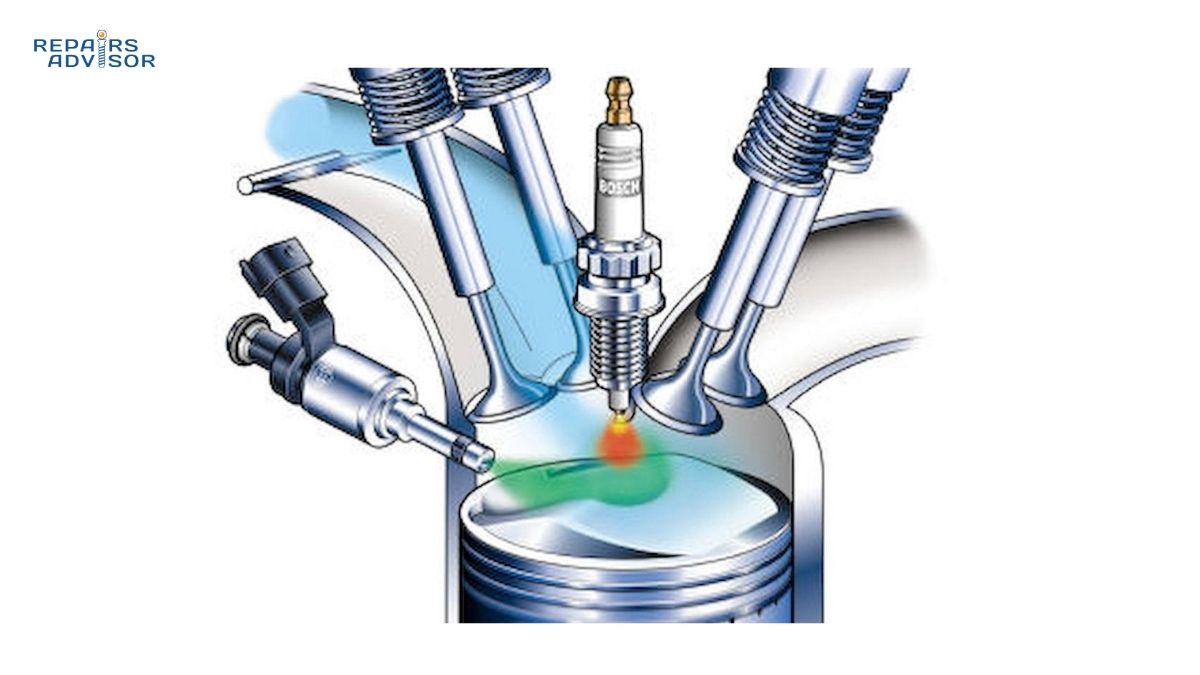
On most petrol vehicles, the sensor mounts directly onto the fuel rail — the metal tube that distributes pressurised fuel to each injector. It typically sits at one end or along the rail’s side, connected by a small wiring harness plug. On petrol direct injection engines, a high-pressure sensor is found on the high-pressure pump outlet or the injector rail itself, while some vehicles also carry a separate low-pressure sensor on the fuel supply line between tank and high-pressure pump.
On V-type engines — including many diesel trucks equipped with Duramax, Powerstroke, or Cummins units — the sensor is frequently located on one of the two fuel rails, often tucked under the intake manifold or beneath a wiring harness. Access can be significantly more difficult than on inline four-cylinder layouts, sometimes requiring intake manifold removal to reach the sensor.
A common source of confusion: the fuel rail pressure sensor is different from the fuel tank pressure sensor. The fuel tank pressure sensor is a separate component located within or on top of the fuel tank, forming part of the EVAP evaporative emissions system. It monitors vapour pressure inside the tank to detect EVAP system leaks and plays no direct role in controlling fuel injection. Mixing up these two sensors leads to misdiagnosis, so confirm which component your scan tool codes are pointing to before proceeding. The broader fuel tank and delivery architecture is worth understanding if you’re tracing any fuel system fault from tank to rail.
Sensor Variants Across Fuel System Types
Vehicles with conventional MPFI systems carry lower-pressure sensors rated to under 100 psi, with simpler internal construction. GDI petrol engines require sensors rated to 200 bar or more, with more robust diaphragm materials for the extreme pressures of direct injection. Common rail diesel applications demand the most capable sensors — components engineered to withstand continuous exposure to thousands of bar of pressure, along with the vibration and thermal cycling of diesel operation. Fitting a lower-rated sensor to a high-pressure application is a failure waiting to happen; always confirm the correct specification in your vehicle’s service manual or a reputable parts catalogue before ordering.
Symptoms of a Failing Fuel Pressure Sensor
Fuel pressure sensor failures rarely follow a predictable pattern. Because the ECU is receiving incorrect or inconsistent data rather than no data at all, symptoms tend to be erratic — appearing and disappearing, shifting character depending on engine temperature or load. This is one of the reasons this component often gets overlooked during early diagnosis.
The check engine light is typically the first sign, triggered when the ECU detects a pressure reading outside expected parameters or behaving inconsistently relative to other inputs. Rough idling often follows — the engine hunts and surges at traffic lights as the ECU constantly adjusts fuelling in response to confused pressure data. Under acceleration the vehicle may hesitate or feel sluggish, particularly under sustained load, as the ECU miscalculates the fuel quantity needed. Fuel economy drops of 15–25% are common when the sensor reads falsely low, since the ECU enriches the mixture in response.
Hard starting or a no-start condition develops in more severe cases. A sensor reporting zero pressure during cranking may cause the ECU to suppress injector operation entirely as a safety measure — the engine cranks continuously without firing. On diesel vehicles, a sensor reading falsely low pressure causes the ECU to over-fuel aggressively, producing a distinct loud knock or diesel rattle as combustion pressure spikes. Limp mode activation — where the management system restricts power output to protect the engine — is particularly common on diesel vehicles with rail pressure sensor faults.
Engine stalling during deceleration or at idle is another symptom that frequently points here. As load drops and the ECU adjusts fuelling downward, a sensor providing noisy or drifting readings can push calibration outside the stable idle range. This symptom is easy to attribute to other causes — idle air control, vacuum leaks, a weakening fuel pump — which is exactly why scan tool live data is so valuable in narrowing down the fault correctly.
OBD2 Fault Codes Associated with Fuel Pressure Sensor Faults
The OBD2 system monitors the fuel rail pressure sensor circuit continuously and stores diagnostic trouble codes when it detects anomalies. Understanding what each code means helps distinguish between a failed sensor, a wiring fault, or a genuine fuel pressure problem — because these codes can be triggered by any of the above.
The core codes in this family are: P0190 (fuel rail pressure sensor circuit malfunction — a generic fault indicating the ECU has lost confidence in the signal); P0191 (range/performance — the reading is inconsistent with expected values given current engine operating conditions); P0192 (circuit low input — signal voltage is below expected range, often interpreted as excessively low pressure); and P0193 (circuit high input — signal voltage is above expected range). These are frequently accompanied by P0087 (fuel rail system pressure too low) or P0088 (fuel rail system pressure too high), which the ECU sets when it acts on the sensor’s instructions and the result falls outside acceptable limits.
A critical point: these codes indicate a circuit or signal problem, not automatically a failed sensor. A corroded connector, a broken signal wire, or a poor ground can generate identical codes. Always inspect the wiring harness and connector before condemning the sensor itself. The OBD2 diagnostic code guide covers the broader framework for reading and interpreting codes, while the P00XX fuel volume and timing code family places these sensor codes in the wider context of fuel system faults. The companion P0087 code guide is particularly useful reading alongside this article, as it frequently co-presents with sensor faults and helps distinguish whether the root issue is sensor accuracy or actual fuel delivery.
How to Diagnose a Faulty Fuel Pressure Sensor
Methodical diagnosis saves time and avoids replacing a sensor that doesn’t need replacing. The following sequence moves from the least invasive and most informative steps first.
Step 1: Scan Tool Live Data (Start Here)
Connect an OBD2 scanner capable of reading live PIDs — a basic code reader is not sufficient here. Navigate to the fuel rail pressure sensor channel and monitor the reading at idle, under light acceleration, and under sustained load. What you’re looking for is the relationship between the ECU’s desired pressure target and what the sensor is reporting.
A healthy sensor tracks the target closely, rising and falling smoothly as throttle input changes. Red flags: a reading stuck at zero or pinned at maximum (total signal failure); a reading that fluctuates erratically while the engine runs normally (noisy signal); or a reading consistently offset from target without any corresponding drivability symptom (sensor drift). This step also separates sensor faults from pump and regulator faults: if desired pressure is 1,800 bar and actual is consistently 900 bar with no erratic behaviour, the problem is fuel supply — not the sensor. If actual pressure jumps between 500 and 2,000 bar while the engine idles smoothly, the sensor is almost certainly generating false data.
Step 2: Multimeter Voltage Test
With the ignition on and engine off, locate the sensor connector and verify that the reference voltage supply pin is delivering approximately 5 volts. An absent or significantly different voltage points to a wiring or ECU fault upstream. With the engine running at idle, back-probe the signal pin (without disconnecting the connector) and measure output voltage — typically 1–2 volts at idle, rising toward 3–3.5 volts under load. A reading stuck at 0V, pinned at 4.5V, or varying erratically while idle appears smooth all point to sensor failure. Compare against your vehicle’s service manual specification, as thresholds vary between manufacturers.
Step 3: Resistance and Continuity Check
Disconnect the sensor connector, set the multimeter to ohms, and measure resistance across the sensor terminals. Infinite resistance indicates an open-circuit failure of the sensor element. Also verify continuity along the signal wire from the sensor connector back to the ECU connector — a broken or high-resistance wire produces identical symptoms to a dead sensor and is considerably cheaper to fix.
Step 4: Mechanical Fuel Pressure Verification
If any doubt remains about whether the fault is sensor inaccuracy or actual low fuel pressure, fitting a mechanical gauge to the fuel rail test port provides definitive confirmation. Compare the mechanical gauge reading to the scan tool’s sensor-reported value. A significant discrepancy — for example, the mechanical gauge showing 58 psi while the scan tool reports 30 psi — confirms the sensor is misreporting rather than pressure itself being low.
Safety note: Working on pressurised fuel systems carries genuine fire and injection-injury risk. Before disconnecting any fuel component, relieve system pressure by disabling the fuel pump fuse and cranking the engine until it stalls, then disconnect the battery. Work in a well-ventilated area away from ignition sources. This is especially important on high-pressure GDI and diesel common rail systems where rail pressure can reach thousands of psi and takes time to dissipate after the pump stops. Consult your vehicle’s service manual for the specific pressure relief procedure. The diagnostic principles here share useful overlap with other precision engine sensors: the fuel injector circuit and the MAP sensor both use voltage output to report pressure and load data to the ECU, and their diagnostic approaches are closely related.
Why Fuel Pressure Sensors Fail
Fuel contamination is the most common cause of premature failure. Microscopic debris — rust particles from an ageing tank, dirt that bypassed a worn filter, or water that has accumulated in the system — can clog or abrade the sensing element. The diaphragm and strain gauge components are precision-machined to tight tolerances; even minor contamination can compromise accuracy long before visible damage is apparent.
Connector corrosion is the second most frequent cause, particularly on vehicles in humid climates or regions where road salt is used. Moisture works into the connector over time, oxidising the pin contacts and increasing circuit resistance. The result is exactly the kind of erratic, intermittent signal that makes sensor faults so difficult to trace — the fault may only appear at certain temperatures or when the harness is at a specific flex position.
Heat and vibration take a cumulative toll on internal components over higher mileages. The sensor sits directly on the fuel rail, cycling through significant temperature extremes every time the engine runs. Thermal expansion and contraction gradually fatigue solder joints and diaphragm material. Most sensors are designed to last 80,000–150,000 miles under normal conditions, though this varies with fuel quality and operating environment. Similar failure mechanisms affect other engine sensors — the coolant temperature sensor and knock sensor share the same vulnerabilities to connector corrosion and vibration-induced fatigue.
Replacement and Preventive Maintenance
Replacement Overview and Costs
The sensor itself costs $40–$120 depending on vehicle make and whether you choose OEM or a quality aftermarket unit. On high-pressure GDI and diesel applications, always use OEM-specification sensors — the pressure rating and connector specification must match exactly, and fitting an undersized sensor on a high-pressure system is both a reliability and safety concern.
Workshop labour typically adds $100–$200, bringing total repair cost to approximately $150–$350. This range shifts upward if the sensor sits beneath an intake manifold or in a position requiring substantial disassembly to access.
DIY suitability depends on vehicle layout. On many inline four-cylinder petrol engines, the sensor is accessible on top of the rail with standard tools, and an intermediate DIYer can typically complete the swap in 30–60 minutes once system pressure has been properly relieved. On V-engines where access requires intake manifold removal, or on common rail diesel systems where rail pressure remains hazardously elevated for some time after shutdown, professional service is the appropriate choice. Vehicle-specific service documentation is available through manufacturer manual pages for makes including Ford, Toyota, and others across the Repairs Advisor catalogue.
Preventive Maintenance to Extend Sensor Life
The most effective protection is looking after the fuel system as a whole. Using quality fuel with proper detergent additives reduces the contaminant load reaching the sensor. Replacing the fuel filter on the manufacturer’s schedule is critical — a clogged or aged filter passes debris that would otherwise be captured. Many manufacturers recommend professional fuel system service every 30,000–50,000 km to clear light deposits and protect precision components throughout the delivery system.
During routine service visits, ask your technician to inspect the sensor connector and wiring harness for corrosion, cracked insulation, or loose pins. A small amount of dielectric grease applied to the connector contacts provides a moisture barrier that can meaningfully extend connector life and prevent the intermittent faults that are most difficult to trace. These habits benefit the entire sensor network — the same discipline that protects your fuel pressure sensor applies equally to other precision signal devices your ECU depends on.
When symptoms do appear — a check engine light, rough idle, or hesitation — address them promptly. Continued driving with a faulty fuel pressure sensor risks secondary damage: lean conditions can damage catalytic converters and oxygen sensors (a potentially expensive repair), while sustained over-fuelling can wash cylinder walls and foul injectors. The sensor itself is a modest-cost repair; the downstream consequences of leaving it are not.
Fuel Pressure Sensor FAQ: Common Questions Answered
The fuel pressure sensor generates a lot of questions — partly because its failure symptoms overlap with so many other fuel system faults, and partly because there are actually two different sensors that carry similar names. These are the most common questions about how it works, how to identify a fault, and what to do about it.
Quick Answer
The fuel pressure sensor monitors fuel rail pressure and sends a voltage signal to the ECU to control fuel injection. When it fails, codes P0190–P0193 are typical, with symptoms ranging from rough idle and hesitation to hard starting and stalling. It is not the same component as the fuel tank pressure sensor (part of the EVAP system) — a common mix-up. Diagnosis starts with scan tool live data; total repair cost runs $150–$350 depending on vehicle and access difficulty.
What does a fuel pressure sensor actually do?
The fuel pressure sensor — also called the fuel rail pressure sensor — measures the pressure inside the fuel rail and sends a continuous voltage signal to the engine control unit (ECU). The ECU uses this reading to manage fuel injection timing and quantity, adjusting the high-pressure pump output or fuel pressure regulator to maintain target rail pressure under all driving conditions.
It’s worth distinguishing the sensor from the fuel pressure regulator. The sensor reports what pressure is; the regulator physically adjusts it in response to ECU commands. A faulty sensor can produce every symptom of a regulator problem while actual fuel pressure remains perfectly normal — the ECU is reacting to false data rather than a real hardware fault. Understanding how the broader fuel injection system manages pressure helps clarify where each component sits in the control loop.
What are the symptoms of a bad fuel pressure sensor?
The most common symptoms are:
Check engine light — usually the first sign, often accompanied by codes P0190, P0191, P0192, or P0193.
Rough or unstable idle — the engine hunts and surges as the ECU continuously adjusts fuelling in response to incorrect pressure readings.
Hesitation or sluggishness under acceleration — the ECU miscalculates the fuel quantity needed when the sensor is providing inaccurate data.
Hard starting or no-start — if the sensor reports zero pressure during cranking, the ECU may suppress injector firing entirely as a safety measure.
Engine stalling — particularly at idle or during deceleration, when fuelling demands shift and the sensor’s erratic readings push calibration outside the stable idle range.
Reduced fuel economy — a falsely low pressure reading causes the ECU to enrich the fuel mixture unnecessarily; drops of 15–25% are not uncommon.
Limp mode — common on diesel vehicles, where the engine management system restricts power output in response to perceived fuel delivery problems.
These symptoms tend to be intermittent rather than constant, appearing and disappearing as the sensor’s readings fluctuate. That inconsistency is one reason sensor faults can be tricky to pin down without live scan tool data. A weakening fuel pump can produce similar symptoms, so systematic diagnosis matters.
What OBD2 codes does a faulty fuel pressure sensor trigger?
The primary codes are:
P0190 — Fuel Rail Pressure Sensor Circuit Malfunction (generic signal fault)
P0191 — Fuel Rail Pressure Sensor Circuit Range/Performance (reading inconsistent with operating conditions)
P0192 — Fuel Rail Pressure Sensor Circuit Low Input (signal voltage below expected range)
P0193 — Fuel Rail Pressure Sensor Circuit High Input (signal voltage above expected range)
These are frequently stored alongside P0087 (fuel rail system pressure too low) or P0088 (fuel rail system pressure too high), which the ECU sets when it acts on the sensor’s instructions and the result falls outside acceptable limits. It’s important to recognise that P0190–P0193 indicate a circuit or signal problem — not automatically a dead sensor. Corroded connectors and damaged wiring can generate identical codes. For a broader introduction to reading and interpreting fault codes, the OBD2 codes guide covers the fundamentals.
Is the fuel pressure sensor the same as the fuel tank pressure sensor?
No — these are two different components with different locations and functions, though the naming causes genuine confusion.
The fuel rail pressure sensor sits on the fuel rail (the metal tube that supplies the injectors) and monitors injection-side fuel pressure in real time. It is directly involved in controlling how much fuel enters the engine.
The fuel tank pressure sensor (FTP sensor) is located in or on top of the fuel tank as part of the EVAP evaporative emissions system. Its job is to monitor vapour pressure inside the tank to detect EVAP system leaks — it plays no role in fuel injection control. Faults in the FTP sensor typically trigger EVAP-related codes and may cause emissions test failures, not the drivability symptoms associated with a faulty fuel rail pressure sensor.
When diagnosing a code, confirm which sensor is being flagged before ordering parts.
Can I drive with a faulty fuel pressure sensor?
Short distances at low speed may be possible — for example, moving the vehicle to a workshop — but extended driving is not advisable. A faulty sensor can cause the ECU to deliver an incorrect fuel mixture, which risks secondary damage to catalytic converters and oxygen sensors from a sustained lean or rich condition. On diesel vehicles, a sensor fault that triggers limp mode means significantly reduced power; one that causes over-fuelling creates knock conditions that stress engine components.
If the vehicle is stalling frequently, displaying severe hesitation, or producing unusual engine sounds, stop driving and have it assessed. These symptoms suggest the sensor fault is actively causing the ECU to make poor fuelling decisions rather than simply generating a warning code.
How do you test a fuel pressure sensor?
The most effective first step is scan tool live data. Connect an OBD2 scanner capable of displaying live PIDs and monitor the fuel rail pressure channel at idle, under light acceleration, and under load. Compare the sensor’s reported pressure against the ECU’s target pressure. A reading stuck at zero, pinned at maximum, or fluctuating erratically while the engine runs smoothly all indicate a sensor fault. If actual and desired pressure track together but both sag under load, the problem is more likely fuel supply — pump or regulator — rather than the sensor itself.
For electrical verification, use a multimeter to confirm the sensor is receiving its 5-volt reference supply (ignition on, engine off) and that the signal wire returns a voltage in the expected 0.5–4.5V range. Measuring resistance across the sensor terminals with it disconnected will reveal an open-circuit failure. The MAP sensor uses the same three-wire voltage output architecture and responds to identical multimeter testing procedures — useful context if you’re working through a broader sensor diagnosis.
Safety reminder: Before disconnecting any fuel system component for testing, relieve fuel system pressure by disabling the fuel pump fuse, cranking the engine to stall it, and disconnecting the battery. High-pressure GDI and diesel common rail systems retain dangerous rail pressures after the pump stops. Consult your vehicle’s service manual for the specific pressure relief procedure before proceeding.
How much does it cost to replace a fuel pressure sensor?
The sensor itself typically costs $40–$120, depending on vehicle make and whether you use an OEM or quality aftermarket part. Workshop labour adds approximately $100–$200, bringing the all-in cost to roughly $150–$350 for most vehicles. This range rises if the sensor is located beneath an intake manifold or in a position requiring significant disassembly to access — common on V-type engines and many diesel trucks.
On accessible inline four-cylinder petrol engines, an intermediate DIYer can typically complete the replacement in 30–60 minutes once fuel system pressure has been properly relieved. On high-pressure GDI and common rail diesel applications, professional service is recommended — the pressure ratings involved, combined with difficult access on many V-engine layouts, make this a job where experience matters. Vehicle-specific repair documentation for your make is available through the direct injection systems guide and manufacturer manual pages across the Repairs Advisor catalogue.
How long does a fuel pressure sensor last?
Most sensors are engineered to last 80,000–150,000 miles under normal operating conditions, though lifespan varies considerably with fuel quality, operating environment, and maintenance habits. Using quality fuel with proper detergent additives, replacing the fuel filter on schedule, and keeping electrical connectors clean and protected against moisture are the most effective ways to extend sensor life. Contaminated fuel and corroded connectors are the two most common causes of premature failure — neither is inevitable with good maintenance practice.
The sensor is not a scheduled service item on most vehicles; replacement is typically triggered by fault codes or drivability symptoms rather than mileage intervals. If you’re servicing other fuel system components at higher mileage — fuel injectors, the high-pressure pump — it’s worth inspecting the sensor connector and wiring at the same time. Similar maintenance principles apply across the engine sensor network, including components like the coolant temperature sensor that share the same vulnerability to connector degradation.