Your brake pedal connects to your wheels through an incompressible liquid working under extreme conditions that most drivers never think about. Every time you press the brake pedal, brake fluid transmits hundreds of pounds of force through steel lines and rubber hoses to activate calipers at each wheel. Without this vital hydraulic medium, you’d have zero stopping power—no matter how hard you pressed the pedal.
Most drivers don’t realize their brake fluid is hygroscopic, meaning it continuously absorbs moisture from the atmosphere. This water contamination gradually lowers the fluid’s boiling point by over 100°F, promoting corrosion throughout the brake system, and can ultimately cause complete brake failure during heavy use. Understanding brake fluid types, contamination symptoms, and maintenance intervals isn’t just good vehicle stewardship—it’s critical for your safety and the safety of everyone on the road.
Different DOT ratings (DOT 3, DOT 4, DOT 5, and DOT 5.1) represent distinct chemical formulations with specific applications. Choosing the wrong type or neglecting regular maintenance can lead to brake fade, component corrosion, and expensive repairs exceeding $1,000. Regular fluid changes costing around $100 every 2-3 years prevent these catastrophic failures while maintaining peak braking performance.
In this comprehensive guide, you’ll learn how DOT fluid classifications work and their chemical compositions, why hygroscopic properties affect performance and maintenance schedules, how to recognize moisture contamination symptoms and their consequences, the step-by-step hydraulic operation from pedal to caliper, when and how to check, test, change, and bleed brake fluid, and the critical safety hazards you must understand when handling brake fluid. Understanding how your master cylinder works together with brake fluid properties gives you complete knowledge of your vehicle’s hydraulic brake control system.
Safety Note: Brake fluid is toxic and corrosive. Always wear protective equipment when handling brake fluid, and consult a qualified technician for any brake system issues including spongy pedals, leaks, or warning lights. Never attempt brake system repairs without proper training and tools.
Brake Fluid Types and Chemical Properties
Understanding the DOT Classification System
The Department of Transportation (DOT) establishes brake fluid standards through Federal Motor Vehicle Safety Standard (FMVSS) No. 116, which defines specifications for DOT 3, DOT 4, DOT 5, and DOT 5.1 brake fluids. These classifications are based primarily on dry boiling point, wet boiling point, and viscosity characteristics across temperature ranges. The boiling point specifications are absolutely critical for preventing vapor lock—a condition where brake fluid boils under heavy use, creating compressible steam pockets that cause brake failure.
The “dry” boiling point refers to new, uncontaminated fluid containing zero percent moisture, while the “wet” boiling point measures fluid after absorbing approximately three percent water—a real-world condition that occurs after just 18 months of service in many vehicles. This distinction is crucial because all glycol-based brake fluids absorb moisture from the atmosphere, progressively lowering their boiling points over time.
DOT 3 Brake Fluid: The Standard Glycol-Based Fluid
DOT 3 brake fluid uses a glycol ether base combined with corrosion inhibitors and lubricating agents. The typical composition includes 60-90% solvent (glycol ethers), 5-30% lubricating agents, and 2-5% specialized additives that protect metal components from corrosion and prevent oxidation. This formulation provides a minimum dry boiling point of 401°F (205°C) and a wet boiling point of at least 284°F (140°C).
DOT 3 remains the most common brake fluid type in vehicles manufactured before 2006, particularly in standard passenger cars with moderate braking demands. Its hygroscopic nature means it absorbs up to two percent water per year from the atmosphere through microscopic pores in rubber brake hoses, past aging seals, and during brief reservoir cap removal. Despite this moisture absorption, DOT 3 maintains compatibility with all brake system types including those with ABS.
For everyday driving conditions without extreme heat, DOT 3 performs reliably and costs less than higher-specification fluids. The recommended change interval is every 2-3 years or 30,000-40,000 miles, whichever comes first. DOT 3’s primary advantage is its slower moisture absorption rate compared to DOT 4, though its lower boiling point limits performance under heavy braking conditions like mountain descents or frequent towing.
DOT 4 Brake Fluid: Enhanced Performance Through Chemistry
DOT 4 brake fluid builds on the DOT 3 formula by adding borate ester compounds to the glycol ether base, significantly enhancing heat resistance. This chemical enhancement raises the minimum dry boiling point to 446°F (230°C) and the wet boiling point to 311°F (155°C)—substantially higher than DOT 3 specifications. Modern vehicles manufactured after 2006 typically specify DOT 4 fluid as standard equipment.
While DOT 4 absorbs moisture faster than DOT 3, it maintains a higher boiling point even after water contamination, making it superior for vehicles equipped with ABS systems or traction control. The fluid excels in heavy-duty applications including towing, mountain driving, and performance vehicles where sustained high temperatures are common. DOT 4 is fully compatible with DOT 3 systems, allowing you to upgrade but never downgrade.
The recommended change interval for DOT 4 is every two years or 20,000-30,000 miles due to its faster moisture absorption characteristics. Vehicles with advanced electronic brake systems particularly benefit from DOT 4’s superior performance under stress, as electronic stability control and automatic emergency braking systems subject brake fluid to rapid pressure cycling that generates substantial heat.
DOT 5 Brake Fluid: The Silicone Alternative
DOT 5 represents a fundamental departure from glycol-based fluids, using a silicone base that contains at least 70% diorgano polysiloxane. By federal regulation, DOT 5 must be purple in color to prevent accidental mixing with glycol-based fluids. This silicone formulation provides an impressive dry boiling point of 500°F (260°C) and wet boiling point of 356°F (180°F), with stable viscosity characteristics across extreme temperature ranges.
Unlike glycol-based fluids, DOT 5 is hydrophobic—it repels water instead of absorbing it. This property sounds advantageous, but creates serious problems in real-world applications. While DOT 5 won’t absorb atmospheric moisture, any water that enters the brake system through leaks or condensation doesn’t mix with the fluid. Instead, water pools in low points of the system where it can freeze in winter or boil during braking, causing localized corrosion and brake failure.
The critical limitation of DOT 5 is its complete incompatibility with ABS systems. During rapid ABS cycling, DOT 5 can aerate—forming tiny air bubbles that create a compressible, spongy pedal feel. DOT 5 also exhibits higher compressibility than glycol fluids even without aeration, resulting in a softer pedal feel that some drivers find disconcerting.
DOT 5 finds its niche in military vehicles designed for extreme temperature ranges, classic cars with non-ABS systems intended for show rather than heavy use, and vehicles in long-term storage. Its paint-safe property makes it popular with show car enthusiasts, as glycol-based fluids aggressively attack automotive paint. Converting to DOT 5 requires a complete system flush since even small amounts of glycol fluid contamination cause problems.
DOT 5.1 Brake Fluid: High-Performance Glycol Engineering
DOT 5.1 represents the pinnacle of glycol-based brake fluid engineering, using optimized glycol ether and borate ester formulations to achieve performance matching DOT 5’s silicone-based specifications. DOT 5.1 provides a minimum dry boiling point of 500°F (260°C) and wet boiling point of 356°F (180°F), but maintains full compatibility with DOT 3 and DOT 4 systems. Unlike DOT 5, DOT 5.1 is clear or yellow in color—never purple.
The critical advantage of DOT 5.1 over DOT 5 is complete ABS compatibility with no aeration issues during rapid pressure cycling. DOT 5.1 also features lower viscosity at cold temperatures, improving response in advanced stability control systems that require split-second brake pressure modulation. High-performance vehicles, sports cars used for track days, and any vehicle subjected to extreme braking demands benefit significantly from DOT 5.1’s superior thermal performance.
Racing applications almost universally specify DOT 5.1 fluid due to its exceptional heat resistance combined with the precise pedal feel that only glycol-based fluids provide. Heavy towing applications and frequent mountain driving also justify the extra cost of DOT 5.1 fluid. The trade-off is the shortest change interval of any brake fluid—every 1-2 years or 15,000-20,000 miles—because DOT 5.1 remains hygroscopic like all glycol-based fluids.
Critical Mixing Rules and Compatibility
Understanding which brake fluids can be safely mixed prevents catastrophic brake system failures. DOT 3, DOT 4, and DOT 5.1 are all glycol-based and can be mixed without chemical incompatibility, though mixing different specifications isn’t ideal for optimal performance. You can safely upgrade from DOT 3 to DOT 4 or DOT 5.1 by simply adding the higher-specification fluid, taking advantage of improved heat resistance.
However, you must never replace a DOT 4 system with DOT 3 fluid—this downgrade reduces system performance and can cause brake failure under conditions where DOT 4’s higher boiling point is required. Most critically, never mix DOT 5 silicone-based fluid with any glycol-based fluid (DOT 3, 4, or 5.1). The chemical incompatibility causes the fluid to gel, coagulate, or separate, resulting in immediate brake system failure.
The best practice is always using the exact brake fluid specification printed on your master cylinder reservoir cap. Manufacturers specify fluid types based on extensive testing of system components, expected operating temperatures, and ABS requirements. When in doubt, consult your vehicle owner’s manual or check with your dealer to verify the correct specification for your specific make and model. Understanding how disc brakes work together with fluid requirements helps you appreciate why proper fluid selection matters so much.
Hygroscopic Properties and Moisture Contamination
Why Brake Fluid Absorbs Water
Glycol-based brake fluids (DOT 3, 4, and 5.1) are hygroscopic by their chemical nature, meaning they attract and absorb water molecules from the surrounding atmosphere. This isn’t a manufacturing defect—it’s an inherent property of glycol ether compounds that makes them excellent hydraulic fluids but also creates ongoing maintenance requirements.
Moisture enters your brake system through multiple pathways. The primary route is through microscopic pores in rubber brake hoses that are permeable to water vapor molecules. As brake hoses age and the rubber compounds deteriorate, this permeability increases. Moisture also enters past aging, deteriorated seals in the master cylinder and brake calipers, particularly in vehicles exposed to high humidity environments. Even brief reservoir cap removal during routine fluid level checks allows moist air to enter the system.
The moisture absorption rate accelerates in humid climates, making brake fluid maintenance even more critical in coastal areas or regions with high atmospheric humidity. Fresh brake fluid can absorb two to three percent water content within the first year of service. After 18 months, contamination levels commonly reach three percent. In vehicles that have gone several years without brake fluid service, water content can climb to seven or eight percent—far beyond safe operating limits.
A comprehensive NHTSA survey examined brake fluid conditions across 1,720 vehicles and found that 20% contained five percent or more water content—a level that severely compromises brake system performance and safety. This data underscores why regular brake fluid testing and replacement isn’t optional maintenance—it’s a critical safety requirement.
How Moisture Degrades Braking Performance
Water contamination attacks brake system performance through two distinct mechanisms: boiling point depression and corrosion acceleration. Just three percent moisture content can lower DOT 3’s boiling point by approximately 100°F, dropping it from 401°F to around 293°F—barely above the boiling point of pure water. DOT 4 fluid with two percent moisture experiences an even more dramatic drop, losing nearly 200°F of heat resistance and falling from 446°F to approximately 250°F.
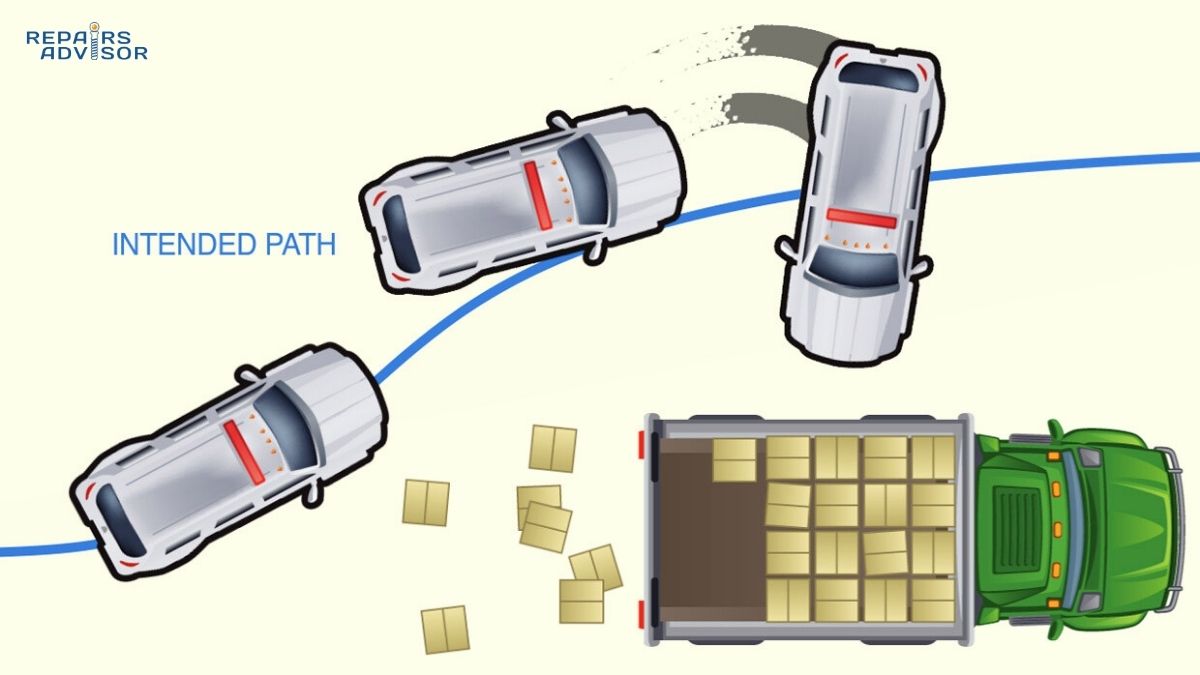
Since water boils at 212°F, heavily contaminated brake fluid can boil during normal driving conditions under heavy loads. When brake fluid boils, it creates steam pockets in the brake lines. Unlike incompressible liquid, steam is a highly compressible gas that causes the phenomenon known as vapor lock. When you press the brake pedal with vapor lock present, the pedal feels spongy and may sink toward the floor without generating sufficient clamping force at the wheels. In severe cases, vapor lock causes complete brake failure.
This scenario is particularly dangerous during mountain descents, where sustained braking generates extreme heat in brake pads and rotors. Towing heavy trailers creates similar conditions—repeated braking causes heat to build throughout the system, eventually boiling contaminated fluid. Track driving subjects brake systems to sustained high temperatures that quickly expose moisture contamination problems.
Water in brake fluid also promotes aggressive corrosion in steel brake lines, caliper pistons and bores, wheel cylinders, master cylinder internals, and ABS modulator components. Corroded metal components shed debris particles that contaminate the fluid further, accelerate wear on seals and moving parts, and create rough surfaces that damage seals and cause leaks. Pitting in caliper bores leads to seal failure and fluid leaks that require complete caliper replacement.
The financial impact of moisture-driven corrosion escalates quickly. While a preventive brake fluid flush costs $80-150, corroded components can require repairs exceeding $1,000. Replacing corroded brake lines, calipers, master cylinders, and ABS modulators represents a maintenance failure that could have been prevented with regular fluid changes. Understanding how brake boosters work alongside fluid maintenance helps you appreciate the entire hydraulic system’s vulnerability to moisture damage.
Recognizing Contamination Symptoms
Visual inspection provides the first indication of brake fluid contamination. Fresh, uncontaminated brake fluid appears clear to light amber—similar to vegetable oil in appearance and consistency. Light brown coloration indicates mild contamination and signals that fluid replacement should be scheduled soon. Dark brown or black brake fluid reveals severe contamination requiring immediate attention, as the dark color comes from dissolved metal particles, degraded rubber compounds, and chemical breakdown products.
Milky or cloudy brake fluid appearance specifically indicates water contamination that’s compromising brake system performance. If you notice floating particles or sediment in the reservoir, the brake system has experienced significant corrosion with metal debris circulating through brake lines and components.
Performance symptoms often appear before visual contamination becomes obvious. A spongy or soft brake pedal feel indicates air or moisture creating compressible pockets in the hydraulic system. If the brake pedal slowly sinks toward the floor when held under steady pressure, severe contamination or internal seal failure is present. Increased stopping distances signal reduced hydraulic pressure transmission due to contamination. Brake fade—loss of braking power during repeated heavy use—occurs when fluid boils and creates vapor lock.
Dashboard warning lights provide electronic confirmation of problems. The ABS warning light illuminates when the system detects pressure anomalies that indicate contaminated fluid, particularly in vehicles with electronic stability control that monitors brake system response precisely. The general brake warning light activates for low fluid levels, pressure imbalances, or system malfunctions that often relate to fluid contamination.
Professional testing methods provide objective measurements of fluid condition. Copper test strips measure copper content released by corrosion in brake system components—readings exceeding 200 parts per million indicate the fluid’s corrosion inhibitors are exhausted and fluid replacement is mandatory. Moisture test strips directly measure water percentage in the fluid. Electronic boiling point testers measure the actual boiling temperature of fluid sampled from the reservoir, providing immediate assessment of thermal performance capability.
How Brake Fluid Works: Step-by-Step Hydraulic Operation
The Hydraulic Advantage Principle
Your brake system harnesses Pascal’s Law—pressure applied to a confined liquid transmits equally in all directions. This fundamental principle of hydraulics enables a relatively small master cylinder piston, typically one inch in diameter, to create sufficient pressure to activate much larger caliper pistons measuring 1.5 to 2.5 inches in diameter. The size difference creates hydraulic multiplication, amplifying your moderate 50-pound pedal pressure into 200-300 pounds of clamping force at each brake caliper.
Brake fluid transmits this force because liquids are essentially incompressible—unlike air or vapor which compress easily under pressure. When moisture contamination allows brake fluid to boil, creating steam pockets, the hydraulic advantage disappears because compressible gas absorbs the applied pressure instead of transmitting it to the calipers.
The brake system incorporates several key components working in concert: the brake fluid reservoir stores fluid and allows for thermal expansion and contraction; the master cylinder converts pedal motion into hydraulic pressure; brake lines and hoses transport pressurized fluid to each wheel; calipers or wheel cylinders convert hydraulic pressure back into mechanical clamping force; and brake pads or shoes create friction against rotors or drums to slow the vehicle.
Pedal Application and Master Cylinder Activation
When you press the brake pedal, the pushrod enters the master cylinder bore and begins advancing the primary piston. Before this can generate pressure, the brake booster multiplies your pedal force using engine vacuum, typically providing a 3:1 ratio that amplifies your 50-pound foot pressure into 150 pounds of pushrod force entering the master cylinder.
As the primary piston advances, it first closes the compensation port that connects the primary chamber to the reservoir. With this port sealed, continued piston movement pressurizes brake fluid in the primary circuit, which typically feeds the front brakes. This hydraulic pressure simultaneously pushes the secondary piston forward, pressurizing the secondary circuit that typically feeds the rear brakes.
This dual-circuit design provides critical safety redundancy. If one circuit fails due to a leak or component failure, the other circuit continues providing partial braking capability. You’ll experience a longer pedal travel and reduced braking force, but you’ll still be able to stop the vehicle safely enough to reach a repair facility.
During moderate braking, system pressure typically reaches 800-1,200 psi. Emergency braking can generate pressures exceeding 2,000 psi in modern vehicles equipped with electronic brake force distribution and brake assist systems. These extreme pressures underscore why brake lines must be steel rather than flexible material, and why proper fluid maintenance is critical for system integrity.
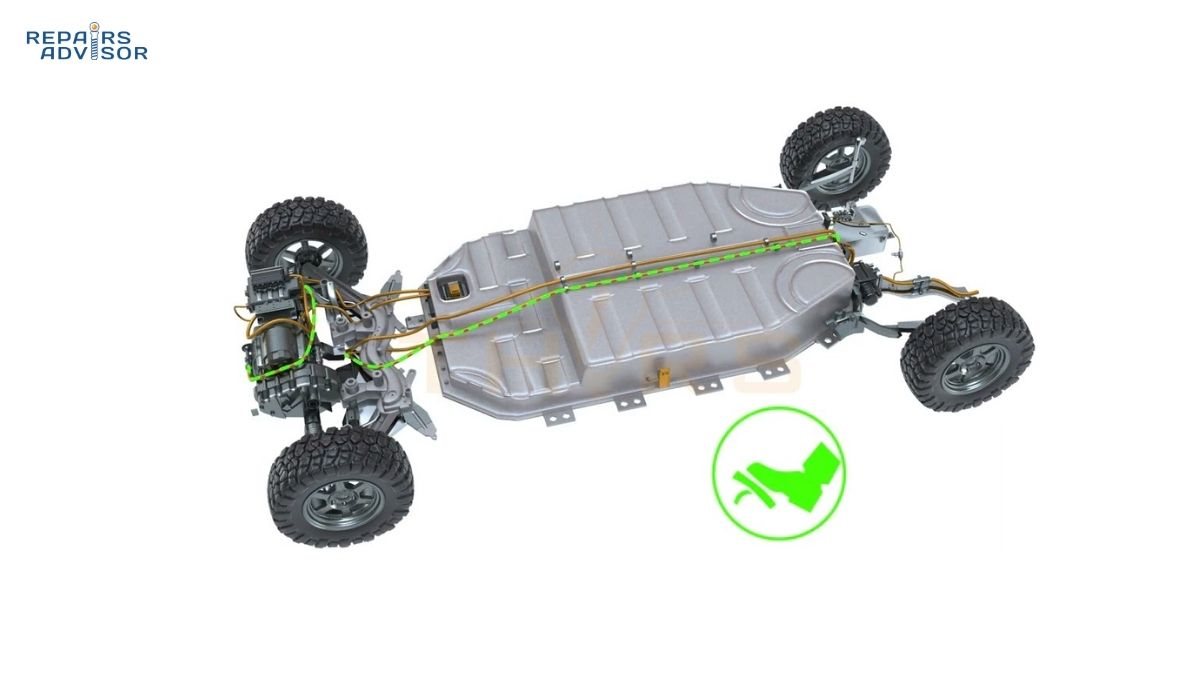
Pressure Transmission Through Brake Lines
Pressurized brake fluid flows from the master cylinder through steel brake lines that run along the vehicle’s frame or underbody. Steel lines provide the strength necessary to contain high hydraulic pressures without expansion that would create a spongy pedal feel. At each wheel, flexible rubber brake hoses connect the rigid steel lines to the calipers or wheel cylinders, accommodating suspension movement and steering articulation without restricting brake function.
The brake fluid reaches all four calipers or wheel cylinders simultaneously, providing instant response across the entire braking system with virtually zero lag between pedal application and wheel braking force. However, the distribution of braking force between front and rear wheels isn’t equal—nor should it be.
Brake proportioning valves modulate rear brake pressure to prevent premature rear wheel lockup. During braking, weight transfers forward due to deceleration forces, increasing tire contact patch and traction at the front wheels while reducing rear wheel traction. Front brakes therefore receive 60-70% of total braking force, while rear brakes receive 30-40%, dynamically adjusted based on vehicle loading and brake system design.
Modern vehicles with electronic brake force distribution use sensors and electronic control units to optimize this front-rear balance continuously based on driving conditions, vehicle load, and brake pedal pressure. These advanced systems depend on clean, uncontaminated brake fluid for rapid, precise pressure modulation.
Caliper Piston Actuation and Brake Engagement
When pressurized brake fluid enters the brake caliper, it acts on the back side of one or more pistons depending on caliper design. The hydraulic pressure must first overcome the resistance of square-section rubber seals that fit in grooves in the caliper bore, then begins forcing the pistons outward from their bores.
In floating caliper designs with a single piston on the inboard side, the piston pushes the inboard brake pad against the rotor surface. The reaction force causes the entire caliper body to slide inward on guide pins or slides, simultaneously pulling the outboard pad into contact with the opposite rotor face. This elegant design achieves even clamping force with just one piston.
Fixed calipers use a different approach, with opposing pistons—typically two, four, or six total—positioned on both sides of the rotor. When hydraulic pressure activates these calipers, pistons on both sides move simultaneously toward the rotor, pressing both brake pads with equal force. Fixed calipers provide superior performance in high-heat applications but cost more and weigh more than floating designs.
Once the brake pads contact the spinning rotor with sufficient pressure, friction converts the vehicle’s kinetic energy into thermal energy. Brake temperatures during normal city driving reach 150-250°F, while highway emergency stops generate 400-600°F. Mountain descents while towing can sustain temperatures of 600-900°F, and track or racing conditions can exceed 1,200°F at the rotor surface.
These extreme temperatures explain why brake fluid boiling point specifications matter so much. Contaminated fluid with a depressed boiling point fails precisely when you need it most—during heavy braking that generates maximum heat.
Electronic System Modulation and Integration
Modern vehicles integrate brake fluid hydraulics with sophisticated electronic control systems. ABS systems monitor individual wheel speeds through sensors, detecting impending wheel lockup during hard braking. When lockup is detected, the ABS hydraulic control unit rapidly pulses brake pressure to that wheel five to 15 times per second, maintaining maximum stopping force while preventing the wheel from skidding.
Traction control systems use the same hardware in reverse, applying brake pressure to spinning wheels during acceleration to transfer power to wheels with better traction. Electronic stability control applies individual wheel braking to correct vehicle yaw, helping you maintain control during emergency maneuvers.
Advanced driver assistance systems including automatic emergency braking, adaptive cruise control, and pre-collision braking all depend on the brake hydraulic system to function. These systems can apply full braking force without driver input when sensors detect an imminent collision. The rapid response required by these electronic systems demands clean, uncontaminated brake fluid with consistent viscosity and instant pressure transmission capability.
Brake Release and System Reset
When you release the brake pedal, the master cylinder pistons retract under spring pressure, opening the compensation ports that connect the pressure chambers back to the reservoir. System pressure drops immediately to zero as brake fluid returns to the reservoir. At each caliper, the square-section piston seals perform their second critical function—piston retraction.
During brake application, these seals stretch slightly as the pistons move outward. When hydraulic pressure releases, the seals elastically return to their original shape, pulling the pistons back approximately 0.005 to 0.010 inches. This creates a small clearance gap between the brake pads and rotor, preventing brake drag that would reduce fuel economy, generate unnecessary heat, and cause premature brake pad wear.
The brake system is now reset and ready for the next brake application with no delay. This instant response cycle can repeat continuously throughout your drive, with electronic systems capable of modulating pressure dozens of times per second when needed. The reliability of this process depends entirely on maintaining clean, properly specified brake fluid throughout the hydraulic system.
Checking, Testing, and Changing Brake Fluid
When and How to Check Brake Fluid
Check your brake fluid level every three to four months—an easy practice is checking it each time you have an oil change performed. Visual inspection through the translucent master cylinder reservoir takes just seconds and can alert you to potential problems before they become dangerous. Professional testing of fluid condition should occur annually to assess moisture content and corrosion inhibitor effectiveness.
Perform an immediate fluid check if you experience any brake performance changes: spongy or soft pedal feel, illuminated brake warning lights, increased stopping distances, or unusual noises during braking. These symptoms often indicate fluid contamination or system leaks that require prompt attention.
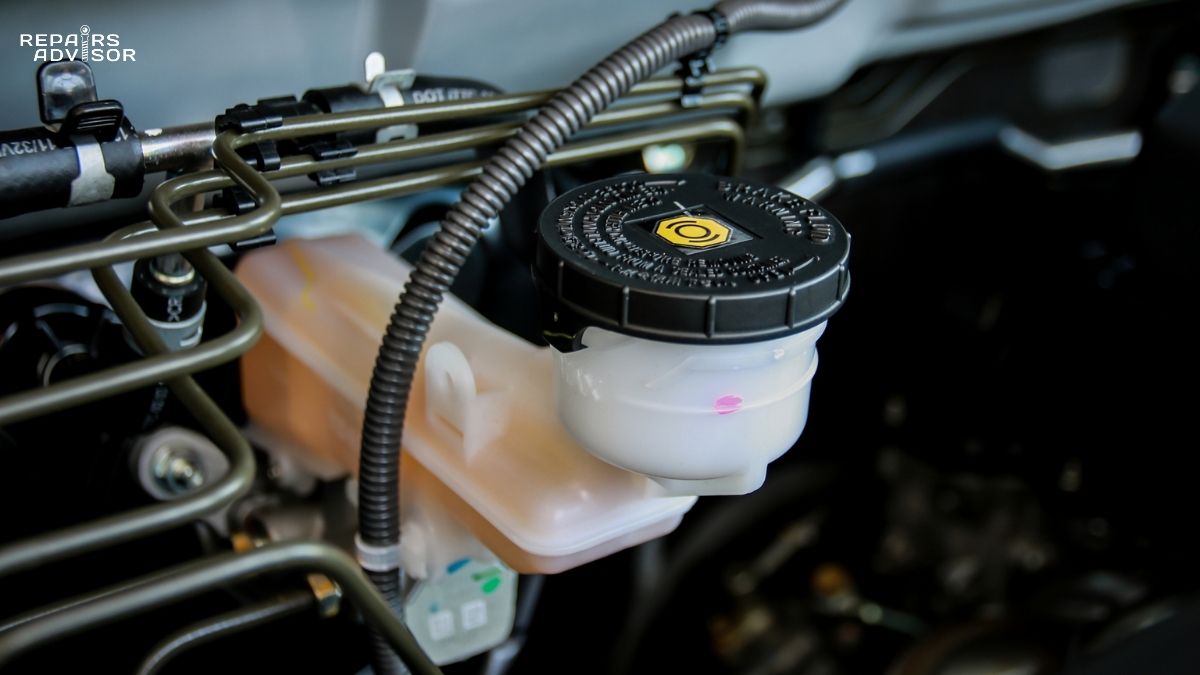
To check brake fluid level, park your vehicle on level ground with the engine off. Locate the master cylinder reservoir near the firewall at the rear of the engine bay, typically on the driver’s side though some vehicles place it on the passenger side. Wipe the reservoir exterior clean with a rag to prevent dirt from entering the system during any cap removal.
Most modern vehicles use translucent plastic reservoirs with MIN and MAX level markings visible on the exterior—you can check the fluid level without removing the cap. Older vehicles with metal reservoirs require removing the spring-loaded cap to see the “full” line inside. The fluid level should rest between the MIN and MAX marks. If the level approaches the MIN line, investigate the cause before simply topping off.
Low fluid levels indicate one of two conditions: worn brake pads that have caused caliper pistons to extend further, drawing more fluid into the system, or a brake system leak allowing fluid to escape. Never top off brake fluid without determining which condition exists. If brake pads are worn and due for replacement, the fluid level will return to normal after new pads are installed and pistons are pushed back into their bores. If a leak exists, adding fluid without repair simply delays the inevitable failure while putting you at risk of complete brake loss.
Fluid Testing Methods and Interpretation
Professional brake fluid testing provides objective measurements that visual inspection cannot deliver. Copper test strips cost just a few dollars and work by detecting copper ions dissolved in the brake fluid from corroded components. Dip the test strip in the reservoir fluid for 60 seconds, then compare the color against the chart provided with the test strips. Copper content exceeding 200 parts per million indicates the fluid’s corrosion inhibitors are exhausted—schedule fluid replacement immediately.
Moisture content test strips measure water percentage directly. These strips react to water in the fluid, changing color to indicate contamination levels. When moisture content exceeds three percent, the fluid has reached the end of its service life and requires replacement. Electronic brake fluid testers provide the most accurate assessment, measuring the actual boiling point of your brake fluid. These handheld devices cost $30-100 and give you precise data about thermal performance capability.
DIY visual assessment provides a quick preliminary evaluation. Fresh brake fluid appears clear to light amber, similar to vegetable oil in color and consistency. As the fluid ages and becomes contaminated, it darkens to light brown, then dark brown, and eventually black when severely degraded. Water contamination creates a milky or cloudy appearance. If visual inspection reveals anything other than clear to light amber fluid, schedule professional testing to determine if immediate replacement is necessary.
Brake Fluid Change Intervals and Service Requirements
Manufacturer recommendations for brake fluid change intervals vary by fluid type and expected vehicle use. DOT 3 fluid typically requires replacement every 2-3 years or 30,000-40,000 miles for everyday driving conditions. DOT 4 fluid absorbs moisture faster and needs changing every two years or 20,000-30,000 miles. DOT 5.1 high-performance fluid has the shortest service interval—every 1-2 years or 15,000-20,000 miles—despite its superior boiling point specifications. Even DOT 5 silicone fluid requires changing every 2-3 years because chemical degradation occurs over time regardless of moisture content.
Severe driving conditions warrant more frequent fluid changes. If you regularly tow heavy trailers, drive in mountainous terrain, or participate in track events, consider cutting the recommended intervals in half. High-performance driving subjects brake fluid to extreme thermal stress that accelerates chemical breakdown and contamination.
Manufacturer policies on brake fluid service vary considerably. Some Ford, GM, and Chrysler vehicles specify “lifetime fill” with premium fluids, though most technicians consider this optimistic and still recommend periodic changes. European manufacturers typically mandate two-year intervals regardless of mileage. Performance-oriented brands often specify annual changes for vehicles subjected to aggressive driving.
The best practice is following the specific recommendations in your vehicle owner’s manual. When the manual provides no guidance, follow the fluid manufacturer’s recommendations for your driving conditions and climate. Err on the side of more frequent changes—preventive maintenance costs far less than repairing damage from contaminated fluid.
Brake Bleeding: Process Overview and Professional Service
Brake bleeding becomes necessary whenever air enters the hydraulic system or when performing a complete fluid flush. Air in brake lines creates a compressible medium that causes spongy pedal feel and reduced braking force. Bleeding removes this air by forcing it out through bleeder valves while maintaining fluid pressure throughout the system.
Several bleeding methods exist, each with advantages and disadvantages. The two-person manual method has one person pump the brake pedal to build pressure while another opens bleeder valves sequentially, allowing fluid and air to escape. This traditional method works reliably but requires coordination and patience. Gravity bleeding opens bleeder valves and allows fluid to drip slowly through the system under its own weight—simple but extremely time-consuming, often requiring several hours.
Vacuum bleeding uses a vacuum pump to draw fluid through the system from each bleeder valve. This method works well for one person but can draw air past bleeder valve threads, creating deceptive bubble streams that don’t actually represent air in the brake lines. Pressure bleeding uses a pressurized tank connected to the master cylinder reservoir, forcing new fluid through the entire system. This professional method works quickly and effectively but requires expensive specialized equipment.
The bleeding sequence matters critically for effectiveness. Start with the wheel farthest from the master cylinder—usually the right rear—then work progressively closer. A typical sequence is right rear, left rear, right front, left front. This ensures air moves outward through the system rather than becoming trapped in intermediate locations.
During any bleeding procedure, maintaining fluid level in the master cylinder reservoir is absolutely critical. If the reservoir runs dry, air enters the master cylinder—potentially contaminating components that are extremely difficult to bleed properly. Check and refill the reservoir after bleeding each wheel. Use only fresh brake fluid from a newly opened container, as brake fluid absorbs moisture from air even sitting in an opened bottle.
Brake bleeding requires specific tools including properly sized bleeder wrenches, clear vinyl tubing, catch containers, and fresh brake fluid. ABS-equipped vehicles may require special procedures using diagnostic scan tools to cycle the ABS pump and valves, ensuring no air remains trapped in the hydraulic control unit. Given these complexities and the safety-critical nature of brake systems, professional brake fluid service is strongly recommended unless you have proper training, tools, and experience.
Professional brake fluid flush and bleeding typically costs $80-150, including labor, fluid, and system testing. This modest investment provides peace of mind that the job is done correctly with proper procedures, appropriate tools, and verification testing to ensure safe brake operation.
Safety Considerations for Brake Fluid Handling
Brake fluid presents serious safety hazards that demand respect and proper precautions. The fluid is extremely corrosive to automotive paint—spills must be wiped up immediately and flushed with water. Even small drops can strip paint down to bare metal within minutes. Keep a spray bottle of water and clean rags nearby whenever working with brake fluid.
Brake fluid is highly toxic if ingested. The glycol compounds taste sweet, making them attractive to children and pets—a dangerous combination that has caused numerous poisonings. Store brake fluid in its original sealed container in a locked cabinet away from children and pets. Never leave open containers unattended, and clean up any spills immediately.
The corrosive and toxic properties require personal protective equipment during any brake fluid service. Wear safety glasses or goggles to protect against splashes—brake fluid causes serious eye irritation and damage. Chemical-resistant gloves made of nitrile or neoprene protect your skin from prolonged contact that causes irritation and dryness. Long sleeves and pants provide additional protection against spills and splashes.
Work in a well-ventilated area to avoid prolonged exposure to brake fluid vapors, which can irritate respiratory passages. If brake fluid contacts your eyes, rinse immediately with water for at least 15 minutes and seek medical attention. If swallowed, do not induce vomiting—call poison control immediately as ingestion can cause kidney failure and death. If you inhale significant amounts of vapor and experience breathing difficulty, move to fresh air and seek medical attention.
Proper disposal is legally mandated because brake fluid is classified as hazardous waste. Never pour brake fluid down drains, on the ground, or mix it with other automotive fluids. Contaminating soil or groundwater creates environmental hazards and legal liability. Take used brake fluid to a hazardous waste collection facility or an auto parts store that offers recycling services. Many facilities accept used brake fluid free of charge as part of environmental protection programs.
Location, Access, and Maintenance Best Practices
Locating Brake Fluid System Components
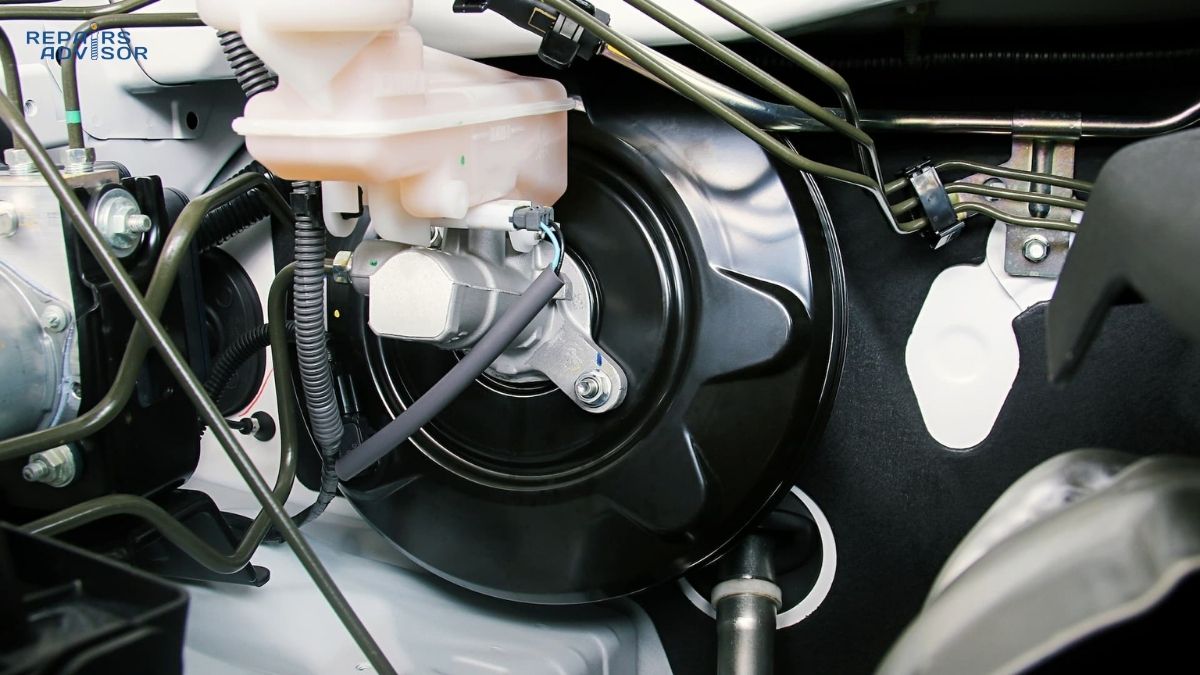
The master cylinder reservoir mounts on the firewall at the rear of the engine bay, visible when you open the hood. On most vehicles, you’ll find it on the driver’s side, though some manufacturers place it on the passenger side. The reservoir appears as a cylindrical or rectangular plastic or metal container with a screw-on cap marked with the brake fluid symbol—typically a yellow octagon containing a circle with brackets.
The reservoir connects directly to the brake booster, a large round canister mounted between the reservoir and the firewall. This integrated mounting makes visual identification straightforward. Look for the MIN and MAX level markings molded into translucent reservoirs or printed on metal ones. The cap displays the DOT specification your vehicle requires—never deviate from this specification.
Bleeder valves provide access points for brake fluid service at each wheel. On disc brake systems, you’ll find the bleeder valve on top of each brake caliper, typically protected by a small rubber dust cap. Drum brake systems have bleeder valves on the wheel cylinders accessed through the backing plate. Steel brake lines run along the vehicle frame or underbody, with flexible rubber hoses connecting to each wheel assembly.
DIY Capabilities vs. Professional Service Requirements
Intermediate-level DIY mechanics can safely perform certain brake fluid tasks. Checking fluid level and color takes just five minutes with no tools beyond a clean rag. Topping off the reservoir with the correct fluid type requires ten minutes and careful attention to the specification marked on the cap. Visual inspection for leaks and contamination takes about 15 minutes and can reveal problems before they become dangerous.
Testing brake fluid condition with test strips requires about 30 minutes and a test kit costing $15-30. These DIY-friendly tasks help you monitor brake system health and schedule professional service before problems become emergencies. However, they require following proper safety precautions including protective equipment and careful handling.
Professional service is mandatory for safety-critical brake work. Complete brake fluid flush requires specific tools, procedures, and expertise to avoid introducing air into the system. Brake bleeding after component repairs must follow precise sequences and techniques to ensure complete air removal. ABS system bleeding often requires diagnostic scan tools to cycle electronic components. Any internal brake hydraulic repairs involving the master cylinder, calipers, or brake lines should only be performed by qualified technicians.
Diagnosis of brake problems including spongy pedals, warning lights, or reduced performance requires specialized knowledge and diagnostic equipment. Attempting brake repairs without proper training and tools risks brake failure that could cause accidents, injuries, and legal liability. When in doubt, consult a professional—your life and the lives of others depend on reliable brakes.
Preventive Maintenance Schedule
Implement a systematic brake fluid maintenance schedule to maximize safety and minimize repair costs. Check fluid level monthly—this two-minute task can alert you to leaks or worn brake pads before they cause problems. Professional inspection annually should include copper content testing, moisture percentage measurement, and system leak inspection. Replace brake fluid according to manufacturer specifications, typically every 2-3 years or 20,000-40,000 miles depending on fluid type.
Address brake warning lights immediately—they indicate system malfunctions that require professional diagnosis. Monitor brake pedal feel continuously for changes that might signal developing problems. Spongy pedal feel, increased pedal travel, or reduced brake response all warrant immediate professional attention. Keep the master cylinder reservoir cap sealed tight between checks to minimize moisture absorption from the atmosphere.
Warning Signs Requiring Immediate Action
Certain symptoms demand immediate professional attention because they indicate serious brake system problems. A spongy or soft brake pedal feel indicates air or moisture contamination creating compressible pockets in the hydraulic system. If the brake pedal slowly sinks toward the floor when held under steady pressure, internal seal failure or severe contamination is present.
Illuminated brake warning lights on the dashboard signal system malfunctions detected by electronic monitoring. Longer stopping distances than normal indicate reduced hydraulic pressure or component wear. A burning smell from brakes suggests overheating from dragging calipers or boiling fluid. Visible fluid leaks near wheels or under the vehicle require immediate attention to prevent complete brake failure.
Dark or black brake fluid visible in the reservoir indicates severe contamination requiring immediate fluid replacement. Grinding, squealing, or unusual noises during braking often indicate brake pad wear but can also signal hydraulic problems. Never ignore these warning signs—brake failure can occur suddenly without additional warning.
Professional diagnosis typically costs $100-150 and can identify problems before they cause accidents or expensive repairs. Component repairs range from $200 for simple fixes to over $1,000 for major work involving corroded parts. These costs pale in comparison to the expense—financial and human—of brake failure causing an accident.
Conclusion: Brake Fluid Knowledge Empowers Safe Driving
Brake fluid serves as the vital hydraulic link between your brake pedal and your vehicle’s stopping power, transmitting hundreds of pounds of force through incompressible liquid under extreme conditions. Understanding DOT classifications, hygroscopic properties, and maintenance requirements empowers you to maintain safe, reliable braking performance throughout your vehicle’s service life.
The chemical differences between DOT 3, DOT 4, DOT 5, and DOT 5.1 aren’t academic trivia—they represent real performance variations that affect safety. Choosing the correct fluid type for your vehicle and driving conditions ensures your brakes can handle the thermal demands you place on them. Remember that DOT 5 silicone fluid cannot be mixed with glycol-based DOT 3, 4, or 5.1 fluids, and always verify the specification marked on your master cylinder reservoir cap.
Moisture contamination represents the primary enemy of brake fluid performance. Glycol-based fluids continuously absorb water from the atmosphere, progressively lowering boiling points and promoting corrosion throughout the hydraulic system. Dark, contaminated fluid or spongy brake pedals demand immediate attention—these symptoms indicate your brake system is approaching failure. Regular fluid changes costing around $100 every 2-3 years prevent moisture-related brake failures and corrosion damage that can exceed $1,000 to repair.
While checking fluid levels and performing visual inspections are DIY-friendly tasks, brake system work is safety-critical and best left to qualified professionals. Brake bleeding, component replacement, and system diagnosis require specialized knowledge, proper tools, and careful attention to procedures. The modest cost of professional brake service provides peace of mind that your braking system operates safely.
Implement a systematic maintenance schedule: check fluid monthly, obtain professional testing annually, and replace fluid according to manufacturer specifications. Address warning signs immediately—spongy pedals, warning lights, unusual noises, or visible leaks all indicate problems requiring prompt professional attention. Your braking system is too critical for your safety to risk improper maintenance.
For vehicle-specific brake system information, consult professional repair manuals for Ford, Toyota, Chevrolet, and Honda vehicles. Understanding related components including brake-by-wire systems, parking brakes, and brake proportioning valves provides comprehensive knowledge of modern braking technology.
If you experience any brake issues whatsoever—spongy pedals, warning lights, unusual noises, reduced performance, or visible leaks—seek immediate professional inspection. Brake system failures can be catastrophic, occurring with little warning when contaminated fluid reaches its limits during heavy braking. Don’t gamble with your safety or the safety of others on the road. A $100 brake fluid service today prevents accidents tomorrow.