Modern vehicles weighing 3,000 to 6,000 pounds require immense force to bring them to a safe stop. Before brake boosters became standard equipment in the 1960s, drivers had to apply 100 pounds or more of pedal force to achieve adequate braking—a physically demanding and tiring task, especially in stop-and-go traffic or emergency situations. The brake booster revolutionized automotive safety by multiplying the driver’s pedal input by three to six times, making effortless braking possible for everyone from a 120-pound driver to professional truck operators.
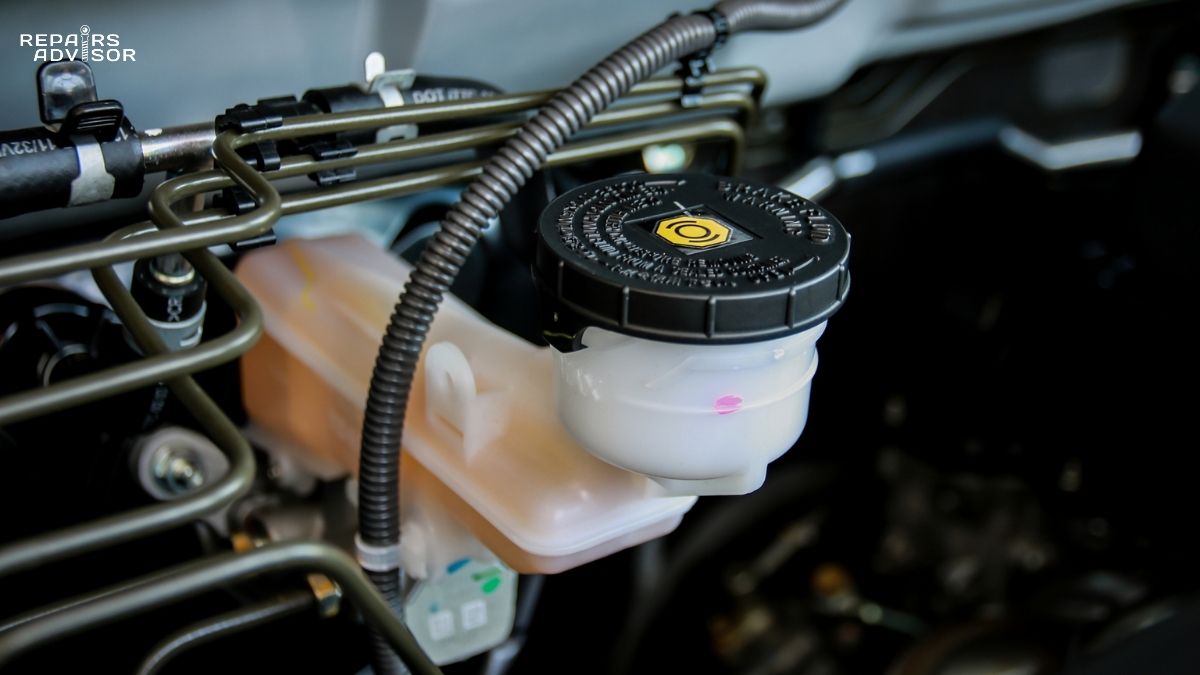
The brake booster, also called a vacuum brake booster or power brake unit, sits between the brake pedal linkage and the master cylinder mounted on your vehicle’s firewall. This critical component uses engine vacuum, hydraulic pressure, or electric motors to amplify your 40-60 pound pedal effort into 200-300 pounds of force at the master cylinder piston. Without this power assist, modern disc brake systems would be nearly impossible to operate effectively—the clamping force required to stop a vehicle equipped with four-wheel disc brakes far exceeds what most drivers could physically generate through pedal pressure alone.
Understanding how your brake booster works helps you recognize warning signs of failure before they compromise your safety. This comprehensive guide explains the three types of brake boosters (vacuum, hydraulic, and electric), details the operation of vacuum brake boosters found in 75% of vehicles, covers common failure symptoms, provides DIY testing procedures, and discusses when professional service is essential. Whether you’re an intermediate DIY enthusiast maintaining your own vehicle, a professional technician diagnosing brake problems, or a beginner learning about automotive systems, you’ll gain practical knowledge about this essential safety component.
Critical Safety Note: Brake booster failure makes your vehicle extremely difficult to stop and creates immediate safety hazards. If you experience a hard brake pedal, increased stopping distance, hissing sounds when braking, or engine stalling when you apply the brakes, have your vehicle inspected by a qualified technician immediately. While your brakes will still function mechanically with a failed booster, the excessive pedal force required makes emergency stops dangerous and unpredictable.
Understanding Brake Booster Function and Types
The primary function of any brake booster is to amplify the driver’s pedal force before it reaches the master cylinder. Located on the firewall between the brake pedal linkage inside the cabin and the master cylinder in the engine compartment, the booster acts as a force multiplier—transforming your moderate 40-60 pound pedal pressure into 200-300 pounds (or more) of force pushing the master cylinder piston. This amplification allows the master cylinder to generate sufficient hydraulic pressure—typically 800-1,200 psi—to activate the brake calipers or wheel cylinders at each corner of your vehicle.
Three distinct types of brake boosters are used in modern vehicles, each employing different power sources to provide braking assistance. Understanding these differences helps you recognize which system your vehicle uses and what diagnostic procedures apply to your specific configuration.
Vacuum Brake Boosters: The Industry Standard
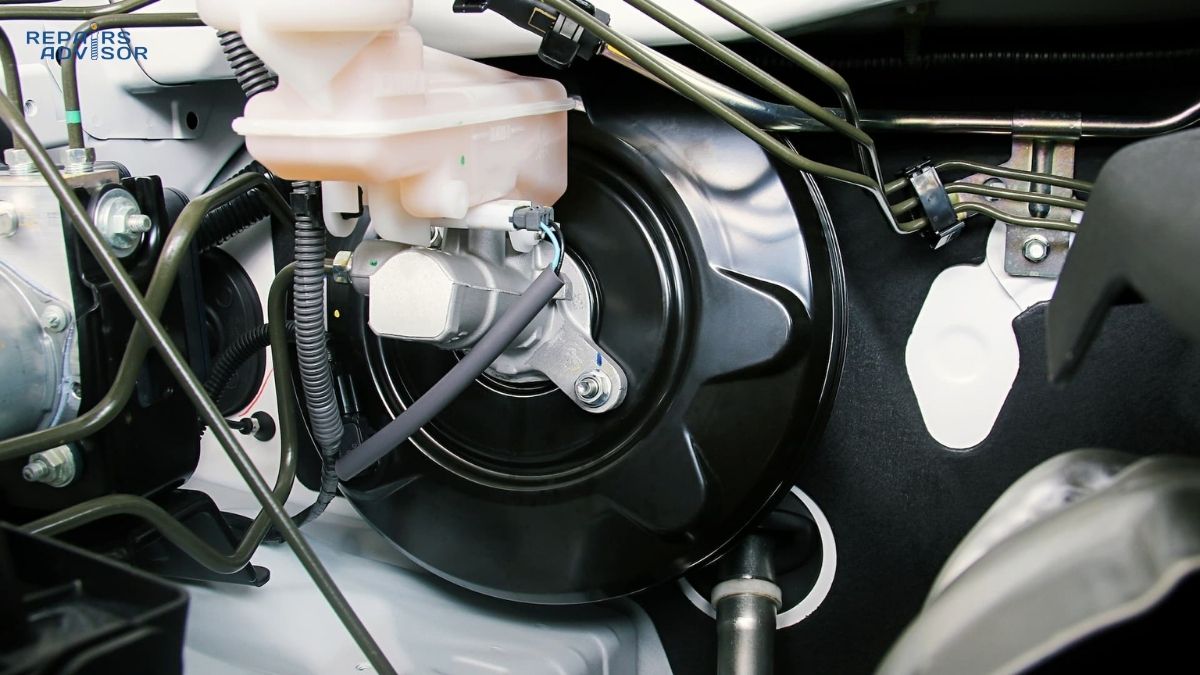
Vacuum brake boosters represent approximately 75% of all brake assist systems in passenger vehicles and light trucks. These units use the vacuum naturally created by your engine’s intake manifold to generate a pressure differential across a large diaphragm. The typical vacuum booster appears as a round black or silver canister, 6-10 inches in diameter and 3-5 inches thick, mounted prominently on the firewall with the master cylinder bolted to its front face.
Inside the booster housing, a flexible rubber diaphragm divides the unit into two chambers. During normal operation, engine vacuum (typically 17-21 inches of mercury) is pulled through a vacuum hose and check valve into both chambers, creating equal low pressure on both sides of the diaphragm. When you press the brake pedal, a control valve opens the rear chamber to atmospheric pressure (14.7 psi at sea level) while maintaining vacuum in the front chamber. This pressure differential—usually about 10 psi—acts on the large diaphragm surface area (50-80 square inches), generating hundreds of pounds of additional force that pushes the master cylinder piston.
The vacuum check valve serves a critical safety function by maintaining a reserve of vacuum in the booster even after the engine stops. This one-way valve allows air to be sucked out of the booster but prevents atmospheric air from flowing back in. A properly functioning check valve provides two to three power-assisted brake applications after engine shutdown, which is essential if your engine stalls while driving or if you need to move the vehicle with the engine off.
Vacuum brake boosters offer several advantages that explain their widespread adoption: they’re mechanically simple with few moving parts, lightweight compared to hydraulic systems, cost-effective to manufacture, and highly reliable with typical service lives of 150,000 miles or 10-15 years. However, they do have limitations—vacuum boosters require adequate engine vacuum to function, which can be problematic on diesel engines (which don’t naturally create intake vacuum), turbocharged engines at boost, and some modern gasoline engines with variable valve timing. In these applications, an electric vacuum pump supplements the natural engine vacuum.
Beginner Note: Think of a vacuum brake booster like a see-saw where one side (atmospheric pressure) is much heavier than the other side (vacuum). When you press the brake pedal, you’re tipping this see-saw to let the heavy side (atmospheric air pressure) push down on a large lever (the diaphragm), which multiplies your pedal effort many times over.
Hydraulic Brake Boosters: Power Steering Integration
Hydraulic brake boosters, commonly called “hydro-boost” systems, use pressurized hydraulic fluid from your vehicle’s power steering pump instead of engine vacuum. These compact units fit in the same location as vacuum boosters but operate on an entirely different principle. When you press the brake pedal, a spool valve inside the hydro-boost unit directs high-pressure power steering fluid (typically 1,000-1,500 psi) into a chamber containing a power piston. This hydraulic pressure pushes the piston forward, which in turn pushes the master cylinder piston, providing brake assist.
Hydro-boost systems include an accumulator—a nitrogen-charged pressure vessel that stores hydraulic energy. If the power steering pump fails or the drive belt breaks, the accumulator provides sufficient pressure for several power-assisted brake applications, similar to how a vacuum booster’s check valve maintains a vacuum reserve. Some advanced hydro-boost systems use dual accumulators for extended reserve capacity.
These hydraulic systems are standard equipment on most diesel-powered trucks and SUVs (Ford F-Series Super Duty, Chevrolet Silverado HD, RAM heavy-duty trucks) because diesel engines don’t create intake vacuum. They’re also found on some high-performance vehicles where the boost pressure from turbochargers or superchargers reduces available engine vacuum. Hydro-boost provides significantly more assist than vacuum systems—up to 2,000 psi of hydraulic force—which is why heavy-duty trucks with massive brake systems rely on this technology.
The main disadvantage of hydro-boost is its dependency on the power steering system. If your power steering pump fails or the drive belt breaks, you’ll lose both power steering and brake assist simultaneously. Additionally, hydro-boost units are heavier, more complex, and more expensive than vacuum boosters, and they require special procedures for bleeding air from the system during service.
Professional Insight: When diagnosing brake problems on hydro-boost equipped vehicles, always check the power steering fluid level and condition first. Low fluid, aerated fluid, or contamination from a failed brake booster can cause both steering and braking symptoms. If you’re replacing a hydro-boost unit, it’s strongly recommended to flush the entire power steering system to remove any debris that may have circulated.
Electric and Electronic Brake Boosters: The Future of Braking
Electric brake boosters represent the newest evolution in brake assist technology, becoming increasingly common on hybrid vehicles, electric vehicles, and newer luxury cars. These systems use an electric motor to create hydraulic pressure instead of relying on engine vacuum or power steering pump pressure. The most recognizable is Bosch’s “iBooster,” which combines an electric motor, ball screw mechanism, and integrated electronic control unit in a compact package.
Electronic brake boosters offer several compelling advantages for modern vehicles. They operate completely independently of the engine or power steering system, making them ideal for electric vehicles that have no engine vacuum and electric power steering that eliminates a hydraulic pump. They provide precise, repeatable brake assist that can be modulated in milliseconds by electronic control systems. This precision enables advanced safety features like automatic emergency braking, adaptive cruise control with stop-and-go capability, and seamless integration with regenerative braking systems that recover energy during deceleration.
“Brake-by-wire” represents the most advanced implementation, where there’s no direct mechanical connection between your brake pedal and the brake calipers. Instead, sensors measure pedal position and force, an electronic control unit calculates the required braking effort, and electro-hydraulic actuators apply the brakes at each wheel. These systems are tightly integrated with ABS, traction control, and electronic stability control, enabling advanced vehicle dynamics control.
The primary limitations of electric brake boosters are their higher initial cost and complexity. They require electrical power to operate and use sophisticated electronic control modules that require specialized diagnostic equipment for troubleshooting. However, as vehicles become increasingly electrified and automated, electric brake boosters are rapidly becoming the industry standard for new vehicle designs.
Vacuum Brake Booster Components and Construction
Understanding the components inside a vacuum brake booster reveals how this elegant mechanical device can multiply your pedal force so effectively. While vacuum boosters are sealed units that shouldn’t be disassembled outside a specialized rebuild facility, knowing their internal construction helps you diagnose problems and understand operation.
External Components You Can See
The most visible part of the brake booster is its housing—a cast iron or aluminum shell formed in two halves and either welded or crimped together. This sealed canister is typically 7-10 inches in diameter depending on vehicle size, with larger boosters on trucks and SUVs. The housing is painted or powder-coated for corrosion protection and has several external features:
The vacuum hose connection on the booster’s face connects to your engine’s intake manifold via a rubber vacuum hose. This fitting incorporates the check valve (sometimes the check valve is separate in the hose) that maintains vacuum reserve. The pushrod extends from the rear of the booster into the cabin where it connects to the brake pedal linkage through a clevis pin or threaded rod. On the front face, a second pushrod extends into the master cylinder, and this pushrod length is precisely adjusted during installation. Four mounting studs project from the booster’s rear flange, passing through the firewall where nuts secure the unit—these studs also hold the master cylinder, creating a compact, integrated assembly.
The check valve deserves special attention as it’s often the only serviceable component on a vacuum booster. This one-way valve allows air to flow from the booster toward the intake manifold but prevents air from flowing back toward the booster. Inside the valve, a spring-loaded rubber disc or ball seals against a seat when atmospheric pressure tries to enter. Quality check valves can hold vacuum for days or weeks without leakage, while failed valves lose vacuum within minutes, resulting in a hard brake pedal on the first application after the engine has been off.
Internal Components and Their Functions
Inside the sealed housing, the diaphragm is the heart of the vacuum booster’s operation. This large circular membrane, typically 6-9 inches in diameter, is made from reinforced rubber compound designed to remain flexible across a temperature range from -40°F to 250°F. The diaphragm divides the booster into two chambers: the front vacuum chamber (closest to the master cylinder) and the rear working chamber (closest to the brake pedal). A steel diaphragm plate is bonded to the rubber diaphragm, providing structural rigidity and a mounting point for the pushrod assembly.
The control valve is a sophisticated valve assembly built into the center of the diaphragm plate where the pedal pushrod passes through. This valve has two operating positions: vacuum mode and boost mode. In vacuum mode (brakes not applied), the valve connects both chambers to vacuum, equalizing pressure. In boost mode (brakes applied), the valve closes the vacuum port and opens an atmospheric port, allowing outside air to enter the rear chamber. The valve modulates continuously as you vary pedal pressure, providing smooth, progressive brake assist.
A return spring—usually a large coil spring—sits in the front vacuum chamber, compressed between the booster housing and the diaphragm plate. This spring pushes the diaphragm back to its rest position when you release the brake pedal, ensuring the control valve returns to vacuum mode. Spring force must be carefully calibrated—too weak and the brakes might drag, too strong and pedal feel becomes abnormal.
The reaction disc is a small rubber disc that fits between the booster’s output pushrod and the master cylinder piston. As hydraulic pressure builds in the master cylinder, it pushes back against the booster pushrod. The reaction disc deforms slightly under this load, transmitting proportional feedback pressure to your foot through the pedal linkage. This “pedal feel” is essential for smooth brake modulation—without it, braking would feel like an on/off switch.
An air filter protects the atmospheric valve inlet, preventing dust and debris from entering the booster during the millions of brake applications over its lifetime. This filter is typically a small foam element or sintered metal disc.
Single Diaphragm vs. Dual Diaphragm Designs
Standard vacuum boosters use a single diaphragm that’s adequate for passenger cars and light trucks. The larger the diaphragm diameter, the more force it can generate from a given pressure differential. However, there’s a practical limit to booster size—making the unit too large creates packaging problems in the engine compartment and increases weight.
Dual diaphragm boosters, also called tandem vacuum brake boosters, overcome this limitation by using two diaphragms arranged in series within a slightly longer housing. Each diaphragm operates independently, but their forces add together. This design effectively doubles the surface area available for vacuum to act upon without significantly increasing the booster’s diameter. Dual diaphragm units can provide 30-50% more braking assistance than single diaphragm boosters of the same diameter.
You’ll find dual diaphragm boosters on:
- Full-size trucks and SUVs (Ford F-150, Chevrolet Silverado 1500, RAM 1500)
- Performance vehicles with upgraded brake systems
- Vehicles designed for towing heavy trailers
- Aftermarket brake upgrades for classic cars and hot rods
The trade-off is increased complexity, weight (an extra 2-3 pounds), and cost. For most passenger vehicles, a well-designed single diaphragm booster provides sufficient assistance.
Professional Note: When replacing a vacuum booster, the pushrod length adjustment is critical. The pushrod must be set precisely so there’s minimal clearance (0.005-0.015 inches typical) between the pushrod and master cylinder piston when the brakes are released. Too much clearance creates excessive pedal travel before the brakes engage. Too little clearance (or interference) prevents the master cylinder from fully releasing, causing constant brake drag, overheating, and premature wear. Always consult the vehicle-specific service manual for proper adjustment procedures.
How Vacuum Brake Boosters Work: Step-by-Step Operation
The vacuum brake booster’s operation cycle involves four distinct phases: rest, apply, hold, and release. Understanding each phase reveals the elegant simplicity of this force multiplication system.
Rest Position: Equal Vacuum on Both Sides
When you’re not pressing the brake pedal, the vacuum brake booster sits in its rest or equilibrium state. Your engine’s intake manifold creates a strong vacuum—typically 17-21 inches of mercury (in Hg) at idle, equivalent to about 8-10 psi below atmospheric pressure. This vacuum flows continuously through the vacuum hose and check valve into the front chamber of the booster. The control valve, in its neutral position, connects the rear chamber to the front chamber, allowing vacuum to flow throughout the entire booster.
With equal vacuum on both sides of the diaphragm, there’s no pressure differential and thus no force trying to move the diaphragm. The return spring holds the diaphragm plate in its rearward position, keeping the booster pushrod slightly retracted from the master cylinder piston. No force is being applied to the master cylinder, and no pressure exists in the brake fluid system beyond the residual pressure needed to keep seals expanded.
This rest state is maintained continuously while driving—whether you’re cruising on the highway or sitting at a stoplight, the booster chambers remain under vacuum, ready to provide instant assist the moment you touch the brake pedal. The check valve ensures that vacuum is maintained even during brief periods of lower engine vacuum, such as during wide-open-throttle acceleration when intake manifold pressure rises.
Brake Application: Creating the Pressure Differential
The moment you press down on the brake pedal, the pedal pushrod moves forward into the booster, pushing against the control valve assembly in the center of the diaphragm plate. This initial movement of about 1/8 to 1/4 inch accomplishes two critical actions nearly simultaneously.
First, the control valve closes the passage between the front and rear chambers, isolating the rear chamber from the vacuum source. The front chamber remains connected to engine vacuum and stays at low pressure (5-7 psi absolute). Second, continued pedal movement opens the atmospheric valve, allowing outside air at normal atmospheric pressure (14.7 psi at sea level) to rush into the now-isolated rear chamber behind the diaphragm.
This creates a pressure differential across the diaphragm—approximately 10 psi difference between the 14.7 psi atmospheric pressure in the rear chamber and the 5-7 psi vacuum pressure in the front chamber. While 10 psi may not sound like much, when you multiply it by the diaphragm’s surface area, the resulting force is substantial. A typical passenger car booster with a 7-inch diameter diaphragm has about 38 square inches of effective area. Using the formula Force = Pressure × Area:
Force = 10 psi × 38 square inches = 380 pounds of assist
Larger vehicles with 9-inch boosters generate even more force: Force = 10 psi × 63 square inches = 630 pounds of assist
This vacuum-generated force pushes the diaphragm plate forward, which pushes the booster output pushrod forward into the master cylinder piston. Your modest 50-pound pedal effort, combined with the booster’s 380-630 pounds of assist, results in total force of 430-680 pounds being applied to the master cylinder—a force multiplication of 8-13 times your input.
The master cylinder converts this mechanical force into hydraulic pressure, sending brake fluid through the brake lines at 800-1,200 psi to actuate the disc brake calipers or drum brake wheel cylinders at each corner of your vehicle.
Pedal Modulation and Progressive Control
One of the vacuum booster’s most important features is its ability to provide smooth, progressive brake modulation that allows you to control deceleration precisely. This isn’t a simple on/off switch—the control valve responds continuously to changes in pedal pressure, varying the amount of atmospheric air entering the rear chamber.
When you press the pedal lightly for gentle braking, the control valve opens the atmospheric valve just slightly, allowing a small amount of air to enter the rear chamber. This creates a modest pressure differential and proportionally modest boost force. As you increase pedal pressure, the valve opens wider, more air rushes in, the pressure differential increases, and boost force increases proportionally.
The reaction disc plays a crucial role in this modulation. As braking force increases and hydraulic pressure builds in the master cylinder, this pressure pushes back against the booster’s output pushrod. The rubber reaction disc compresses slightly under this load, and this compression is transmitted through the valve assembly back to your foot on the pedal. You feel this as increasing pedal resistance—the harder you brake, the firmer the pedal feels. This feedback gives you a natural sense of how much braking force you’re generating, allowing you to modulate smoothly without constantly watching your speed or feeling jerky deceleration.
Advanced modern vehicles integrate the vacuum booster with electronic brake control systems. The ABS system can rapidly pulse hydraulic pressure to individual wheels during emergency braking, preventing wheel lockup while the booster maintains steady assist. Traction control uses the booster to apply braking to a spinning wheel without any pedal input from the driver. Electronic stability control can simultaneously brake individual wheels and reduce engine power to help maintain vehicle control during emergency maneuvers—all while the vacuum booster continues providing power assist for driver-initiated braking.
Brake Release: Return to Equilibrium
When you release pressure on the brake pedal, the pedal linkage, return springs, and master cylinder piston springs push the pedal pushrod back out of the booster. This rearward movement of the control valve reverses the valve positions: the atmospheric valve closes, sealing off the rear chamber from outside air, while the vacuum valve opens, reconnecting the rear chamber to the front chamber and thus to engine vacuum.
Vacuum from the front chamber rushes into the rear chamber through the now-open passage, quickly equalizing pressure on both sides of the diaphragm. With no pressure differential, there’s no force pushing the diaphragm forward. The return spring pushes the diaphragm plate backward to its rest position, which pulls the booster output pushrod away from the master cylinder piston.
This pushrod retraction allows the master cylinder piston to return to its rest position, releasing hydraulic pressure in the brake lines. The brake calipers and drum brake wheel cylinders release, allowing the brake pads and shoes to retract slightly from the rotors and drums, restoring free wheel rotation.
The entire release process happens nearly instantaneously—within a fraction of a second—so that repeated brake applications in traffic or emergency situations receive full power assist every time. The vacuum reservoir maintained by the check valve ensures consistent performance even during rapid brake cycling.
Check Valve Operation and Reserve Capacity
The vacuum check valve serves as a critical safety backstop for the brake booster system. This one-way valve allows vacuum to be pulled from the booster toward the intake manifold, but prevents atmospheric pressure from flowing backward into the booster when engine vacuum drops or the engine stops.
During normal operation, any time the pressure in the rear chamber is higher than in the vacuum line (which occurs during brake application when atmospheric air enters), the check valve opens slightly to allow air to flow out toward the intake manifold. This helps evacuate the rear chamber more quickly when you release the brakes. When engine vacuum is strong, the check valve remains open continuously, maintaining maximum vacuum in both booster chambers.
The valve’s safety function becomes critical when the engine stalls or is turned off. The moment engine vacuum drops, the check valve’s spring-loaded disc or ball seats firmly against its sealing surface, trapping vacuum inside the booster. A quality check valve can maintain this vacuum reserve for days or even weeks without significant leakage.
This reserve vacuum provides two to three power-assisted brake applications after the engine stops—enough to bring the vehicle to a safe stop if the engine stalls while driving, or to move the vehicle with the engine off during maintenance procedures. On the first brake application after engine shutdown, you’ll get full assist as the trapped vacuum provides the pressure differential. The second application will feel slightly firmer as atmospheric air has now entered the rear chamber and can’t be evacuated without engine vacuum. By the third application, most of the vacuum reserve is depleted, and you’ll need to use full manual braking force.
If your check valve fails, you’ll typically notice that the very first brake application after starting the engine feels hard, requiring excessive pedal effort. Once the engine is running and rebuilding vacuum, subsequent applications feel normal. This immediate hard pedal on the first application is a telltale sign of a failed check valve that’s allowing vacuum to leak out when the engine is off.
Beginner Note: Think of the brake booster like an air compressor tool. The engine acts like the compressor, constantly building up “stored pressure” (actually stored vacuum) in the booster’s tank. When you press the brake pedal, you’re like pulling the trigger on an air tool—you use a little effort, but the stored pressure does most of the work. The check valve is like a one-way valve that keeps the pressure stored in the tank even when the compressor (engine) stops running.
Common Brake Booster Failure Symptoms and Testing
Brake booster failures are relatively rare compared to other brake components, but when they do occur, the symptoms are usually dramatic and immediately noticeable. Recognizing these warning signs early prevents dangerous situations and allows you to seek professional service before complete failure occurs.
Hard Brake Pedal: The Primary Symptom
The most common and obvious sign of brake booster failure is a hard brake pedal that requires excessive physical force to achieve normal braking. While your brakes will technically still function—there’s a mechanical connection from pedal to master cylinder—you’ll need to press much harder to generate adequate stopping power. What normally requires 40-60 pounds of effort might now demand 100-150 pounds or more, making normal braking tiring and emergency stops extremely difficult, especially for smaller drivers.
The hardness may develop gradually over weeks as a diaphragm slowly tears or seals deteriorate, or it can appear suddenly if a major component fails. You might notice that the first brake application after starting the engine feels okay, but subsequent applications feel progressively harder—this pattern suggests the booster is losing vacuum between applications and can’t rebuild reserve quickly enough.
In some cases, the pedal feels hard immediately upon starting the engine but improves after a few seconds once vacuum builds up. This specific symptom usually indicates a failed check valve that’s allowing vacuum to leak out when the engine is off, rather than a booster failure.
Safety Warning: A hard brake pedal is an immediate safety concern. While you can still stop the vehicle using manual braking force alone, the excessive effort required makes emergency stops unpredictable and dangerous. Have your vehicle towed or carefully driven to a repair facility at low speed, avoiding highways and heavy traffic.
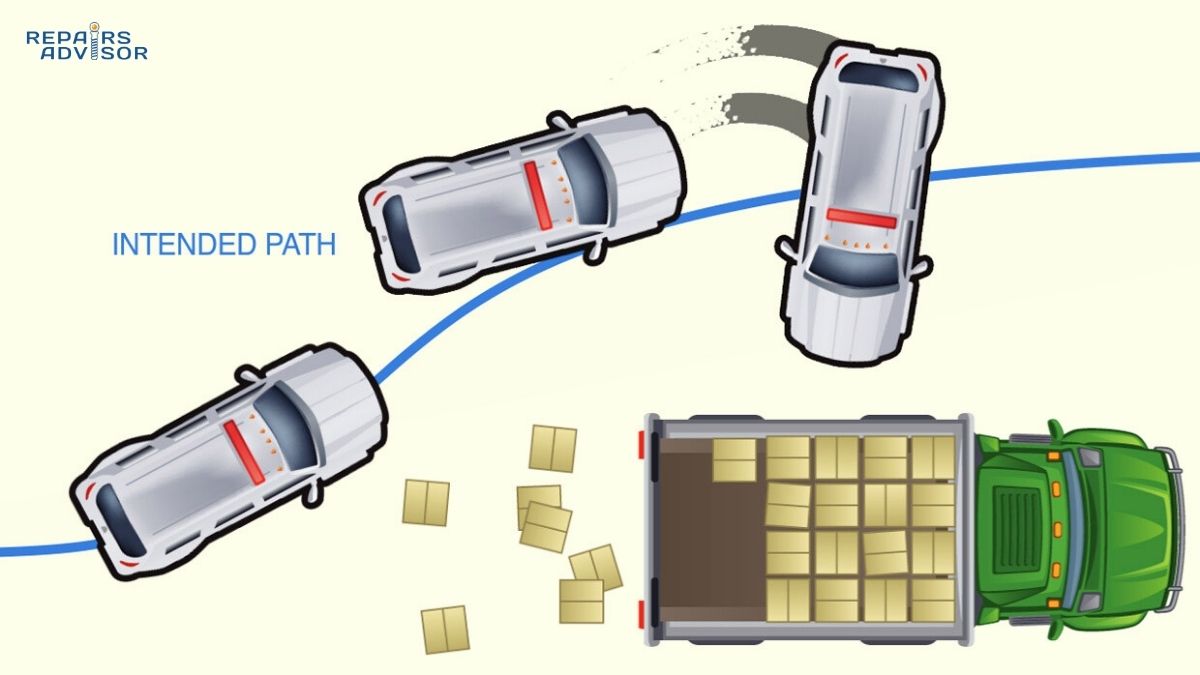
Increased Stopping Distance
When your brake booster isn’t providing proper assist, you’ll notice that your vehicle takes longer to stop than normal—often 30-50% more distance. This happens because most drivers subconsciously expect a certain pedal pressure to produce a certain deceleration rate. When the booster fails, that same pedal pressure generates much less braking force, resulting in weaker braking.
This symptom is particularly dangerous because it may not be immediately obvious during casual driving. You might attribute slightly longer stopping distances to worn brake pads, different road conditions, or just imagination. The danger manifests in emergency situations when you expect your normal hard brake application to produce emergency stopping power, but the failed booster means you’re not generating enough force quickly enough to avoid a collision.
If you notice you’re braking earlier for stops, the brake pedal doesn’t seem as responsive as it used to, or you had a close call where the vehicle didn’t slow as quickly as expected, have your brake system inspected immediately. Don’t wait for the problem to worsen.
Hissing Sound When Braking
A hissing noise that occurs when you press the brake pedal—often described as sounding like air leaking from a tire—indicates a vacuum leak in the brake booster system. The hissing may come from the brake pedal area inside the cabin, from under the hood near the booster, or from both locations. The sound occurs because high-pressure atmospheric air is leaking into the vacuum side of the booster through a tear in the diaphragm, failed seal, or cracked housing.
This vacuum leak doesn’t just affect braking—it also disrupts engine operation by allowing unmeasured air into the intake system. You might experience rough idle, higher-than-normal idle RPM, or difficulty maintaining steady engine speed. The leak essentially creates a large vacuum leak on the intake manifold, confusing the engine management system’s calculations of air-fuel mixture.
In some cases, you’ll only hear the hiss when you first press the brake pedal (the initial rush of air equalizing pressure), but not during sustained brake application. In other cases, the hiss continues as long as you hold the pedal down. Either pattern indicates a problem requiring immediate attention—driving with a severe vacuum leak can damage your engine over time by running too lean (too much air, not enough fuel).
Engine Stalling or Rough Idle When Braking
When the brake booster’s internal diaphragm tears or seals fail catastrophically, atmospheric air can flood into the engine’s intake manifold when you apply the brakes. This massive, sudden vacuum leak overwhelms the engine management system’s ability to compensate, causing the engine to stall when you press the brake pedal. You might also experience severely rough idle, engine shuddering, or a noticeable drop in idle speed when the brakes are applied.
This symptom is more common on older vehicles without sophisticated electronic engine management. Modern engines with closed-loop fuel control and idle speed compensation can usually maintain running despite vacuum leaks, though you’ll see increased idle RPM and may trigger a check engine light with diagnostic codes for “vacuum leak” or “system too lean.”
If your engine stalls when braking, you’ve lost both engine vacuum (which the booster needs) and power steering assist (on vehicles with hydraulic power steering). This creates a compound emergency—you have no power brakes and you must wrestle with manual steering to get to safety. If you experience this symptom, pull over immediately to a safe location and have the vehicle towed.
Abnormal Brake Pedal Position
A brake booster with an internal imbalance may cause the brake pedal to sit higher than normal, or the pedal may not return fully to its rest position after you release it. This happens when pressure differential across the diaphragm is incorrect, holding the diaphragm and pushrod in a partially extended position. You might find the pedal sitting 1-2 inches higher than you’re used to, requiring you to lift your foot awkwardly high before pressing down.
Alternatively, some booster failures cause the pedal to feel “spongy” or soft, sinking slowly toward the floor under steady pressure. This symptom can be confusing because soft pedal usually indicates air in the brake lines or a master cylinder problem, not a booster issue. However, certain booster failures—particularly where the reaction disc has deteriorated—can produce this feel.
Any significant change in brake pedal height, feel, or return characteristics warrants immediate inspection. Brake pedal behavior is so consistent that any deviation likely indicates a problem somewhere in the system.
DIY Testing Procedures for Intermediate DIY Enthusiasts
You can perform three simple tests at home with no special tools to determine whether your brake booster is functioning properly. These tests are safe, require no disassembly, and take only a few minutes.
Test 1: Static Vacuum Test (Engine Off Method)
This test checks whether the booster can provide assist when vacuum is applied.
- With the engine completely off, pump the brake pedal firmly 5-6 times to fully evacuate any vacuum remaining in the booster. You should feel the pedal get progressively firmer with each pump as vacuum depletes.
- After evacuating vacuum, press down firmly on the brake pedal and hold moderate, steady pressure—about 40-50 pounds of force.
- While holding the pedal down, start the engine and let it idle.
- If the booster is working properly: The moment the engine starts and creates vacuum, you’ll feel the brake pedal drop or sink 1/4 to 1/2 inch beneath your foot. This pedal drop is caused by vacuum suddenly assisting your effort, requiring less force to hold the same master cylinder pressure. The pedal will then feel slightly softer or more responsive as the booster provides assist.
- If the booster is failing: The pedal will remain rock-hard with no drop or change in feel when the engine starts. This indicates the booster cannot create a pressure differential to provide assist.
Test 2: Vacuum Reserve Test
This test checks whether the check valve is maintaining vacuum reserve for power-assisted stops after engine shutdown.
- Start the engine and let it idle for at least 60 seconds to build full vacuum in the booster.
- Turn the engine off completely.
- Wait 30-60 seconds, then slowly and deliberately pump the brake pedal, counting each application.
- If the system is working properly: The first brake application will feel normally light and responsive—vacuum assist is working. The second application will feel slightly firmer but still assisted. The third application will feel noticeably firmer with less assist. By the fourth or fifth application, the pedal should feel fully manual with no assist at all.
- If the check valve is failing: All applications feel hard immediately, indicating the check valve isn’t holding vacuum reserve. Even the first application after engine shutdown requires full manual effort.
- If the booster diaphragm is leaking: You might get one assisted application, but subsequent applications become hard very quickly as vacuum leaks away.
This progressive increase in pedal effort over several applications is normal and demonstrates proper check valve function. The reserve exists as a safety feature for emergency stops if your engine stalls.
Test 3: Check Valve Physical Test
This test directly evaluates the check valve’s one-way operation.
- Locate the vacuum check valve—it’s either built into the booster’s vacuum port or installed in-line in the vacuum hose between the booster and intake manifold.
- Disconnect the vacuum hose from the intake manifold side of the check valve (leave it connected to the booster).
- Try to blow air through the check valve toward the booster. With a good check valve: You should NOT be able to blow air through. The valve should seal completely, preventing air flow.
- Try to suck air through the check valve in the opposite direction (away from the booster). With a good check valve: Air should flow freely with minimal resistance.
- If you can blow air through toward the booster: The check valve has failed and must be replaced. It’s no longer preventing atmospheric air from entering when the engine is off.
Replacing just the check valve is inexpensive ($10-30) and straightforward, requiring only basic hand tools. If the test confirms check valve failure but your booster otherwise works properly, this simple replacement may solve your hard pedal problem.
When Professional Diagnosis Is Required
While these DIY tests can identify obvious booster failures, subtle problems require professional diagnosis with specialized equipment. Take your vehicle to a qualified technician if:
- Test results are inconclusive or inconsistent
- You hear hissing but can’t locate the source
- The check engine light is illuminated with lean fuel mixture codes
- You experience any combination of symptoms (hard pedal plus engine stalling, etc.)
- Symptoms occur only under specific conditions (cold weather, after sitting overnight, during highway driving)
Professional technicians can perform vacuum gauge testing to measure actual vacuum levels (should be 17-21 inches Hg at idle), leak-down testing to quantify vacuum loss rates, and comprehensive brake system inspection to rule out other components causing similar symptoms. For vehicles with hydro-boost systems, specialized hydraulic pressure testing equipment is required to diagnose assist problems.
Professional Note: When diagnosing hard pedal complaints, always verify adequate vacuum supply before condemning the booster. Check for vacuum leaks elsewhere on the engine, verify the vacuum hose is correctly routed and not collapsed, and measure intake manifold vacuum with a gauge. Many technicians have replaced perfectly good boosters when the actual problem was inadequate engine vacuum from another source.
Brake Booster Replacement and Maintenance
Brake boosters are designed as lifetime components requiring no routine maintenance under normal circumstances. However, age-related wear, contamination, or failure eventually necessitates replacement. Understanding when replacement is necessary, what the process involves, and realistic cost expectations helps you make informed service decisions.
When Brake Booster Replacement Is Necessary
Several conditions indicate your brake booster has reached the end of its service life and requires replacement:
Confirmed failure symptoms: If you’ve performed the DIY tests described above and confirmed the booster isn’t providing assist, or if you experience any combination of hard pedal, hissing sounds, increased stopping distance, and engine stalling when braking, replacement is necessary. Don’t attempt to repair the booster internally—while some specialty shops can rebuild certain designs, it’s rarely cost-effective compared to replacement with a new or remanufactured unit.
Age and mileage: Even without failure symptoms, brake boosters naturally deteriorate over time. Rubber diaphragms become brittle and develop cracks, internal seals harden and lose resilience, and corrosion affects internal components. Most brake boosters last 150,000 to 200,000 miles or 15-20 years, whichever comes first. If your vehicle has original brake components at high mileage, preventive replacement during major brake service can prevent future failures.
Check valve failure: If only the check valve has failed but the booster itself tests good, you can replace just the check valve ($10-40 part, 15-30 minutes labor). However, if the booster is already high-mileage, many technicians recommend complete booster replacement since check valve failure often precedes booster failure.
Contamination: If brake fluid has leaked back into the booster due to master cylinder seal failure, the brake fluid will destroy the booster’s internal rubber components. In this situation, you must replace both the master cylinder and the brake booster. On hydro-boost systems, contamination from a failed unit can damage the power steering system, requiring complete system flushing and component replacement.
Professional Replacement Process
Brake booster replacement is a 2-4 hour job requiring professional expertise and proper procedures to ensure safe brake system operation after service. Here’s what’s involved:
Diagnosis verification comes first—the technician performs comprehensive brake system testing to confirm the booster is actually the problem. Many symptoms blamed on boosters are actually caused by master cylinder failure, air in brake lines, or insufficient engine vacuum from other causes. Testing with a vacuum gauge, checking for vacuum leaks, and systematic component testing isolates the actual failure.
Master cylinder removal is required since it’s bolted to the front of the booster. In most cases, the technician can carefully unbolt the master cylinder and position it aside without disconnecting brake lines, avoiding the need for system bleeding. However, on some vehicles with restricted access, brake lines must be disconnected, requiring complete system bleeding after installation.
Vacuum hose disconnection and check valve removal frees the booster from the engine. The technician inspects the vacuum hose for cracks, collapse, or other damage and replaces it if necessary.
Interior access and pedal disconnection involves removing interior panels or working from underneath the dashboard to access the four mounting nuts on the firewall and disconnect the pushrod from the brake pedal linkage. Some vehicles provide exterior access to these nuts, significantly simplifying the job, while others require contortionist-level access.
Pushrod adjustment is the most critical step that prevents brake problems after installation. The new booster’s pushrod must be set to the exact length specified by the manufacturer, typically requiring special gauges or precision measurements. Too much clearance between the pushrod and master cylinder piston creates excessive pedal travel. Too little clearance (or worse, interference) prevents the master cylinder from releasing properly, causing constant brake drag, overheating, and premature brake pad wear.
Installation and testing reverses the removal process, with particular attention to proper torque specifications on all fasteners. After installation, the technician verifies proper brake pedal height, checks for adequate vacuum assist, ensures proper brake release (no drag), and road tests the vehicle to confirm normal braking performance.
If brake lines were disconnected, complete system bleeding removes air from the hydraulic circuits. The technician typically uses a pressure bleeder or vacuum bleeder to efficiently evacuate air from all four corners, ensuring firm pedal feel and maximum braking performance.
Replacement Cost Expectations
Brake booster replacement costs vary significantly based on vehicle type, booster design, and regional labor rates:
Vacuum brake booster parts:
- Economy remanufactured units: $80-$150
- Quality remanufactured (Cardone, A1 Cardone): $120-$300
- New OEM or premium aftermarket: $200-$500
- Performance dual-diaphragm upgrades: $250-$600
Hydraulic (hydro-boost) parts:
- Remanufactured units: $200-$400
- New OEM units: $400-$800
Labor costs:
- Standard installation (2-3 hours): $150-$400
- Difficult access requiring dashboard work (3-4 hours): $300-$500
- Brake system bleeding: $50-$100 additional
Total typical costs:
- Vacuum booster replacement: $300-$800 average
- Hydro-boost replacement: $500-$1,200 average
- Luxury or performance vehicles: $800-$1,500+
These prices don’t include related repairs that might be necessary, such as master cylinder replacement (add $150-$400), brake line replacement if damaged during service, or power steering system work on hydro-boost vehicles.
No Routine Maintenance Required
Unlike brake pads that wear and require periodic replacement, brake boosters are sealed units requiring no routine maintenance. There’s no service schedule for checking or adjusting boosters, no lubrication to perform, and no inspections needed except during diagnosis of brake problems.
However, you should have your technician perform a visual inspection of the brake booster during regular brake service (typically every 30,000-50,000 miles when brake pads are replaced). This inspection looks for:
- Vacuum hose cracks, deterioration, or improper routing
- Corrosion or damage to booster housing
- Brake fluid leaks from master cylinder (which could contaminate booster)
- Loose mounting hardware
Additionally, monitor brake pedal feel during normal driving. Any change in the effort required to achieve normal braking, any new noises, or any symptoms described earlier warrant immediate inspection even if you’re between scheduled maintenance intervals.
DIY Replacement: Not Recommended for Most
While mechanically inclined intermediate DIY enthusiasts can physically perform brake booster replacement, it’s not recommended unless you have specific experience with brake system work. Critical factors make this a professional-level job:
Safety-critical nature: Your brake booster directly affects your ability to stop safely. Errors in installation or adjustment can result in brake failure, creating severe accident risk for you, your passengers, and other road users.
Pushrod adjustment precision: Setting the pushrod correctly requires either specialized gauges or careful measurement techniques and interpretation of service manual specifications. Even experienced DIYers often struggle with this adjustment, and errors aren’t immediately obvious—problems may only manifest after days or weeks of driving.
Brake bleeding requirements: If brake lines must be disconnected, you’ll need to properly bleed the entire hydraulic system. Without proper equipment (pressure bleeder or quality vacuum bleeder), achieving firm pedal feel and full braking performance is difficult.
Diagnostic uncertainty: Many symptoms blamed on brake boosters are actually caused by other components. Without professional diagnostic equipment to confirm the booster is actually bad, you might replace a good booster while the real problem remains unaddressed.
If you insist on DIY replacement: Invest in the vehicle-specific service manual, purchase quality tools including a brake bleeder, follow torque specifications exactly, take your time with pushrod adjustment, and have a knowledgeable friend or mechanic review your work before driving. Consider having a professional shop perform final inspection and verification after you complete the replacement.
Professional Note: Insurance considerations warrant attention—if an at-fault accident occurs and investigation reveals improper brake work, liability issues can arise. Professional shops carry insurance specifically covering brake work, and their workmanship warranties protect you if problems develop.What is a brake booster and what does it do?
Conclusion
The brake booster is one of those essential components that most drivers never think about—until it fails. This unassuming canister mounted on your firewall works continuously, multiplying your pedal effort by three to six times, transforming difficult manual braking into the effortless, precise stopping power we take for granted in modern vehicles. Whether your vehicle uses a traditional vacuum brake booster drawing power from engine vacuum, a hydro-boost system leveraging power steering pressure, or an advanced electric brake booster integrating with electronic safety systems, the fundamental purpose remains the same: making your vehicle safe and easy to control.
Understanding how your brake booster operates helps you recognize warning signs before they compromise safety. A hard brake pedal, increased stopping distance, hissing sounds, or engine stalling when braking are immediate red flags requiring professional inspection. The simple DIY tests described in this guide can help you diagnose obvious failures, potentially catching problems before they leave you stranded or create dangerous situations. However, brake system work is inherently safety-critical—while inspection and testing are DIY-appropriate, actual repair or replacement demands professional expertise, specialized tools, and precise adjustment procedures.
Regular attention to brake pedal feel during normal driving is your best early warning system. Your brake pedal should feel consistent day after day, year after year. Any change—requiring more effort, taking longer to stop, sitting at a different height, or producing unusual sounds—deserves immediate investigation. Don’t dismiss subtle changes as imagination or aging components. Your brake booster is designed to last 150,000+ miles or 15+ years, but when it does eventually fail, prompt replacement ensures your vehicle retains the braking performance that keeps you and others safe.
Immediate Action Items If You Experience Symptoms
If you notice any of these warning signs, take immediate action:
- Hard brake pedal requiring excessive force: Drive carefully to a repair facility at low speed, avoiding highways. Do not attempt long trips or high-speed driving.
- Hissing sound when braking: Have the vehicle inspected within 24-48 hours. The vacuum leak affects both braking and engine performance.
- Increased stopping distance: Adjust your driving immediately—brake earlier, increase following distance, avoid aggressive maneuvers. Schedule inspection as soon as possible.
- Engine stalling when braking: Pull over immediately and have the vehicle towed. This symptom indicates severe failure creating multiple safety hazards.
Do not delay professional service when brake problems arise. While your brakes will technically function with a failed booster through the mechanical backup connection, the excessive effort required makes emergency stops unpredictable and dangerous. The cost of brake booster replacement ($300-$1,200 typical) is insignificant compared to the safety risks of continued driving with compromised braking.
Additional Resources for Vehicle-Specific Information
For detailed repair procedures, component specifications, and diagnostic information specific to your vehicle make and model, consult manufacturer service manuals and repair guides:
- Ford repair manuals – Comprehensive service information for F-Series, Mustang, Explorer, and all Ford vehicles
- Chevrolet repair manuals – Complete repair guides for Silverado, Corvette, Camaro, and Chevrolet lineup
- Toyota repair manuals – Factory service procedures for Camry, RAV4, Tacoma, and all Toyota models
- Honda repair manuals – Detailed maintenance and repair information for Civic, Accord, CR-V, and Honda vehicles
These manufacturer-specific manuals provide exact specifications for vacuum booster sizing, pushrod adjustment procedures, torque specifications, bleeding procedures, and model-specific diagnostic techniques that generic repair information cannot address.
Browse the complete vehicle safety and braking system category for related articles on brake components, maintenance procedures, and diagnostic guides at Vehicle Safety – Cars Category.
Final Safety Reminder
Your brake booster enables modern vehicles to stop safely, reliably, and with minimal driver effort—but only when it’s functioning properly. Never ignore warning signs, never delay professional service for brake concerns, and never attempt repairs beyond your skill level on this safety-critical component. Your life, your passengers’ lives, and the safety of other road users depend on your vehicle’s ability to stop when needed. Invest in proper brake system maintenance and respond immediately to any symptoms—it’s the most important safety decision you can make as a vehicle owner.
Emergency Note: If you experience complete brake system failure with no pedal pressure or stopping ability, remember that you can still use the parking brake for emergency stopping. Apply it gradually—not suddenly—to bring the vehicle to a controlled stop without locking the rear wheels. This emergency procedure works whether your failure is brake booster related or from other causes like total hydraulic failure.
Stay safe on the roads by maintaining your brake system properly and responding promptly to any warning signs your vehicle provides.