When you press your brake pedal and your vehicle responds with smooth, controlled stopping power, you’re experiencing the master cylinder at work. This precision-engineered hydraulic component serves as the heart of your braking system, converting the mechanical force from your foot into the hydraulic pressure that brings thousands of pounds of metal, passengers, and cargo to a safe stop. Without a properly functioning master cylinder, your vehicle simply cannot brake—a reality that makes understanding this critical component essential for every vehicle owner.
The master cylinder’s importance cannot be overstated. Located in your engine compartment near the firewall, this unassuming component generates hydraulic pressures ranging from 800 to 1,200 PSI during normal braking, and up to 2,000 PSI during emergency stops. Modern vehicles use tandem master cylinders with dual independent circuits—a safety design mandated since the late 1960s that ensures you maintain at least partial braking capability even if one circuit fails. This redundancy has saved countless lives by preventing total brake failure.
Understanding how your master cylinder works helps you recognize warning signs of failure before they become dangerous. A spongy brake pedal, increased stopping distances, or a pedal that slowly sinks to the floor are all symptoms that demand immediate attention. The master cylinder works in concert with your brake booster to multiply your pedal force by 4-6 times, then distributes that hydraulic pressure through brake fluid to the brake calipers at each wheel. When any part of this system fails, the consequences can be catastrophic.
Why Master Cylinders Are Critical for Brake Safety
The master cylinder serves as the central control point for your entire brake system, converting mechanical force from the brake pedal into hydraulic pressure that activates the brakes at each wheel. This conversion happens through a precisely engineered hydraulic system that can generate tremendous force—typically 800 to 1,200 PSI during normal braking, and up to 2,000 PSI during emergency stops. Without a functioning master cylinder, you have zero stopping power, making it one of the most safety-critical components in your vehicle.
What makes modern master cylinders particularly reliable is their dual-circuit design, officially called a tandem master cylinder. Federal safety regulations have required this configuration since the late 1960s after earlier single-circuit systems proved dangerously vulnerable to total failure. The tandem design houses two independent hydraulic circuits within a single unit: a primary circuit and a secondary circuit. Each circuit operates one front wheel brake and the diagonally opposite rear wheel brake. For example, the primary circuit might control the right front and left rear brakes, while the secondary circuit handles the left front and right rear brakes.
This diagonal split pattern is engineered specifically to prevent dangerous vehicle pull during brake failure. If your right front brake line ruptures, you still have your left front brake and right rear brake functioning through the intact circuit. The vehicle will pull slightly toward the working front brake, but it remains controllable and can still be stopped safely—though with greater pedal effort and increased stopping distance. This redundancy transforms what would be a catastrophic total brake failure into a manageable emergency situation that allows you to safely pull over.
Master cylinder failure doesn’t happen suddenly without warning. The typical master cylinder lasts between 60,000 and 200,000 miles depending on driving conditions and maintenance practices. Highway commuters who brake gently and infrequently often see their master cylinders last well past 150,000 miles. City drivers who constantly brake in stop-and-go traffic put significantly more stress on the system and may need replacement closer to 80,000 miles. The most common failure mode involves deterioration of the internal rubber seals, which gradually lose their ability to maintain hydraulic pressure.
When a master cylinder begins failing, symptoms typically progress from subtle to severe. You might first notice a slightly softer brake pedal feel or increased pedal travel. As seal wear progresses, the pedal becomes noticeably spongy and may slowly sink toward the floor when held with constant pressure. Eventually, severe internal seal failure can result in such significant pressure loss that the brakes barely function at all. External leaks at the rear seal where the master cylinder mounts to the brake booster represent another failure mode, often causing brake fluid to leak into the booster housing where it’s not immediately visible.
The master cylinder works as an integrated component of your modern brake system, feeding hydraulic pressure to advanced electronic systems like ABS and electronic stability control. These systems rely on consistent master cylinder pressure to function correctly. When master cylinder performance degrades, it affects not just basic braking but also these advanced safety features that help prevent accidents. This interconnected nature makes master cylinder health critical to overall vehicle safety.
Master Cylinder Parts and Construction Explained
A master cylinder assembly combines precision mechanical engineering with hydraulic principles to create one of the most reliable components in your vehicle. Understanding its construction helps you appreciate why proper maintenance matters and what can go wrong when components fail.
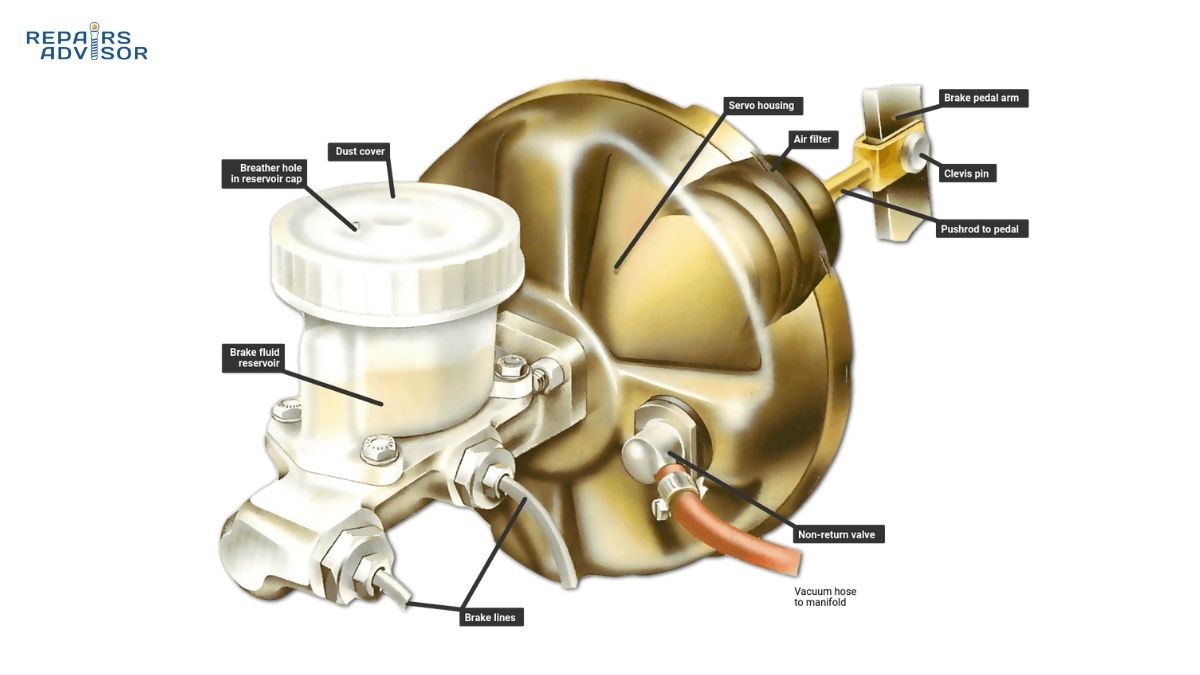
The most visible external component is the fluid reservoir, which sits on top of the master cylinder body. Modern reservoirs use transparent plastic construction that allows you to check fluid level at a glance, while older vehicles employed metal reservoirs with removable caps. The reservoir features a dual-chamber design with one compartment feeding each hydraulic circuit. Total capacity typically ranges from 12 to 16 ounces, with MAX and MIN level marks clearly visible. Inside the reservoir, a float sensor monitors fluid level and triggers your brake warning light if fluid drops too low—an early warning system that can alert you to leaks before brake performance seriously degrades.
The reservoir cap includes a diaphragm and vent system that serves two critical functions. As brake pads wear down, brake fluid displaces from the reservoir into the calipers to take up the space created by pad wear. The diaphragm prevents outside air and moisture from contaminating the brake fluid while allowing air to enter the reservoir as fluid level drops. This sealed-but-vented design maintains proper pressure in the reservoir while protecting the hygroscopic brake fluid from moisture absorption that would lower its boiling point and compromise braking performance.
Inside the master cylinder housing—typically cast from either iron or aluminum—two pistons work in tandem to generate hydraulic pressure for the dual circuits. The primary piston connects directly to the push rod that extends from your brake pedal or brake booster. When you press the brake pedal, the push rod drives the primary piston forward through the bore. The secondary piston sits ahead of the primary piston, separated by a spring and hydraulic fluid. As the primary piston moves forward and pressurizes fluid, that pressure acts on the secondary piston and drives it forward as well, generating pressure in the second circuit.
The bore diameter of a master cylinder significantly affects brake pedal feel and brake system performance. Common bore sizes range from 7/8 inch (22mm) to 1-1/8 inch (29mm). A smaller bore diameter creates higher hydraulic pressure with less pedal effort but requires more pedal travel to displace enough fluid. This configuration suits manual brake systems and smaller vehicles. Larger bore diameters generate lower pressure but with shorter pedal travel and firmer pedal feel—ideal for power brake systems on larger vehicles. Your vehicle’s master cylinder bore diameter is carefully engineered to match the brake system components and provide optimal pedal feel and stopping power.
Hydraulic seals represent the most critical internal components because they’re also the most vulnerable to wear and failure. The primary cup seal on each piston prevents brake fluid from bypassing around the piston as it moves forward—without a proper seal, pressure simply pushes fluid backward instead of out through the brake lines. Secondary seals fit between the piston and bore wall to prevent external leakage. These seals use a square cross-section profile that serves a dual purpose: creating a pressure seal during brake application and providing a mechanical return force when pressure releases. As the piston moves forward, the square seal stretches slightly. When you release the brake pedal, the seal’s elastic memory pulls the piston back a few thousandths of an inch, creating proper pad clearance.
Seal material must withstand the aggressive properties of brake fluid while maintaining elasticity across a wide temperature range. Modern seals typically use EPDM (Ethylene Propylene Diene Monomer) rubber specifically formulated for brake fluid compatibility. These seals gradually deteriorate over years of exposure to brake fluid, moisture absorption, and thermal cycling. When seals fail, internal leakage allows brake fluid to bypass the pistons, resulting in the characteristic spongy pedal feel and gradual pressure loss that signals master cylinder failure.
Return springs inside the master cylinder push the pistons back to their rest positions when brake pressure releases. These carefully calibrated springs maintain slight residual pressure in the brake lines—typically 2 to 6 PSI—which prevents air from entering the system through microscopic imperfections in seals and fittings. On vehicles with drum brakes, residual check valves maintain this minimum pressure specifically in the drum brake circuits where it’s most needed.
The master cylinder bore features precisely machined compensation ports and outlet ports that control fluid flow. When brakes are released and pistons return to rest position, the compensation ports allow fluid to flow freely between the working chambers and reservoir. This enables the system to compensate for thermal expansion, pad wear, and minor fluid level changes. As the piston moves forward during brake application, the primary cup seal passes over the compensation port, blocking it and allowing pressure to build. The outlet ports connect to your vehicle’s brake lines and feed the pressurized fluid to the wheel brakes.
Quality master cylinders from manufacturers like Bosch, Brembo, ATE, Wagner, and Raybestos feature precision machining, corrosion-resistant coatings, and high-quality seal materials that ensure long service life. The bore surface finish is critical—any scoring, corrosion, or roughness accelerates seal wear and causes premature failure. Remanufactured master cylinders can provide reliable service when properly reconditioned with new seals, resurfaces bores, and corrosion protection. Budget aftermarket units may save money initially but often feature rougher bore finishes and inferior seal materials that result in shorter service life.
The master cylinder works in coordination with the brake proportioning valve that adjusts front-to-rear brake force distribution, and connects to drum brakes on many vehicles where residual pressure valves prevent air entry in the wheel cylinders.
How Master Cylinders Work: Step-by-Step Operation
Understanding the precise sequence of events when you press the brake pedal reveals the elegant hydraulic engineering that enables reliable braking. The master cylinder operation involves six distinct phases that work together seamlessly to convert mechanical force into controlled stopping power.
Step 1: Brake Application Begins
When you press the brake pedal, the mechanical linkage connects to a push rod that enters the rear of the master cylinder. On vehicles equipped with power brakes, the push rod first passes through the brake booster, which uses vacuum or hydraulic pressure to multiply your foot force by a factor of 3 to 4 times. This amplified force drives the push rod into the master cylinder, where it contacts the primary piston. As the push rod advances, it overcomes the resistance of the return spring and begins moving the primary piston forward through the bore.
Step 2: Primary Circuit Pressure Generation
As the primary piston advances, its primary cup seal passes over the compensation port, sealing off the connection between the working chamber and the reservoir. With the compensation port blocked, continued piston movement compresses the brake fluid trapped between the primary and secondary pistons. Brake fluid is essentially incompressible, so this compression immediately generates hydraulic pressure. The pressure builds rapidly—a typical brake application generates 1,000 PSI in about half a second. This pressurized fluid pushes through the primary circuit outlet port and travels through brake lines to one front wheel and the diagonally opposite rear wheel.
Step 3: Secondary Circuit Activation
Simultaneously with primary circuit pressurization, the rising hydraulic pressure between the two pistons acts on the face of the secondary piston, pushing it forward against its return spring. The secondary piston advances through its bore, and its cup seal passes over its compensation port, sealing off the secondary circuit from the reservoir. As the secondary piston continues forward, it compresses fluid in the secondary working chamber, generating pressure that flows through the secondary circuit outlet port to feed the remaining two wheels. Both circuits operate independently but simultaneously, ensuring equal pressure delivery to all four wheels under normal operation.
Step 4: Hydraulic Force Multiplication
The master cylinder’s relatively small bore diameter compared to the large caliper pistons at each wheel creates significant mechanical advantage through hydraulic force multiplication. Consider a typical system: a master cylinder with a 1.0-inch bore diameter has a cross-sectional area of 0.785 square inches. When you apply 100 pounds of force to the brake pedal, and the brake booster multiplies this to 400 pounds, that 400-pound force acting on 0.785 square inches generates approximately 510 PSI.
This 510 PSI pressure travels through the brake lines to each wheel. At the front wheels, brake calipers might feature pistons with 2.5-inch diameters, giving them a cross-sectional area of 4.91 square inches. When 510 PSI acts on 4.91 square inches, it generates approximately 2,500 pounds of clamping force at each front wheel. This hydraulic advantage means moderate pedal pressure creates thousands of pounds of total braking force across all four wheels. The master cylinder efficiently converts your 50-pound foot effort into more than 8,000 pounds of total brake force.
Modern brake systems integrate electronic control with this hydraulic foundation. Your ABS system uses electronic valves to rapidly modulate master cylinder pressure to individual wheels, preventing wheel lockup during hard braking. Electronic stability control systems can apply braking to specific wheels independently to help maintain vehicle control during emergency maneuvers. Despite these electronic enhancements, the master cylinder remains the fundamental pressure source that makes these advanced systems possible.
Step 5: Brake Modulation and Control
Throughout the braking event, you continuously modulate brake pedal pressure to achieve your desired deceleration rate. The hydraulic system responds instantly to pressure changes, allowing precise control. Press harder and pressure increases proportionally; ease off slightly and pressure decreases immediately. This direct mechanical connection between your foot and the brakes provides intuitive feedback that helps you judge braking force. You can feel the road through the brake pedal—the subtle feedback that tells you if you’re braking on dry pavement, wet roads, or ice.
The master cylinder maintains this proportional pressure relationship throughout its operating range. Whether you’re gently slowing for a red light or performing an emergency stop, the master cylinder faithfully converts your pedal input into corresponding hydraulic pressure. This linear response characteristic is what makes brake pedal feel predictable and confidence-inspiring. When master cylinder seals begin failing, this proportional relationship degrades, resulting in inconsistent pedal feel and reduced driver confidence.
Step 6: Brake Release and System Reset
When you release the brake pedal, the return springs in both the master cylinder and the brake booster push the pistons backward. As the pistons retract, hydraulic pressure in the system drops rapidly. The compensation ports uncover, opening the connection between the working chambers and the reservoir. Brake fluid flows back from the brake lines and calipers into the master cylinder reservoir as the brake pads release from the rotors.
The square-section seals play a crucial role during release. During brake application, these seals stretched slightly as the pistons advanced. When pressure drops, the seals’ elastic memory pulls the pistons back approximately 0.005 to 0.010 inches. This small retraction creates crucial clearance between brake pads and rotors, preventing brake drag that would cause constant pad wear, excessive heat buildup, and reduced fuel economy. A small amount of fluid remains in the brake lines at residual pressure (2-6 PSI) to prevent air from entering through microscopic seal imperfections.
The system now sits at rest, ready for the next brake application. Fluid gradually flows from the reservoir to compensate for the small amounts displaced by brake pad wear. As pads wear thinner over time, caliper pistons must extend slightly farther to press pads against rotors, drawing more fluid from the reservoir. This is why brake fluid level naturally drops as pads wear—a completely normal phenomenon that shouldn’t be confused with leakage.
The master cylinder bore diameter significantly affects these characteristics. Smaller bores (7/8 inch) create higher pressure with less effort but require more pedal travel and displace less fluid per stroke—ideal for manual brake systems. Larger bores (1-1/8 inch) generate adequate pressure for power brake systems with shorter pedal travel and firmer feel, better suited to larger, heavier vehicles with high-performance braking requirements.
Master Cylinder Failure Symptoms and Diagnosis
Master cylinders rarely fail catastrophically without warning. Instead, they typically exhibit progressive symptoms that worsen over weeks or months as internal seals deteriorate. Recognizing these warning signs early allows you to address master cylinder problems before they compromise your safety.
Spongy or Soft Brake Pedal
The most common symptom of master cylinder failure is a soft, spongy brake pedal that feels mushy when pressed and requires excessive travel before the brakes engage. This occurs when internal seals fail, allowing pressurized brake fluid to bypass the pistons instead of flowing through the brake lines to the wheel cylinders. You’re essentially pumping fluid back and forth inside the master cylinder rather than generating pressure at the wheels. The pedal might firm up temporarily if you pump it several times, as this can momentarily reseat the seals, but the spongy feel returns quickly. This symptom can also indicate air in the brake lines, but when combined with other master cylinder failure signs, internal seal failure is the likely culprit.
Sinking Brake Pedal
A pedal that slowly sinks toward the floor when held with constant pressure is the classic diagnostic sign of master cylinder internal seal failure. To test this, start your engine and pump the brake pedal several times to build pressure, then hold the pedal down with firm, steady pressure for 30 to 60 seconds. A healthy master cylinder maintains constant pressure, and the pedal stays firm at a consistent height. If the pedal gradually sinks toward the floor despite constant pressure, internal seals are allowing fluid to bypass the pistons. This test is so diagnostic that mechanics use it as a primary method to confirm master cylinder failure without disassembly.
Brake Fluid Leaks
Master cylinders can leak either externally or internally. External leaks occur at the rear seal where the master cylinder mounts to the brake booster or firewall. These leaks often aren’t immediately visible because fluid drips behind the master cylinder or into the brake booster housing. You might notice brake fluid on the booster surface, firewall, or in the area where the master cylinder mounts. Check the mounting area carefully with a flashlight—wetness, staining, or a brake fluid odor all indicate leakage. Internal leaks don’t produce visible fluid outside the master cylinder but cause the pedal problems described above. However, internal leaks still consume fluid, so you’ll notice the reservoir level dropping more quickly than normal brake pad wear would explain.
Contaminated Brake Fluid
Brake fluid should be clear to light amber in color. If the fluid in your master cylinder reservoir appears dark brown or black, internal rubber seals are deteriorating. As seals age and break down, rubber particles contaminate the fluid and give it a dark, dirty appearance. You might also see debris or particles floating in the reservoir or settled on the bottom of the reservoir cap. This contamination indicates advanced seal degradation throughout the brake system, though the master cylinder seals, being under constant pressure and movement, typically deteriorate first. Severely contaminated fluid often has a thick, syrupy consistency rather than the thin, oily feel of fresh brake fluid.
Uneven Braking or Vehicle Pull
When one of the two independent circuits in a tandem master cylinder fails, the vehicle pulls toward the side with working brakes during braking. For example, if the right front and left rear circuit fails, the left front brake and right rear brake still work, pulling the vehicle to the left. You’ll also notice significantly reduced braking power since only half your brakes function. The brake pedal typically feels softer than normal and requires more pressure to achieve even minimal braking. This symptom requires immediate attention—driving with only half your brakes working is extremely dangerous and illegal in most jurisdictions.
Brake Warning Light Illumination
Modern vehicles use pressure differential switches in the master cylinder or brake distribution block to detect circuit failures. When pressure drops in one circuit while remaining normal in the other, the switch triggers your brake warning light. The float sensor in the reservoir also activates the warning light when fluid level drops below the minimum mark. If your brake warning light illuminates, check the fluid level first. If fluid is at the proper level but the light remains on, you likely have a circuit pressure problem that could indicate master cylinder failure or leaks elsewhere in the system.
Professional Diagnostic Testing
Professional technicians can perform additional tests beyond the basic pedal hold test. They might use a pressure gauge connected to the brake lines to measure actual hydraulic pressure during brake application. Low or unequal pressures between circuits confirm master cylinder problems. A visual inspection of the master cylinder bore after removal can reveal scoring, corrosion, or pitting that damages seals. However, often the master cylinder appears fine externally even when internal seals have failed.
Before condemning the master cylinder, technicians must rule out other causes of similar symptoms. Air in the brake lines from incomplete bleeding produces a spongy pedal. Leaking brake calipers, wheel cylinders, or brake lines cause fluid loss and soft pedal feel. Worn brake pads don’t cause master cylinder symptoms but do result in increased pedal travel. A comprehensive brake inspection examines the entire system to pinpoint the actual problem area.
Understanding these symptoms helps you recognize master cylinder failure early. If you experience any brake problems—unusual pedal feel, warning lights, fluid leaks, or reduced braking performance—have your vehicle inspected by a qualified technician immediately. Brake system failures can be catastrophic, and master cylinder problems always warrant urgent professional attention. Never continue driving a vehicle with suspected master cylinder failure; have it towed to a repair facility for proper diagnosis and repair. For more information about warning signs, see our guide to brake warning lights and brake system troubleshooting.
Master Cylinder Maintenance and Replacement
Proper master cylinder maintenance focuses primarily on preserving the brake fluid that keeps internal seals healthy and prevents corrosion. Unlike many vehicle components that require regular service or adjustment, the master cylinder itself needs no routine maintenance beyond monitoring fluid condition and level.
Regular Brake Fluid Checks
Check your master cylinder fluid level at least monthly and during every oil change. With the vehicle parked on level ground and the engine off, open the hood and locate the master cylinder reservoir—typically on the driver’s side near the firewall. Most modern vehicles use translucent plastic reservoirs with MIN and MAX level marks visible on the side. The fluid level should rest at or near the MAX mark when brake pads are new. As brake pads wear down, fluid level drops slightly to compensate—a gradual decline of a few millimeters over thousands of miles is completely normal.
Sudden or rapid fluid level drops indicate leakage somewhere in your brake system. If you must add fluid more than once between brake service appointments, have your brake system inspected for leaks. Common leak points include brake line fittings, caliper seals, wheel cylinder seals, and the master cylinder’s own rear seal. Never ignore low fluid levels or the brake warning light—these warn of potentially dangerous brake system problems.
When checking fluid level, also inspect fluid condition. Fresh brake fluid ranges from clear to light amber in color. Dark brown or black fluid indicates contamination from deteriorating rubber seals throughout the system. If your brake fluid appears dark, schedule a complete brake fluid flush. The fluid should also have a thin, oily consistency. Thick or syrupy fluid has absorbed excessive moisture or contains contamination that compromises its performance.
Brake Fluid Flush Schedule
Brake fluid is hygroscopic, meaning it absorbs moisture from the atmosphere through microscopic pores in rubber hoses and seals. This absorbed moisture lowers the fluid’s boiling point and promotes internal corrosion. Fresh DOT 3 brake fluid has a dry boiling point above 400°F, but after two years of service, absorbed moisture can lower the boiling point below 300°F. During hard braking, brake temperatures can exceed 300°F, causing moisture-contaminated fluid to boil and form vapor bubbles that compress under pressure, resulting in a soft, spongy pedal and reduced braking.
Follow your vehicle manufacturer’s recommendation for brake fluid replacement, typically every 2 to 3 years or 24,000 to 36,000 miles. Vehicles operated in humid climates should flush fluid more frequently—moisture absorption happens faster in high-humidity environments. The flush procedure removes old fluid from the master cylinder, brake lines, calipers, and wheel cylinders, replacing it with fresh fluid throughout the entire system. This service costs $80 to $150 at most shops but prevents much more expensive repairs caused by internal corrosion and seal damage.
Master Cylinder Replacement Cost
When master cylinder replacement becomes necessary, expect costs ranging from $300 to $800 for most vehicles. The master cylinder itself costs $150 to $400, with economy car parts at the lower end and luxury or high-performance vehicle parts at the upper end. Labor adds another $150 to $400, typically requiring 1.5 to 3 hours of work. The job involves removing the old master cylinder, bench-bleeding the new unit to remove internal air, installation, brake line connection, and complete brake system bleeding to purge air from every corner of the hydraulic system.
Several factors affect master cylinder replacement cost. Vehicles with simple engine bay access and easily removed brake lines complete quickly and cost less. Vehicles with cramped engine compartments, difficult brake line access, or badly corroded brake line fittings require more labor time. Additional parts like new brake lines, fittings, or brake fluid add to material costs. Some vehicles require brake pedal pushrod adjustment during master cylinder replacement, adding complexity and time.
OEM master cylinders from manufacturers like Bosch, Brembo, and ATE ensure the highest quality and precise fit but cost more than aftermarket alternatives. Remanufactured master cylinders from reputable suppliers like Cardone or BBB Industries offer good value—these units feature new seals, pistons, and refinished bores at costs typically 30-40% below new OEM parts. Budget aftermarket options save money but may have shorter service life due to lower quality seal materials and less precise machining.
DIY Replacement Considerations
Experienced home mechanics with proper tools can successfully replace master cylinders, but this job requires specific technical knowledge and specialized equipment. You must understand hydraulic system principles, have experience with brake system bleeding, and possess the proper tools: line wrenches to prevent rounding off brake line fittings, a bench bleeding kit, a vacuum brake bleeder or helper for pedal bleeding, and basic hand tools.
The critical steps include: bench bleeding the new master cylinder to remove air from its internal passages before installation, properly tightening brake line fittings without cross-threading or over-tightening, bleeding the complete brake system in the correct sequence, and thoroughly testing brake pedal feel and stopping power before driving. Mistakes during any of these steps can result in brake failure.
For most vehicle owners, professional installation is the recommended choice. Brake system work is safety-critical, and proper installation requires experience and knowledge that comes from training and practice. Professional technicians complete the job efficiently, guarantee their work, and have diagnostic equipment to verify proper brake system operation before returning your vehicle. The peace of mind knowing your brakes are correctly repaired is worth the labor cost.
Location and Access
Finding your master cylinder is straightforward. Open the hood and look at the driver’s side firewall—the vertical panel separating the engine compartment from the passenger cabin. The master cylinder mounts to the brake booster, a large round metal canister positioned directly behind the brake pedal’s location. The master cylinder extends forward from the booster with the fluid reservoir sitting on top. Two brake lines connect to the master cylinder body—these steel lines run to the front and rear brake circuits.
The master cylinder is typically easy to see and access from above in the engine compartment. However, some vehicles with cramped engine bays position the master cylinder where the battery, air intake, or other components partially obstruct access. Brake line removal can be challenging on older vehicles where corrosion has frozen the fittings. Professional technicians have penetrating oils, heat application tools, and experience that helps them remove stubborn fittings without damaging brake lines.
Vehicle-specific information about your master cylinder, brake system configuration, and replacement procedures can be found in repair manuals for your make and model. Check resources specific to your vehicle brand, such as Ford brake systems or Toyota brake systems, for detailed information about your particular vehicle’s brake system configuration.
Conclusion
The master cylinder serves as the vital connection between your brake pedal and your vehicle’s stopping power, converting mechanical force into the hydraulic pressure that brings your vehicle safely to rest. This precisely engineered component generates 800 to 2,000 PSI of hydraulic pressure, multiplies your pedal force by 4 to 6 times, and incorporates dual independent circuits that provide critical safety redundancy. Understanding how your master cylinder works and recognizing failure symptoms empowers you to maintain this essential safety system properly.
Modern tandem master cylinders represent one of the most significant automotive safety advances, ensuring that brake system failures result in reduced braking performance rather than total brake loss. The dual-circuit design has saved countless lives since its implementation became mandatory in the late 1960s. Regular brake fluid maintenance—checking levels monthly and flushing the system every 2 to 3 years—prevents the seal deterioration and internal corrosion that cause most master cylinder failures. With proper maintenance, master cylinders reliably serve for 60,000 to 200,000 miles.
Common failure symptoms include spongy pedal feel, a pedal that slowly sinks when held, brake fluid leaks, contaminated brake fluid, and uneven braking. The simple pedal hold test—pressing and holding the brake pedal for 30 to 60 seconds to see if it sinks—reliably diagnoses internal seal failure. If you experience any of these symptoms, schedule professional brake system inspection immediately. Never continue driving with suspected master cylinder problems, as brake failure can be catastrophic.
While experienced DIY mechanics can successfully replace master cylinders, professional service is strongly recommended for most vehicle owners. Brake system work is safety-critical and requires specialized knowledge, proper tools, and experience with hydraulic system bleeding. Professional technicians ensure correct installation, complete brake system bleeding, and verification of proper operation before returning your vehicle. The typical replacement cost of $300 to $800 is money well spent for the safety and peace of mind that comes with knowing your brakes function correctly.
Your master cylinder works in concert with other critical brake components including the brake booster, brake fluid, brake calipers, and brake pads to provide reliable stopping power. Understanding each component helps you maintain your complete brake system properly. If you experience any brake problems—unusual pedal feel, warning lights, fluid leaks, or reduced braking performance—have your vehicle inspected by a qualified brake specialist immediately. Your safety and the safety of others on the road depends on properly functioning brakes.
Critical Safety Reminders
⚠️ Brake system work is safety-critical and requires specialized knowledge. Improper master cylinder installation can result in complete brake failure.
⚠️ Brake fluid is corrosive to paint and toxic if ingested. Use proper personal protective equipment including safety glasses and gloves. Wash any brake fluid off painted surfaces immediately with soap and water.
⚠️ Always bleed the brake system completely after master cylinder replacement. Air in brake lines causes spongy pedal feel and dramatically reduced braking performance. Every wheel must be bled in the proper sequence.
⚠️ Test brakes thoroughly in a safe environment before normal driving. After any brake service, test stopping power at low speeds in a safe area with no traffic. Pump the pedal several times to build pressure before driving.
⚠️ If uncertain about any brake work, consult a professional technician. Brake system failures can be catastrophic. Professional service ensures proper installation, bleeding, and operation verification.
⚠️ Never drive a vehicle with suspected master cylinder failure. Have the vehicle towed to a repair facility for proper diagnosis and repair. Brake system problems always warrant urgent professional attention.