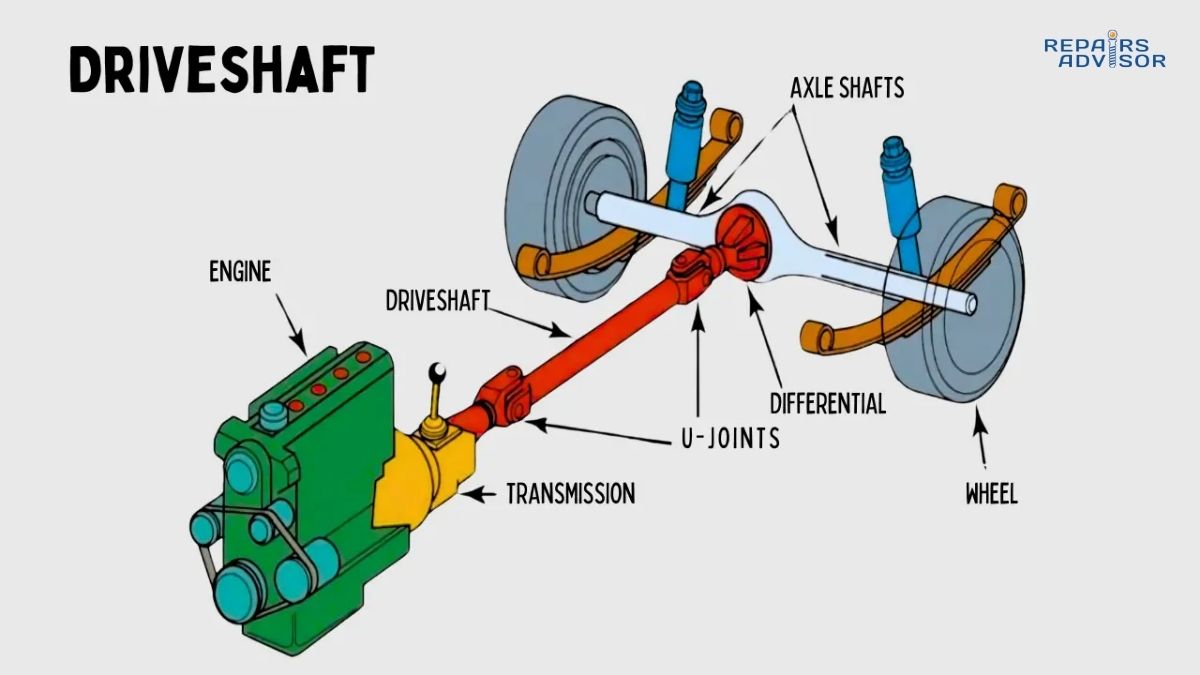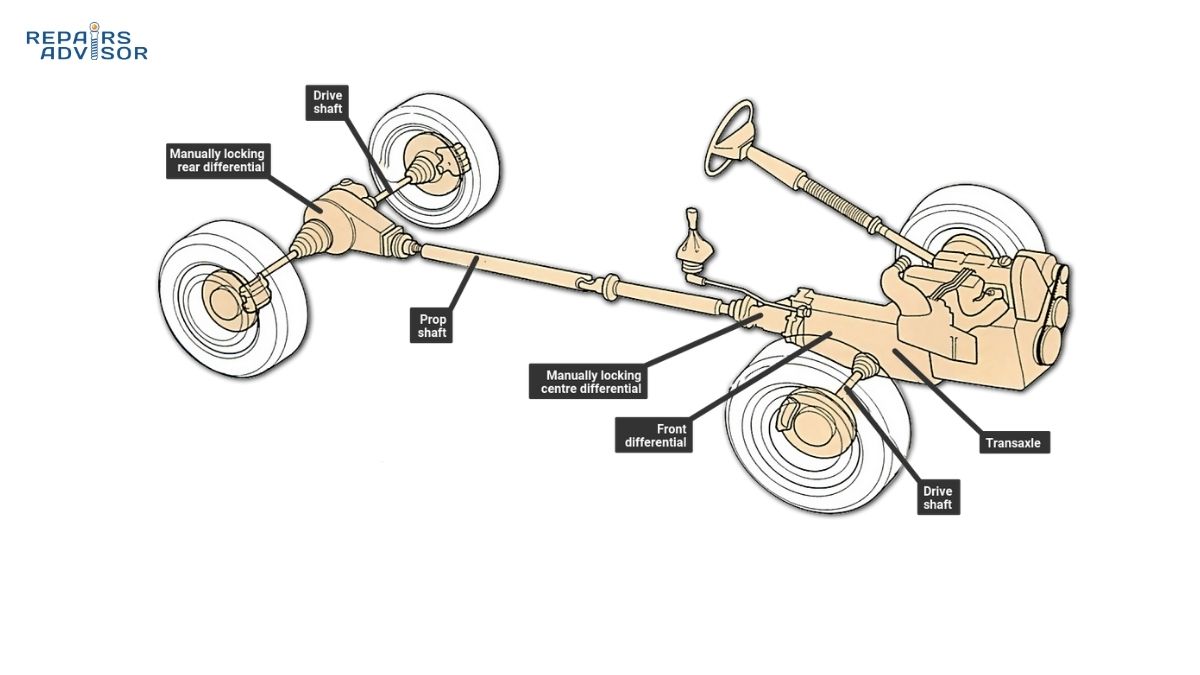
Introduction
If you’ve ever wondered how pressing a pedal with your foot translates into smooth gear changes in your manual transmission vehicle, you’re about to discover one of automotive engineering’s most elegant solutions. Modern manual transmissions have largely abandoned cable-operated clutches in favor of hydraulic actuation systems—and for good reason. Hydraulic clutch systems deliver consistent pedal feel, self-adjusting operation, and reduced maintenance throughout the clutch’s entire lifespan.
Unlike older cable-actuated systems that required periodic adjustment and suffered from cable stretching and wear, hydraulic clutches use incompressible fluid to transmit force from your foot to the clutch mechanism. This fundamental change revolutionized how drivers interact with manual transmissions, making them easier to operate while simultaneously improving reliability. Whether you’re troubleshooting a spongy pedal, planning maintenance, or simply curious about the mechanics beneath your feet, understanding how hydraulic clutch systems work empowers you to make informed decisions about your vehicle’s care.
This comprehensive guide explores every aspect of hydraulic clutch operation, from the basic principles of hydraulic pressure to detailed troubleshooting procedures. We’ll examine the core components, walk through the engagement and disengagement process step-by-step, and provide practical maintenance guidance to keep your system functioning optimally. Understanding your manual transmission starts with understanding how you control it.
What is a Hydraulic Clutch System?
Definition and Purpose
A hydraulic clutch system is a mechanism that converts the mechanical force from your clutch pedal into hydraulic pressure, which then actuates the clutch assembly to engage or disengage power transmission between the engine and transmission. At its core, the system operates on Pascal’s law—the principle that pressure applied to a confined fluid transmits equally throughout that fluid. When you press the clutch pedal, you’re not pulling a cable; instead, you’re pushing a piston that pressurizes brake fluid, which travels through lines to another piston that performs the actual clutch disengagement work.
The primary purpose of this system is to interrupt power flow from the engine to the transmission, allowing smooth gear changes without grinding or damaging synchronizers. By using hydraulic principles rather than mechanical cables, engineers achieve force multiplication, consistent operation, and automatic compensation for clutch wear. The system essentially acts as a hydraulic lever, amplifying your foot’s force by a factor of four to six times before it reaches the clutch pressure plate.
Compared to traditional clutch cable systems, hydraulic actuation eliminates the stretching, binding, and adjustment issues that plagued earlier designs. Cable systems required periodic adjustment as the cable stretched and the clutch disc wore, leading to changing engagement points and inconsistent pedal feel. Hydraulic systems maintain the same pedal characteristics from installation until the clutch disc reaches its wear limit.
Key System Advantages
The self-adjusting nature of hydraulic clutches represents perhaps their greatest advantage. As the clutch disc friction material wears down over tens of thousands of miles, the system automatically compensates. The master cylinder’s compensation port allows fluid to flow into or out of the system as needed, maintaining optimal hydraulic volume without manual adjustment. This means the clutch engagement point remains consistent throughout the clutch’s service life—something impossible with cable systems that stretch and require regular adjustment.
Pedal effort reduction is another significant benefit that drivers immediately notice. The hydraulic advantage provided by different piston diameters in the master and slave cylinders means you press with perhaps 20-30 pounds of force at the pedal, but the slave cylinder delivers 100-150 pounds to the release fork. This force multiplication makes clutch operation significantly easier, particularly in vehicles with heavy-duty or performance clutches that would require substantial leg strength with a direct mechanical connection.
Durability improvements stem from eliminating the cable as a wear component. Cables in mechanical systems gradually stretch, fray, and corrode—especially in harsh climates where road salt accelerates deterioration. They require periodic lubrication and eventually snap, often leaving drivers stranded. Hydraulic systems have no cable to stretch or break, and while seals eventually wear, they typically provide warning signs like gradual fluid loss rather than catastrophic failure.
The precision and responsiveness of hydraulic actuation benefit performance driving and smooth daily operation alike. Incompressible hydraulic fluid transmits your pedal inputs instantaneously to the clutch mechanism with zero slack or compliance. This immediate response allows more precise clutch modulation during launches, upshifts, and downshifts. The consistent pedal feel also makes it easier to develop muscle memory for the engagement point, leading to smoother gear changes.
Evolution in Modern Vehicles
The transition from cable to hydraulic clutch actuation accelerated dramatically in the 1990s as manufacturers recognized the benefits of reduced warranty claims and improved customer satisfaction. While some European manufacturers adopted hydraulic systems earlier—particularly in performance vehicles where clutch pedal loads were higher—widespread adoption across all vehicle segments occurred as emissions regulations demanded more precise control and as consumers expected improved refinement.
Today, finding a new manual transmission vehicle with a cable-actuated clutch is rare outside of motorcycles and some budget-oriented vehicles. The manufacturing cost difference between cable and hydraulic systems has narrowed considerably as hydraulic component production has scaled up. Meanwhile, the integration benefits have expanded—modern hydraulic clutches often incorporate position sensors for start interlock systems, hill-start assist features, and transmission control unit inputs that weren’t possible with simple cable linkages.
High-performance vehicles and trucks handling heavy loads especially benefit from hydraulic actuation. Performance clutches with aggressive pressure plate spring rates would create uncomfortably heavy pedal efforts with cable systems, but hydraulic advantages make them manageable. Similarly, heavy-duty truck clutches dealing with substantial torque loads rely on hydraulic multiplication to keep pedal forces within reasonable ranges for all-day driving comfort.
Core Components of a Hydraulic Clutch System
Clutch Pedal and Linkage
The clutch pedal assembly serves as your mechanical input to the hydraulic system. It’s a lever arm mounted on a pivot point above the driver’s footwell, typically positioned to the left of the brake pedal. The pedal’s geometry provides initial mechanical advantage—the distance from the pivot to where your foot pushes is longer than the distance from the pivot to where the push rod connects, creating leverage that multiplies your foot force before it even reaches the master cylinder.
The push rod connects the clutch pedal to the master cylinder through a clevis joint, allowing angular motion as the pedal swings through its travel. This connection must have proper free play—typically one-half to one and one-half inches of pedal travel before you feel resistance. This free play ensures the master cylinder’s piston fully returns to its rest position, allowing the compensation port to open and preventing residual pressure that could cause clutch slippage or premature release bearing wear.
Modern pedal assemblies incorporate over-center springs or assist springs that reduce the effort required to hold the pedal down while stopped in traffic. These springs effectively change the pedal’s effort curve, making the initial depression relatively easy, building resistance through mid-travel where you modulate clutch engagement, then reducing effort again at full depression. This ergonomic refinement significantly improves driving comfort during extended periods in stop-and-go traffic.
Clutch Master Cylinder
The clutch master cylinder is the heart of the hydraulic system, mounted on the firewall in the engine compartment directly in line with the clutch pedal’s push rod. Its construction closely resembles a brake master cylinder but with a single circuit rather than the dual circuits required for brake safety. Inside the cylinder bore, a piston moves forward and backward as you press and release the clutch pedal, pressurizing the hydraulic fluid contained in the sealed system.
The master cylinder’s internal design includes several critical features. The primary seal on the piston face creates pressure during forward movement, while a secondary seal behind the piston prevents fluid leakage into the driver’s compartment. Between these seals, a compensation port connects to the fluid reservoir—this port is key to the system’s self-adjusting capability. When the pedal is fully released and the piston returns to its rest position, this port opens, allowing fluid to flow freely between the reservoir and the cylinder bore.
Typical master cylinder bore diameters range from 0.625 to 0.875 inches, with the exact size carefully matched to the slave cylinder diameter to achieve the desired hydraulic ratio. Smaller master cylinder bores relative to slave cylinder bores create greater force multiplication but require more pedal travel. Engineers balance these factors to achieve acceptable pedal travel distances while providing adequate force at the clutch pressure plate.
The fluid reservoir mounted atop or beside the master cylinder stores hydraulic fluid and allows expansion space as fluid heats up during operation. Many vehicles share this reservoir between the clutch and brake systems, with separate chambers preventing cross-contamination while simplifying fluid level checks. The reservoir cap typically includes a rubber diaphragm that flexes to accommodate fluid level changes while preventing moisture-laden air from entering the system.
Hydraulic Lines and Hoses
The hydraulic plumbing connecting the master cylinder to the slave cylinder must withstand substantial pressure—typically 800 to 1200 PSI during normal operation—while remaining flexible enough to accommodate engine movement and vibration. The system uses a combination of rigid metal lines where protection and fixed routing are possible, transitioning to flexible reinforced rubber or braided stainless steel hoses where movement occurs.
Rigid metal lines, usually made from steel or copper-nickel alloy, run along the firewall and frame rails where they’re protected from road debris and mechanical damage. These lines provide precise routing and eliminate the flexibility that could absorb hydraulic pressure, ensuring efficient force transmission. At each end and at strategic points along the route, these rigid lines connect to flexible hoses through threaded fittings with sealing washers or flare connections.
Flexible hoses handle the connection between the chassis-mounted lines and the engine/transmission assembly, which moves on its mounts during acceleration, braking, and gear changes. These hoses must be DOT-approved for brake system use, meaning they’re reinforced with fabric or wire braiding to prevent expansion under pressure. High-performance applications sometimes use braided stainless steel hoses with PTFE inner liners for improved pedal feel by eliminating the slight expansion that occurs with rubber hoses.
The routing path typically passes through the firewall via a grommet-protected hole, follows the engine compartment’s left side (in left-hand-drive vehicles), and descends to meet the slave cylinder mounted on the transmission bell housing. Proper routing avoids heat sources like exhaust manifolds, ensures adequate clearance from moving parts, and prevents sharp bends that could restrict fluid flow or cause premature hose failure.
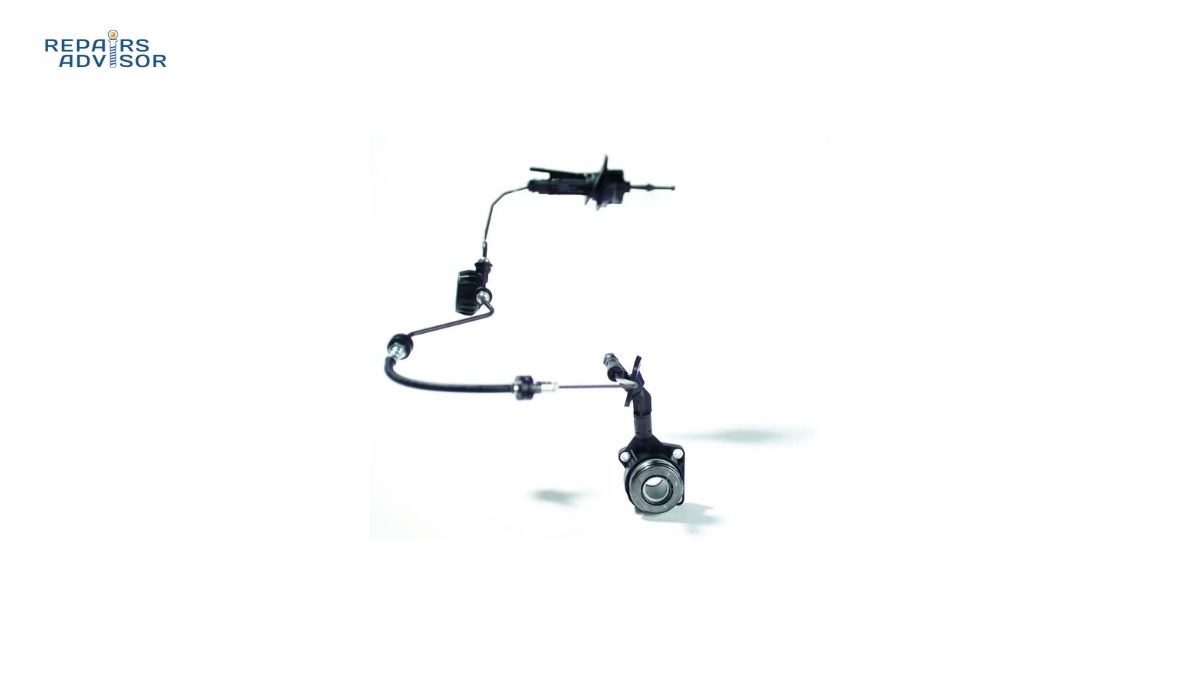
Clutch Slave Cylinder
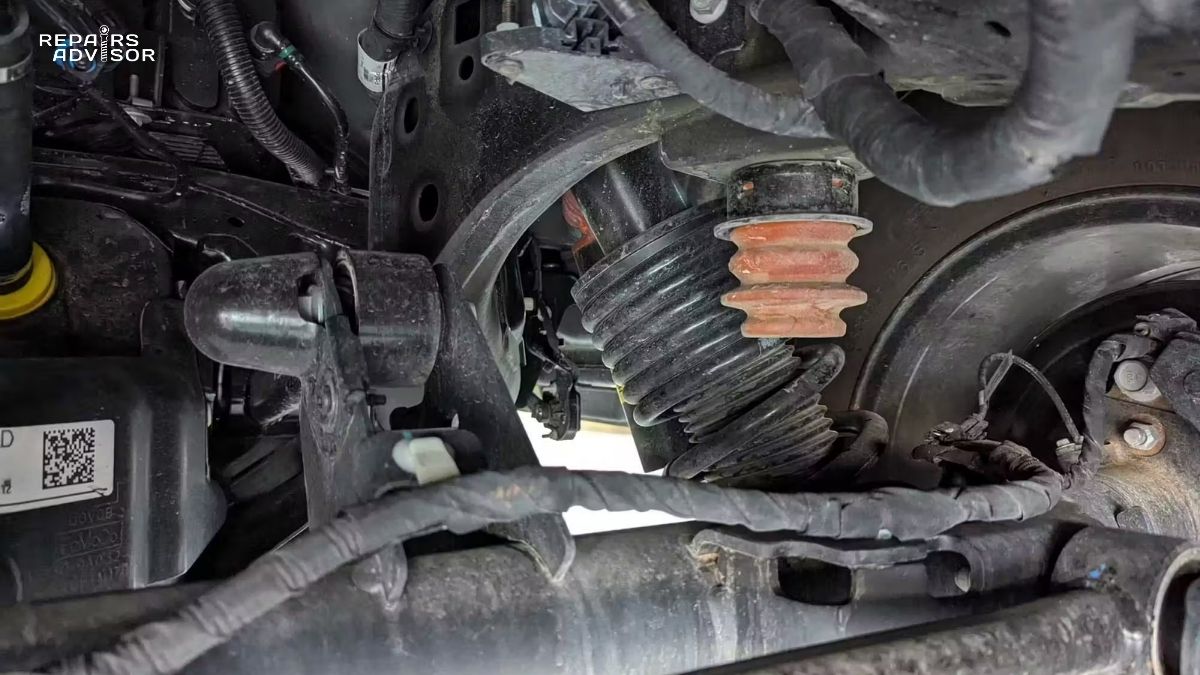
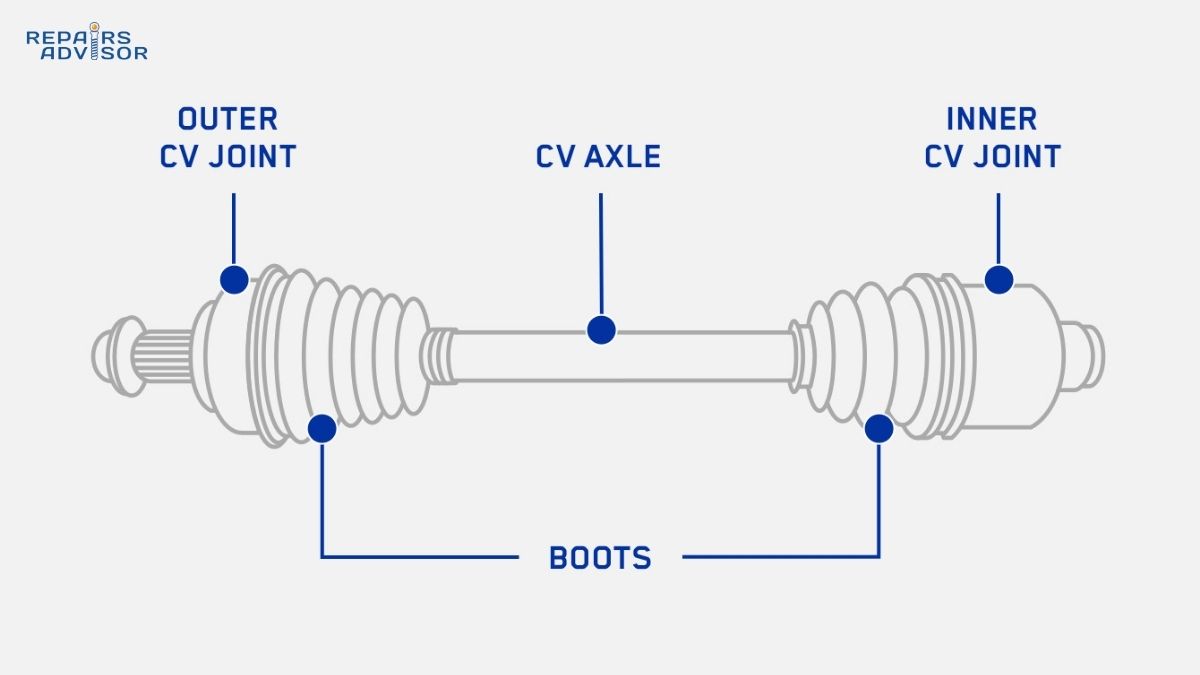
The slave cylinder receives pressurized hydraulic fluid from the master cylinder and converts that hydraulic pressure back into mechanical force to actuate the clutch release mechanism. Two primary design configurations exist: external slave cylinders mounted on the outside of the transmission bell housing, and concentric slave cylinders (CSCs) integrated with the release bearing inside the bell housing.
External slave cylinders mount to the bell housing with bolts, positioning their push rod to contact the clutch release fork. As hydraulic pressure builds, the slave cylinder’s piston extends outward, pushing the release fork, which pivots to press the clutch release bearing against the pressure plate’s diaphragm spring fingers. These external designs offer serviceability advantages—they’re easily accessible for inspection, bleeding, and replacement without transmission removal. The bleeding valve on the slave cylinder typically points upward or to the side for easy access during service.
Concentric slave cylinders represent a more modern, compact approach. The CSC surrounds the transmission input shaft, integrating the hydraulic actuation with the release bearing in a single assembly. When hydraulic pressure builds, the CSC piston pushes the release bearing directly against the pressure plate diaphragm spring, eliminating the release fork entirely. This design reduces the number of moving parts, decreases the overall package size, and provides more linear force application to the pressure plate.
However, CSC designs present servicing challenges. Because they’re located inside the bell housing, slave cylinder or release bearing failure typically requires transmission removal for replacement—a significantly more labor-intensive job than external slave cylinder replacement. Additionally, CSCs can be more difficult to bleed properly because of their internal location and the challenge of positioning the bleeder valve at the system’s highest point to effectively purge air bubbles.
Slave cylinder bore diameters typically range from 0.875 to 1.125 inches—larger than the master cylinder bore to provide the force multiplication needed at the clutch mechanism. The hydraulic ratio between master and slave cylinders commonly falls between 4:1 and 6:1, meaning the slave cylinder develops four to six times the force applied at the master cylinder, though with correspondingly reduced travel distance.
Release Fork and Bearing Assembly
The release fork acts as a lever to transfer force from the external slave cylinder (in non-CSC systems) to the release bearing. This fork pivots on a ball stud or pivot pin mounted in the bell housing, with one end receiving force from the slave cylinder push rod and the other end pressing against the release bearing’s outer collar. The fork’s leverage ratio provides additional mechanical advantage beyond the hydraulic multiplication already achieved.
The fork must maintain proper alignment and freedom of movement while handling substantial forces during clutch disengagement. Wear points include the pivot ball, the slave cylinder contact point, and the release bearing contact surfaces. Some manufacturers install replaceable wear pads at these contact points to extend service life. Excessive wear or damage to the release fork can cause erratic clutch operation, unusual noises, or incomplete clutch disengagement.
Release bearing positioning is critical. The bearing must maintain slight clearance from the pressure plate’s diaphragm spring when the clutch is engaged (pedal up) to prevent premature bearing wear. During clutch disengagement (pedal down), the fork pushes the bearing forward to contact the diaphragm spring’s inner fingers with adequate force to compress the spring and retract the pressure plate. This bearing operates in a harsh environment, subjected to high rotational speeds, substantial thrust loads, and limited lubrication.
Hydraulic Fluid
The hydraulic clutch system operates with standard DOT 3 or DOT 4 brake fluid in most vehicles, chosen for its specific properties that make hydraulic actuation possible. The most critical characteristic is incompressibility—hydraulic fluid doesn’t compress under pressure the way air or gases do, allowing instant force transmission from the master cylinder to the slave cylinder with zero energy loss to fluid compression.
DOT 3 and DOT 4 fluids are glycol-based, formulated to withstand the high temperatures generated in brake and clutch systems while maintaining consistent viscosity across a wide temperature range. These fluids include corrosion inhibitors to protect the internal metal surfaces of cylinders and passages, along with lubricants to maintain seal pliability. The key difference between DOT 3 and DOT 4 is boiling point—DOT 4 has higher dry and wet boiling points, providing a safety margin in demanding applications.
Some vehicles, particularly certain European models, specify DOT 5 silicone-based fluid. This fluid type is NOT compatible with glycol-based fluids and must never be mixed with DOT 3 or DOT 4. Silicone fluid doesn’t absorb moisture like glycol fluids do, but it tends to aerate more easily and compresses slightly more than glycol fluids. Always verify your vehicle’s specifications before adding fluid.
The hygroscopic nature of glycol-based fluids—their tendency to absorb moisture from the atmosphere—is both a benefit and a challenge. The benefit: absorbed moisture distributes throughout the fluid rather than forming localized pockets of water that could cause rust or freezing. The challenge: as moisture content increases over time, the fluid’s boiling point decreases significantly. This is why periodic fluid replacement is recommended even though hydraulic clutch systems generate far less heat than brake systems.
How a Hydraulic Clutch Works: Step-by-Step Operation
Phase 1: Clutch Disengagement (Pedal Depressed)
Step 1: Pedal Actuation Begins
When you press the clutch pedal with your foot, you’re initiating a precisely engineered chain of events that temporarily disconnects your engine from the transmission. The initial pedal travel—that half-inch to inch-and-a-half of free play—takes up slack in the linkage and allows the master cylinder piston to move forward to close the compensation port. This free play is essential; without it, the piston might not fully return to its rest position when you release the pedal, leaving residual pressure in the system that could cause clutch slippage or premature wear.
As you continue pressing past the free play zone, you feel increasing resistance. This resistance comes from the master cylinder piston compressing the hydraulic fluid against the force of the pressure plate springs transmitted back through the entire system. The pedal’s mechanical leverage—its design as a lever arm—provides your first stage of force multiplication, typically doubling or tripling the force your foot applies before it reaches the master cylinder.
Step 2: Master Cylinder Pressure Generation
Once the master cylinder piston moves forward enough to block the compensation port, the system becomes a sealed, pressurized circuit. Continued piston advancement forces brake fluid out of the master cylinder bore and into the hydraulic lines leading to the slave cylinder. Because the fluid is essentially incompressible, the pressure builds rapidly and uniformly throughout the entire system—a perfect demonstration of Pascal’s law in action.
The pressure you create reaches 800 to 1200 PSI in typical applications, though high-performance clutches with heavy-duty pressure plate springs may require even higher pressures. This pressure transmits almost instantaneously through the hydraulic lines; unlike a cable that can stretch slightly or have friction in its housing, hydraulic fluid delivers your input to the slave cylinder with zero delay and zero energy loss to the transmission medium.
The master cylinder bore diameter plays a crucial role here. A smaller bore diameter means the piston must travel farther to displace the volume of fluid needed to actuate the slave cylinder, but it also creates more pressure for a given pedal force. Engineers carefully size this bore to balance pedal travel distance against pedal effort—you want enough travel to feel and modulate clutch engagement, but not so much that your leg must extend uncomfortably far to fully disengage the clutch.
Step 3: Slave Cylinder Activation
As pressurized fluid reaches the slave cylinder, it acts against the slave cylinder piston with force determined by the pressure level and the piston’s surface area. Because the slave cylinder typically has a larger bore diameter than the master cylinder, the pressure acts on a larger surface area, creating greater output force. This is hydraulic force multiplication: pressure remains constant throughout the system, but force increases with piston area.
For example, if your 0.75-inch diameter master cylinder generates 1000 PSI pressure, and that pressure acts on a 1.0-inch diameter slave cylinder piston, the force at the slave cylinder is significantly greater than the force at the master cylinder—even though the pressure is identical. The mathematical relationship follows the formula: Force = Pressure × Area. With slave cylinder areas typically 1.5 to 2.5 times larger than master cylinder areas, you achieve force multiplication ratios of 4:1 to 6:1.
The slave cylinder piston extends outward, pushing either a release fork (in external slave cylinder designs) or pushing directly against the pressure plate (in concentric slave cylinder designs). This outward movement must overcome the resistance of the pressure plate’s diaphragm spring—a substantial force that can exceed 1000 pounds in performance applications. The hydraulic advantage makes this possible with comfortable pedal effort.
Step 4: Release Bearing Engagement
Whether actuated by a release fork or directly by a concentric slave cylinder, the release bearing now presses against the inner fingers of the pressure plate’s diaphragm spring. This cone-shaped spring acts as a lever with the fulcrum at its outer perimeter where it contacts the pressure plate body. Pressing the inner fingers inward causes the outer edge of the spring to move outward, pulling the pressure plate away from the flywheel and clutch disc.
As the pressure plate retracts, pressure on the clutch disc decreases rapidly. The friction material on the clutch disc, which had been sandwiched between the flywheel face and pressure plate surface, is now free to rotate independently. With no clamping force holding the clutch disc to the spinning flywheel, the connection between engine and transmission is interrupted. The engine can now continue running at idle speed while the transmission input shaft either slows to a stop or changes speed as you select a different gear.
The release bearing must apply sufficient force to fully compress the diaphragm spring and create adequate clearance between the pressure plate and clutch disc. Insufficient force results in clutch drag—the disc continues making partial contact with the flywheel, making gear selection difficult and potentially damaging the transmission synchronizers. This is why proper system bleeding and maintained fluid levels are critical; any air in the system compresses instead of transmitting force, reducing the available force at the release bearing.
Phase 2: Clutch Engagement (Pedal Released)
Step 1: Pressure Release
When you release the clutch pedal, the process reverses. The pedal return spring (or sometimes just the diaphragm spring’s force transmitted back through the system) pulls the pedal back to its rest position. As the master cylinder piston retracts, it reduces the volume of trapped hydraulic fluid in the cylinder bore, dropping system pressure rapidly toward zero.
Critically, as the piston returns fully to its rest position, it uncovers the compensation port. This port’s opening allows fluid to flow freely between the cylinder bore and the reservoir, equalizing pressure to atmospheric. Any excess fluid displaced by clutch disc wear or thermal expansion can escape to the reservoir, while any shortage can be replenished from the reservoir. This compensation mechanism is what makes the system self-adjusting.
Step 2: System Return
With hydraulic pressure eliminated, the slave cylinder piston retracts. In external slave cylinder designs, the release fork’s return spring or the diaphragm spring’s own force pushes the slave cylinder piston back into its bore, displacing fluid back toward the master cylinder and reservoir. In concentric slave cylinder designs, the diaphragm spring directly pushes the CSC’s bearing carrier and piston assembly backward, achieving the same result.
The release bearing withdraws from contact with the pressure plate’s diaphragm spring, restoring a small clearance gap—typically 0.040 to 0.080 inches. This clearance is essential to prevent the release bearing from spinning constantly against the diaphragm spring while the clutch is engaged. Constant contact would generate heat, accelerate bearing wear, and could eventually cause premature bearing failure. The self-adjusting nature of the hydraulic system maintains this clearance automatically as the clutch disc wears thinner over its service life.
Step 3: Clutch Re-Engagement
With the release bearing withdrawn, the diaphragm spring returns to its natural shape, pulling the pressure plate forward to clamp the clutch disc firmly against the flywheel face. The spring force—often 1200 to 1800 pounds in stock applications and even more in performance clutches—creates sufficient friction between the flywheel, clutch disc, and pressure plate to transmit engine torque without slippage.
The engagement process isn’t instantaneous; it occurs progressively as you release the pedal. During the initial release from full depression, the pressure plate moves forward but hasn’t yet contacted the clutch disc firmly. This is the engagement zone—the portion of pedal travel where you modulate clutch engagement by controlling how much clamping force the pressure plate applies. Smooth driving requires developing feel for this engagement zone, releasing the pedal gradually to allow the engine and transmission speeds to synchronize without harsh engagement or excessive clutch slippage.
Once fully engaged, the clutch disc, pressure plate, and flywheel rotate together as a unit, transmitting power from the engine crankshaft through the clutch disc hub to the transmission input shaft. The hydraulic system returns to its standby state, with zero pressure in the lines and the master cylinder’s compensation port open to the reservoir, ready for the next gear change cycle.
Pascal’s Law in Action
The entire hydraulic clutch system beautifully demonstrates Pascal’s law: “Pressure applied to a confined fluid transmits undiminished throughout the fluid in all directions.” When you create 1000 PSI in the master cylinder, that same 1000 PSI exists everywhere in the system—in the hydraulic lines, at all connection points, and in the slave cylinder. The pressure doesn’t decrease as it travels; only the volume of fluid moved and the force generated differ based on piston areas.
This principle enables force multiplication without energy loss. A mechanical lever system provides force multiplication, but friction at pivot points consumes some energy. A cable system suffers from friction between the cable and its housing. A hydraulic system, by contrast, transmits force through a sealed, lubricated environment with minimal friction losses. The only energy loss comes from seal friction, which is negligible compared to mechanical or cable systems.
The force calculation is straightforward: Force equals Pressure times Area (F = P × A). If your master cylinder has a 0.75-inch diameter bore, its area is approximately 0.442 square inches. At 1000 PSI, this generates 442 pounds of force pushing fluid into the system. If your slave cylinder has a 1.0-inch diameter bore, its area is approximately 0.785 square inches. That same 1000 PSI acting on 0.785 square inches produces 785 pounds of force—a 1.77:1 force multiplication from hydraulic advantage alone.
When you account for the mechanical advantage from the clutch pedal’s lever arm (perhaps 3:1) and the hydraulic advantage (perhaps 1.8:1), the overall system gain might be 5.4:1. This means 30 pounds of effort from your foot becomes 162 pounds at the release fork—sufficient to overcome the pressure plate spring resistance with comfortable pedal effort.
Self-Adjustment Features
One of the most significant advantages of hydraulic clutch systems over cable-actuated designs is their ability to automatically compensate for clutch disc wear without manual adjustment. As the friction material on the clutch disc wears down over tens of thousands of miles of operation, the pressure plate moves slightly closer to the flywheel to maintain clamping force. In a cable system, this wear would cause the cable to become effectively “longer,” changing the engagement point and eventually requiring adjustment.
The hydraulic system’s self-adjustment occurs through the master cylinder’s compensation port. When the clutch pedal is fully released and the master cylinder piston returns to its rest position, the compensation port opens, creating a connection between the pressurized side of the system and the fluid reservoir. As the clutch disc wears thinner, the slave cylinder piston extends slightly further to maintain contact with the release fork or release bearing. This extension draws additional fluid from the reservoir through the compensation port.
The fluid level in the reservoir gradually decreases as the clutch wears, serving as a convenient wear indicator. A technician can assess clutch disc wear simply by checking the reservoir fluid level—a significantly lower level compared to when the clutch was new indicates substantial disc wear. This provides advance warning that clutch replacement will soon be necessary, typically when the fluid level drops to within 0.5 inches of the minimum mark.
The beauty of this system is its automatic operation. The driver experiences consistent clutch engagement at the same pedal position from the day the clutch is installed until replacement becomes necessary. There are no cables to adjust, no linkage geometry changes to compensate for, and no gradual shifts in pedal feel that occur with wear. The hydraulic system simply accommodates the wear by drawing more fluid from the reservoir, maintaining optimal geometry throughout the clutch’s service life.
This self-adjustment has limits, of course. Once the clutch disc friction material wears down to the rivets—typically at 80,000 to 120,000 miles in normal driving—the clutch must be replaced before damage occurs to the flywheel or pressure plate. At this point, the fluid reservoir will be at or below its minimum level, and attempting to continue driving risks running the system dry, introducing air, and causing complete clutch system failure.
Common Hydraulic Clutch System Configurations
External Slave Cylinder Design
The traditional external slave cylinder design mounts to the outside of the transmission bell housing with two or more bolts, positioning a push rod to contact the clutch release fork. This configuration has been standard for decades and remains common in trucks, many domestic vehicles, and some imports. The slave cylinder typically mounts at an angle pointing upward and forward, with the bleeder valve at the top for easy air removal during service.
External designs offer significant serviceability advantages. The slave cylinder is readily accessible without transmission removal, making replacement a straightforward job that many DIY enthusiasts can accomplish in their driveway. The bleeding procedure is also simpler because the bleeder valve can be positioned at the system’s highest point, allowing air bubbles to rise naturally and escape during bleeding. If the release bearing fails—a common wear item—it can often be replaced by removing the transmission without disturbing the hydraulic system.
The push rod connecting the slave cylinder to the release fork must have proper adjustment to maintain correct release bearing clearance. Some systems use a threaded rod with a locknut, allowing manual adjustment of the release bearing-to-diaphragm spring gap. Others use a fixed-length rod, relying on the release fork geometry and slave cylinder stroke to provide correct clearance automatically. Wear at the push rod-to-fork contact point can gradually increase this clearance over time, potentially requiring shim adjustment or fork replacement.
External slave cylinders are particularly well-suited to heavy-duty applications and retrofit installations. Their robust construction handles the higher forces required in trucks or vehicles with aggressive performance clutches. Additionally, converting a vehicle from cable to hydraulic actuation is more practical with an external slave cylinder because it doesn’t require transmission disassembly for installation.
Concentric Slave Cylinder (CSC) Design
Concentric slave cylinders represent a more modern, integrated approach that combines the slave cylinder function with the release bearing in a single assembly. The CSC surrounds the transmission input shaft, mounting inside the bell housing and eliminating the release fork entirely. When hydraulic pressure builds, the CSC’s piston pushes its integrated bearing directly against the pressure plate’s diaphragm spring with linear, centered force application.
This design offers several engineering advantages. By eliminating the release fork and its pivot point, engineers reduce the number of moving parts, potential wear points, and sources of friction or compliance in the system. The CSC provides more concentric force application to the diaphragm spring, reducing the likelihood of uneven pressure plate wear or release problems. The compact packaging also allows smaller bell housing designs, contributing to overall vehicle weight reduction and improved packaging efficiency.
CSCs are particularly popular in modern European vehicles, dual-clutch transmissions, and performance applications where precise clutch modulation matters. The direct force path from hydraulic pressure to bearing contact eliminates the mechanical multiplication (and potential for slop) that occurs in release fork systems. This can provide more linear, predictable clutch engagement characteristics that enthusiast drivers appreciate.
However, CSC designs present service challenges that owners must understand. Because the CSC is located inside the bell housing, slave cylinder or bearing failure requires transmission removal for access—a significantly more expensive repair than replacing an external slave cylinder. Some CSC designs have experienced durability issues with internal seals failing prematurely, allowing hydraulic fluid to leak into the bell housing and contaminate the clutch disc.
Bleeding CSC systems can also be more challenging. The bleeder valve location inside or near the bell housing may not be at the system’s highest point, making complete air removal difficult. Some manufacturers specify special bleeding procedures for CSC systems, sometimes requiring the use of a pressure bleeder or vacuum bleeder rather than traditional manual bleeding methods. Understanding whether your vehicle uses a CSC versus external slave cylinder design is important when planning maintenance or troubleshooting clutch problems.
Dual-Circuit Integration
Many modern vehicles integrate the clutch and brake hydraulic systems by sharing a common fluid reservoir. This configuration offers packaging advantages and simplifies fluid level monitoring—you check one reservoir instead of two separate units. The clutch master cylinder draws fluid from one chamber of the brake fluid reservoir (or from a separate reservoir chamber mounted to the same unit), while the brake master cylinder draws from the other chamber(s).
Despite sharing a reservoir, the clutch and brake hydraulic circuits remain completely separate. A partition inside the reservoir prevents fluid from flowing between chambers, ensuring that a clutch system leak cannot compromise brake system integrity or vice versa. This safety isolation is critical—you never want brake system problems affecting clutch operation or clutch problems affecting brake function.
From a maintenance perspective, shared reservoir systems require attention to total fluid level. If you notice the reservoir is low, you must determine whether the clutch or brake system is consuming fluid due to wear or leaking. Typically, slow gradual fluid loss indicates normal wear (clutch disc or brake pad wear), while rapid fluid loss suggests a leak requiring immediate attention. The reservoir usually has separate minimum level marks for each chamber, allowing you to identify which system needs investigation.
Some performance vehicles and trucks with especially heavy-duty clutches use completely separate reservoirs for clutch and brake systems. This separation provides additional fluid capacity for the clutch system and allows the use of different fluid specifications if needed (though most still use the same DOT 3 or DOT 4 fluid in both systems). Separate reservoirs also eliminate any possibility of one system affecting the other through fluid level changes.
Maintenance Requirements and Best Practices
Fluid Level Inspection
Regular fluid level checks are the foundation of hydraulic clutch system maintenance. Unlike engine oil that you check monthly, clutch fluid requires inspection only every few months under normal circumstances—but don’t skip these checks. Low fluid level is your primary warning sign of either normal clutch disc wear or potentially more serious problems like hydraulic leaks.
Locate the fluid reservoir, typically mounted on the firewall near the brake master cylinder. Some vehicles use a shared reservoir with separate chambers for clutch and brake systems, while others have independent reservoirs. The reservoir is usually translucent plastic, allowing you to check the level without removing the cap. Look for “MAX” and “MIN” markings molded into the side. The fluid level should rest between these marks when the system is cold.
Normal clutch disc wear causes gradual fluid level decrease over tens of thousands of miles. As the friction material on the clutch disc wears thinner, the slave cylinder piston extends further to compensate, drawing more fluid from the reservoir. If your fluid level has dropped halfway between MAX and MIN over 40,000 to 60,000 miles of driving, that’s typical wear progression. You can safely top off the reservoir, but start planning for eventual clutch replacement—you’re probably approaching the latter half of the clutch disc’s service life.
Rapid fluid level decrease indicates a problem requiring immediate attention. If the level drops noticeably over a few weeks or months, you have a leak somewhere in the system. Check the carpet under the clutch pedal for dampness (master cylinder leaking into the driver’s compartment), inspect the slave cylinder for wetness around the dust boot, and examine all hydraulic line connections for seepage. A sudden drop to minimum level combined with a spongy pedal feel suggests a significant leak that needs immediate repair to prevent complete clutch failure.
When topping off fluid, always use the exact type specified in your owner’s manual—typically DOT 3 or DOT 4 brake fluid for most vehicles. Never use DOT 5 silicone fluid unless specifically required by your vehicle manufacturer, as mixing silicone and glycol-based fluids causes severe damage to rubber seals and renders the entire system useless. Keep the reservoir cap threads clean, and ensure the cap seals properly after refilling to prevent moisture absorption that degrades fluid performance.
System Bleeding Procedure
Bleeding the hydraulic clutch system removes air bubbles that inevitably enter when you open the system for component replacement or when air sneaks past aging seals. Air in hydraulic systems is problematic because unlike the incompressible fluid, air compresses easily. When air is present, your pedal feels spongy, and available force at the slave cylinder decreases significantly—the pedal travel that should be transmitting force to the clutch is instead compressing air bubbles.
You’ll need to bleed the system after replacing any hydraulic component (master cylinder, slave cylinder, or hydraulic lines), if the fluid reservoir runs dry, or whenever you notice spongy pedal feel developing despite adequate fluid level. Bleeding is straightforward but requires patience and attention to detail for best results.
Two-Person Manual Bleeding Method
The traditional approach requires a helper and works well for most systems. Position a drain pan under the slave cylinder bleeder valve, and connect a clear plastic tube to the bleeder nipple, submerging the tube’s other end in a few inches of fresh brake fluid in a catch bottle. This submerged tube prevents air from being sucked back into the system when the bleeder closes.
Have your helper press the clutch pedal slowly to the floor and hold it there. With the pedal held down, crack open the bleeder valve about one-half turn. Fluid and air will discharge through the tube into your catch bottle. Watch for air bubbles—they’ll be visible in the clear tube. Close the bleeder valve before your helper releases the pedal. This sequence is critical: pedal down, open bleeder, close bleeder, pedal up. If you allow the pedal to rise while the bleeder is open, you’ll suck air back into the system.
Repeat this process, checking and topping off the reservoir frequently—never let it run dry or you’ll introduce more air and start over. Continue until you see steady fluid flow with no air bubbles. Typically, 10 to 20 cycles suffice, though stubborn systems may require more. After bleeding, the clutch pedal should feel firm with a clear engagement point, not spongy or inconsistent.
Vacuum Bleeding Method
A vacuum bleeder tool allows one-person bleeding by pulling fluid and air through the system rather than pushing it. Connect the vacuum bleeder to the slave cylinder bleeder valve, then create vacuum (typically 15-20 inches Hg). Open the bleeder valve and watch fluid draw from the reservoir through the system and into the vacuum bleeder’s catch container. Continue pulling vacuum until no more air bubbles appear in the catch container.
Vacuum bleeding works well but has a limitation: if the bleeder valve threads are worn or damaged, the vacuum can draw air past the threads rather than pulling it from the hydraulic system, leading to endless air bubbles that don’t represent actual system contamination. If you see continuous air despite extensive bleeding, check the bleeder valve condition and thread sealant.
Pressure Bleeding Method
Professional shops often use pressure bleeders that attach to the fluid reservoir and pressurize the system with regulated air pressure (typically 10-15 PSI). With the system pressurized from the reservoir, you simply open the slave cylinder bleeder valve and let pressure push fluid and air out until only bubble-free fluid emerges. This method is quick and thorough but requires a pressure bleeder tool with the correct adapter for your reservoir.
Critical Bleeding Tip for External Slave Cylinders
Here’s a technique that solves many difficult bleeding situations: temporarily remove the slave cylinder from the bell housing (leaving the hydraulic line connected) and position it with the bleeder valve pointing straight up—higher than all other parts of the hydraulic system. Air bubbles naturally rise, and positioning the bleeder at the absolute highest point allows them to collect there for easy removal. After bleeding in this position, reinstall the slave cylinder and perform a few final bleeding cycles to ensure complete air removal.
Concentric Slave Cylinder Bleeding
CSC systems require special attention during bleeding. Because the bleeder valve may not be easily accessible or at the system’s highest point, follow your manufacturer’s specific procedure. Some require transmission rotation to position the bleeder optimally, while others specify pressure or vacuum bleeding methods. If bleeding a CSC proves difficult, consider taking the vehicle to a professional shop with proper equipment and experience.
Component Inspection
Visual inspection of hydraulic clutch components should be part of your regular maintenance routine, particularly if you’re experiencing any clutch problems. Start with the fluid reservoir—look for fluid level, color, and clarity. Fresh brake fluid is clear with a slight golden tint. Dark brown or black fluid indicates contamination and requires system flushing. Particles floating in the fluid suggest internal seal degradation or corrosion.
Inspect the master cylinder area under the dash. Pull back the dust boot where the push rod enters the master cylinder body. If you find fluid inside the boot, the primary seal is leaking and cylinder replacement is necessary. Check the carpet under the clutch pedal for dampness or brake fluid smell—internal master cylinder leakage allows fluid to seep into the driver’s compartment, creating a safety hazard and contaminating carpeting.
Move to the slave cylinder. Pull back its dust boot (on external cylinders) and check for fluid—any fluid presence indicates seal failure requiring cylinder replacement. Look for wetness on the slave cylinder body, hydraulic lines, and all connection points. Fresh brake fluid is oily to the touch and has a distinctive odor; wetting your finger and smelling it confirms whether mysterious dampness is brake fluid or another fluid (oil, coolant, etc.).
Examine hydraulic lines and hoses for damage. Rigid lines shouldn’t show rust, dents, or kinks. Flexible hoses shouldn’t show cracks, abrasion, or bulging—bulging indicates the internal reinforcement has failed and the hose will rupture under pressure. Check that hoses have proper routing clearance from exhaust components, moving suspension parts, and sharp edges.
When to Consult a Professional
Certain conditions warrant professional diagnostic expertise. If you’ve bled the system thoroughly but spongy pedal feel persists, internal cylinder damage (scored bores, damaged seals) may prevent proper pressure buildup. If you experience sudden pedal dropping to the floor, complete hydraulic failure has occurred requiring immediate professional attention—do not drive the vehicle. When dealing with concentric slave cylinders requiring transmission removal, professional service is often the most practical choice unless you have substantial mechanical experience and proper equipment.
Fluid Replacement Schedule
While hydraulic clutch systems don’t generate the heat that brake systems do, the fluid still requires periodic replacement because of moisture absorption. Glycol-based brake fluid (DOT 3 and DOT 4) is hygroscopic—it absorbs moisture from the atmosphere through the reservoir vent and microscopic seal permeability. Over time, moisture content increases from near-zero when fresh to 3-4% after several years of service.
Moisture contamination lowers the fluid’s boiling point and promotes internal corrosion in master and slave cylinder bores. Although clutch systems rarely generate enough heat to boil the fluid (unlike brakes that convert kinetic energy to heat), corrosion from moisture damages cylinder bores and seals, leading to leaks and failure. Replacing the fluid every two years or 30,000 miles maintains system integrity and prevents premature component failure.
The replacement procedure combines draining and bleeding. Start by using a turkey baster or vacuum pump to remove old fluid from the reservoir. Refill with fresh fluid, then bleed the system at the slave cylinder until fluid emerging from the bleeder valve runs clear rather than dark. This flushing action replaces old contaminated fluid throughout the system. The process typically requires one to two pints of fresh fluid—have extra on hand to ensure you can completely flush the system.
Some technicians question whether clutch fluid replacement is as critical as brake fluid replacement since clutch systems generate minimal heat. However, the corrosion prevention benefit alone justifies the minimal cost and effort. A $15 fluid change every few years prevents $300-500 cylinder replacement costs and potential roadside breakdown inconvenience.
Troubleshooting Common Issues
Spongy or Soft Pedal Feel
A clutch pedal that feels soft, spongy, or doesn’t provide firm resistance indicates air in the hydraulic system or internal cylinder problems. When you press a properly functioning hydraulic clutch, you should feel immediate firm resistance after taking up the free play. Sponginess—a compressible, mushy feeling—means something compressible is in the system, and that something is almost always air.
Primary Causes and Diagnosis
Air enters the system through several routes. External leaks at line connections, cylinder seals, or damaged hoses allow fluid to seep out and air to seep in. Internal master cylinder or slave cylinder seal failure allows air past the piston rather than through external leaks—these internal leaks are harder to detect because they don’t produce visible fluid loss. Very old fluid that’s absorbed excessive moisture can create sponginess through dissolved gases or internal corrosion that damages sealing surfaces.
Start diagnosis by checking the fluid reservoir level. If it’s low, you have a leak—find and repair it before bleeding. Inspect all hydraulic components and connections for wetness, paying special attention to cylinder dust boots and line fittings. If external inspection reveals no leaks but the pedal is spongy, internal seal degradation is likely.
Solutions
Begin with thorough system bleeding using your preferred method (manual, vacuum, or pressure). Many spongy pedal cases resolve with proper bleeding that removes entrapped air. If sponginess returns quickly after bleeding—within days or weeks—you have an ongoing air entry path requiring component replacement. Master cylinders with worn primary seals are the most common culprits, followed by slave cylinder seal failure.
Replace any cylinder showing internal leakage or external seepage. Installing a new cylinder without addressing the reason for the original failure (contaminated fluid, moisture-induced corrosion) will lead to repeat failure, so combine cylinder replacement with complete system fluid flushing. After component replacement, bleed thoroughly and verify firm pedal feel before returning the vehicle to service.
Safety Note: Don’t ignore spongy pedal feel. While the clutch may still function partially, incomplete disengagement puts extreme loads on transmission synchronizers, causing rapid damage. The grinding noise you hear when forcing gears to mesh is synchro teeth being destroyed—expensive internal transmission damage that a simple hydraulic repair could have prevented.
Clutch Pedal Sinking to Floor
A clutch pedal that gradually sinks to the floor when held down, or that won’t return from the floor after depression, indicates complete loss of hydraulic integrity. This condition makes driving impossible—you can’t disengage the clutch properly to shift gears, and forcing shifts will damage the transmission.
Causes and Diagnosis
Total pressure loss occurs from catastrophic seal failure in the master or slave cylinder, complete hydraulic line rupture, or running the system completely dry through neglected fluid level. The master cylinder’s primary seal is the usual culprit—it fails either from age-related deterioration, corrosion damage from moisture-contaminated fluid, or scoring of the cylinder bore from abrasive particles.
Test by pumping the clutch pedal rapidly several times. If you can temporarily restore some pedal resistance through pumping but it immediately sinks again when held down, the master cylinder has failed. Check the reservoir—if it’s full and you have no external leaks but the pedal still sinks, internal master cylinder failure is confirmed. If the reservoir is empty and you find fluid puddles under the vehicle, external leakage from the slave cylinder or hydraulic lines is your problem.
Solutions
Replace the failed component immediately. A pedal-sinking condition that occurs while driving is dangerous—you may become stuck in gear unable to shift or unable to disengage the clutch at intersections. Have the vehicle towed rather than attempting to drive it. After component replacement, thoroughly bleed the system and verify solid pedal feel before driving.
Prevent this failure through proper maintenance. Regular fluid replacement prevents the moisture-induced corrosion that damages cylinder bores and seals. Monitoring fluid level identifies leaks early, before complete failure occurs. If you catch a leak early (noticing slight fluid level decrease and minor dampness at a cylinder), you can plan replacement at your convenience rather than experiencing roadside failure.
Difficulty Shifting Gears
When your clutch won’t disengage completely, you experience grinding when trying to select gears, especially when downshifting or engaging reverse. This “clutch dragging” or “clutch drag” means the clutch disc continues making partial contact with the flywheel even with the pedal fully depressed, causing the transmission input shaft to continue rotating when it should be stopped.
Causes and Diagnosis
Hydraulic system problems causing incomplete clutch disengagement include air in the lines (reduce available force at release bearing), insufficient slave cylinder stroke (worn components, improper adjustment), or low fluid level (insufficient fluid volume for full actuation). Non-hydraulic causes include worn or damaged clutch components, but hydraulic issues are more common and easier to address.
Diagnose by testing shifting with the engine off versus engine running. If gears engage smoothly with the engine off but grind with the engine running (clutch pedal fully depressed), you have clutch drag. Check fluid level—if it’s at or below minimum, top it off and bleed the system. If fluid level is adequate but you still have drag, air in the system or worn components preventing full slave cylinder extension are likely.
Solutions
Start with system bleeding to remove any air. If drag persists after bleeding with adequate fluid level, inspect mechanical components. On external slave cylinder systems, check that the push rod adjustment provides adequate release bearing travel—some systems use adjustable push rods with locknuts that may need adjustment. Verify the release fork isn’t cracked or worn at pivot points, preventing full travel.
If these checks reveal no problems but drag continues, the clutch disc may be sticking on the input shaft splines (rust or contamination), the pressure plate may have failed, or the release bearing may not be making proper contact with the diaphragm spring. These conditions require transmission removal for clutch inspection and repair. Consult a professional technician for diagnosis if hydraulic system repair doesn’t resolve the shifting difficulty.
Understanding how your manual gearbox operates helps you recognize whether problems originate from clutch hydraulics or from the transmission itself. Grinding only on one specific gear suggests transmission problems, while grinding on multiple gears typically indicates clutch drag from hydraulic issues.
Fluid Leakage Issues
Hydraulic fluid leaks waste fluid, introduce air into the system, and create safety hazards from slippery fluid on surfaces or fire risk from fluid contacting hot exhaust components. Brake fluid is also highly corrosive to paint and can cause expensive bodywork damage if not cleaned immediately.
Common Leak Points and Detection
Master cylinder rear seals (where the push rod enters) leak into the driver’s compartment, appearing as dampness on carpeting or a brake fluid smell in the cabin. This is particularly dangerous because leaked fluid can make the pedal slippery and difficult to press. Check by pulling back the dust boot at the master cylinder’s rear—any fluid inside indicates seal failure.
Slave cylinder seals leak externally, appearing as wetness on the cylinder body or transmission bell housing. External slave cylinders show obvious wetness around the push rod dust boot or cylinder body. Concentric slave cylinders leak into the bell housing, sometimes contaminating the clutch disc with brake fluid—this causes severe clutch shudder and requires clutch replacement along with CSC replacement.
Hydraulic line connections leak at threaded fittings or flare connections, usually from loose connections, damaged sealing washers, or corrosion. These leaks typically appear as slow seepage that accumulates dirt, creating dirty wet spots at connection points. Flexible hoses leak when their internal reinforcement fails, causing bulging and eventually rupture—inspect hoses for bulges, cracks, or abrasion damage.
Solutions and Prevention
Address master cylinder leaks with cylinder replacement—rebuilding with seal kits is possible but new cylinders are often comparatively inexpensive and provide longer service life. For slave cylinder leaks, replacement is the only reliable solution, especially for concentric designs where transmission removal is required (making labor the major cost regardless of whether you install a rebuilt or new cylinder).
Hydraulic line and connection leaks sometimes resolve with tightening or new sealing washers. If a line itself is damaged (rust, kinking, or stone damage), replace that section rather than attempting repairs. Flexible hose bulging or cracking requires immediate replacement—bulging indicates imminent failure that could occur without warning.
Prevent leaks through regular fluid changes that minimize corrosion, proper line routing that avoids mechanical damage, and prompt attention to any small leaks before they worsen. Clean leaked fluid from painted surfaces immediately using water—brake fluid dissolves paint rapidly.
Unusual Noises During Operation
Noises during clutch operation help diagnose specific problems. Each noise type points to different components requiring attention, helping you determine whether the hydraulic system, mechanical clutch components, or transmission is at fault.
Squealing or Chirping
High-pitched squealing or chirping when depressing the clutch pedal typically comes from the release bearing spinning against the pressure plate diaphragm spring. This noise indicates release bearing wear—the bearing’s internal lubrication has degraded, causing metal-on-metal contact. Release bearings should operate silently when functioning properly.
Diagnose by pressing the clutch pedal with the engine running—if the noise occurs or changes with pedal position, the release bearing is the source. This condition requires transmission removal to replace the release bearing. Fortunately, release bearing replacement timing often coincides with clutch disc replacement, allowing both jobs during the same transmission removal.
Grinding Noises
Grinding when attempting to engage gears indicates clutch drag—the clutch isn’t fully disengaging, so gears are clashing as you try to mesh them. This damages transmission synchronizers and requires immediate attention. Grinding points to hydraulic problems (air in system, insufficient slave cylinder travel) or mechanical clutch problems (warped clutch disc, damaged pressure plate).
The grinding you hear is hardened steel synchro teeth being destroyed by forced gear engagement against still-rotating gears. This damage is expensive to repair, requiring transmission disassembly and synchronizer replacement. Preventing synchronizer damage by properly maintaining the hydraulic system and replacing worn clutch components before they cause drag saves substantial repair costs.
Clicking or Rattling
Clicking or rattling from the bell housing area during clutch operation suggests release fork problems. The fork may have worn at its pivot point, creating excessive play, or may be cracked near stress points. Some release forks use spring clips or pivot bearings that can wear or fail, creating clicking noises.
External inspection and testing can sometimes identify release fork problems—transmission movement on its mounts may cause visible fork wobble or excessive play at the slave cylinder push rod connection. However, definitive diagnosis and repair require transmission removal for access to the fork and its pivot.
Hissing Sounds
A hissing sound coinciding with clutch pedal depression or release suggests air movement in the hydraulic system—either air entering through a leak under vacuum conditions or air being compressed and decompressed as pressure changes. This noise confirms air presence and indicates bleeding is necessary after identifying and repairing the leak allowing air entry.
Professional Consultation Recommended
Release bearing replacement, clutch assembly replacement, and internal slave cylinder replacement all require transmission removal—jobs that exceed DIY capabilities for many owners. These repairs require specialty tools (transmission jack, flywheel holder, clutch alignment tool), significant mechanical knowledge, and often several hours of labor even for experienced technicians. If noise diagnosis points to these internal components, consult a professional shop for estimates and scheduling.
Hydraulic vs. Mechanical Clutch Systems
Performance Comparison
The operational feel between hydraulic and cable-actuated clutch systems differs noticeably. Hydraulic systems provide lighter, more consistent pedal effort throughout the pedal travel range. The force you apply multiplies through hydraulic advantage before reaching the clutch, so typical pedal effort ranges from 15 to 30 pounds. Cable systems require more effort—often 30 to 50 pounds—because they lack hydraulic multiplication and suffer from friction between the cable and its housing.
Consistency is where hydraulic systems truly excel. A properly functioning hydraulic clutch feels identical every time you press it—the engagement point doesn’t wander, the effort doesn’t vary, and operation remains smooth throughout the clutch disc’s service life. Cable systems change character as cables stretch, requiring periodic adjustment to maintain proper engagement point. The adjustment process itself involves trial and error, rarely achieving perfect results.
The self-adjusting nature of hydraulic systems eliminates the maintenance burden that cable systems impose. Cable clutches require adjustment every 10,000 to 20,000 miles as the cable stretches and the clutch disc wears. This adjustment requires accessing adjustment nuts, measuring free play, making changes, and testing—a process many owners neglect, leading to premature clutch or cable failure. Hydraulic systems need no such adjustment; they automatically compensate for wear from the day you install the clutch until replacement becomes necessary.
Durability differences become apparent over years of ownership. Clutch cables gradually stretch, fray at the ends, and corrode internally—eventually they snap, leaving you stranded. Hydraulic systems have no cable to break, and while master or slave cylinder seals eventually wear, they typically provide warning through gradual fluid loss rather than sudden catastrophic failure. A failing hydraulic component gives you time to plan repair; a snapping cable leaves you stuck immediately.
Cost Considerations
Initial installation costs favor cable systems—they’re simpler with fewer components. A complete cable clutch system (cable, mounting hardware, linkage) costs $50 to $150 in parts, while a hydraulic system (master cylinder, slave cylinder, lines, reservoir, fluid) runs $200 to $500. Installation labor for hydraulic systems also runs higher due to bleeding requirements and more complex routing.
However, long-term ownership costs often favor hydraulics. Cable replacement every 40,000 to 80,000 miles costs $100 to $200 including labor, while hydraulic systems frequently operate 100,000+ miles before requiring cylinder replacement. When replacement becomes necessary, hydraulic repairs cost more—$300 to $700 for master or slave cylinder replacement including labor and bleeding—but the longer service interval reduces the total cost per mile of ownership.
Performance modifications favor hydraulic systems despite higher costs. Upgrading to heavy-duty or competition clutches dramatically increases pressure plate spring loads. With cable systems, these springs create uncomfortably heavy pedal effort—sometimes 60 to 80 pounds or more—leading to leg fatigue during extended driving. Hydraulic systems maintain reasonable pedal effort even with aggressive performance clutches because the hydraulic advantage multiplies your pedal force before it reaches those heavy springs.
Repair complexity affects DIY versus professional service costs. Cable replacement is straightforward—disconnect both ends, route the new cable, adjust free play, done. Many owners handle cable replacement themselves, saving labor costs. Hydraulic repairs require bleeding to remove air, which some DIY owners find challenging. Professional bleeding adds $50 to $100 to repair costs, but many shops include bleeding with component replacement, minimizing the added expense.
When Each System Excels
Hydraulic systems dominate modern automotive applications for good reasons. Cars, trucks, and SUVs benefit from hydraulics’ self-adjusting convenience, consistent pedal feel, and suitability for powerful engines with heavy-duty clutches. If you’re driving a vehicle manufactured after 2000 with a manual transmission, you almost certainly have a hydraulic clutch—it’s become the industry standard.
High-performance applications strongly favor hydraulics. Sports cars, racing applications, and heavily modified vehicles with increased horsepower need clutches with substantial clamping force to prevent slippage. The hydraulic advantage makes these heavy clutches operable with reasonable pedal effort. Additionally, hydraulic systems support more precise pedal feel and modulation, helping skilled drivers achieve optimal launches and smooth high-RPM shifts.
Cable systems remain appropriate in specific applications. Motorcycles continue using cable clutches because they’re lighter, simpler, and easier to route through a motorcycle’s compact frame. The weight difference matters on motorcycles where every pound affects handling and performance. Additionally, motorcycle clutches require less clamping force than automotive clutches, making cable operation acceptable even without hydraulic multiplication.
Classic and vintage vehicle restorations sometimes maintain cable systems for originality or because converting to hydraulic would require extensive modifications. Owners accepting regular adjustment as part of vintage vehicle ownership preserve these systems for historical accuracy. However, many classic car enthusiasts install hydraulic conversion kits despite the installation complexity because the improved operation justifies the effort and expense.
Budget-conscious applications in developing markets sometimes use cable systems to minimize initial vehicle cost and simplify field repairs where hydraulic expertise and bleeding equipment may be limited. Simple cable systems can be repaired with basic tools and no specialized knowledge, while hydraulic systems require proper bleeding equipment and fluid for correct service.
Safety Considerations
Critical Safety Warnings
Hydraulic clutch systems use the same brake fluid that powers your vehicle’s braking system, and this fluid demands respect and careful handling. Brake fluid (whether DOT 3, DOT 4, or DOT 5) is corrosive, flammable under certain conditions, and toxic if ingested. Understanding proper handling procedures protects you, your vehicle’s finish, and ensures safe system operation.
Paint Damage Prevention: Brake fluid dissolves automotive paint rapidly—within minutes, it can damage clear coat and color layers, creating dull spots or complete paint removal requiring expensive body shop repair. Always cover painted surfaces near your work area with plastic sheeting or absorbent cloths before opening hydraulic components. If fluid contacts paint, immediately flush with large amounts of water—don’t wait to finish your work. Time is critical; water removes brake fluid before it damages paint, but only if applied quickly.
Personal Protection: Always wear safety glasses when working with hydraulic systems. Pressurized fluid can spray when loosening connections, and even small amounts in your eyes cause severe irritation. Nitrile gloves protect your hands from prolonged fluid exposure, which can dry and irritate skin. Work in well-ventilated areas—brake fluid vapors, while not highly toxic, shouldn’t be inhaled in concentration.
Fluid Type Compliance: Using incorrect fluid types causes immediate and severe system damage. Never mix DOT 3 and DOT 4 glycol-based fluids with DOT 5 silicone fluid—they’re chemically incompatible. Mixing them creates a gel that ruins all rubber seals and requires complete system dismantling, cleaning, and seal replacement. Always verify your vehicle’s specified fluid type in the owner’s manual before adding or replacing fluid. When in doubt, DOT 3 and DOT 4 are interchangeable (DOT 4 has higher boiling points), but DOT 5 is never interchangeable with glycol fluids.
Driving Safety Warnings: Operating a vehicle with compromised clutch hydraulics risks serious transmission damage and potentially dangerous situations. Incomplete clutch disengagement forces gears to mesh while still rotating, destroying synchronizers and potentially locking the transmission. If your clutch pedal feels spongy, sinks to the floor, or if you hear grinding during shifts, stop driving immediately. The transmission damage you cause by continuing to drive will cost thousands to repair—far more than addressing the hydraulic problem promptly.
Proper Fluid Handling
Store brake fluid in sealed containers away from children and pets. Unopened containers maintain fluid quality indefinitely, but opened containers absorb moisture from air, degrading performance within months. Purchase container sizes you’ll use completely rather than storing partially used containers long-term. Mark containers with opening dates to track age.
Dispose of used brake fluid properly—never pour it down drains, onto soil, or into trash. Brake fluid is toxic to aquatic life and contaminates groundwater. Most auto parts stores, quick-lube shops, and recycling centers accept used brake fluid for proper disposal. Collect used fluid in sealed containers during bleeding or component replacement, then transport to an appropriate disposal facility.
Keep brake fluid away from engine compartment heat sources. While it’s not gasoline-level flammable, brake fluid can ignite if exposed to hot exhaust manifolds or catalytic converters. Wipe up spills immediately and ensure no fluid residue remains on hot components. The distinctive brake fluid smell helps you identify leaks or spills—if you smell it while driving, investigate immediately.
When Professional Service is Mandatory
Certain hydraulic clutch repairs exceed reasonable DIY capabilities and warrant professional service. Concentric slave cylinder replacement requires transmission removal, which demands specialty tools (transmission jack capable of safely supporting 100-200 pounds, flywheel holder to prevent engine rotation during clutch bolt removal, clutch disc alignment tool) and substantial mechanical knowledge. Without proper equipment and experience, you risk transmission damage, injury from dropped components, or improper reassembly leading to clutch failure.
Complete clutch assembly replacement timing often coincides with hydraulic system repairs. If your clutch disc is worn when the slave cylinder fails, replacing both during the same transmission removal makes economic sense—you pay the labor once. However, this combination job requires everything needed for transmission removal plus clutch installation expertise. Professional shops perform this work routinely with appropriate equipment; DIY attempts risk improper clutch alignment, pressure plate installation errors, or flywheel damage.
Persistent hydraulic system problems—those where you’ve bled thoroughly, replaced obvious failed components, but issues persist—suggest hidden problems best diagnosed by experienced technicians. Internal master cylinder bore damage (scoring, pitting from corrosion) isn’t visible during external inspection but prevents proper seal operation. Professional shops have experience recognizing these subtle problems and access to measurement tools for confirming cylinder bore condition.
If hydraulic problems coincide with transmission issues—difficulty engaging multiple gears, grinding in multiple gears, or unusual transmission noises—professional diagnosis determines whether you’re facing simple hydraulic repairs or more extensive transmission problems. Misdiagnosis wastes money replacing components that aren’t actually failing; accurate diagnosis from the start saves money long-term.
Integration with Modern Vehicle Systems
Modern vehicles integrate hydraulic clutch systems with electronic controls and safety systems that enhance operation and vehicle functionality. These integrations provide convenience features and safety improvements that weren’t possible with simple mechanical cable systems.
Electronic clutch position sensors monitor clutch pedal position throughout its travel range. These sensors, typically mounted on the master cylinder or pedal assembly, provide continuous position data to the engine control unit (ECU). The ECU uses this information to modify engine management during gear changes—reducing ignition timing slightly or briefly cutting fuel when the clutch disengages, creating smoother shifts and reducing drivetrain shock.
Start interlock safety systems prevent engine starting unless the clutch pedal is fully depressed (and the transmission is in neutral). This safety feature prevents unintended vehicle movement when starting the engine—without the clutch depressed, an engaged transmission would cause the vehicle to lurch when the starter engages. The clutch pedal position sensor or a dedicated switch near the top of the pedal travel signals the ECU that conditions are safe for starting.
Hill start assist systems integrated with hydraulic clutches help prevent rollback when starting on inclines. When you release the brake pedal on a hill, the system automatically maintains brake pressure briefly (typically 1-2 seconds) until you begin releasing the clutch and applying throttle. This brief brake hold prevents the frightening and potentially dangerous backward roll that inexperienced drivers experience when transitioning from brake to throttle on hills. The clutch position sensor tells the hill start system when you’re engaging the clutch, signaling when to release automatic brake pressure.
Performance driving modes in sports cars sometimes adjust clutch feel characteristics electronically. While the hydraulic system itself doesn’t change, electronic throttle control and engine management can modify how the powertrain responds to clutch engagement, making launches more aggressive in sport mode or smoother and more gradual in comfort mode. These refinements enhance driving character without requiring complex mechanical changes to the clutch system.
Dual-clutch transmission technology represents the most advanced evolution of clutch hydraulics. DCTs use two hydraulically actuated clutches—one for odd gears, one for even gears—allowing lightning-fast automated shifts while maintaining the efficiency advantages of manual transmissions. Although drivers don’t operate these clutches manually, the underlying hydraulic principles remain identical to conventional manual transmission systems.
Conclusion
Hydraulic clutch systems represent a perfect example of automotive engineering achieving elegance through fundamental physics. By applying Pascal’s law—that pressure in a confined fluid transmits equally in all directions—engineers created systems that multiply force, maintain consistency, and automatically adjust throughout years of service. The simple act of pressing a clutch pedal initiates a precisely orchestrated sequence: mechanical leverage at the pedal, hydraulic force multiplication through the master and slave cylinders, and mechanical advantage through the release fork, all combining to generate the substantial force needed to interrupt power flow between engine and transmission.
Understanding your hydraulic clutch system empowers informed maintenance decisions and helps you recognize problems early. Regular fluid level checks, periodic bleeding when necessary, and prompt attention to leaks prevent the majority of clutch hydraulic failures. When problems do occur, systematic diagnosis using the troubleshooting approaches outlined in this guide helps identify whether you’re dealing with air in the system, component failure, or mechanical clutch problems requiring different solutions.
The advantages hydraulic systems provide—consistent pedal feel, self-adjusting operation, reduced maintenance compared to cable systems, and suitability for high-performance applications—explain their near-universal adoption in modern manual transmission vehicles. While professional service is sometimes necessary for complex repairs like concentric slave cylinder replacement, many hydraulic clutch maintenance tasks fall within DIY capabilities for mechanically inclined owners equipped with proper tools and bleeding equipment.
Remember the critical safety considerations: brake fluid damages paint, requires careful handling, and must be disposed of properly. More importantly, operating a vehicle with compromised clutch hydraulics risks expensive transmission damage. If your clutch pedal feels spongy, if fluid levels drop rapidly, or if you experience difficulty shifting, address these issues immediately rather than continuing to drive.
For detailed vehicle-specific procedures, torque specifications, and bleeding techniques for your particular model, consult your vehicle’s factory service manual or a quality aftermarket repair manual. These resources provide exact specifications and step-by-step procedures tailored to your vehicle, ensuring repairs meet manufacturer standards. Whether you’re performing maintenance yourself or working with a professional shop, understanding how your manual transmission and clutch system function together helps you maintain reliable operation and maximize clutch service life.
Download your vehicle-specific repair manual today to keep detailed procedures at hand for future maintenance. Your transmission will thank you with smooth, reliable gear changes for years to come.