If you’ve ever heard mechanics talk about flywheels and flexplates, you might have noticed these terms get used interchangeably—but they shouldn’t. While both components connect your engine to your transmission and help your vehicle start, they’re fundamentally different parts designed for completely different transmission types. Using the wrong terminology or, worse, installing the wrong component can lead to serious mechanical failure.
Understanding the difference between a flywheel and a flexplate isn’t just automotive trivia—it’s essential knowledge for proper diagnosis, repair, and maintenance. Whether you’re troubleshooting mysterious rattling noises, planning a clutch replacement, or simply want to understand what’s happening between your engine and transmission, this guide breaks down everything you need to know about these critical drivetrain components.
In this comprehensive guide, we’ll explore the structural and functional differences between flywheels and flexplates, explain how each component operates in its respective transmission system, identify common failure symptoms, discuss replacement costs, and provide safety guidance for DIY repairs versus professional consultation. By the end, you’ll be able to confidently identify which component your vehicle uses and understand when professional help becomes essential.
Let’s start by examining the flywheel, the heavyweight champion of manual transmissions.
What Is a Flywheel? The Manual Transmission Powerhouse
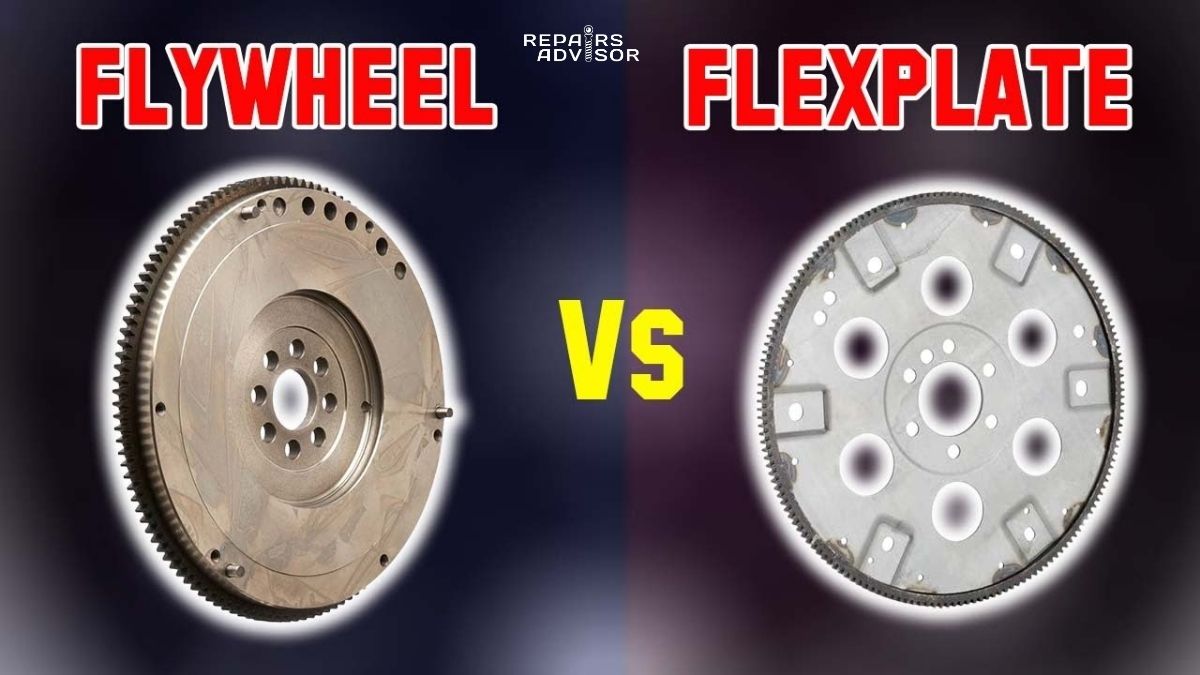
A flywheel is a heavy, circular metal disc that bolts directly to your engine’s crankshaft in vehicles equipped with manual transmissions. Weighing anywhere from 15 to 50 pounds depending on the application, this substantial component serves multiple critical functions that make smooth manual transmission operation possible. Learn more about how these components interact in our guide on how flywheel and flexplate work.
The Three Primary Functions of a Flywheel
First and foremost, the flywheel stores rotational kinetic energy. Internal combustion engines don’t produce power continuously—they fire in pulses as each cylinder completes its power stroke. The flywheel’s mass acts as a mechanical battery, storing energy during power strokes and releasing it during the intake, compression, and exhaust strokes. This energy storage smooths out the jerky power delivery inherent to piston engines, creating the smooth, continuous rotation your transmission needs.
Second, the flywheel provides a precision-machined friction surface for the clutch disc to engage against. When you release the clutch pedal, the clutch disc is squeezed between the flywheel’s friction surface and the pressure plate, creating the mechanical connection that transfers power from engine to transmission. This friction surface must be perfectly flat and smooth—any warping, scoring, or contamination directly affects clutch performance and can cause slipping, chattering, or failure to disengage.
Third, the flywheel carries a ring gear around its outer circumference that engages with your starter motor. When you turn the ignition key, the starter motor extends a small pinion gear that meshes with this ring gear, rotating the flywheel and cranking the engine. Damaged or worn ring gear teeth can prevent your engine from starting, requiring multiple attempts or causing grinding noises during cranking.
Flywheel Construction and Design Variations
Traditional flywheels are manufactured from heavy-duty cast iron or steel, machined to precise tolerances to ensure perfect balance and a flat friction surface. The construction is deliberately massive—weight is a feature, not a bug. This weight provides the rotational inertia necessary for energy storage and vibration dampening. Performance applications sometimes use aluminum flywheels to reduce weight and improve throttle response, though these sacrifice some of the smoothness and stall resistance that heavier flywheels provide.
The ring gear, typically featuring 150 to 170 teeth depending on the engine size, is either welded to the flywheel’s outer edge or heat-shrunk into place. This gear must be perfectly aligned and securely attached because it experiences tremendous forces during engine starting. Some flywheels also incorporate balance weights—deliberate mass additions or removals that compensate for the engine’s inherent imbalances and reduce vibration.
Modern vehicles often use dual-mass flywheels (DMFs), a more sophisticated design that addresses vibration and noise issues in higher-torque engines. A dual-mass flywheel consists of two separate masses connected by a series of arc springs housed in a grease-filled chamber. The primary mass bolts to the crankshaft and rotates with the engine, while the secondary mass connects to the clutch assembly. The internal springs isolate transmission noise and dampen torsional vibrations far more effectively than a solid flywheel, resulting in quieter operation and reduced wear on transmission components.
How Flywheels Enable Manual Transmission Operation
The flywheel’s role in manual transmission operation extends beyond simple power transfer. When you press the clutch pedal, you’re activating the hydraulic clutch system or cable mechanism that pushes the clutch release bearing against the pressure plate’s diaphragm spring. This action releases the clamping force on the clutch disc, allowing it to slip against the flywheel’s surface or disengage completely.
Here’s the crucial part: even when the clutch is disengaged and the clutch disc isn’t gripping the flywheel, the flywheel continues spinning with the engine. Its substantial rotational inertia helps maintain engine speed while you shift gears. Without this momentum, the engine would slow down too rapidly during gear changes, making smooth shifts nearly impossible and potentially causing the engine to stall, especially at low RPMs.
When you release the clutch pedal after selecting a new gear, the pressure plate clamps the clutch disc firmly against the flywheel’s friction surface once again. The friction between the disc and flywheel gradually synchronizes the speeds of the engine and transmission input shaft, smoothly transferring power and allowing the vehicle to accelerate in the new gear. This entire dance depends on the flywheel’s ability to maintain steady rotation and provide a consistent friction surface.
For a deeper understanding of how this process integrates with the rest of your transmission, see our guide on how manual gearbox works.
Professional Insight: Dual-mass flywheels significantly reduce transmission whine and gear rattle, making them popular in modern diesel engines and high-torque applications. However, they come with a significant downside—replacement costs typically run three to four times higher than traditional solid flywheels, often reaching $800-$1,200 or more for parts alone. Many professional mechanics recommend replacing the dual-mass flywheel whenever the clutch is serviced, even if it seems functional, because these components have a finite service life and failure shortly after clutch replacement means repeating all that expensive labor.
What Is a Flexplate? The Automatic Transmission Connector
While manual transmissions rely on heavy flywheels, automatic transmissions use an entirely different component called a flexplate. This thin, stamped steel disc weighs only 5 to 15 pounds—a fraction of a flywheel’s weight—and serves as a coupling mechanism between the engine and the torque converter. The name “flexplate” comes from its defining characteristic: unlike the rigid flywheel, this component is designed to flex along its main axis during operation.
Why Automatic Transmissions Use Flexplates Instead of Flywheels
The fundamental difference comes down to how power is transferred. Manual transmissions use friction coupling through the clutch, requiring a heavy, rigid flywheel to provide energy storage and a friction surface. Automatic transmissions, on the other hand, use hydraulic coupling through the torque converter, which relies on fluid dynamics rather than mechanical friction to transfer power.
The torque converter contains an impeller connected to the engine, a turbine connected to the transmission, and a stator between them. Engine power spins the impeller, which throws transmission fluid against the turbine blades, spinning them and driving the transmission. This fluid coupling is inherently smooth—there’s no grabbing, grinding, or sudden engagement like you’d feel with a worn clutch. Because the power transfer happens through fluid rather than friction, there’s no need for the heavy mass or friction surface that characterizes a flywheel.
This is where the flexplate’s flexibility becomes crucial. The torque converter doesn’t maintain perfect alignment with the crankshaft during operation—small misalignments occur due to engine movement on its mounts, temperature changes causing expansion and contraction, and the dynamic forces of acceleration and deceleration. A rigid connection would crack under these stresses, but the flexplate’s ability to flex slightly along its main axis accommodates these movements without failure.
Flexplate Construction and Design Features
A typical flexplate is stamped from sheet steel approximately 1/8 inch thick—thin enough to flex under load but strong enough to transmit hundreds of pound-feet of torque. The stamping process creates a pattern of mounting holes and often includes formed areas that provide controlled flexibility. Balance weights may be welded or stamped into the plate to counteract engine imbalances, similar to a flywheel but with much less mass.
The mounting bolt pattern is critical and varies by vehicle. The inner bolt circle attaches to the engine’s crankshaft, while the outer bolt pattern connects to the torque converter’s outer shell. These bolt patterns must match precisely—using the wrong flexplate can result in an engine that won’t even turn by hand, potentially causing catastrophic damage if you attempt to start it. Flexplate bolts are typically longer than flywheel bolts and feature larger flanged heads to distribute clamping force across the thin material without deforming it.
Like flywheels, flexplates carry a ring gear welded to their outer edge for starter motor engagement. This ring gear serves the identical purpose—providing teeth for the starter pinion to engage—but the difference in flexplate thickness means the ring gear sits at a different depth than a flywheel’s ring gear. This is one reason why proper starter indexing and shimming matters: the starter must be positioned at exactly the right distance to mesh properly with the ring gear without grinding or binding.
How Flexplates Enable Automatic Transmission Operation
The flexplate’s job is straightforward but critical: it must reliably transmit all engine torque to the torque converter while accommodating the dynamic misalignments inherent in the system. Every time you accelerate, the engine twists slightly on its mounts, and the flexplate must flex to accommodate this movement. When the automatic transmission shifts gears, brief torque spikes occur, and the flexplate must transmit these forces without cracking.
Unlike the flywheel, which remains engaged with the clutch disc whenever the clutch pedal isn’t pressed, the flexplate is always connected to the torque converter. There’s no driver-controlled disengagement mechanism in an automatic transmission. The torque converter itself handles the job of allowing the engine to idle in gear without stalling—when you stop at a red light with your foot on the brake, the fluid coupling in the torque converter permits the engine to continue running even though the transmission output shaft is stationary. Understanding this system fully requires knowledge of how ATF and friction materials work within the transmission.
The flexplate’s light weight offers an important advantage: reduced rotational mass means less energy is required to accelerate the engine, improving throttle response and fuel efficiency slightly compared to the heavier flywheel. However, this also means the flexplate provides virtually no energy storage or vibration dampening—those functions are handled by the torque converter’s fluid coupling and the transmission’s internal components.
Beginner-Friendly Explanation: Think of a flexplate like a flexible coupling disk you might see connecting two shafts on industrial equipment. It needs to transmit rotational force reliably while allowing for slight misalignment and movement. The flexplate does the same job in your vehicle—it connects your spinning engine to your transmission’s torque converter while accommodating the fact that these two components don’t sit in perfect alignment as the engine rocks on its mounts during acceleration and deceleration. Because your automatic transmission uses fluid instead of friction to transfer power, it doesn’t need the heavy, rigid flywheel that manual transmissions require.
Key Differences Between Flywheels and Flexplates: A Comprehensive Comparison
Now that we understand each component individually, let’s examine the critical differences that set them apart. These distinctions go far beyond simple weight and thickness—they reflect fundamental differences in how manual and automatic transmissions operate.
Understanding the Design Philosophy Differences
The stark contrast in weight and thickness reflects the different jobs these components perform. A flywheel must store significant kinetic energy to smooth out engine pulses and provide the momentum that keeps the engine running smoothly when the clutch is disengaged. This requires mass—lots of it. Engineers carefully calculate the optimal flywheel weight to balance smoothness and responsiveness. Too light, and the engine loses momentum quickly, making it prone to stalling and creating jerky power delivery. Too heavy, and the engine becomes sluggish to rev, hurting performance and fuel economy.
The flexplate, by contrast, is simply a connector. It doesn’t need to store energy because the torque converter’s fluid mass serves that function. It doesn’t need a friction surface because there’s no clutch disc to engage. Its only jobs are transmitting torque and accommodating misalignment, which it accomplishes through strategic flexibility rather than rigid strength. Less material means lower cost, reduced weight, and better fuel efficiency—all advantages when the component doesn’t require the mass that makes flywheels so heavy.
The construction methods also differ significantly. Flywheels require precision machining to create the flat, smooth friction surface necessary for proper clutch operation. The entire friction face must be within a few thousandths of an inch of perfect flatness, and any scoring or imperfections will cause clutch problems. Flexplates, being stamped rather than machined, can be manufactured much more quickly and cheaply. The stamping process creates the mounting hole patterns and any necessary balance weight features in a single operation.
Physical Identification: Knowing What You’re Looking At
If you need to identify whether your vehicle uses a flywheel or flexplate, several visual and physical characteristics make identification straightforward, even for beginners.
Visual Inspection When Removed:
- Flywheel identification: Thick, heavy component with one very smooth, machined surface (the friction face) and a rough cast or machined opposite side. When you pick it up, you’ll immediately notice the substantial weight. The ring gear sits prominently around the outer edge, and you may see balance weights cast into the body or welded on.
- Flexplate identification: Thin, lightweight stamped metal disc that you can actually flex slightly by hand if you grip opposite edges (don’t bend it deliberately—this is just an observation). No machined friction surface; both sides show the stamped pattern with mounting holes. The ring gear is welded to the outer edge, and the plate may show formed sections or stamped balance weights.
Quick Determination Without Removal: The easiest way to determine which component your vehicle uses doesn’t require any disassembly at all: Does your vehicle have a clutch pedal? If yes, it has a manual transmission and therefore uses a flywheel. If there’s no clutch pedal and the vehicle shifts automatically, it uses a flexplate. This simple check works 100% of the time because these components are fundamentally tied to transmission type.
If you need to inspect the component without removing the transmission, many vehicles have a small inspection cover on the bell housing (the metal housing that surrounds the flywheel or flexplate area). Removing this cover—usually held by just two or three bolts—allows you to see the ring gear and part of the component through the opening. A flywheel will appear much thicker in this viewing window compared to a flexplate’s thin profile.
Bolt Identification: Even the mounting hardware differs. Flywheel bolts are typically shorter and often feature star-shaped lock washers to prevent loosening under the vibration and stress of clutch engagement. Flexplate bolts are longer to account for the need to reach through the flexplate and into the crankshaft while also attaching to the torque converter, and they have larger flanged heads to distribute clamping pressure. Attempting to use flywheel bolts on a flexplate (or vice versa) can cause serious problems, including oil pan lip damage or improper torque converter mounting.
Common Failure Symptoms and Diagnostic Approaches
Both flywheels and flexplates are durable components designed to last well over 100,000 miles under normal operating conditions. However, they do eventually fail, and when they do, the symptoms can be dramatic—and sometimes confusing. Understanding these failure patterns helps you diagnose problems accurately and avoid misidentifying transmission or engine issues as flywheel or flexplate problems (or vice versa).
Flywheel Failure Symptoms in Manual Transmissions
Slipping Gears and Clutch Engagement Problems
One of the most common and frustrating symptoms of flywheel problems is gear slippage and poor clutch engagement. When you shift into gear and release the clutch pedal, the RPMs may climb without a corresponding increase in vehicle speed—the classic symptom of a slipping clutch. While worn clutch discs often cause this problem, a damaged or contaminated flywheel friction surface can create identical symptoms.
Oil leaks from the rear main crankshaft seal or transmission input shaft seal can contaminate the flywheel’s friction surface. Even a small amount of oil creates a barrier between the clutch disc and flywheel, preventing proper grip. The clutch disc’s friction material simply slides against the oily surface instead of grabbing firmly. If you’ve recently replaced the clutch but slipping persists, a contaminated flywheel is often the culprit.
Similarly, a warped flywheel creates uneven contact with the clutch disc. When pressure plate clamping force is applied, only the high spots on the warped flywheel surface make contact, dramatically reducing the friction area. This reduced contact area causes slipping under load, even if the clutch disc itself is new. Flywheel warping typically results from excessive heat—either from clutch abuse (riding the clutch, excessive slipping) or improper break-in of a new clutch.
Grinding, Clanking, and Rattling Noises
Audible symptoms of flywheel problems range from subtle to alarming. A worn or damaged flywheel can produce grinding noises during gear changes, particularly if the friction surface has developed grooves or scoring. These irregularities cause the clutch disc to vibrate as it engages and disengages, creating a grinding sensation you can feel through the clutch pedal and hear from under the vehicle.
Dual-mass flywheels develop a distinctive rattling sound when they fail. Remember, these flywheels contain internal springs in a grease-filled chamber that dampen vibrations. When these springs break, the grease dries out, or the internal components wear, the flywheel begins to rattle at idle. This noise typically sounds like marbles rattling in a can and is most pronounced when the engine is cold. As the engine warms up, thermal expansion may reduce the rattle somewhat, but it rarely disappears completely. This rattling can be mistaken for transmission bearing noise or even engine problems, but it has a distinctive metallic, loose quality that experienced mechanics recognize immediately.
Clutch Pedal Vibrations and Judder
A failing flywheel often announces itself through vibrations you can feel in the clutch pedal. When you press or release the clutch pedal, it may vibrate or shudder noticeably—a sensation that often worsens as the problem progresses. This vibration indicates that the flywheel surface is no longer true (perfectly flat), creating an uneven engagement surface.
Warped flywheels cause clutch chatter, a severe vibration that occurs during clutch engagement. When you release the clutch pedal to take off from a stop, the vehicle may judder violently, almost like driving over rough pavement. This happens because the uneven flywheel surface causes the clutch disc to alternately grab and slip rapidly as it attempts to engage. The vibration can be severe enough to shake the entire vehicle and may even make smooth takeoffs nearly impossible.
Incorrectly mounted flywheels—installed without proper alignment or with incorrect bolt torque—can also cause vibrations. The flywheel must be perfectly centered on the crankshaft and bolted with the exact torque specified by the manufacturer. Even small alignment errors create an imbalance that causes the entire rotating assembly to vibrate, transmitting these vibrations through the clutch system and into the chassis.
Burning Smell from Clutch Area
A distinctive burning smell emanating from under the vehicle, particularly during or after driving, often indicates clutch problems—but the root cause may be flywheel-related. The smell resembles burnt toast or burning rubber and comes from overheated clutch disc friction material.
When a flywheel is warped or contaminated, the clutch disc slips excessively during engagement, generating tremendous heat through friction. This heat degrades the clutch disc’s friction material, creating the burning odor. If you’ve recently replaced the clutch but still smell burning during normal driving (not just aggressive starts or hill climbing), the flywheel is likely the culprit. The new clutch disc is being destroyed by trying to grip an inadequate flywheel surface.
Difficulty Starting the Engine
While less common than other symptoms, damaged ring gear teeth can prevent your engine from starting reliably. When you turn the ignition key, the starter motor’s pinion gear must mesh with the flywheel’s ring gear to crank the engine. If several teeth on the ring gear are chipped, worn, or missing, the starter pinion may encounter a gap and simply spin without engaging the flywheel.
This symptom typically manifests as intermittent starting problems—sometimes the engine cranks normally, other times you hear a high-pitched whirring or grinding noise from the starter motor area without the engine turning over. Attempting to start the engine multiple times may eventually position the flywheel so an intact section of ring gear aligns with the starter pinion, allowing the engine to start. However, this damage progressively worsens, and eventually, no position will allow successful engagement.
Flexplate Failure Symptoms in Automatic Transmissions
Metallic Rattling, Knocking, and Clanking Noises
The most common and distinctive symptom of flexplate failure is a metallic rattling or knocking noise from the rear of the engine, particularly noticeable at idle. This sound originates from the bell housing area where the flexplate and torque converter are located. The noise can vary in character depending on the severity and nature of the crack.
Early-stage cracks in a flexplate often produce a light rattling or ticking sound at idle that may disappear or diminish at higher RPMs. As the crack progresses, the noise typically becomes louder and may persist across the RPM range. The sound is often described as tinny or metallic—distinctly different from the deeper knocking of rod bearings or the grinding of transmission bearings. Some drivers describe it as sounding like a loose heat shield or a nail rattling in a can.
What makes this symptom particularly tricky is that it can mimic other serious problems. A badly cracked flexplate can sound remarkably similar to a rod bearing knock, causing panic for vehicle owners who assume their engine is failing. The key distinction is that flexplate noise is most pronounced at idle and during coasting, while rod knock typically worsens under load and with engine speed. Additionally, flexplate noise often has an intermittent quality—it may come and go depending on engine temperature, vehicle speed, and transmission gear.
Clicking, Chirping, and Squeaking Sounds
In addition to rattling, failing flexplates can produce lighter clicking or chirping sounds that some drivers describe as similar to a cricket or squeaking belt. These sounds typically indicate an early-stage crack that allows the flexplate to flex more than designed, creating slight movement between cracked sections. The clicking occurs as these sections tap against each other during the flexplate’s rotation.
This type of noise is often most noticeable when the engine is cold and may diminish once everything warms up and expands slightly. Don’t be fooled by the temporary disappearance—the crack isn’t healing, and thermal expansion is simply closing the gap temporarily. The problem will return when the engine cools and will progressively worsen over time.
Heavy Vibrations During Acceleration
A cracked or failing flexplate creates an imbalance in the rotating assembly, similar to a tire with a missing balance weight. This imbalance manifests as vibrations that you can feel through the driver’s seat and floor panels, particularly during acceleration when torque loads are highest. The vibration may feel like driving on slightly rough pavement or may be severe enough to shake the entire vehicle noticeably.
These vibrations typically worsen as vehicle speed increases because the imbalance force grows exponentially with rotational speed. You might feel smoothness at idle, moderate vibration at 30 mph, and severe shaking at 60 mph. The vibration often improves slightly when you take your foot off the accelerator and coast, as torque loads on the cracked flexplate decrease.
It’s important to distinguish flexplate vibrations from other causes like worn CV joints, unbalanced tires, or bad wheel bearings. Flexplate vibrations are usually consistent across all speeds (increasing with speed but maintaining the same character) and don’t change with steering input, whereas wheel-bearing noise often changes when you turn left or right.
Starting Problems and Starter Engagement Issues
Just like flywheels, flexplates can suffer ring gear damage that prevents reliable starting. Damaged teeth on the flexplate’s ring gear cause the starter motor to free-spin without turning the engine. You’ll hear the starter motor running (a high-pitched whirring sound) but the engine won’t crank.
With flexplates, this problem often results from improper starter installation or misalignment. If the starter motor isn’t shimmed correctly or mounts loosely, it can position the pinion gear too close or too far from the ring gear. When too close, the pinion smashes against the ring gear teeth, chipping them. When too far, the pinion barely engages, causing it to slip and grind against the tooth tips, gradually wearing them down.
Knocking or Clunking When Shifting Into Gear
A distinctive sharp knock or clunk when you shift from Park into Drive or Reverse often indicates a loose or severely cracked flexplate. This noise occurs because the damaged flexplate allows excessive rotational play between the crankshaft and torque converter. When the transmission engages, the sudden application of load takes up this slack violently, creating the knocking sound.
This symptom can be confused with worn engine or transmission mounts, which produce similar noises. The distinction is timing and character: mount-related knocks occur immediately when shifting and sound more dull or thudding, while flexplate knocks may occur a split-second after the shift as the cracked sections impact each other and tend to sound more metallic.
Diagnostic Procedures for Accurate Identification
Visual Inspection Through Bell Housing Access
The most reliable diagnostic method for both flywheels and flexplates is direct visual inspection. Many vehicles provide an inspection cover on the bell housing—a removable plate held by two to four bolts that provides a window into the flywheel or flexplate area. Removing this cover allows you to examine the ring gear and portions of the component for damage.
For flexplates specifically, look for cracks radiating from the inner bolt circle (where it attaches to the crankshaft) toward the outer edge or around the torque converter mounting holes. These cracks often appear as dark lines or rusty streaks on the metal surface. Using brake cleaner or degreaser to remove oil and dirt makes cracks more visible. A bright flashlight or inspection light is essential—cracks can be hairline thin and easily missed in poor lighting.
For flywheels, check the friction surface for scoring, grooves, heat discoloration, or warping. Light scoring appears as fine scratches across the friction face, while severe scoring looks like deep grooves. Heat discoloration manifests as blue, purple, or brown coloring on areas that have been overheated. If you can see the friction surface through the inspection port, try to assess its flatness by looking for obvious warping, though precise measurement requires removal.
Physical Testing for Movement and Play
With the inspection cover removed, you can perform hands-on tests to check for excessive play or damage. Using a pry bar or large screwdriver, carefully attempt to move the flexplate or flywheel. There should be virtually no movement at all—these components must be solidly mounted to the crankshaft.
If you can move the component noticeably or if it makes clicking or knocking sounds when you pry on it, mounting bolts may be loose, or the component may be cracked. For flexplates, try to flex the visible portions slightly with your hands (safely, with the engine off and vehicle secured). A healthy flexplate has some flexibility, but a cracked plate may show excessive movement or audible cracking sounds.
Ring Gear Tooth Inspection
Examine the ring gear teeth visible through the inspection port or starter mounting location. Healthy teeth have smooth, square profiles. Damaged teeth show chipping, rounding of the tips, or missing sections. Rotate the crankshaft by hand (using a socket on the front crankshaft bolt) to inspect the entire ring gear circumference, as damage may only exist in the section that typically aligns with the starter pinion.
Noise Diagnosis with Stethoscope
An automotive stethoscope provides an excellent diagnostic tool for pinpointing the source of noises. With the engine running at idle, place the stethoscope probe on the bell housing in several locations. Flexplate rattling will be loudest when the probe touches the bell housing directly, while transmission bearing noise will be more prominent on the transmission case itself. This technique helps distinguish flexplate noise from transmission problems, engine issues, or exhaust system rattles.
When to Seek Professional Diagnosis
While visual inspection and basic testing can identify obvious problems, certain situations require professional expertise and diagnostic equipment:
For Dual-Mass Flywheels: These complex components require specialized testing to determine their condition. Professionals use specific procedures to check for excessive free play in the dual-mass mechanism, verify spring function, and assess whether the grease remains intact. DIY diagnosis often misses subtle failures that will lead to problems shortly after installation.
For Intermittent Symptoms: If problems come and go or only occur under specific conditions, professional diagnosis with proper test drives and experience interpreting symptoms becomes valuable. An experienced technician can often identify patterns you might miss.
When Multiple Problems Coexist: If you’re experiencing both transmission issues and potential flywheel/flexplate symptoms, professional diagnosis ensures correct identification of the primary problem versus secondary effects. Installing a new flexplate won’t fix transmission problems, and replacing transmission components won’t address a failing flywheel.
For Vehicles with Starting Problems: While ring gear damage seems straightforward, starting problems can result from numerous issues including starter motor failure, electrical problems, or engine mechanical problems. Professional diagnosis ensures you’re addressing the actual cause rather than replacing components unnecessarily.
Replacement Costs and Financial Considerations
Understanding the costs associated with flywheel and flexplate replacement helps you budget appropriately and make informed decisions about DIY versus professional repair. These costs vary significantly based on component type, vehicle complexity, and regional labor rates, but we can establish reasonable expectations.
Part Costs: What You’ll Pay for Components
Flywheel Component Pricing:
Single-mass flywheels for common vehicles typically range from $50 to $300, with most falling in the $100-$200 range. Basic economy car flywheels cost less, while heavy-duty truck flywheels with larger diameter and greater mass cost more. Premium brands and OEM parts command higher prices than aftermarket alternatives, though the quality difference isn’t always substantial for this relatively simple component.
Dual-mass flywheels represent a significant cost increase, typically ranging from $400 to over $800, with some luxury or performance vehicle applications exceeding $1,200. The complexity of the dual-mass design, with its internal springs, bearings, and grease-filled chambers, makes these components expensive to manufacture. OEM dual-mass flywheels almost always cost more than aftermarket versions, and many mechanics recommend staying with OEM quality for these sophisticated components.
Performance flywheels—lightweight aluminum units designed for racing or enthusiast applications—range from $200 to $600 depending on material quality and manufacturing precision. These specialized components trade off some driveability smoothness for quicker engine response and reduced rotating weight.
Flexplate Component Pricing:
Standard flexplates are considerably less expensive than flywheels, typically ranging from $40 to $160 for most applications. The stamped construction and lack of machined surfaces make flexplates cheaper to manufacture. Common domestic vehicle flexplates often cost $60-$100, while European or luxury vehicle flexplates may reach $150-$200.
Heavy-duty flexplates for modified or high-performance vehicles range from $100 to $250. These upgraded components use thicker material or more sophisticated designs to handle increased power levels beyond stock specifications. If you’ve modified your engine for significantly more power, a heavy-duty flexplate becomes a wise investment to prevent premature failure.
Labor Costs: The Expensive Part of the Job
Labor represents the majority of flywheel or flexplate replacement costs because accessing these components requires removing the transmission—a time-consuming and technically demanding job. Understanding what’s involved helps explain these costs.
Typical Labor Time and Rates:
Most flywheel or flexplate replacements require 4 to 8 hours of labor, depending on vehicle configuration and technician experience. Front-wheel-drive vehicles often take longer than rear-wheel-drive vehicles because transmission removal requires more disassembly of suspension components, axles, and subframe elements. Four-wheel-drive vehicles can be even more complex, requiring transfer case removal or disconnection.
Independent repair shop labor rates typically range from $80 to $200 per hour, varying significantly by region and shop reputation. Urban areas and shops specializing in European vehicles generally charge higher rates. Dealership labor rates run $150 to $250+ per hour, though you get manufacturer-specific expertise and often better access to specialized tools and updated technical service bulletins.
These hourly rates multiply by job duration to determine labor cost. A straightforward rear-wheel-drive manual transmission job might be completed in 4 hours at $100/hour, yielding $400 in labor. A complex front-wheel-drive automatic transmission job taking 7 hours at $150/hour results in $1,050 in labor. This is why labor typically exceeds parts cost for this repair.
Factors That Increase Labor Time:
Several factors can push the job toward the longer end of the time estimate or beyond:
- Exhaust system complexity: Some vehicles require extensive exhaust removal to access transmission mounting points or provide clearance for transmission removal
- Tight engine bay packaging: Modern vehicles with transversely-mounted engines in small engine bays require more disassembly
- Corroded fasteners: Rust belt vehicles with heavily corroded bolts may require extra time for penetrating fluid application, heating, or cutting stubborn bolts
- Additional component removal: Some vehicles require removing motor mounts, subframe sections, or even draining and dropping the oil pan for access
- All-wheel-drive systems: Transfer cases and additional driveshafts add complexity and time
- Technician experience: Shops unfamiliar with your specific vehicle may take longer than specialists who perform this job regularly
Total Replacement Cost Estimates
Manual Transmission Flywheel Replacement:
For a single-mass flywheel replacement in a common vehicle with a straightforward rear-wheel-drive layout, expect total costs between $500 and $1,200. This includes parts ($100-$300) and labor ($400-$900). If you’re also replacing the clutch while the transmission is out—which makes excellent sense—add another $300-$800 for the clutch kit and minimal additional labor, bringing the total to $800-$2,000.
Dual-mass flywheel replacements cost significantly more due to the expensive component. Expect $1,200 to $2,500 or more for dual-mass flywheel replacement combined with a new clutch kit. The higher parts cost ($400-$800+ for the flywheel alone, plus $300-$800 for a clutch kit compatible with dual-mass designs) drives the total upward. Labor remains similar to single-mass flywheel jobs, but the total investment increases dramatically.
Automatic Transmission Flexplate Replacement:
Flexplate replacement typically costs less than flywheel replacement due to the lower component cost and sometimes simpler job. Expect total costs between $400 and $1,000 for most applications, including parts ($60-$160) and labor ($340-$840). The job usually sits at the lower end of this range for rear-wheel-drive vehicles with good access, while front-wheel-drive vehicles often approach the higher end.
Complex vehicles with tight packaging or extensive disassembly requirements can push costs to $1,200-$1,500, particularly at dealerships with higher labor rates. These higher costs typically affect European luxury vehicles, certain all-wheel-drive systems, and vehicles where the manufacturer made unfortunate design decisions that complicate transmission access.
Opportunistic Replacement: Maximizing Value
One of the most important financial considerations is whether to replace the flywheel or flexplate during related work, even if it’s not yet showing obvious symptoms.
During Clutch Replacement (Manual Transmissions):
When your mechanic removes the transmission to replace a worn clutch, the flywheel is completely exposed and easily accessible. At this point, the major labor expense is already incurred—all the difficult work of transmission removal is complete. This is the ideal time to address the flywheel, whether through resurfacing or replacement.
Flywheel resurfacing costs $50-$100 for single-mass flywheels and ensures a smooth, flat friction surface for the new clutch disc. Most mechanics recommend resurfacing as standard practice during clutch replacement to maximize new clutch lifespan. If the flywheel shows significant scoring, heat damage, or is near the minimum thickness specification, replacement becomes the better choice.
For dual-mass flywheels, resurfacing isn’t possible—they must be replaced if damaged. Many professionals recommend preemptive replacement even if the dual-mass flywheel seems functional because failure rates increase significantly after 100,000-150,000 miles. Replacing the dual-mass flywheel during clutch service costs only the parts price plus perhaps 30 minutes additional labor. If the flywheel fails six months after clutch replacement, you’re paying for complete transmission removal all over again—potentially $800-$1,200 in labor for a $600 flywheel.
During Transmission Work (Automatic Transmissions):
If your automatic transmission requires removal for rebuilding, torque converter replacement, or rear main seal service, this becomes an excellent opportunity to inspect and potentially replace the flexplate. The additional labor cost is minimal—perhaps 15-30 minutes to remove and install the flexplate, since the transmission is already out.
Inspect the flexplate carefully for any cracks, especially around the bolt holes. Even small cracks will propagate over time, eventually causing complete failure. If the vehicle has over 150,000 miles or shows any signs of stress cracks, replacement makes financial sense given the minimal additional labor cost. A $100 flexplate installed opportunistically prevents a future $800+ job to address flexplate failure.
Similarly, if replacing the rear main crankshaft seal, the mechanic must remove the transmission and separate the torque converter from the flexplate. This creates perfect access for flexplate inspection and replacement. The incremental cost is only the parts price plus minimal labor.
Cost-Saving Considerations and Caveats
DIY Replacement Feasibility:
Experienced DIY mechanics with proper equipment can save significant money on labor costs by performing flywheel or flexplate replacement themselves. However, this job isn’t suitable for beginners or those lacking proper tools. Essential equipment includes a transmission jack (or equivalent support), quality jack stands rated for the vehicle’s weight, a torque wrench, and a complete set of sockets and wrenches.
For rear-wheel-drive manual transmission vehicles, this is a moderately challenging DIY project. For front-wheel-drive vehicles or automatics, the complexity increases significantly. Consider whether the labor savings justify the time investment, physical effort, and risk of improper installation. A poorly installed flywheel or flexplate can cause severe damage to the clutch, transmission, or starter.
Parts Quality Considerations:
With flywheels and flexplates, the difference between high-quality aftermarket and budget parts can be significant. Cheap flywheels may use inferior materials that warp more easily or ring gears that wear prematurely. Budget flexplates might use thinner material that cracks more quickly under stress.
For single-mass flywheels, reputable aftermarket brands often match or exceed OEM quality at lower cost. For dual-mass flywheels, many professionals recommend staying with OEM components because the engineering complexity makes cheap alternatives unreliable. The same applies to flexplates for high-power applications—OEM or quality aftermarket parts prove more reliable than budget options.
Transmission Removal Labor Savings:
If you’re planning multiple repairs that require transmission removal, combining them into a single job maximizes value. Replacing the clutch, resurface/replace the flywheel, install a new rear main seal, and replace the pilot bearing all at once costs far less than performing these jobs separately. Coordinate timing to address all these components during one transmission-out service interval.
For more information about your specific vehicle’s requirements, consult the service manual available through our Ford repair manuals, Chevrolet repair manuals, or Toyota repair manuals resources.
Safety Considerations and Professional Consultation Guidelines
Flywheel and flexplate replacement involves serious safety hazards and requires specific technical knowledge for proper installation. Understanding these safety considerations helps you make informed decisions about DIY repair versus professional service.
Critical Safety Hazards and Required Equipment
Weight and Handling Hazards:
Flywheels represent a significant handling challenge due to their weight. A typical automotive flywheel weighs 20-40 pounds, while truck flywheels can exceed 50 pounds. These components are awkwardly shaped—a large disc without convenient grip points—making them difficult to control. Dropping a flywheel can cause serious foot or leg injuries, and the machined friction surface can be damaged if the flywheel contacts concrete.
Flexplates, while much lighter, have sharp edges from the stamping process that can cause cuts if not handled carefully. The ring gear teeth are particularly sharp and can cause painful injuries if you drag your hand across them.
More critically, both repairs require supporting the entire weight of the transmission while working beneath the vehicle. A typical manual transmission weighs 80-150 pounds, while larger automatic transmissions can exceed 200 pounds. These components absolutely cannot be supported by jack stands alone—a proper transmission jack with a secure mounting saddle is essential equipment.
Crushing and Pinch Hazards:
Working under a vehicle supported only by a jack is extremely dangerous and causes dozens of deaths annually. The vehicle MUST be supported on jack stands properly rated for its weight, with the jack serving only as backup support. Even with proper jack stands, working under a vehicle to remove a transmission creates numerous pinch points where hands, fingers, or arms can be trapped between the transmission and chassis during removal or installation.
The rotating assembly itself presents hazards. If you need to rotate the engine to access specific bolts or align components, ensure the ignition is disabled and someone isn’t inadvertently turning the key. Piston engines store compression that can cause sudden rotation if you’re turning the crankshaft through a compression stroke.
Required Safety Equipment Checklist:
- Heavy-duty transmission jack or equivalent support system
- Multiple jack stands rated for vehicle weight (minimum 3-ton, preferably 6-ton for trucks)
- Safety glasses to protect against metal shavings and debris
- Mechanic’s gloves for grip and hand protection
- Penetrating oil for rusted or seized bolts
- Quality torque wrench covering the required torque range
- Breaker bar for stubborn bolt removal
- Proper wheel chocks to prevent vehicle movement
- Fire extinguisher (working with automotive fluids always carries fire risk)
Common Installation Mistakes That Cause Failure
Incorrect Torque Specifications:
The single most critical aspect of flywheel and flexplate installation is proper bolt torque. These fasteners must be tightened to the manufacturer’s exact specifications, in the specified sequence (typically a star or cross pattern), and using the specified method (often requiring three passes: initial snug, followed by progressive tightening to final specification).
Under-torqued bolts allow the flywheel or flexplate to shift during operation, quickly destroying the component and potentially damaging the crankshaft. Over-torqued bolts can strip threads in the aluminum crankshaft (on some engines), elongate bolt holes in the flexplate, or cause bolts to break. Either extreme results in catastrophic failure.
Many modern vehicles require special “torque-to-yield” or “stretch” bolts that are designed for one-time use. These bolts permanently deform during installation and lose their clamping ability if reused. Always check whether your application requires new bolts—attempting to save $20 on new bolts risks a $1,500 repeat of the entire job when the flywheel comes loose.
Wrong Component Selection:
Installing the incorrect flywheel or flexplate causes immediate problems, often preventing the engine from running at all. Engine balance specifications determine which flywheel is correct—some engines use externally balanced flywheels with offset balance weights, while others use neutral-balance flywheels paired with a balanced harmonic damper. Installing a neutral balance flywheel on an engine requiring external balance creates severe vibration that can damage engine mounts, crack the crankshaft, or destroy transmission components.
For flexplates, the bolt pattern must match both the crankshaft and the torque converter. Installing a flexplate with the wrong bolt pattern can result in an engine that won’t even turn by hand, potentially bending valves or causing other internal damage if someone attempts to start it.
Confusing flexplate applications is surprisingly easy—many flexplates look similar but have subtle differences in mounting hole positions, ring gear tooth count, or balance weight location. Always verify part numbers against your vehicle’s specifications rather than relying on appearance.
Friction Surface Contamination:
For flywheels specifically, contaminating the friction surface during installation ruins the new clutch immediately. Even small amounts of oil, grease, brake cleaner residue, or fingerprints on the flywheel’s friction surface prevent proper clutch engagement. The new clutch disc will slip, overheat, and glaze, requiring another complete clutch replacement job.
Proper procedure requires cleaning the flywheel friction surface with brake parts cleaner or denatured alcohol, allowing it to air dry completely, and avoiding any contact with the surface after cleaning. Some mechanics wear clean cotton gloves during final installation to prevent fingerprint contamination. Similarly, the clutch disc friction surfaces must never be contaminated—handle these components by their metal centers only, never touching the friction material.
Skill-Level Appropriate Boundaries
For Complete Beginners:
This repair exceeds the recommended skill level for beginner DIYers. The complexity, weight of components, safety hazards, and critical nature of proper torque specifications make professional installation the wise choice. The money saved on DIY labor doesn’t justify the risks of injury, vehicle damage, or repeat repairs from improper installation.
If you’re determined to tackle this project as a learning experience, find an experienced mentor who can supervise and guide you through the process. Don’t attempt this as your first major automotive repair project. Consider starting with simpler repairs like brake pad replacement, spark plug changes, or oil changes to build fundamental skills before attempting transmission-level work.
For Intermediate DIY Enthusiasts:
This repair is feasible for intermediate-level DIYers with proper equipment, a quality repair manual for your specific vehicle, and good mechanical aptitude. Success requires careful attention to detail, precise following of torque specifications, and patience during the lengthy disassembly and reassembly process.
Before starting, honestly assess whether you have:
- A proper workspace with adequate lighting and room to work
- All required tools, including a transmission jack and torque wrench
- At least a full day (possibly two) to complete the job without rushing
- A backup vehicle in case complications arise
- Access to a service manual with specific torque specs and procedures for your vehicle
Even with these prerequisites, consider having a professional technician verify your work before final assembly. Many shops will perform a quick inspection for a reasonable fee, providing peace of mind that critical components are properly installed. The modest cost for this inspection provides valuable insurance against expensive mistakes.
For Professional Mechanics:
This represents a straightforward repair for professional technicians, though attention to detail remains critical. The key considerations are:
- Verify correct parts before installation using VIN-specific lookups
- Inspect related components (clutch disc, pressure plate, pilot bearing, rear main seal) during access
- Follow exact torque specifications with calibrated tools
- Verify proper alignment during installation
- Test for proper starter engagement before final assembly
- Document work and provide warranty on parts and installation
When Professional Consultation Becomes Mandatory
Certain situations require professional expertise regardless of DIY experience:
Dual-Mass Flywheel Diagnosis and Replacement: These complex components require specialized testing to determine condition and specific procedures for installation. The sophisticated design makes DIY replacement risky—improper installation can cause premature failure of an expensive component.
Concurrent Transmission Problems: If you’re experiencing transmission slipping, grinding, or erratic shifting in addition to potential flywheel or flexplate symptoms, professional diagnosis becomes essential. Multiple problems can create confusing symptom combinations, and addressing only one issue won’t solve the overall problem.
Unusual Symptoms or Unclear Diagnosis: If symptoms don’t clearly match the failure patterns described in this guide, professional diagnosis prevents unnecessary parts replacement. Modern vehicles have complex systems, and multiple problems can create symptoms that mimic flywheel or flexplate failure.
Lack of Proper Equipment: Don’t attempt this repair without proper support equipment. Trying to support a transmission using inadequate jacking methods or floor jacks creates serious safety hazards and often results in damaged components or injuries. If you don’t own a transmission jack, the rental cost plus your time investment may exceed professional labor costs.
Time Constraints: This isn’t a repair to rush. If you need your vehicle operational quickly and can’t commit a full weekend to the project, professional service provides faster turnaround. Shops with lifts and specialized tools complete the job far more efficiently than DIY efforts.
Professional Service Advantages
Beyond technical expertise, professional service provides several valuable benefits:
Correct Part Identification: Professionals access VIN-specific parts databases that ensure compatibility. This prevents the common DIY mistake of ordering parts based on year/make/model that turn out to be incorrect for your specific engine or transmission variant.
Specialized Tools and Equipment: Shops invest in vehicle lifts, professional transmission jacks, and specialized tools that make the job safer and more efficient. Their torque wrenches are professionally calibrated, ensuring accurate bolt torque.
Experience-Based Diagnosis: Experienced technicians quickly identify related problems that need attention while the transmission is out. This might include leaking seals, worn clutch components, or damaged transmission mounts—problems you might miss until they cause future failures.
Warranty Coverage: Reputable shops warranty both parts and labor. If the replacement flexplate develops premature cracks or the flywheel shows problems, warranty coverage protects you from paying twice for the same repair. This warranty protection typically extends 12 months or 12,000 miles, providing valuable peace of mind.
Liability Protection: If something goes wrong during professional service—damaged transmission, stripped threads, broken components—the shop’s insurance covers the repairs. DIY mistakes become expensive out-of-pocket expenses.
For detailed vehicle-specific procedures and torque specifications, professional service manuals available through Honda repair manuals, BMW repair manuals, and Mercedes-Benz repair manuals provide essential technical information that generic repair guides cannot match.
Conclusion: Making Informed Flywheel and Flexplate Decisions
Understanding the differences between flywheels and flexplates transforms these components from confusing automotive jargon into clearly defined parts with specific purposes. Manual transmissions depend on heavy, rigid flywheels to store rotational energy, provide clutch friction surfaces, and maintain engine momentum during gear changes. Automatic transmissions use thin, flexible flexplates simply to connect the crankshaft to the torque converter, relying on fluid coupling rather than mechanical friction for power transfer.
The construction differences reflect these distinct functions. Flywheels use cast iron or steel construction weighing 15-50 pounds, with precision-machined friction surfaces and substantial mass for energy storage. Flexplates use stamped sheet steel construction weighing just 5-15 pounds, with no friction surface but designed-in flexibility to accommodate torque converter movement. Neither component can substitute for the other—they’re fundamentally different parts for fundamentally different transmission types.
Recognizing failure symptoms helps you diagnose problems accurately and avoid misidentifying these issues as more serious engine or transmission failures. Manual transmission flywheel problems manifest as clutch slippage, grinding noises, pedal vibrations, and burning smells—symptoms tied to the clutch system’s operation. Automatic transmission flexplate failures produce distinctive metallic rattling at idle, vibrations during acceleration, and knocking when shifting into gear—symptoms reflecting the flexplate’s role in connecting to the torque converter.
Three Essential Takeaways:
First, replacement costs range from $400-$1,000 for most flexplate jobs and $500-$2,500 for flywheel replacements depending on component type and vehicle complexity. Labor represents the majority of this cost because transmission removal requires significant time and expertise. Opportunistic replacement during related work—clutch service for manual transmissions, transmission rebuild or torque converter replacement for automatics—maximizes value by leveraging already-invested labor costs.
Second, proper installation is absolutely critical and requires specific equipment, correct torque specifications, and attention to detail. Under-torqued bolts allow components to shift and fail prematurely. Over-torqued bolts strip threads or break. Wrong components create severe vibration or prevent engine operation entirely. Contaminated friction surfaces destroy clutches immediately. These aren’t repairs where “close enough” succeeds—precision matters enormously.
Third, honest assessment of your skill level, equipment availability, and time constraints determines whether DIY or professional installation makes sense. This repair exceeds beginner capabilities and requires intermediate-level skills with proper tools. Professional service provides correct parts identification, specialized equipment, experience-based diagnosis of related problems, warranty protection, and liability coverage that DIY efforts cannot match.
Your Next Steps
If you’re experiencing symptoms suggesting flywheel or flexplate problems:
- Document the symptoms precisely: When do noises occur? Under what conditions do vibrations appear? Has starting become difficult? This information helps professionals diagnose accurately.
- Consult vehicle-specific repair manuals: Access detailed torque specifications, bolt replacement requirements, and alignment procedures for your exact year, make, and model through manufacturer service manuals.
- Obtain professional diagnosis before purchasing parts: Confirm the actual problem before ordering components. Many symptoms that seem like flywheel or flexplate failures originate from other sources.
- Consider related repairs during transmission removal: Clutch replacement, rear main seal replacement, and pilot bearing replacement all become cost-effective when the transmission is already out. Plan comprehensive service rather than piecemeal repairs.
- Prioritize safety over cost savings: If you lack proper equipment, adequate workspace, or sufficient experience, professional installation protects you from injury and ensures reliable repair.
Final Recommendation: Your vehicle’s reliability and your personal safety are worth more than labor cost savings. Flywheel and flexplate replacement involves heavy components, complex disassembly, and critical installation requirements. If you possess the skills, tools, and time to complete this repair properly, it represents an achievable DIY project that saves significant money. If significant doubt exists about any aspect of the process, professional installation provides peace of mind and proper results.
The difference between a flywheel and flexplate reflects the fundamental difference between manual and automatic transmissions. Understanding these components, their functions, failure modes, and replacement requirements empowers you to make informed decisions about diagnosis, repair options, and service providers. Whether you tackle this repair yourself or rely on professional expertise, knowledge transforms you from a confused vehicle owner into an informed customer who understands exactly what’s being done and why it matters.
Related Resources for Deeper Understanding
Transmission Systems:
- How Manual Transmission Synchronizers Work: Smooth Shifting Technology
- How Dual-Clutch Transmissions Work: Fast Shifting
- How CVT Transmissions Work: Continuous Variable Ratios
Drivetrain Components:
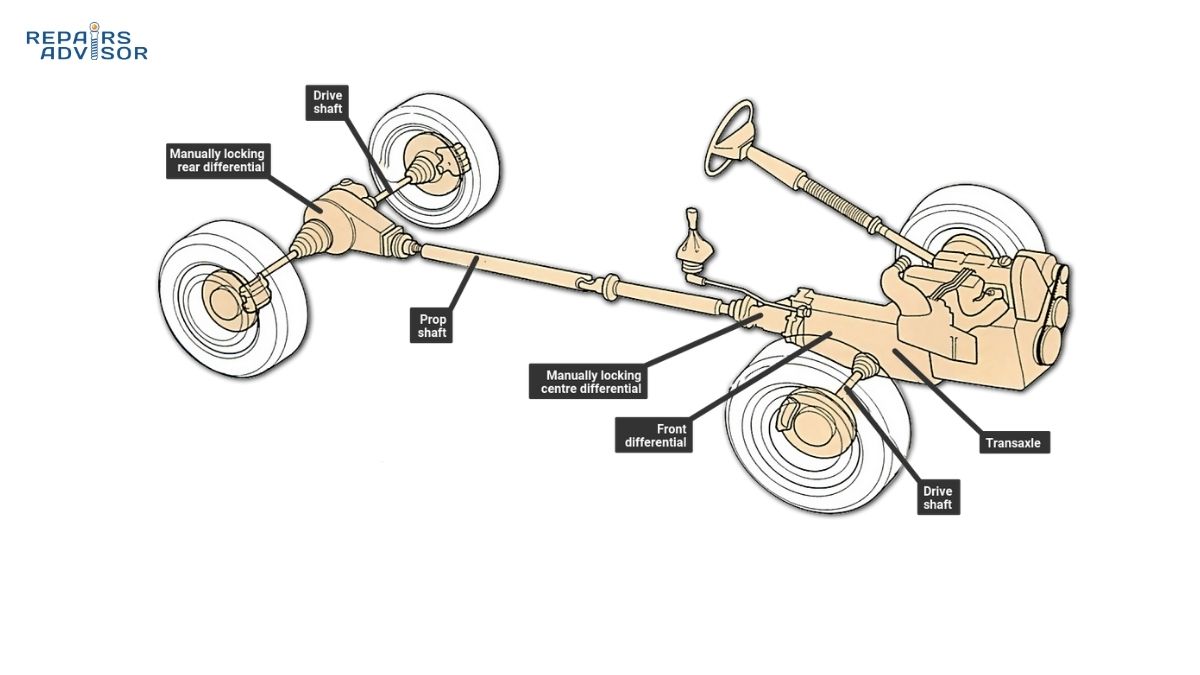
- How Differential Systems Work: Torque Distribution
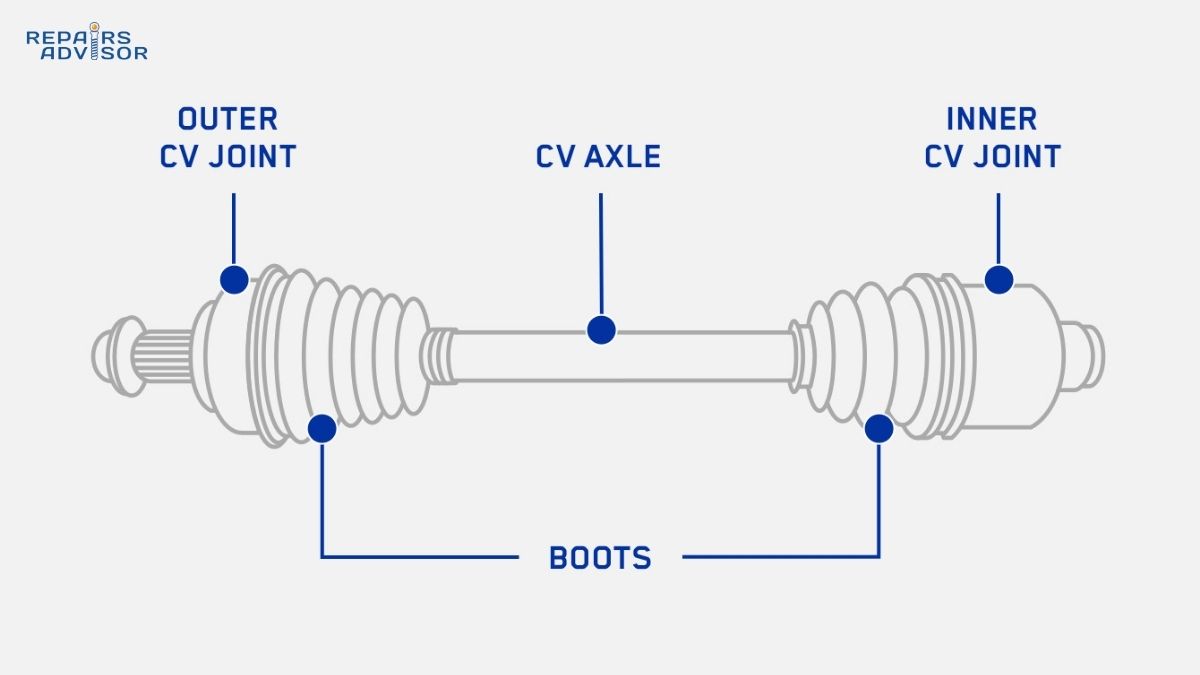
- How CV Joints Work: Constant Velocity Power Transfer
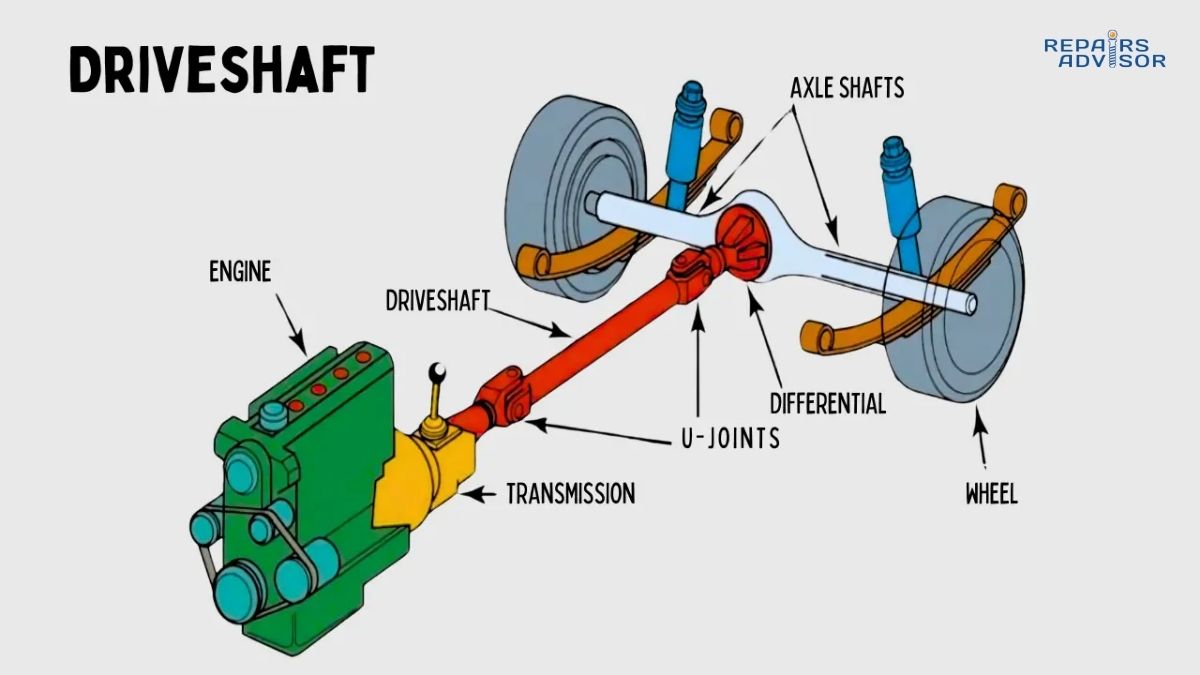
- How Drive Shafts Work: Power Transmission
Vehicle-Specific Service Information: Access detailed repair procedures, torque specifications, and technical service bulletins through manufacturer-specific repair manual collections. Our comprehensive database covers all major manufacturers with regularly updated technical information that generic repair guides cannot provide.