Your vehicle’s suspension system contains dozens of components working together to deliver a smooth ride and precise handling. Among these, control arms serve as critical structural links that most drivers never think about—until something goes wrong. These unassuming metal components play a fundamental role in keeping your wheels properly positioned through every turn, bump, and pothole you encounter.
When control arms begin to fail, the symptoms can range from annoying clunking noises to serious safety concerns like poor steering response and rapid tire wear. Understanding how control arms work, recognizing failure symptoms early, and knowing when professional service is necessary can save you money and prevent potentially dangerous driving situations.
This guide provides a comprehensive look at control arm function, types, common failure modes, and replacement considerations. Whether you’re experiencing suspension issues, planning preventive maintenance, or simply want to understand your vehicle better, you’ll find the information you need to make informed decisions about this critical suspension component. Let’s explore how your car’s suspension works and where control arms fit into the bigger picture.
What Are Control Arms?
Control arms are metal structural members that connect your vehicle’s wheel assembly to the chassis or frame. They function as pivoting links that allow controlled vertical wheel movement while maintaining proper wheel alignment. Think of them as the crucial connection point that lets your wheels move up and down with the road surface while preventing unwanted side-to-side motion that would compromise steering and handling.
In most suspension designs, each front wheel has at least one control arm, though many vehicles use both upper and lower control arms for enhanced control. These components are positioned between the vehicle’s frame and the steering knuckle—the part that holds the wheel bearing and brake assembly. This strategic placement makes control arms essential for both suspension articulation and steering precision.
The primary job of a control arm is to allow the suspension to move through its travel range while maintaining the wheel’s relationship to the chassis. When you hit a bump, the control arm pivots on its mounting points, allowing the wheel to move upward without disturbing the vehicle’s body. When you turn the steering wheel, the control arm accommodates the steering angle change while the suspension continues to function normally. This dual capability makes control arms indispensable for both ride quality and handling performance.
Control arms must be extremely robust because they handle significant forces. During braking, acceleration, and cornering, these components transfer loads between the wheels and chassis while maintaining structural integrity. A failed control arm can result in loss of vehicle control, making them true safety-critical components that demand attention when problems arise. For a detailed technical explanation, see how control arms work in suspension geometry.
Physical Structure and Design
Control arms come in several distinct shapes, each designed for specific suspension applications. The most common configurations include A-arms (shaped like a capital letter A), L-arms (resembling an L), and wishbone designs (similar to a chicken’s wishbone). These shapes aren’t arbitrary—each provides specific mounting points and load distribution characteristics suited to different suspension geometries.
Materials and Construction: Most control arms are manufactured from stamped steel, cast iron, cast aluminum, or forged steel. Economy vehicles typically use stamped steel for cost-effectiveness, while luxury and performance cars often feature cast aluminum for reduced weight and improved handling response. Forged steel control arms offer maximum strength for heavy-duty applications like trucks and off-road vehicles.
The material choice involves trade-offs between weight, strength, cost, and corrosion resistance. Aluminum control arms resist rust better than steel and reduce unsprung weight (the weight of components not supported by the suspension springs), which improves ride quality and handling. However, aluminum arms cost significantly more to manufacture. Steel arms are heavier but offer excellent strength-to-cost ratios and can be easily formed into complex shapes.
For intermediate DIYers, understanding these design differences helps when selecting replacement parts. A stamped steel replacement will function adequately for daily driving, while an upgraded aluminum arm might improve handling feel—though you’ll pay a premium for that improvement.
For professional technicians, control arm design directly impacts suspension geometry calculations. The distance between mounting points, the angle of the arm, and its stiffness all affect camber curves, roll center height, and instant center location. When replacing control arms on performance vehicles or after collision damage, verifying that replacement parts maintain OEM geometry specifications is essential for preserving handling characteristics.
For beginners, the simple explanation is this: Control arms are like strong metal levers that connect your wheels to the car’s body. They’re shaped to fit in the available space while being strong enough to handle the forces from driving, turning, and braking. The specific shape matters less than understanding that they must be sturdy and properly attached at both ends.
Control Arm Components and Assembly
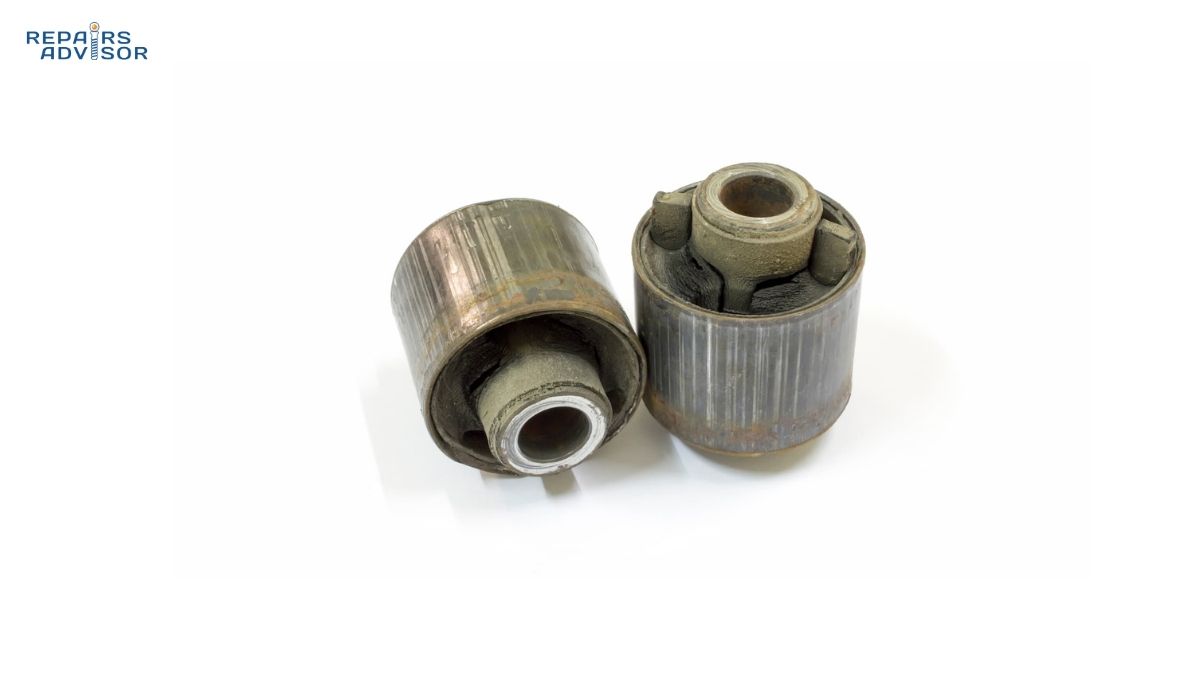
A complete control arm assembly consists of three primary components: the arm structure itself, the chassis-mounting bushings, and the ball joint that connects to the steering knuckle. Understanding each component helps diagnose failures and make informed repair decisions.
Ball Joint Connection
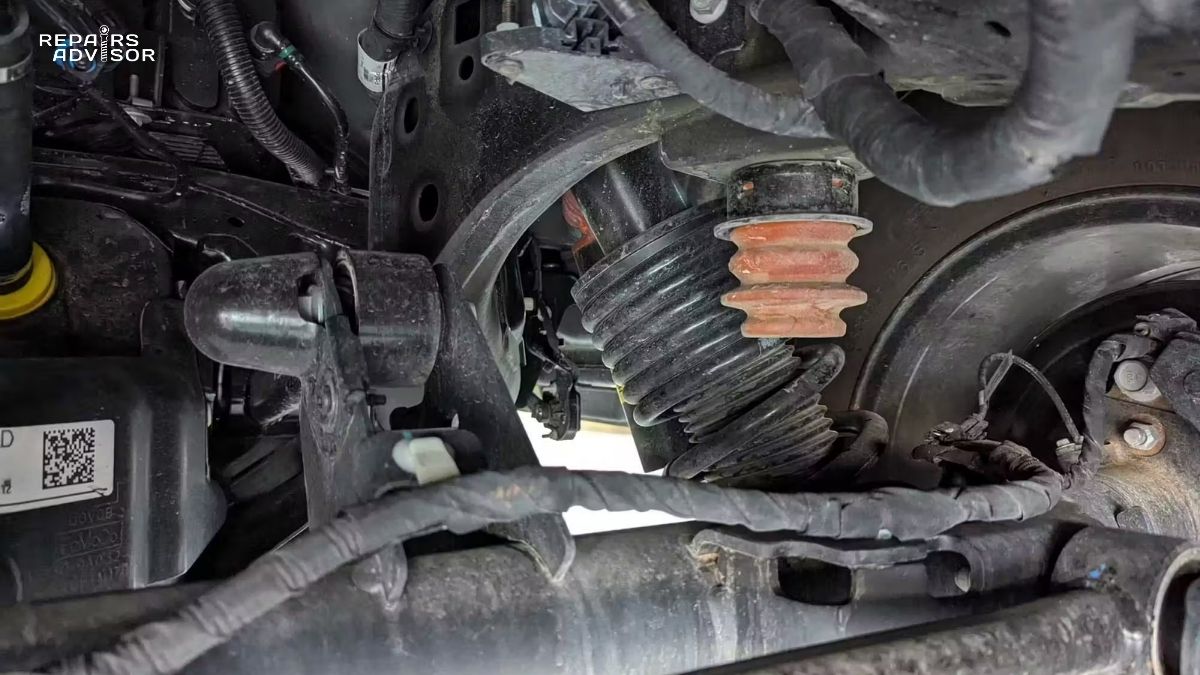
The ball joint creates a pivoting connection between the control arm and the steering knuckle. This joint must allow rotation in multiple directions—think of a ball-and-socket design similar to your hip joint. The ball stud protrudes from a socket housing, sealed by a protective rubber or polyurethane boot filled with grease.
This design enables the wheel to steer left and right while the suspension moves up and down. Without this multi-directional pivot capability, the suspension would bind during steering, creating dangerous handling problems. The grease-filled boot serves two critical purposes: it lubricates the joint to prevent metal-on-metal wear, and it keeps contaminants like water, dirt, and road salt out of the precision-machined surfaces.
Ball joint failure typically occurs in two ways. First, the protective boot can crack or tear, allowing contamination and grease loss. Once dirt enters the joint, accelerated wear occurs rapidly. Second, normal wear over time increases clearance between the ball and socket, creating looseness that affects wheel alignment and steering precision. For comprehensive information on ball joint design and failure modes, review how ball joints work in suspension pivot points.
Bushing Mounts
At the chassis end, control arms connect through rubber or polyurethane bushings that serve multiple functions. These bushings allow the controlled pivoting motion necessary for suspension travel while isolating the chassis from road vibration and noise. The bushing essentially acts as a cushioned hinge—it permits rotation but dampens vibrations that would otherwise transfer directly to the vehicle’s body.
Rubber bushings are standard equipment on most vehicles. They offer excellent vibration isolation and quiet operation, contributing to a smooth, comfortable ride. However, rubber deteriorates over time due to heat, chemicals, and mechanical flexing. Cracking, hardening, and eventual separation are normal failure modes for rubber bushings after years of service.
Polyurethane bushings are popular aftermarket upgrades for performance applications. They’re more durable than rubber and resist chemical degradation better, often lasting much longer. The trade-off is increased vibration and noise transmission to the chassis—polyurethane simply doesn’t absorb vibrations as effectively as rubber. Performance-oriented drivers accept this compromise for improved suspension response and longer service life.
Hydraulic bushings represent a more sophisticated design found on some luxury vehicles. These use internal hydraulic damping to provide superior vibration isolation at specific frequencies while maintaining good suspension control. They’re more expensive and generally not available as aftermarket replacements, but they offer the best combination of comfort and control when functioning properly.
For detailed technical information on bushing types and their characteristics, see how control arm bushings work in compliance and isolation systems.
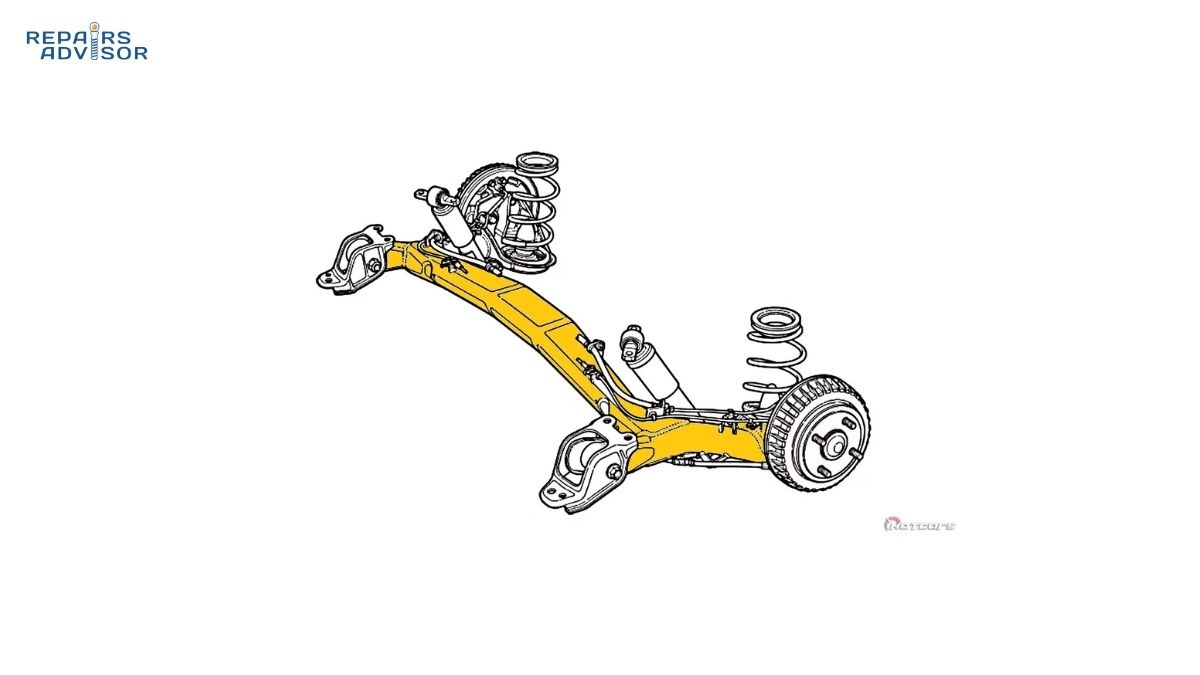
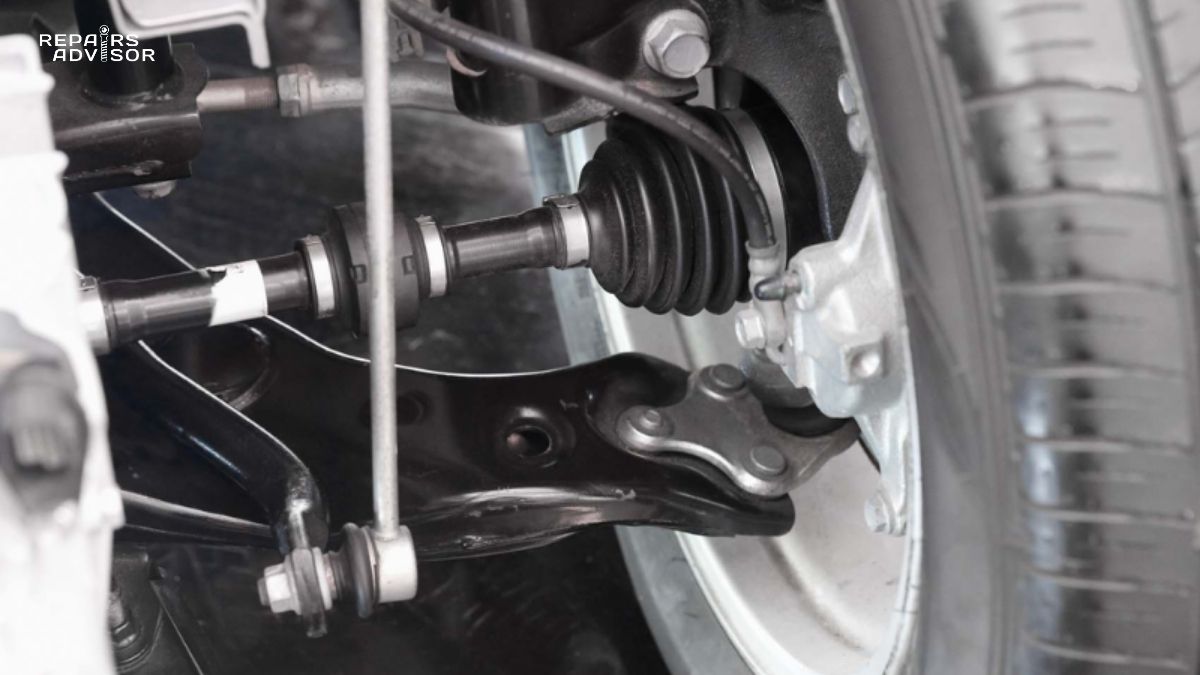
Integration with Other Components
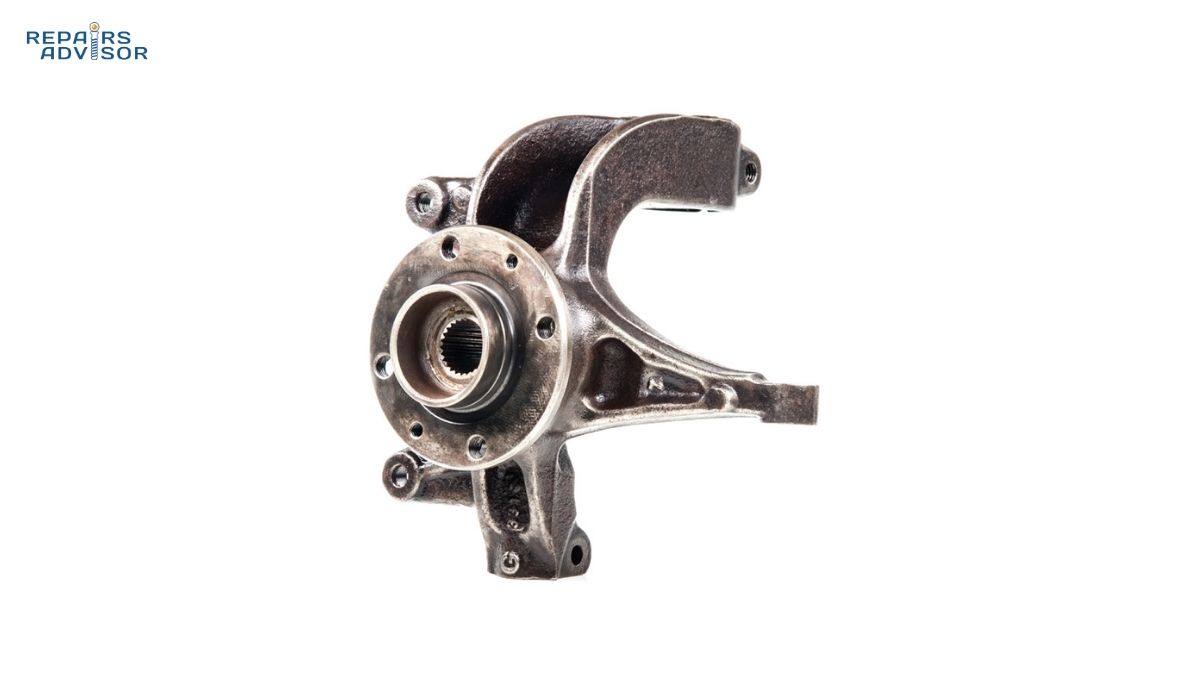
Control arms don’t work in isolation—they’re part of an integrated suspension system. The outer end of the control arm connects to the steering knuckle, which is the component that holds the wheel bearing, supports the brake caliper, and provides the mounting point for the steering linkage. This connection point must handle vertical loads from the suspension, lateral loads from cornering, and longitudinal loads from braking and acceleration.
The control arm also interacts with the vehicle’s shock absorber or strut, though the connection method varies by suspension design. In some configurations, the shock absorber mounts directly to the control arm. In others, it mounts to the steering knuckle or chassis separately. Regardless of the specific arrangement, the shock absorber and control arm work together to control wheel movement—the control arm defines the path the wheel follows, while the shock absorber controls the speed of that movement.
Many vehicles also connect the anti-roll bar (also called a sway bar or stabilizer bar) to the control arm through end links. This connection allows the anti-roll bar to resist body roll during cornering by linking the suspension movement of the left and right wheels. When one wheel moves up, the anti-roll bar applies force to push the opposite wheel down, helping keep the vehicle level during turns.
Understanding these interconnections is important when diagnosing problems. A worn control arm bushing might create symptoms that seem like a bad shock absorber. A failing ball joint could produce noises that sound like a bad wheel bearing. Proper diagnosis requires considering the entire suspension system, not just individual components. Learn more about this critical connection point in how steering knuckles work for wheel support.
Types of Control Arm Configurations
Vehicle manufacturers use several different control arm arrangements, each with specific advantages for different applications. Understanding these configurations helps explain why replacement procedures and costs vary significantly between vehicles.
MacPherson Strut Systems
The MacPherson strut design is the most common front suspension configuration on modern vehicles, particularly on compact and mid-size cars. This system uses a single lower control arm with the strut assembly serving as the upper mounting point. The strut combines the shock absorber and spring into one unit that bolts directly to the steering knuckle at the bottom and to the vehicle’s body at the top.
This configuration offers several advantages. It’s compact, requiring less space than double-wishbone designs—critical for front-wheel-drive vehicles that need room for the engine, transmission, and CV axles. It’s also relatively lightweight and cost-effective to manufacture. The single lower control arm simplifies replacement procedures and reduces parts count.
However, MacPherson strut systems have some limitations from a performance standpoint. The design creates more camber change during suspension travel compared to double-wishbone setups, which can affect tire contact patch and grip during aggressive cornering. The strut also carries both spring loads and lateral forces, potentially creating more friction than separate spring and shock arrangements.
For most drivers, these theoretical performance limitations are irrelevant. MacPherson strut suspensions provide excellent ride quality and handling for everyday driving. They’re also generally easier for DIY maintenance since there’s only one control arm per wheel to deal with. For a complete technical explanation of this popular design, see how MacPherson strut suspension works with compact geometry.
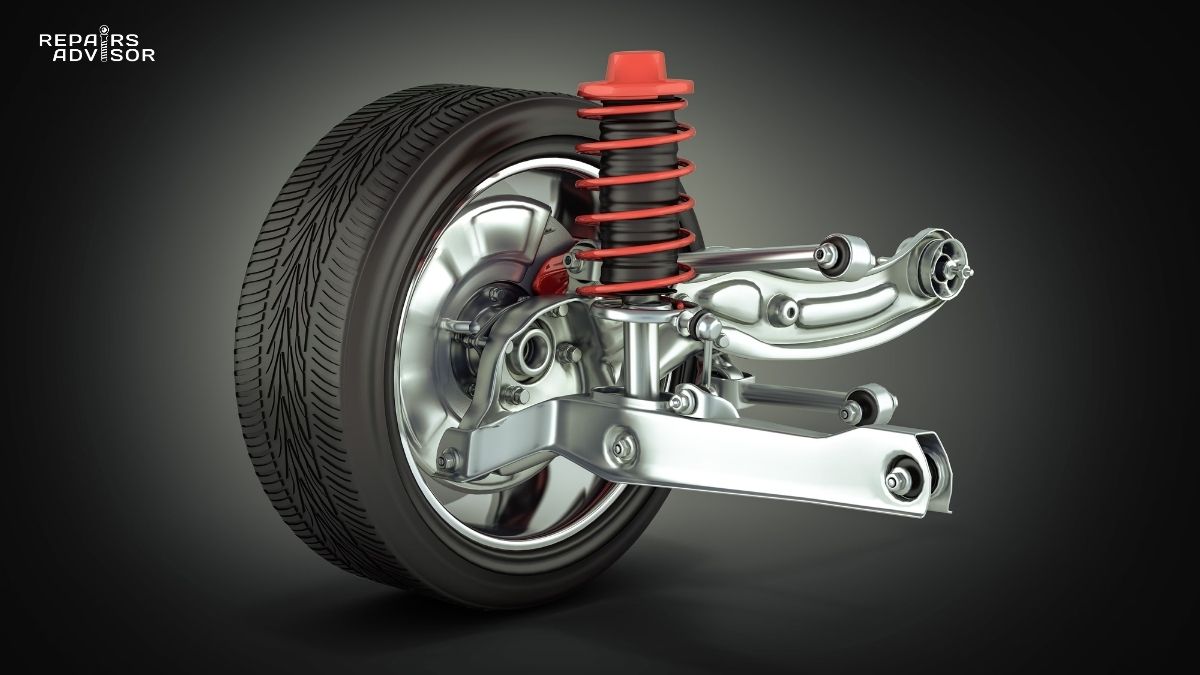
Double Wishbone Systems
Double wishbone (also called double A-arm) suspensions use both upper and lower control arms shaped like wishbones or the letter A. Each arm has two chassis mounting points and connects to the steering knuckle through a ball joint. This creates a four-bar linkage that provides superior control over suspension geometry throughout the travel range.
The double wishbone design offers exceptional camber control. By carefully selecting the length, angle, and mounting points of the upper and lower arms, engineers can minimize camber change during suspension compression and extension. This maintains optimal tire contact with the road surface during cornering, improving grip and handling precision. It’s no coincidence that most performance vehicles and race cars use some variation of double wishbone suspension.
This configuration also separates spring and shock absorber duties more effectively than MacPherson struts. The coil spring can mount between the lower control arm and chassis, while the shock absorber operates more purely as a damper. This separation can improve both ride quality and handling.
The trade-offs include increased complexity, more parts to maintain, and greater packaging space requirements. Double wishbone suspensions cost more to manufacture and typically demand more labor for service and replacement. However, for drivers who prioritize handling performance, these compromises are worthwhile.
When replacing control arms on double wishbone vehicles, both upper and lower arms on the affected side should be inspected carefully. While one may have failed, the other has experienced similar service conditions and may not be far behind. For complete details on this superior suspension architecture, explore how double wishbone suspension works for enhanced control.
Multi-Link Configurations
Multi-link suspensions take control arm design to its logical extreme, using three to five separate links per wheel instead of the traditional upper and lower arms. Each link controls a specific aspect of wheel movement—one link might primarily control toe angle, another handles camber, while others manage longitudinal and lateral wheel positioning.
This complexity provides engineers with exceptional tuning flexibility. By adjusting the length, angle, and mounting points of multiple links, they can achieve suspension characteristics that would be impossible with simpler designs. Multi-link systems can maintain nearly perfect wheel alignment throughout suspension travel while isolating the chassis from road inputs more effectively than simpler configurations.
You’ll typically find multi-link suspensions on luxury vehicles, sports cars, and at the rear of many performance sedans and SUVs. The configuration allows for optimal packaging in rear suspension applications where space is limited but performance demands are high. Some vehicles use multi-link setups front and rear for maximum handling capability.
The drawbacks are predictable: increased cost, more components to potentially fail, and greater complexity for diagnosis and repair. When a multi-link suspension develops problems, the multiple connection points and adjustment mechanisms can make troubleshooting more challenging. Professional diagnosis is often necessary to identify which specific link or bushing has failed.
Replacement costs for multi-link suspensions tend to be higher due to the increased parts count and labor time. However, the exceptional ride quality and handling characteristics justify the expense for many drivers. For technical details on this advanced suspension architecture, review how multi-link suspension works with advanced dynamics.
How Control Arms Function
Understanding the specific jobs control arms perform helps explain why their failure creates the symptoms it does and why proper repair is so critical for safety.
Vertical Wheel Movement Control
The most fundamental function of control arms is permitting vertical wheel movement while constraining it to a specific arc. When your wheel encounters a bump, it needs to move upward to absorb the impact. The control arm pivots on its chassis bushings, allowing this upward movement while preventing the wheel from moving in unwanted directions.
The arc that the wheel follows is determined by the control arm’s length and mounting points. This arc affects how the wheel’s alignment angles change during suspension travel—a critical consideration for ride quality and tire wear. Engineers spend considerable time optimizing this arc to maintain good tire contact with the road surface throughout the suspension’s range of motion.
During compression (when the wheel moves upward), the control arm rotates on its bushings. The ball joint or outer bushing allows the arm to accommodate the changing angle to the steering knuckle. During extension (when the wheel moves downward), the process reverses. Throughout this movement, the control arm must handle the full weight of the vehicle plus dynamic loads from road irregularities.
Wheel Alignment Maintenance
Control arms play a crucial role in maintaining wheel alignment angles—specifically camber, caster, and toe. Camber is the inward or outward tilt of the wheel when viewed from the front. Caster is the forward or backward tilt of the steering axis. Toe refers to whether the wheels point inward or outward when viewed from above.
As the suspension moves through its travel, these angles naturally change. Control arm geometry determines how much they change and in what direction. A well-designed control arm setup minimizes unwanted alignment changes, keeping the tire’s contact patch optimal throughout suspension movement.
When a control arm bushing wears or a ball joint develops excessive play, the wheel’s alignment becomes inconsistent. Instead of following the engineered arc precisely, the wheel position varies unpredictably. This creates uneven tire wear, poor handling, and potential safety issues. Even small amounts of play in a control arm connection can produce noticeable steering problems and accelerated tire wear.
For a comprehensive explanation of how these alignment angles work together, see how steering geometry works for alignment fundamentals.
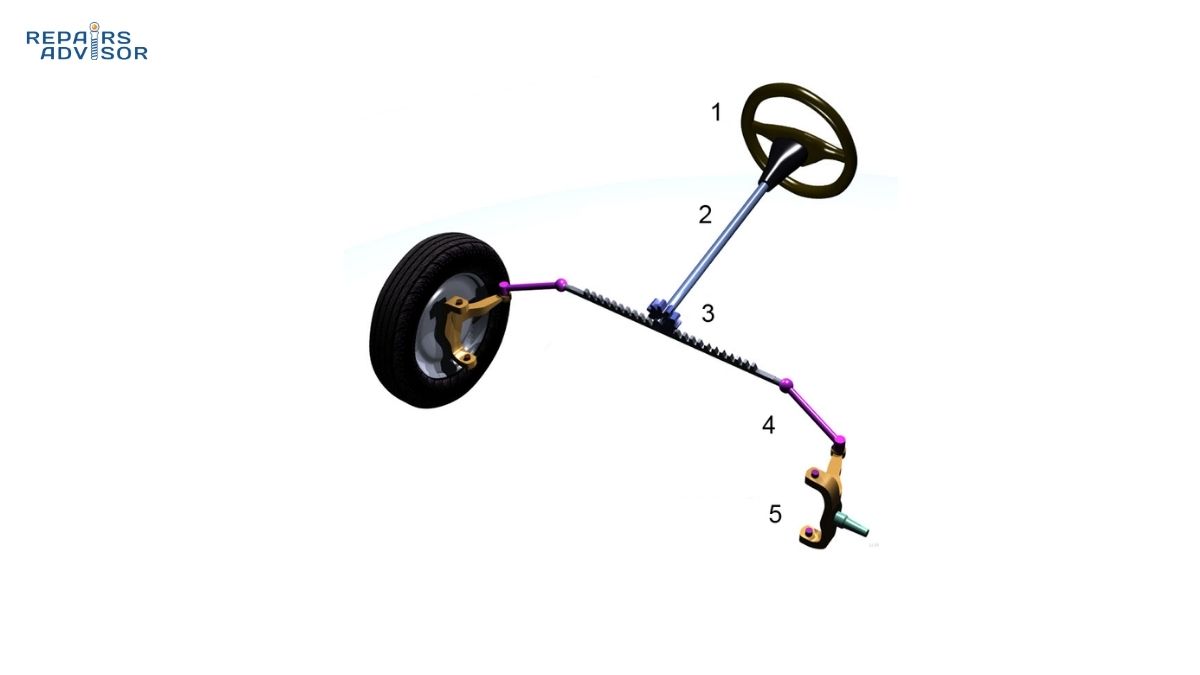
Steering System Integration
Control arms must accommodate steering input while the suspension is moving. When you turn the steering wheel, the steering rack pushes or pulls on the tie rods, which connect to the steering knuckle. The steering knuckle pivots on the ball joints, changing the wheel’s angle. Meanwhile, the suspension continues to move up and down as you drive.
This requires the ball joint to function as a true multi-axis pivot. It must allow the steering knuckle to rotate for steering input while simultaneously accommodating suspension movement in the vertical plane. The ball joint’s spherical design makes this possible—the ball can rotate within the socket in any direction needed.
When control arm components wear, steering precision suffers. Excessive play in a ball joint allows the wheel to move slightly before steering input takes effect, creating a loose or vague steering feel. This delayed response can be particularly dangerous during emergency maneuvers when immediate vehicle response is critical.
Load Transfer Management
Control arms handle substantial forces beyond just supporting the vehicle’s weight. During braking, forward weight transfer loads the front suspension, putting compression forces through the control arms. During acceleration, the opposite occurs—weight transfers rearward, creating tension loads in the front control arms.
Cornering creates even more complex load scenarios. The outside wheels in a turn carry more weight due to lateral weight transfer, while centrifugal force tries to push the wheels outward. The control arms must resist these lateral forces while maintaining proper suspension geometry. This is why control arm bushings and ball joints are subjected to multidirectional loads rather than simple up-and-down movement.
For professional technicians: The control arm’s position affects anti-dive and anti-squat characteristics. The instant center location (where imaginary lines drawn through the upper and lower control arm pivot axes intersect) determines how the suspension responds to braking and acceleration forces. A lower instant center generally reduces brake dive, while a higher position increases it. When replacing control arms after collision damage or on modified vehicles, verifying that geometry specifications match original equipment is essential for maintaining these designed-in characteristics.
For intermediate DIYers: Understanding these load paths helps explain why control arm mounting bolts have specific torque requirements. The bushings work correctly only when preloaded properly with the suspension at normal ride height. Tightening control arm bolts with the suspension hanging loose creates pre-stress in the bushings that leads to premature failure.
For beginners: Think of control arms as the critical link that lets your wheels move smoothly while keeping them pointed in the right direction. They’re constantly working whether you’re driving straight, turning, or going over bumps—which is why they eventually wear out and need replacement.
Common Control Arm Failure Symptoms
Recognizing control arm problems early can prevent more serious damage to other suspension components and avoid potentially dangerous driving situations. Here are the key warning signs to watch for.
Audible Symptoms
Unusual noises from the suspension are often the first indication of control arm problems. A clunking or knocking sound over bumps typically indicates worn bushings or a loose ball joint. As the control arm moves, worn bushings allow metal-to-metal contact or excessive movement, creating the characteristic clunk. This noise is most noticeable over speed bumps, potholes, or rough pavement where suspension movement is most pronounced.
Creaking or squeaking sounds during turns suggest bushing deterioration or a dry ball joint. As the suspension compresses during cornering and the control arm pivots, degraded rubber bushings can produce squeaking noises. A ball joint that has lost its grease lubrication may also squeak or creak as the ball stud rotates in the socket.
These noises often start subtly and progressively worsen. Don’t ignore them—what begins as a minor annoyance can indicate a safety issue developing. A severely worn ball joint can separate completely, causing loss of vehicle control. For detailed diagnostic guidance, see how to spot a bad control arm with visual and audible cues.
Handling and Steering Issues
Worn control arms directly affect steering precision and vehicle handling. A wandering or loose steering feel—where the vehicle doesn’t track straight and requires constant small corrections—often indicates excessive play in control arm components. When ball joints or bushings wear, the wheel can shift position slightly within the available play, making the steering feel disconnected or vague.
If your vehicle pulls consistently to one side despite proper tire pressure, a bent control arm or severely worn bushing may be the cause. The wheel alignment shifts when control arm components fail, creating the pull. Unlike alignment issues caused by simple adjustment needs, problems from worn control arms typically can’t be corrected by alignment alone—the worn components must be replaced first.
Delayed or unresponsive steering input is particularly concerning. When you turn the steering wheel, there should be immediate response from the vehicle. If you notice a delay or need to turn the wheel farther before the vehicle responds, worn ball joints allowing excessive play are likely culprits. This symptom demands immediate attention as it indicates a serious safety issue.
Tire Wear Patterns
Abnormal tire wear patterns often provide the first visible evidence of control arm problems. Excessive wear on the inner or outer edge of the tire indicates improper camber alignment. While alignment issues have various causes, worn control arm components that allow camber to vary unpredictably are common culprits.
Feathering across the tire tread—where the tread blocks feel smooth on one side and sharp on the other—can result from toe alignment problems caused by control arm wear. As you run your hand across the tread from inside to outside (or vice versa), you’ll feel the sharp edges if feathering is present.
Rapid tire wear concentrated on one wheel, or noticeably different wear patterns between left and right wheels, suggests that one side’s suspension has problems while the other remains normal. A bent control arm from curb impact or a failed bushing on one side creates this asymmetric wear pattern.
It’s worth noting that worn control arms often prevent proper wheel alignment. If you’ve had an alignment performed and the settings won’t hold or the vehicle still pulls, the alignment technician may have noted that control arm components prevented achieving proper specifications. This is a clear indication that suspension repairs are needed before alignment can be successful.
Vibration and Ride Quality
Steering wheel vibrations, particularly at highway speeds, can indicate worn control arm bushings. When bushings deteriorate, they lose their damping ability, allowing road vibrations to transfer directly through the suspension to the steering wheel. This is different from vibrations caused by unbalanced wheels—control arm-related vibrations often correlate with road surface quality rather than speed.
Excessive vehicle shake over rough roads or a generally harsh ride quality may indicate that control arm bushings have hardened or failed. The bushings normally absorb vibration and small road irregularities. When they fail, every bump transmits directly to the vehicle’s body, creating an uncomfortable, jarring ride.
A vehicle that feels unstable during lane changes or when crossing raised pavement markings may have control arm problems. The suspension should keep the wheels planted and predictable. If the vehicle feels floaty or like it’s wandering when the wheels cross uneven surfaces, worn bushings allowing excessive control arm movement are a likely cause.
Component-Specific Failures
Ball Joint Wear: The ball joint typically fails before other control arm components due to its exposed position and constant articulation. Symptoms specific to ball joint failure include:
- Vertical play when the wheel is grasped at 12 and 6 o’clock positions and pushed/pulled
- Torn or missing dust boot allowing grease loss and contamination
- Visible grease leakage around the boot
- Squeaking noises during suspension movement
- Steering wheel shimmy at low speeds
Ball joint failure can be catastrophic. If the ball joint separates from the steering knuckle, the wheel loses its attachment to the vehicle, causing immediate loss of control. If you suspect ball joint problems, have the vehicle inspected immediately. For comprehensive information on ball joint failure modes, review how to tell if you have a bad ball joint and why it’s critical.
Bushing Deterioration: Control arm bushings fail through several mechanisms:
- Cracking and tearing of rubber material from age and heat cycling
- Separation between the rubber and metal components
- Hardening of rubber reducing vibration isolation
- Oil-soaked appearance (for hydraulic bushings indicating fluid loss)
- Visible gaps between bushing components and mounting points
Bushing problems typically develop gradually. The rubber slowly deteriorates until it no longer provides adequate support or vibration isolation. Unlike sudden ball joint failure, bushing degradation usually gives plenty of warning through increasing noise, vibration, and alignment issues. For detailed bushing inspection procedures, see how to tell if you have a bad control arm bushing with diagnostic techniques.
Arm Structure Damage: The control arm body itself can fail through:
- Bending from curb strikes or collision impact
- Corrosion and rust perforation (particularly in rust-belt climates)
- Cracks in cast or forged components (rare but possible)
- Deformation from excessive loads or age-related fatigue
A bent control arm usually results from a single traumatic event rather than gradual wear. If you’ve recently hit a curb, large pothole, or been in an accident, have the suspension inspected even if no immediate problems are apparent. A bent control arm may not produce obvious symptoms initially but will cause alignment problems and accelerated tire wear.
Causes of Control Arm Wear and Damage
Understanding what causes control arm failure helps with preventive maintenance and realistic expectations about service life.
Normal Wear Factors
All control arm components have finite service lives. Rubber bushings gradually deteriorate from heat cycling, chemical exposure, and mechanical flexing. Every time the suspension moves, the bushings flex slightly. After 100,000 miles, that represents millions of cycles—eventually the rubber fatigues and begins to crack or tear.
Ball joints wear through a combination of mechanical movement and environmental exposure. The constant articulation of the ball within the socket gradually wears away material, increasing clearance. While ball joints are designed to minimize wear, it’s unavoidable over time. Grease lubrication slows this wear, but it can’t prevent it indefinitely.
Environmental factors significantly affect control arm life. Vehicles operated in areas that use road salt for winter ice control experience more rapid corrosion of metal components and faster degradation of rubber bushings from salt exposure. High temperatures accelerate rubber degradation. Humidity and moisture promote rust formation on steel control arms.
Most control arms are designed to last 100,000 to 150,000 miles under normal operating conditions. Vehicles driven primarily on smooth highways in moderate climates often exceed this, while those subjected to harsh conditions may need replacement sooner. This wide variation makes generic replacement intervals impractical—regular inspection is a better approach.
Accelerated Wear Conditions
Certain driving conditions and habits substantially shorten control arm life. Rough roads with numerous potholes subject suspension components to higher impact loads than smooth pavement. Each pothole impact creates stress peaks far exceeding normal driving loads, accelerating fatigue and wear.
Repeatedly driving over curbs—even at low speeds—can bend control arms or damage bushings. The suspension is designed for vertical movement, not lateral impacts. A curb strike creates side loads that control arms weren’t engineered to handle repeatedly.
Aggressive driving behavior accelerates wear. Hard cornering, rapid acceleration, and severe braking all create higher loads in control arm components. Track use or spirited driving on winding roads subjects the suspension to forces far exceeding normal street driving, which is why performance vehicles often need more frequent suspension maintenance.
Prolonged exposure to road salt without regular undercarriage washing accelerates rust formation. The salt residue remains on metal surfaces long after the winter season, continuing to promote corrosion. Regular undercarriage rinsing during and after winter helps minimize this accelerated deterioration.
Overloading the vehicle beyond its gross vehicle weight rating (GVWR) places excessive stress on suspension components. Control arms are designed for specific load ranges. Regular overloading can bend arms, accelerate bushing wear, and cause premature ball joint failure.
Impact and Collision Damage
Single traumatic events can damage control arms that would otherwise last for years. A hard curb strike can bend a control arm even if no other visible damage occurs. The arm may be bent only slightly—not enough to notice visually—but enough to throw off alignment and cause tire wear.
Accidents, even relatively minor ones, should prompt suspension inspection. Impact forces can bend control arms, crack cast components, or damage bushings in ways that aren’t immediately obvious. Insurance repairs should always include thorough suspension inspection, not just replacement of obviously damaged parts.
Hitting large potholes at speed can damage multiple suspension components simultaneously. The impact loads can bend control arms, damage ball joints, tear bushings, and even crack wheel components. If you hit a severe pothole, have the suspension inspected even if the vehicle seems to drive normally—damage may be present but not immediately apparent.
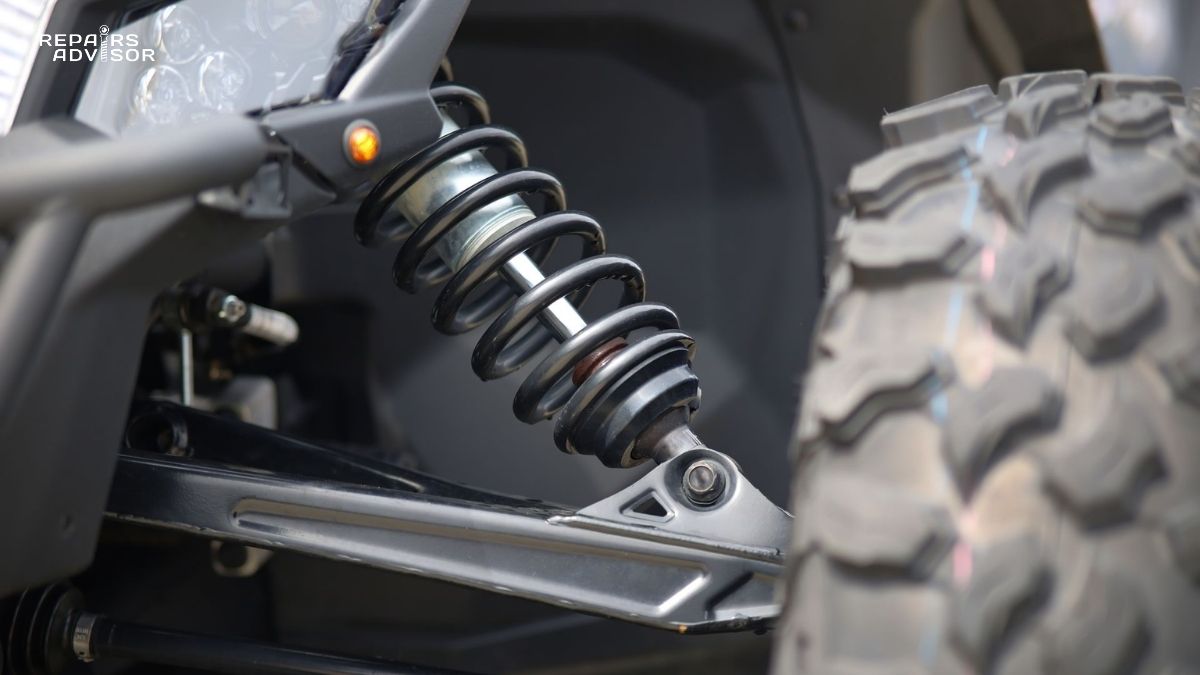
Off-road use without proper suspension upgrades subjects control arms to forces they weren’t designed to handle. Rock strikes, articulation at extreme suspension angles, and repeated high-impact landings can all damage stock control arms. This is why serious off-road vehicles typically upgrade to reinforced control arms designed for these conditions.
Maintenance-Related Issues
Some control arm failures result from inadequate maintenance. Ball joints with grease fittings (called greasable ball joints) need periodic lubrication. Neglecting this maintenance allows the joint to run dry, accelerating wear dramatically. A properly greased ball joint can last 150,000 miles or more, while a neglected one may fail at 50,000 miles.
Torn ball joint dust boots allow contamination that rapidly destroys the joint. If a boot tear is caught early, simply replacing the boot can save the ball joint. Unfortunately, many drivers don’t notice boot damage until the ball joint has already been contaminated and damaged. Regular visual inspection during oil changes can catch boot damage before joint failure occurs.
Failure to maintain proper wheel alignment accelerates tire wear and can increase stress on control arm components. While worn control arms can cause alignment problems, the reverse is also true—running with improper alignment for extended periods can accelerate control arm wear by creating abnormal load patterns.
Neglected undercarriage corrosion protection in harsh climates allows rust to weaken steel control arms. While you can’t prevent all corrosion, regular undercarriage washing and application of corrosion inhibitors can significantly extend component life in salt-exposed areas.
Inspection and Diagnosis Methods
Proper diagnosis of control arm problems requires systematic inspection of multiple components. Here’s how professionals approach the process and what you can check yourself.
Visual Inspection Techniques
Start with a thorough visual inspection of the control arm and its components. You’ll need to get under the vehicle, so use proper jack stands—never work under a vehicle supported only by a jack. Make sure the vehicle is on a level surface and the parking brake is engaged.
Look for obvious damage first. Check the control arm body for bends, cracks, or heavy rust damage. A bent control arm often shows paint cracking or wrinkling where the metal deformed. Deep rust or perforation indicates the arm has weakened and needs replacement.
Examine the bushings carefully. Look for cracks, tears, or separation between the rubber and metal components. The bushing should fill the mounting completely with no visible gaps. Oil-soaked bushings indicate hydraulic bushing failure. Severely deteriorated bushings may have visible chunks of rubber missing or show the metal sleeve inside.
Inspect the ball joint dust boot thoroughly. Even small tears allow contamination that will destroy the joint. Look for grease leakage around the boot—this indicates the seal has failed and the joint is losing lubrication. If the boot is torn but still relatively clean, it may be caught early enough that simply replacing the boot saves the joint. If the boot is torn and the joint is dirty or dry, the ball joint needs replacement.
Check for rust and corrosion on all metal surfaces. Surface rust is normal, but deep pitting or scale indicates advanced corrosion that may have weakened components. Pay particular attention to the areas around the ball joint and bushing mounting points where stress concentrations occur.
Physical Testing Methods
Once visual inspection is complete, physical testing helps identify worn components that may not show obvious visual damage.
Ball Joint Play Test: This is the most important test for identifying ball joint wear. Here’s the correct procedure:
- Jack up the vehicle and support it securely on jack stands positioned under the frame or subframe
- Remove the wheel for better access and visibility
- Grasp the steering knuckle (not the brake rotor) firmly
- Push up and pull down on the knuckle, watching the ball joint
- Any visible movement at the ball joint indicates excessive wear
- For an alternative test, grasp the tire at 12 o’clock and 6 o’clock positions and rock it in and out
- Have an assistant watch the ball joint while you perform this test
- Any play or movement at the ball joint means it needs replacement
Important: Some suspension designs require special procedures for ball joint testing. Double wishbone suspensions must be tested with the wheel supported to unload the spring. MacPherson strut systems should be tested with the wheel hanging. Consult a repair manual for your specific vehicle to ensure accurate testing.
Bushing Inspection: With the vehicle raised, push and pull on the control arm while watching the bushings. They should flex slightly but not show any gaps or separation. If you can see the metal sleeve moving within the rubber bushing, or if the bushing appears to have excessive play, it needs replacement.
Check for oil around hydraulic bushings. Any oil leakage indicates internal seal failure requiring bushing replacement. Also verify that the bushings haven’t shifted within their mounting points—they should be centered and seated properly.
Professional Diagnostic Procedures
Professional technicians have access to specialized equipment and procedures that provide more comprehensive diagnosis.
Alignment rack inspection allows precise measurement of wheel angles while observing component movement. The technician can measure camber, caster, and toe while manually moving the suspension, checking for play or inconsistent movement. If alignment specifications can’t be achieved or won’t hold, worn control arm components are likely culprits.
Load-bearing tests involve using special tools to check ball joint condition under load. Some ball joints show no play when unloaded but have excessive wear evident when tested under vehicle weight. Specialized ball joint loading tools or measurement procedures help identify this wear.
Computer-aided diagnosis on vehicles with electronic suspension or stability control systems can reveal problems that might not be obvious during physical inspection. The vehicle’s control modules monitor suspension movement and may store diagnostic codes indicating excessive movement or irregular behavior from control arm-related sensors.
Safety Note: Ball joint and control arm inspection requires the vehicle to be properly supported on jack stands rated for the vehicle’s weight. Never work under a vehicle supported only by a jack—jacks can fail suddenly, causing serious injury or death. If you’re uncomfortable with these procedures, have a professional technician perform the inspection. The cost of professional diagnosis is minimal compared to the safety risk of improper procedures.
Replacement Considerations and Options
When control arm components fail, you face several decisions about repair approach, parts selection, and whether to tackle the job yourself or hire a professional.
When Replacement is Necessary
Control arm replacement becomes necessary when wear exceeds acceptable limits or damage occurs. Specific replacement triggers include:
Ball joint failure or excessive wear – Any detectable play in the ball joint requires replacement. Don’t wait for complete failure, which can happen suddenly and cause loss of vehicle control.
Bushing deterioration beyond service limits – Severely cracked, torn, or separated bushings need replacement. Hardened bushings that no longer provide adequate vibration isolation should also be replaced, though this is more of a comfort issue than a safety concern.
Bent or damaged control arm structure – Any visible bend, crack, or deformation of the control arm body requires replacement. These structural issues can’t be repaired safely.
Inability to achieve proper wheel alignment – If an alignment technician reports they can’t bring alignment angles within specification due to worn control arm components, replacement is necessary before alignment can be completed successfully.
Corrosion compromising structural integrity – Deep rust, perforation, or scale formation that has weakened the control arm structure requires replacement. Surface rust is normal, but structural compromise is not.
Replacement vs. Component Service
When control arm problems are identified, you have two basic approaches: replace the complete control arm assembly or replace only the worn components.
Complete Control Arm Assembly Replacement:
This approach involves removing the entire control arm and installing a new one that includes fresh ball joints and bushings already installed. Advantages include:
- Easier installation requiring no pressing or special tools
- All components new simultaneously (ball joint, bushings, arm structure)
- Less labor time for DIY work
- Known quality when using reputable manufacturers
- Often the only option for vehicles where bushings aren’t serviceable separately
Disadvantages:
- Higher parts cost than component-only replacement
- May replace components that haven’t actually worn out
- Assembly quality varies with manufacturer—cheap assemblies may use inferior bushings
Component Replacement Only:
This approach involves removing only the worn component (usually ball joint or bushings) and pressing in new parts while reusing the control arm structure. Advantages include:
- Lower parts cost (just the worn component)
- Original equipment arm retained (which may be higher quality)
- More sustainable approach (less waste)
Disadvantages:
- Requires hydraulic press or specialized pressing tools
- More labor-intensive
- Risk of damaging control arm during pressing
- May not address other worn components you didn’t replace
- Professional service typically required unless you have proper tools
For most DIY applications, complete assembly replacement makes more sense. The cost difference between a complete assembly and separate components isn’t huge when you factor in the tools and time required for pressing. Professional shops often prefer component replacement because they have the necessary equipment and can complete the job efficiently, saving the customer money on parts even with higher labor costs.
OEM vs. Aftermarket Options
When selecting replacement control arms, you’ll choose between original equipment manufacturer (OEM) parts and aftermarket options.
OEM (Original Equipment Manufacturer) Parts:
These are parts manufactured to the vehicle maker’s specifications, often by the same supplier that provided parts for the original assembly. Advantages include:
- Exact fit guaranteed—no modifications needed
- Same materials and specifications as original
- Known quality and performance characteristics
- Often the safest choice for vehicles under warranty
Disadvantages:
- Typically the most expensive option
- May not represent the latest design improvements
- Sometimes manufactured by the same company as cheaper aftermarket parts with only branding differences
Aftermarket Economy Parts:
These are non-OEM parts manufactured to approximate OEM specifications, usually at lower cost. Advantages include:
- Significantly lower cost than OEM
- Adequate quality for daily driver applications
- Wide availability
- Often come with good warranties
Disadvantages:
- Quality varies widely between manufacturers
- May not fit as precisely as OEM
- Bushing materials may not match OEM durability
- Sometimes manufactured with less expensive materials
Aftermarket Performance Options:
Performance-oriented aftermarket control arms offer upgrades over stock parts. These include:
- Aluminum construction for reduced weight
- Forged steel for increased strength
- Polyurethane or spherical bushings for improved response
- Adjustable designs for alignment tuning
- Enhanced corrosion resistance
Advantages:
- Improved handling response
- Better durability in demanding applications
- Adjustability for fine-tuning suspension geometry
- Often better materials than OEM
Disadvantages:
- Significantly higher cost than OEM or economy parts
- May sacrifice ride comfort for performance
- Firmer bushings transmit more noise and vibration
- Not necessary for normal daily driving
Selection Recommendation: For daily drivers, quality aftermarket assemblies from reputable manufacturers (Moog, TRW, Mevotech) offer the best value—good quality at reasonable prices. For performance vehicles or track use, consider performance upgrades. For luxury vehicles where ride quality is paramount, OEM parts ensure original comfort and noise isolation.
Professional Service Considerations
The decision between DIY and professional service depends on several factors: your mechanical skill level, available tools, vehicle design complexity, and safety considerations.
DIY-Appropriate Situations:
- Bolt-on control arm assembly replacement on accessible vehicles
- MacPherson strut systems with straightforward access
- You have proper jack stands, torque wrench, and basic hand tools
- You’re comfortable working under the vehicle
- The vehicle has conventional suspension (not air or active systems)
Professional Service Recommended:
- Internal bushing or ball joint pressing (requires hydraulic press)
- Suspension geometry verification and adjustment
- Vehicles with limited access (may require subframe removal)
- Any situation where you’re uncertain about procedures
- Vehicles you depend on for transportation (minimize downtime)
Mandatory Professional Service:
- Vehicles with air suspension systems
- Active suspension requiring specialized tools and software
- Complex multi-link setups requiring simultaneous adjustment
- Situations where proper tools aren’t available
- Any vehicle where improper repair creates serious safety risk
Post-Replacement Alignment: Regardless of who performs the control arm replacement, professional wheel alignment is essential afterward. Control arm replacement changes suspension geometry, making proper alignment impossible without adjustment. Operating the vehicle without post-service alignment will cause rapid tire wear and poor handling. Factor alignment cost ($80-$150 typically) into your total repair budget.
Safety Warning: Control arms are safety-critical suspension components. Improper installation can lead to sudden component failure and loss of vehicle control. If you lack experience with suspension work, proper safety equipment (rated jack stands, torque wrench), or confidence in your abilities, professional service is the right choice. The cost difference between DIY and professional service is small compared to the potential consequences of improper repair.
Cost Expectations and Service Life
Understanding typical costs helps with budgeting for control arm replacement and evaluating repair estimates.
Replacement Cost Ranges
Control arm replacement costs vary significantly based on vehicle type, parts quality, and whether you choose DIY or professional service.
DIY Parts Cost:
- Economy control arm assembly: $50-$100 per side
- Quality aftermarket (Moog, TRW): $80-$200 per side
- OEM parts: $150-$350 per side
- Performance upgrades: $200-$500+ per side
- Both sides (recommended): $100-$1,000 total
Professional Service Cost (Parts + Labor):
- Economy/compact vehicles: $200-$400 per side
- Mid-size sedans/SUVs: $300-$600 per side
- Luxury vehicles: $400-$800 per side
- Performance vehicles: $500-$1,200 per side
- Component replacement only: Often $50-$150 less per side
Additional Costs:
- Wheel alignment (essential): $80-$150
- Additional worn components discovered during repair
- Subframe removal (if required): Add $200-$500
- Upper and lower arms (double wishbone): Approximately double the single-arm cost
Example Total Cost Scenarios:
Budget repair on economy car:
- Front lower control arms (both sides): $160
- Labor: $240
- Alignment: $90
- Total: $490
Quality repair on mid-size sedan:
- Front lower control arms (both): $320
- Labor: $400
- Alignment: $120
- Total: $840
Luxury vehicle with double wishbone:
- Upper and lower arms (both sides): $1,600
- Labor: $800
- Alignment: $150
- Total: $2,550
These are typical ranges—actual costs vary by location, specific vehicle, and service provider rates.
Expected Service Life
Control arm longevity depends on multiple factors, making precise predictions difficult.
OEM control arms: Most last 100,000 to 200,000 miles under normal conditions. Factors extending service life include:
- Primarily highway driving on smooth roads
- Moderate climates without road salt
- Regular maintenance and undercarriage cleaning
- Conservative driving style
Factors reducing service life:
- Harsh winter climates with road salt
- Rough roads, frequent potholes
- Aggressive driving habits
- Overloading the vehicle
- Lack of undercarriage maintenance
Performance aftermarket parts: Service life varies dramatically by design. Polyurethane bushings often outlast rubber, potentially lasting 200,000+ miles. However, spherical bearings in performance arms may need rebuilding every 50,000-75,000 miles depending on use.
Ball joints: When control arms have replaceable ball joints, the joint typically needs replacement before the arm structure. Greasable ball joints with proper maintenance can last 150,000+ miles. Sealed ball joints generally last 80,000-120,000 miles. Ball joints fail sooner on heavy vehicles, in harsh climates, or with frequent off-road use.
Bushings: Rubber bushings are usually the first component to deteriorate, often showing problems at 80,000-120,000 miles. Polyurethane bushings last significantly longer, often 150,000-200,000+ miles, but trade comfort for longevity.
Cost-Saving Considerations
Several strategies can minimize control arm replacement costs without compromising safety:
Replace both sides together: Even if only one side has failed, the opposite side has experienced similar service conditions and may not be far behind. Replacing both sides simultaneously:
- Saves labor costs (already working on the suspension)
- Prevents the need for a second repair shortly after
- Ensures balanced suspension characteristics
- Requires only one alignment service
Consider DIY for straightforward replacements: If you have mechanical aptitude and proper tools, DIY replacement of bolt-on control arm assemblies can save $200-$500 per side in labor. However, professional alignment is still essential post-repair.
Choose quality aftermarket over OEM: Reputable aftermarket brands like Moog, TRW, and Mevotech often provide OEM-equivalent quality at 30-50% lower cost. Avoid ultra-cheap no-name brands that may have questionable quality.
Complete assemblies vs. components: For DIY work, complete assemblies are usually cost-effective when you factor in tool requirements for component replacement. For professional service, ask for quotes both ways—sometimes component replacement is cheaper despite higher labor.
Factor in alignment: Always budget for post-replacement alignment. Operating with improper alignment will destroy new tires in 5,000-10,000 miles, costing far more than the alignment service.
Don’t delay needed repairs: A failing control arm that’s still drivable may tempt you to postpone repair, but the consequences can be expensive. A separated ball joint can damage the brake rotor, CV axle, and wheel well bodywork—repairs costing thousands beyond the control arm itself. Address problems promptly.
Related Suspension Components
Control arms work as part of an integrated suspension system. Understanding related components helps with comprehensive diagnosis and maintenance planning.
Shock Absorbers and Struts work with control arms to control suspension movement. While control arms define the path the wheel follows, shocks control the speed of that movement. Worn shocks can mask control arm problems or create symptoms that seem like control arm issues. When replacing control arms, assess shock absorber condition—if they’re worn, replacing both together makes sense. Learn more about how shock absorbers and struts work for damping control.
Suspension Springs support the vehicle’s weight and work with control arms to allow suspension travel. Sagging or broken springs affect control arm angles and can accelerate bushing wear. If springs are sagging significantly, replacing them along with control arms restores proper suspension geometry. See how suspension springs work for load support fundamentals.
Anti-Roll Bars connect left and right suspension components to resist body roll during cornering. Many anti-roll bars connect to the control arm through end links. When replacing control arms, inspect anti-roll bar links for wear—they’re inexpensive and often need replacement at similar intervals. For detailed information, review how anti-roll bars work for body roll control.
Tie Rods connect the steering rack to the steering knuckle and work closely with control arms during steering. Tie rod and control arm symptoms can be similar—both cause alignment problems and steering issues. Proper diagnosis requires checking both. Explore how tie rods, ball joints, and columns work for steering linkage details.
Wheel Bearings support the wheel assembly and can create symptoms similar to control arm problems. Growling noises, vibrations, and wandering steering might indicate wheel bearing wear rather than control arm issues. Diagnosis should check both. Learn about how wheel bearing systems work for load support and rotation.
When suspension problems develop, comprehensive inspection of these related components ensures you address all issues simultaneously rather than discovering additional problems after control arm replacement.
Conclusion
Control arms serve as critical structural links between your vehicle’s wheels and chassis, enabling both suspension articulation and steering precision. These robust metal components handle substantial forces during normal driving while allowing controlled wheel movement that maintains ride quality and handling performance.
Key Takeaways
Function and Importance: Control arms allow vertical wheel movement while maintaining proper alignment angles. They integrate suspension and steering systems, handling loads from braking, acceleration, and cornering. Their failure affects both comfort and safety.
Configuration Variations: Different suspension designs use control arms differently. MacPherson strut systems employ a single lower control arm per wheel, double wishbone setups use upper and lower arms for superior control, and multi-link configurations use multiple arms for maximum adjustability.
Failure Recognition: Common symptoms include clunking noises over bumps, steering wander or looseness, rapid or uneven tire wear, vibrations, and poor handling. Ball joint and bushing deterioration are the primary failure modes, though arm structure damage can occur from impact.
Service Considerations: Replacement typically involves choosing between complete control arm assemblies or component-only replacement. Complete assemblies simplify DIY installation, while component replacement can save money with professional service. Wheel alignment is mandatory after replacement.
Cost and Longevity: Expect replacement costs from $200-$600 per side for professional service on typical vehicles, with luxury and performance vehicles costing more. Service life typically ranges from 100,000-200,000 miles depending on driving conditions and maintenance.
When to Seek Professional Help
While experienced DIY mechanics can handle straightforward bolt-on control arm assembly replacement, several situations demand professional service:
Complex Repairs: Internal bushing or ball joint pressing requires specialized equipment. Multi-link suspension systems with numerous adjustment points benefit from professional experience. Vehicles with air suspension or active systems need specialized tools and software.
Safety Concerns: If you lack proper jack stands, torque wrenches, or confidence in your abilities, professional service is essential. Control arms are safety-critical components—improper installation creates serious crash risk.
Diagnostic Uncertainty: When symptoms could indicate control arms, wheel bearings, tie rods, or other components, professional diagnosis saves money by identifying actual problems rather than replacing parts speculatively.
Post-Service Alignment: Even perfect DIY control arm replacement requires professional alignment afterward. The specialized equipment and knowledge needed for precise wheel alignment justifies professional service for this critical final step.
Next Steps
If you’re experiencing symptoms described in this guide—unusual noises, steering problems, vibrations, or rapid tire wear—schedule suspension inspection promptly. Early diagnosis prevents more extensive damage and maintains safety.
For vehicles approaching 100,000 miles, consider including control arm inspection during routine maintenance. Visual inspection of bushings and dust boots takes minimal time but can identify developing problems before they cause symptoms or damage other components.
If you choose DIY replacement, carefully review procedures for your specific vehicle, gather all necessary tools before starting, and never compromise on safety equipment like jack stands. After installation, have professional alignment performed immediately to protect your tires and ensure proper handling.
For professional service, obtain multiple quotes when possible, but don’t select based solely on lowest price. Quality parts and proper procedures matter more than saving a few dollars on what is fundamentally a safety repair. Ask about parts brands, warranty coverage, and whether alignment is included in the quoted price.
Safety Disclaimer: The information in this guide is educational and should not replace professional mechanical diagnosis and service. Control arms and related suspension components are critical for vehicle safety and handling. Always consult qualified automotive technicians for safety-critical suspension work, especially if you lack proper tools, experience, or lifting equipment. Improper suspension repair can result in loss of vehicle control, potentially causing serious injury or death.