If your gas pump keeps clicking off every 10 seconds, forcing you to squeeze the handle over and over for 15 frustrating minutes just to fill your tank—you’re probably dealing with a charcoal canister problem. Even if you’ve never heard of it.
You’re not alone. Thousands of drivers stand at gas stations every day, fighting with pump handles, wondering if something’s wrong with the pump, the station, or their vehicle. The answer? It’s usually your vehicle—specifically, a small black plastic container underneath it called the charcoal canister.
Here’s what makes this frustrating: that annoying refueling problem is just the beginning. When your charcoal canister fails, you’ll also face check engine lights, failed emissions tests, mysterious fuel smells, and repair bills ranging from $150 to $650. But here’s the good news—90% of these failures are completely preventable with one simple habit we’ll cover in this guide.
Whether you’re trying to understand what your mechanic just told you, deciding if you can fix it yourself, or simply want to prevent this problem from happening in the first place, this guide gives you everything you need to know about the charcoal canister and why it matters to your wallet and your vehicle.
What You’ll Learn in This Guide
Most drivers have never heard of the charcoal canister until something goes wrong. Then suddenly, it’s the center of attention—and confusion.
This guide answers the questions you’re actually asking:
- “Why can’t I fill my gas tank?” → Understanding what the canister does and why it fails
- “Is this expensive to fix?” → Real-world costs and when you need a pro vs. DIY
- “How do I prevent this from happening again?” → The one refueling habit that stops 90% of failures
- “Are those fuel smells dangerous?” → Safety concerns you need to know
- “Can I keep driving with a check engine light?” → What happens if you ignore the problem
Let’s start with the basics, then move into what really matters: keeping your vehicle running and your wallet happy. For context on how this fits into your complete emissions system, see our guide on how EVAP systems work.
What Is a Charcoal Canister?
If you’ve never heard of this component before, don’t feel bad—most people haven’t. It’s one of those parts that works silently for years until it doesn’t.
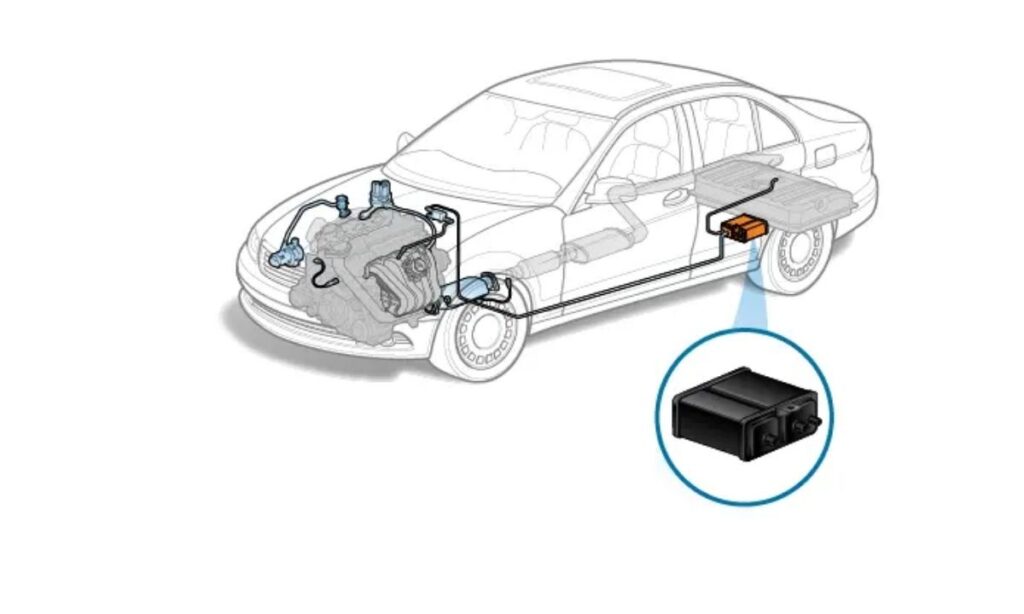
The charcoal canister, also known as the EVAP canister or vapor canister, is a specially designed plastic container filled with activated charcoal granules that serves as the central storage component of your vehicle’s evaporative emission control system. This federally mandated emissions device has been required on all gasoline-powered vehicles sold in the United States since the 1970s, representing one of the earliest and most effective automotive pollution control technologies.
At its core, the charcoal canister performs a deceptively simple but environmentally critical function: it captures gasoline vapors that naturally evaporate from your fuel tank and stores them until your engine can burn them as part of the normal combustion process. Without this component, those hydrocarbon-laden vapors would escape directly into the atmosphere, contributing to smog formation and air quality degradation. The Environmental Protection Agency estimates that a single vehicle without a functioning EVAP system can release as much pollution from fuel evaporation as driving generates through tailpipe emissions.
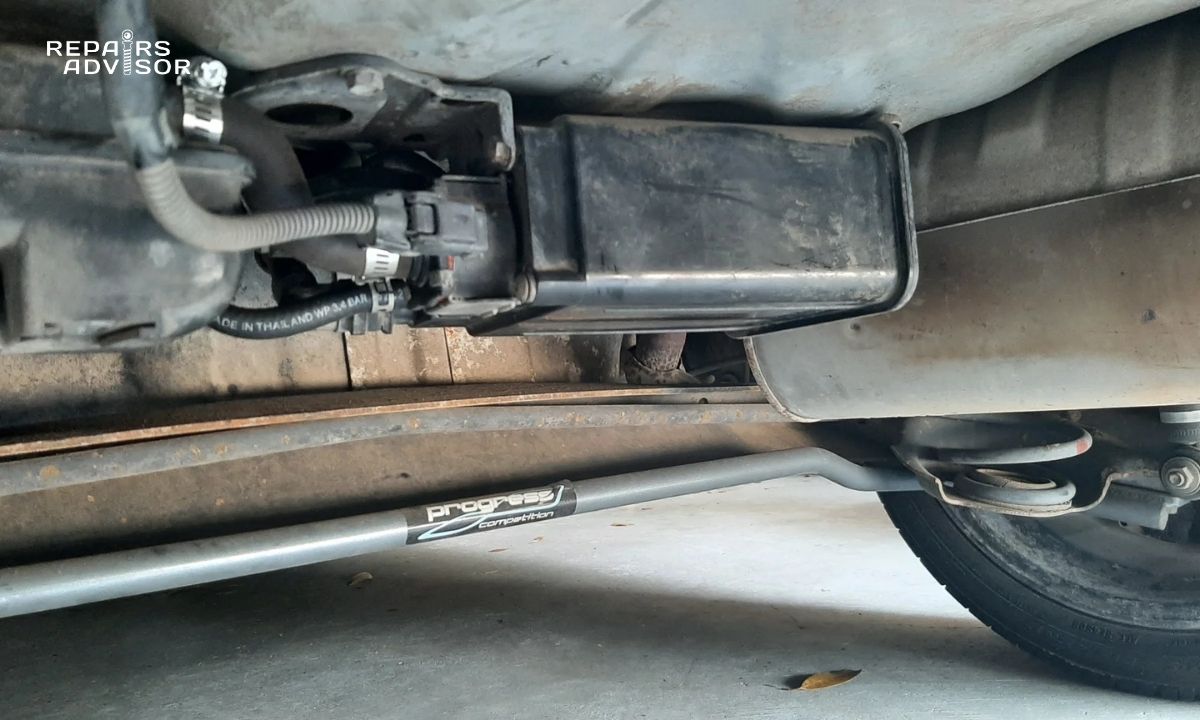
The physical canister itself varies somewhat in size and shape depending on your vehicle’s make and model, but typically measures between six and twelve inches in length with a rectangular or cylindrical profile. You’ll usually find it mounted underneath the vehicle near the fuel tank or tucked into the engine bay, connected to other EVAP system components through a network of vapor lines and hoses. The housing is invariably black or dark gray in color, constructed from durable plastic designed to withstand years of exposure to fuel vapors and environmental conditions.
Inside this unassuming container lies the real magic: activated charcoal, sometimes called activated carbon. This isn’t the same charcoal you use for your backyard grill. Activated charcoal undergoes special processing that creates an incredibly porous material with an enormous internal surface area. A single gram of activated charcoal can have a surface area exceeding 3,000 square meters—roughly equivalent to half a football field. This massive surface area, created by countless microscopic pores throughout the charcoal structure, allows the material to absorb and hold substantial quantities of gasoline vapors in a relatively compact space.
The canister features three or four connection ports on its exterior, each serving a specific purpose in the EVAP system. One port connects to the fuel tank through vapor lines, allowing fuel vapors to flow into the canister for storage. Another connects to the purge valve, which controls when stored vapors are released to the engine. A third port serves as the fresh air vent, allowing atmospheric air to enter the system during the purge cycle. Some vehicles include a fourth port for the vent valve or canister vent solenoid, which the engine computer uses to seal the system during leak detection tests. Understanding how fuel storage works helps contextualize the canister’s role in the larger fuel tank system.
Quick Recap: The charcoal canister is a black plastic container under your car filled with special charcoal that absorbs gas fumes. When it fails, those fumes cause problems—and you’ll know about it fast.
How the Charcoal Canister Works
You don’t need a mechanical engineering degree to understand this. Think of the charcoal canister like a sponge that absorbs gas fumes when your car is parked, then squeezes them out to burn when you’re driving. Simple concept, clever execution.
The charcoal canister operates through two distinct phases that work in harmony to capture, store, and ultimately recycle fuel vapors that would otherwise pollute the atmosphere.
Storage Phase: Capturing Vapors When the Engine is Off
When you park your vehicle and shut off the engine, gasoline in your fuel tank doesn’t simply sit idle. Liquid gasoline naturally evaporates at a surprisingly rapid rate, especially in warm weather. As fuel molecules transition from liquid to gas, they create pressure inside your sealed fuel tank. Without a release mechanism, this pressure would eventually cause problems—either by forcing fuel past seals or by creating dangerous conditions when you open the fuel filler cap.
This is where the charcoal canister enters the picture. As fuel vapors build pressure in the tank, they travel through dedicated vent lines that connect the fuel tank to the charcoal canister. These vapor-laden fumes flow into the canister, where they encounter the activated charcoal waiting inside. The microscopic pores in the charcoal act like millions of tiny parking spaces for hydrocarbon molecules. Through a process called adsorption (different from absorption), fuel vapor molecules adhere to the vast surface area within the charcoal’s porous structure.
The beauty of this system lies in its selectivity. While the activated charcoal eagerly captures gasoline vapors and other hydrocarbons, it allows other gases like air and water vapor to pass through relatively unimpeded. Fresh air enters through the canister’s filtered vent valve, replacing the volume occupied by the captured fuel vapors and preventing a vacuum from forming in the fuel tank. This continuous exchange maintains proper pressure balance while safely storing harmful emissions.
The canister can hold a surprising amount of vapor in this dormant state. Depending on its size and the charcoal’s saturation level, a typical canister might store vapors equivalent to several ounces of liquid gasoline. The system sits patiently in this loaded state, holding those captured emissions until the engine starts and operating conditions become appropriate for the purge cycle.
Purge Phase: Recycling Vapors When the Engine Runs
Once you start your engine and begin driving, the EVAP system’s second phase activates—but not immediately. The engine control module (ECM) monitors numerous parameters before initiating the purge cycle: coolant temperature must indicate the engine has warmed to normal operating temperature, the vehicle must be traveling at a steady speed (typically above idle), engine load must be moderate, and fuel trim values must be within normal ranges.
When all conditions align appropriately, the ECM sends an electronic signal to the purge valve, also called the canister purge solenoid. This computer-controlled valve, mounted between the charcoal canister and the engine’s intake manifold, opens to varying degrees based on driving conditions. The ECM can pulse this valve on and off rapidly, effectively controlling how much vapor flows from the canister to the engine. If you’re experiencing issues with vapor flow, check out our guide on signs of a bad canister purge valve.
With the purge valve open, engine vacuum creates a powerful suction that draws fresh air through the canister’s vent valve. This incoming air sweeps through the activated charcoal, carrying the stored fuel vapors with it. The vapor-enriched air travels through the purge valve and enters the intake manifold, where it mixes with the incoming fresh air and fuel from the injectors. These recycled vapors then burn in the combustion chamber alongside the normal air-fuel mixture, converting potential pollutants into the same exhaust products that result from burning gasoline in the fuel injection system.
The ECM continuously monitors this process through various sensors, particularly the oxygen sensors in the exhaust system. As vapor-enriched air enters the engine, it temporarily enriches the overall air-fuel mixture. The ECM detects this change and adjusts fuel injector pulse width accordingly, reducing the amount of fresh fuel delivered to maintain the ideal combustion ratio. This real-time adjustment ensures smooth engine operation while the purge cycle proceeds.
System Components Integration
The charcoal canister doesn’t operate in isolation—it functions as the central hub in a carefully orchestrated system of components that work together seamlessly. The fuel tank pressure sensor continuously monitors pressure levels inside the fuel tank, providing the ECM with real-time data about vapor generation and system integrity. This sensor plays a critical role not only in controlling the purge cycle but also in detecting leaks anywhere in the EVAP system.
The vent valve, sometimes called the canister vent solenoid, normally remains open to allow fresh air flow during purge cycles. However, when the ECM initiates an EVAP system leak detection test, this valve closes to seal the system. With both the purge valve and vent valve closed, the ECM monitors fuel tank pressure to detect even tiny leaks—modern systems can identify leaks as small as 0.5 millimeters in diameter, roughly the size of a pinhole. Problems with fresh air flow often indicate canister vent valve issues.
All these components connect through a network of vapor lines and hoses that must remain sealed and intact for proper system function. Any crack, disconnection, or degradation in these lines compromises the system’s ability to capture vapors and maintain proper pressure, typically resulting in diagnostic trouble codes and check engine light illumination.
Computer Control Logic
Modern EVAP systems demonstrate sophisticated programming in their control strategies. The ECM doesn’t simply turn the purge cycle on or off—it modulates purge flow based on instantaneous driving conditions. During highway cruising with stable load and speed, the system might purge aggressively to clear accumulated vapors quickly. During acceleration or other high-load situations, purge flow reduces or stops entirely to prevent disrupting the carefully calibrated air-fuel mixture needed for optimal power output.
The system also adapts its behavior based on fuel level. When your tank is nearly full, vapor generation is minimal because there’s little air space above the fuel for evaporation. Conversely, a nearly empty tank provides maximum air space and often generates more vapors, particularly in hot weather. The ECM factors fuel level into its purge strategy, adjusting valve operation accordingly.
Temperature also plays a crucial role. Cold gasoline evaporates much more slowly than warm fuel, so the system might purge less frequently in winter. Hot summer days dramatically increase vapor generation, potentially requiring more aggressive and frequent purge cycles to manage the higher vapor volume. This intelligent adaptation ensures the charcoal never becomes completely saturated, which would render it unable to absorb additional vapors.
Bottom Line: The canister stores fumes when parked, releases them to burn when driving. When it can’t do this anymore, problems start—and you’ll notice them at the gas pump first.
Common Failure Symptoms
Here’s what you’re really looking for: “Is my charcoal canister actually the problem, or is it something else?”
Fair question. The symptoms are pretty distinctive once you know what to look for. If you’re experiencing any of these, there’s a good chance your canister is failing or already failed.
Recognizing charcoal canister failure symptoms early can prevent more serious problems and help you avoid being stranded at the gas station or failing your emissions test. While the canister itself is remarkably durable and often lasts the vehicle’s lifetime, certain conditions can cause premature failure. For more details on specific symptoms, review our article on signs that your charcoal canister is failing.
Primary Warning Signs
Check Engine Light Illumination
The check engine light represents the most common and often the first indication of charcoal canister or EVAP system problems. Your vehicle’s onboard diagnostic system continuously monitors the EVAP system’s integrity and operation, running self-tests during specific driving conditions. When the system detects a malfunction—whether from a leak, clogged canister, faulty valve, or pressure sensor problem—it stores a diagnostic trouble code (DTC) and illuminates the check engine light on your dashboard.
Two diagnostic codes particularly point toward charcoal canister issues: P0440 indicates a general EVAP system malfunction or large leak, while P0442 indicates a small leak detected in the system. However, dozens of other EVAP-related codes exist, and proper diagnosis requires reading the specific code with a scan tool to pinpoint whether the canister itself has failed or if the problem lies elsewhere in the system. Never assume the charcoal canister is the culprit based solely on a check engine light—comprehensive diagnosis is essential.
Difficulty Refueling
If you’ve ever stood at a gas station fighting with a pump handle that keeps clicking off, you know exactly how frustrating this is. Click. Reset. Click. Reset. Click. What should take two minutes stretches into ten or fifteen. Most people assume it’s the pump’s fault. It isn’t.
When the canister becomes clogged with saturated charcoal or contaminated with liquid fuel, it can no longer vent the fuel tank properly. As you pump gasoline into your tank, air and vapor inside must escape to make room for the incoming fuel. With a clogged canister blocking this vent path, pressure builds rapidly in the tank.
This excessive pressure forces the gas pump’s automatic shutoff mechanism to trigger repeatedly—sometimes every few seconds—making it nearly impossible to fill your tank without constant stopping and restarting. Some drivers describe having to squeeze the pump trigger partially to achieve a very slow fuel flow, turning a two-minute refueling stop into a ten or fifteen-minute ordeal. Others report fuel splashing back out of the filler neck, creating a mess and potential safety hazard.
This symptom demands immediate attention, not only for the obvious inconvenience but because attempting to force fuel into a pressurized tank can result in dangerous fuel spillage. The back-pressure that causes pump shutoff indicates the fuel tank cannot properly vent, creating conditions where fuel might spray out when the pump nozzle is removed.
Strong Fuel Odor
A properly functioning EVAP system ensures you never smell gasoline vapors around your vehicle. When the charcoal canister fails—particularly if it cracks or develops leaks in its housing—fuel vapors escape directly into the atmosphere instead of being captured and stored. This releases a distinctive, strong gasoline smell that you’ll typically notice most prominently near the rear of the vehicle or inside the cabin, especially when the ventilation system draws air from outside.
The odor might be particularly noticeable after parking, especially in warm weather when vapor generation peaks. Some drivers report the smell intensifying when they open their car door after the vehicle has sat in the sun. This isn’t merely unpleasant—gasoline vapors contain benzene and other toxic compounds that pose health risks with prolonged exposure. Headaches, dizziness, nausea, and respiratory irritation can result from breathing these fumes in enclosed spaces like garages or vehicle interiors.
Additionally, a saturated charcoal canister that can no longer absorb vapors effectively allows those fumes to escape through the vent valve, producing the same fuel smell even without visible cracks in the canister housing. Either condition requires prompt attention to restore proper emissions control and eliminate the health hazard.
Hissing Sound When Opening Gas Cap
When you unscrew your fuel filler cap, you should hear little more than a quiet click as the cap releases. However, if you hear a loud hissing sound—sometimes described as a rush of air or a whoosh—this indicates excessive pressure or vacuum has built up inside your fuel tank. While modern fuel systems do maintain some positive pressure by design, an audible rush of air suggests the pressure has exceeded normal levels.
This symptom often accompanies a clogged charcoal canister that cannot properly vent the tank. As fuel evaporates and creates vapors, the pressure steadily builds because the blocked canister provides no release path. The sealed fuel system traps this pressure until you open the filler cap, at which point it rapidly equalizes with a hissing sound. Less commonly, a vacuum condition can develop, creating a sucking sound when the cap opens.
Beyond the obvious indication something is wrong, this pressure imbalance can damage other fuel system components over time. Excessive positive pressure stresses fuel tank seams, sender unit seals, and filler neck connections. Vacuum conditions can even cause some plastic fuel tanks to partially collapse inward, creating permanent deformation and potentially damaging the fuel pump module inside.
Failed Emissions Test
In states and jurisdictions requiring periodic emissions testing, a failed charcoal canister represents an automatic failure that prevents vehicle registration renewal. Most modern emissions testing includes a diagnostic scan that checks for stored trouble codes—any active EVAP system code results in immediate test failure regardless of tailpipe emissions levels.
Even without stored codes, a malfunctioning canister causes vehicles to produce elevated hydrocarbon emissions. The evaporative emissions test component specifically measures fuel vapors, and a vehicle releasing uncontrolled vapors through a failed EVAP system exceeds allowable limits. Depending on your location’s testing requirements, you might face tailpipe testing, evaporative testing, or both.
The good news is that repairing the charcoal canister typically resolves these test failures, allowing you to pass on a retest. However, some testing facilities require vehicles to complete a certain number of drive cycles and allow the diagnostic system to run its complete self-tests before retesting, potentially requiring several days of normal driving after repairs.
Performance Impact Symptoms
While less common than the primary symptoms described above, charcoal canister problems can occasionally affect engine performance and drivability. These symptoms typically indicate the purge valve has stuck open, allowing excessive vapor flow into the engine at inappropriate times, or that the canister has become completely saturated and is allowing liquid fuel into the intake system.
Rough idle represents one such symptom, caused by an overly rich fuel mixture when too many fuel vapors enter the intake manifold simultaneously. The engine may idle roughly or inconsistently, with rpm fluctuating or the engine shaking more than normal. Hard starting, particularly after refueling, can occur if the canister has become contaminated with liquid fuel—this liquid can be drawn into the intake system, flooding the engine and making it difficult to start.
Some drivers report reduced fuel economy when the EVAP system malfunctions, though this symptom is subtle and easily attributed to other factors. The fuel economy impact occurs because vapors that should be captured and burned are instead released to the atmosphere, representing wasted fuel. Additionally, if the ECM detects EVAP system problems, it may disable the purge function entirely, preventing any vapor recycling and slightly reducing efficiency.
Engine hesitation or stumbling during acceleration can result from sudden, uncontrolled vapor purging when the purge valve sticks open or fails. As you accelerate and the engine draws in more air, it simultaneously pulls in an excessive slug of fuel vapors, temporarily over-enriching the mixture beyond the ECM’s ability to compensate quickly. This creates a momentary bog or hesitation until the fuel trim adjusts.
Quick Symptom Checklist:
- ✓ Gas pump keeps clicking off → Most common sign
- ✓ Check engine light with EVAP codes → Needs diagnosis
- ✓ Strong gas smell around car → Safety concern
- ✓ Hissing sound opening gas cap → Pressure buildup
- ✓ Failed emissions test → Can’t register vehicle
If you have any two of these symptoms together, your charcoal canister is likely the culprit.
Diagnosis and Testing
Real talk: If you’re not comfortable with car repairs, this is where you call a mechanic. But if you want to understand what they’re doing—or see if you can handle it yourself—here’s the breakdown.
Properly diagnosing a charcoal canister or EVAP system problem requires a systematic approach that moves from simple to complex, ruling out easier-to-fix issues before concluding the canister itself needs replacement.
Professional Diagnostic Approach
Professional EVAP system diagnosis begins with comprehensive data gathering using an advanced automotive scan tool. These professional-grade scanners do far more than simply read diagnostic trouble codes—they provide access to live data streams, freeze frame information captured when the code was set, pending codes that haven’t yet triggered the check engine light, and the results of various system self-tests.
When a technician retrieves an EVAP-related code, the freeze frame data reveals exactly what conditions existed when the fault occurred: vehicle speed, engine temperature, load, fuel level, and the status of various EVAP components. This contextual information often points directly toward the problematic component. For example, if the code set during a purge cycle with the engine at operating temperature, the technician knows to focus on purge-side components like the purge valve, vapor lines, and canister. If it occurred immediately after refueling with a cold engine, attention shifts toward the fuel tank, filler neck, and gas cap.
Live data monitoring allows technicians to observe EVAP system operation in real-time. They can watch purge valve duty cycle (how often and how much it opens), fuel tank pressure readings, and the status of various system valves. By commanding components on and off through the scan tool’s bidirectional control functions, they can verify that solenoids operate mechanically even if the computer isn’t triggering them during normal operation.
Visual inspection follows the scan tool assessment. Technicians examine the charcoal canister housing for obvious damage: cracks, impact damage, or fuel staining that indicates liquid fuel contamination. They trace vapor lines and hoses from the tank through the canister to the purge valve, checking for disconnections, cracks, rodent damage, or deterioration. Many EVAP system problems stem from these simple issues rather than component failure—a cracked hose or disconnected line produces the same codes as a failed canister.
The most definitive diagnostic tool for EVAP systems is the smoke machine, specialized equipment that pumps artificial smoke into the sealed fuel system under slight pressure. With the system filled with smoke, any leak—no matter how small—reveals itself visually as smoke escapes from the breach point. Technicians can then pinpoint whether the leak stems from the canister, a cracked vapor line, a faulty purge valve, loose gas cap, or any other component. This eliminates the guesswork inherent in chasing intermittent or small leaks.
For clogged canister diagnosis, technicians may perform flow testing by attempting to blow air through the canister’s ports. A functioning canister should allow air to pass relatively freely (though with some resistance from the charcoal). A completely clogged canister blocks airflow almost entirely. Some shops use pressure decay testing, where they pressurize the EVAP system to a specific level and monitor how quickly that pressure drops. Rapid pressure loss indicates leaks, while pressure that won’t build suggests a clogged vent path through the canister.
DIY Diagnostic Steps
Home mechanics with intermediate experience can perform several useful diagnostic checks using more affordable equipment and careful observation. The first step requires a basic OBD-II scan tool, available at auto parts stores for $20-$100 or often loaned free from these retailers for DIY use. Connecting the scan tool to your vehicle’s diagnostic port (typically under the dashboard on the driver’s side) allows you to read stored trouble codes and identify which EVAP component or function triggered the check engine light.
While consumer-grade scan tools lack the advanced capabilities of professional equipment, they provide the essential code numbers like P0440, P0442, or other EVAP-related fault codes. Write down the specific codes, then research them to understand which system component or function each code references. This information helps you focus your attention appropriately. For comprehensive guidance on code interpretation, see our guide on how to read OBD codes.
Visual inspection represents the next DIY-friendly diagnostic step. Safely raise and support your vehicle to access the underneath area where the charcoal canister typically mounts. Locate the canister (usually a black plastic container near the fuel tank or in the rear wheel well area) and carefully examine it for damage. Look for cracks in the housing, fuel staining that suggests liquid contamination, loose or disconnected vapor lines, and physical damage from road debris or impacts.
Trace the vapor lines you can access, checking their routing and condition. Feel along the hoses for soft spots, cracks, or areas where the rubber has deteriorated and hardened with age. Check that all connections fit securely onto their ports with properly installed clamps. While you can’t see the entire vapor line system without significant disassembly, you can often spot obvious problems with the accessible portions.
Listen for the purge valve during operation—it should click audibly when the engine is running and conditions are appropriate for purging. The sound resembles a rapid ticking or clicking noise, typically heard from under the hood near the intake manifold. If you never hear this sound during extended driving with a warmed-up engine, the purge valve may have failed in the closed position or the ECM may have disabled purge function due to detected system problems.
When Professional Diagnosis Required
Despite your best DIY diagnostic efforts, certain situations demand professional equipment and expertise. Intermittent problems that come and go unpredictably frustrate even experienced technicians, often requiring the vehicle to remain at the shop for extended monitoring or test drives under specific conditions that trigger the fault. Multiple simultaneous EVAP codes can indicate either multiple failed components or a single root cause affecting several system functions—proper diagnosis requires systematic testing to avoid replacing parts unnecessarily.
Leak detection in particular benefits enormously from professional smoke testing equipment. While DIY smoke testers exist at consumer price points ($50-$150), they lack the precision and smoke generation capacity of professional equipment. Small leaks that trigger check engine lights but produce no obvious symptoms remain nearly impossible to locate without smoke testing. Attempting to fix EVAP leaks by replacing parts based on guesswork often leads to frustration and wasted money when the actual leak source wasn’t addressed.
Electrical testing of solenoid valves, pressure sensors, and the wiring connecting these components requires multimeters, understanding of electrical specifications, and the ability to access technical service information for your specific vehicle. While motivated DIYers can learn these skills, most find this level of diagnosis more time-consuming and frustrating than having a professional handle it.
Most importantly, working around fuel systems demands strict safety precautions. If you’re not completely comfortable working under vehicles, handling fuel-system components, or following proper safety protocols, professional service represents the wisest choice. The risk of fire, fuel spills, or injuries from improper vehicle support far exceeds any savings from attempting diagnosis beyond your skill level.
Replacement Cost and Procedure
The question you really want answered: “How much is this going to cost me?”
Let’s cut to the chase with real numbers, then talk about whether you can DIY this or need to pay someone.
Understanding the financial and mechanical aspects of charcoal canister replacement helps you budget appropriately and decide whether to tackle the job yourself or hire a professional. Costs vary significantly based on your vehicle’s make, model, and the canister’s accessibility.
Cost Breakdown
Quick Cost Overview:
- DIY Parts Only: $100-$500 (just the canister)
- Professional Repair: $150-$650 (parts + labor)
- Most Common Range: $300-$400 total
Now here’s the detail behind those numbers:
The charcoal canister itself represents the primary expense, with costs ranging from $100 to $500 depending on whether you choose aftermarket or original equipment manufacturer (OEM) parts and your vehicle’s specific requirements. Generic aftermarket canisters for common vehicles like Honda Civic, Toyota Corolla, or Ford F-150 typically cost between $100 and $200. Luxury vehicles, European imports, and models with complex EVAP systems can require canisters costing $300 to $500 or more.
OEM parts generally command a premium over aftermarket alternatives—expect to pay 25% to 50% more for a factory part bearing your vehicle manufacturer’s logo. Whether this premium is worthwhile depends on your priorities. OEM canisters are guaranteed to match your original equipment’s specifications exactly, come with manufacturer warranty coverage, and eliminate any concerns about fit or function. Quality aftermarket brands like Dorman, Standard Motor Products, or Spectra Premium offer substantial savings while maintaining reasonable quality standards and often include warranties comparable to OEM parts.
Labor costs vary based primarily on how accessible the canister is on your particular vehicle. If the canister mounts in an easily reached location—perhaps in the engine bay or readily accessible under the rear of the vehicle—replacement might take a technician only 30 minutes to an hour. Labor charges for these simpler jobs typically run $50 to $100 at independent repair shops, with dealerships charging $100 to $175 for the same work.
However, some vehicles position the canister in maddeningly difficult locations requiring removal of fuel tanks, exhaust components, or extensive disassembly to access. These complex replacements can consume two or three hours of labor time, dramatically increasing costs. Before authorizing repair, ask your technician specifically how many hours the job will require and what access challenges exist on your vehicle.
Additional components sometimes need replacement simultaneously. If diagnosis reveals the purge valve or vent valve has also failed, budget an extra $50 to $130 for the purge valve or $40 to $100 for the vent valve, plus additional labor time. Vapor lines and hoses rarely need replacement unless physical damage is evident, but cracked or deteriorated hoses should be replaced to prevent future leaks.
All told, expect total professional replacement costs between $150 and $650 for most vehicles, with the national average hovering around $300 to $400. Luxury vehicles, difficult access situations, or dealership service can push costs toward or beyond the upper end of this range.
Replacement Procedure Overview
While procedures vary by vehicle, the general replacement process follows similar steps whether performed by a professional technician or an advanced DIY mechanic. This overview provides context for understanding the work involved, but always consult vehicle-specific repair information before attempting the job yourself.
Preparation begins with proper safety measures. Disconnect the negative battery cable and set it aside where it cannot accidentally contact the battery terminal—this eliminates ignition sources near fuel system components. Ensure you’re working in a well-ventilated area away from open flames or spark sources. Have a fire extinguisher readily accessible. Gather all necessary parts and tools before beginning: replacement canister, new hose clamps if needed, basic hand tools, jack and jack stands, and wheel chocks.
Safely raise and support the vehicle on jack stands if the canister mounts underneath—never work under a vehicle supported only by a hydraulic jack. Apply parking brake and chock the wheels remaining on the ground. If the canister is in the engine bay, you may not need to raise the vehicle, making the job considerably simpler.
Locate the charcoal canister by referring to your vehicle’s repair manual or searching online for model-specific location information. Common locations include mounted to the frame near the fuel tank, in the rear fenderwell behind plastic splash shields, or in the engine bay near the firewall. Once located, carefully examine how it’s mounted and what lines connect to it.
Take photographs from multiple angles before disconnecting anything—these photos prove invaluable during reassembly when you’re trying to remember which hose connected to which port. Modern smartphones make this documentation effortless, and the time invested in photos is far less than the frustration of misrouted vapor lines.
Disconnect vapor lines by releasing push-to-connect fittings (requiring special quick-disconnect tools on some vehicles), loosening hose clamps with screwdrivers or pliers, or removing threaded connections. Label lines if you’re working without photos. Some fuel vapor may escape when lines are disconnected—this is normal but emphasizes the importance of working in ventilated areas. If the canister includes an electrical connector for the vent valve, disconnect it by pressing the release tab and pulling straight apart.
Remove mounting hardware holding the canister in place. This typically involves two or three bolts or screws securing a bracket around the canister body. On some vehicles, the entire mounting bracket removes with the canister; on others, the canister slides out of the bracket which remains attached to the vehicle. Lower the old canister from its mounting location and set it aside.
Before installing the new canister, compare it carefully to the old unit. Verify the body size and shape match, connection ports are in the same positions, and if equipped, the vent valve matches the original. While aftermarket parts should be direct replacements, manufacturing variations occasionally occur—catching differences now prevents problems during installation.
Position the new canister into its mounting location, ensuring no vapor lines are pinched or kinked underneath it. Secure mounting hardware to factory specifications—snug but not overtightened since you’re threading into plastic components in most cases. Reconnect all vapor lines to their proper ports, referring to your photographs if needed. Push-to-connect fittings should click audibly when fully seated; hose clamp connections should be positioned just behind the connection bead on the port.
If equipped with a vent valve, reconnect its electrical connector by pushing it straight onto the valve until you feel or hear it click into place. Double-check that all connections are secure and no lines remain disconnected—a single forgotten connection causes immediate check engine light illumination after starting the vehicle.
Reconnect the battery negative cable. Start the engine and let it idle while monitoring for unusual sounds, fuel smells, or leaks. The check engine light should illuminate briefly during the startup self-test but then extinguish. If it remains illuminated, immediate diagnosis is required. Allow the engine to reach operating temperature and take a short test drive. The ECM may need to complete several drive cycles before all EVAP system monitors run successfully, but properly completed repairs should prevent the check engine light from returning.
DIY Considerations
Intermediate DIY mechanics with basic tools and mechanical aptitude can successfully replace charcoal canisters on many vehicles, potentially saving $100 to $300 in labor costs. The job requires no special tools beyond standard sockets, wrenches, and screwdrivers on most applications, though a few vehicles demand specific quick-disconnect tools for vapor line fittings (available at auto parts stores for under $20).
However, certain situations call for professional service rather than DIY attempts. If you lack experience safely raising and supporting vehicles on jack stands, this job isn’t an appropriate first learning experience given the time you’ll spend working underneath. The risks of improper vehicle support far exceed any money saved on labor.
Limited mechanical experience presents another reason to consider professional service. While the replacement procedure is straightforward conceptually, successfully navigating the specific challenges on your vehicle—accessing tight spaces, identifying correct hose connections, removing fasteners in difficult locations—requires basic mechanical problem-solving skills. If you regularly struggle with automotive repairs or find instruction manuals confusing, charcoal canister replacement may frustrate you.
Difficult access locations represent the most significant DIY obstacle. Research your specific vehicle before deciding to tackle the job yourself. If the canister mounts behind the fuel tank, requiring tank removal for access, you’re looking at a much more complex project involving fuel system depressurization, supporting a fuel tank full of gasoline, managing multiple electrical connections, and other challenges best left to professionals.
Fuel system contamination discovered during removal indicates you should pause and consult a professional. If you notice liquid fuel inside vapor lines or the canister itself appears saturated with gasoline rather than just vapors, other problems exist upstream that caused this contamination. Simply replacing the canister won’t solve the root cause, and you may end up destroying your new canister if that underlying issue isn’t addressed.
Prevention and Maintenance
This is the section that saves you $500.
Remember how we said 90% of canister failures are preventable? Here’s the one habit that does it—and why most people accidentally kill their own canisters without realizing it.
Preventing charcoal canister failure requires minimal effort but delivers substantial benefits: avoiding repair costs, maintaining emissions compliance, and preserving your vehicle’s fuel efficiency.
Primary Prevention Strategy: THE ONE RULE
Stop refueling the instant the gas pump nozzle clicks off automatically for the first time.
That’s it. That’s the rule. No rounding up to $40.00. No topping off for “just a little more.” First click = done.
Why this matters so much: Why this matters so much:
Modern fuel tanks leave about 10% space at the top—even when the pump clicks off. This space is intentional. It gives fuel room to expand when hot and provides a buffer zone for vapors.
When you top off your tank, you eliminate this safety space. Liquid gasoline flows into lines that should only carry vapor. That liquid gasoline hits the charcoal canister. Game over.
What happens to the charcoal:
- Liquid fuel saturates the activated charcoal
- The charcoal hardens into a useless mass
- It can’t absorb vapors anymore
- Air can’t flow through it
- You get all the symptoms we talked about earlier
The cost of topping off for that perfect $40.00? Potentially $150-$650 in repairs. Not worth it.
Best Practices for Longevity
Beyond avoiding overfilling, several other practices contribute to charcoal canister longevity. Proper refueling technique means inserting the pump nozzle fully into the filler neck but not forcing it or wedging it in. Hold the nozzle at a comfortable angle that allows smooth fuel flow and proper vapor return. Avoid squeezing the trigger fully open—pumping at a moderate flow rate gives the EVAP system time to manage vapor flow properly and reduces the likelihood of premature shutoffs caused by vapor buildup.
When the pump clicks off, remove the nozzle promptly rather than leaving it inserted while you complete other tasks. Any remaining fuel in the nozzle drains back into the pump after shutoff, but leaving it inserted for extended periods can allow additional fuel to dribble into your filler neck. More importantly, the extra time allows more fuel vapors to travel into your tank and potentially into the vapor lines.
Fuel cap maintenance, while not directly related to the canister itself, plays a crucial role in overall EVAP system health. A damaged, worn, or improperly tightened fuel cap is one of the most common causes of EVAP system check engine lights. Inspect your cap’s rubber gasket periodically for cracks, deterioration, or deformation. Replace the cap if the gasket shows any damage—fuel caps are inexpensive ($10-$30) and far cheaper than chasing phantom EVAP system problems.
When tightening your fuel cap, continue turning until you hear three distinct clicks. This ensures proper sealing without overtightening. Modern capless fuel systems eliminate this concern but introduce their own maintenance requirements—keep the filler neck clean and free of debris that could prevent the internal flapper valve from sealing completely.
Regular inspection during routine maintenance provides early warning of developing problems. Whenever your vehicle is raised for oil changes or other service, have your technician visually check accessible vapor lines for cracks, disconnections, or damage. Many EVAP problems become expensive repairs when ignored but cost relatively little to address if caught early. A cracked vapor hose identified during routine maintenance might require a $20 hose and 15 minutes of labor, while the same crack left unaddressed eventually triggers check engine lights, requires diagnostic time, and potentially damages other components.
Address check engine lights promptly rather than ignoring them for weeks or months. While many check engine lights result from minor issues, EVAP codes indicate emissions violations that can worsen over time. The ECM stores valuable diagnostic information in freeze frame data when codes first set—information that helps technicians diagnose problems efficiently. Driving for extended periods with stored codes can overwrite this data, making diagnosis more difficult and potentially more expensive.
Quality fuel selection provides a minor but measurable benefit to EVAP system longevity. Top-tier gasoline brands that meet enhanced detergent standards tend to have more consistent volatility characteristics and produce fewer problematic vapor compounds. While you don’t need premium fuel unless your vehicle specifically requires it, choosing quality brands over discount gas potentially reduces long-term maintenance issues across multiple fuel system components, not just the charcoal canister.
Cleaning vs. Replacement Debate
You might encounter online information, YouTube videos, or well-meaning advice suggesting you can clean and restore a failed charcoal canister rather than replace it. While technically possible on some older canisters with serviceable designs, modern canisters are sealed units engineered as replacement-only components. Professional technicians and vehicle manufacturers universally recommend replacement over cleaning attempts for several compelling reasons.
Sealed canister designs simply cannot be disassembled without destruction. The plastic housings are welded or permanently sealed during manufacturing, making non-destructive opening impossible. Even if you cut the canister open with power tools, reassembling it to achieve a vapor-tight seal proves nearly impossible. Any attempt at home-made sealing with epoxy or other adhesives introduces leak points and almost guarantees premature failure.
Activated charcoal that has become saturated with liquid fuel cannot be effectively reactivated through simple cleaning methods available to home mechanics or even most professional shops. The reactivation process requires heating the charcoal to temperatures exceeding 800 degrees Fahrenheit in controlled atmospheric conditions—essentially impossible in typical shop environments and presenting serious fire hazards if attempted with fuel-contaminated materials.
Even if you somehow accessed the charcoal inside, removed it, and obtained replacement activated charcoal from aquarium supply stores or other sources (as some online guides suggest), you’d likely end up with inferior performance. Automotive-grade activated charcoal uses specific particle sizes, pore structures, and treatments optimized for gasoline vapor absorption. Generic activated carbon products aren’t engineered for this purpose and may not perform adequately in automotive applications.
Finally, attempting to clean rather than replace a canister typically voids any warranty on associated components and may cause the same problem to recur when the underlying issue wasn’t addressed. If your canister became contaminated with liquid fuel due to chronic overfilling, cleaning it doesn’t prevent the same contamination from happening again. Only addressing the root cause—changing refueling habits—prevents repeat failures.
Given these realities, replacement represents the only reliable solution for failed charcoal canisters. The cost difference between attempting cleaning and purchasing a replacement aftermarket canister is often minimal, while the reliability difference is substantial. Save your DIY energy for procedures where it’s truly beneficial rather than attempting to clean components engineered as non-serviceable replacement parts.
Expected Lifespan
Under normal operating conditions with proper refueling habits, a charcoal canister often lasts the entire lifetime of the vehicle—150,000 miles or more isn’t unusual. Many vehicles reach their end of useful life without ever requiring canister replacement. This remarkable durability stems from the canister’s passive function: it contains no moving parts to wear out, operates at ambient temperature without extreme heat exposure, and the activated charcoal itself is chemically stable and doesn’t degrade through normal use.
The primary failure mode is contamination with liquid fuel through overfilling, which is entirely preventable through proper refueling technique. Physical damage from road debris, impacts, or corrosion represents the second most common cause of canister failure, though modern designs with protected mounting locations have largely mitigated these risks compared to older vehicles.
When properly maintained and protected from overfilling, expecting 10 to 15 years or more from your original charcoal canister is entirely reasonable. This longevity makes the canister one of the most reliable components in the EVAP system—far more durable than the various solenoid valves, pressure sensors, and rubber hoses that typically require replacement multiple times over a vehicle’s life.
If your canister fails prematurely—say, within five years or 75,000 miles on a vehicle that hasn’t been overfilled—investigate whether other underlying issues contributed to the failure. Fuel tank pressure sensor problems, purge valve failures that allow liquid fuel to be drawn from the tank, or vapor line routing issues that allow condensed fuel to drain into the canister might accelerate failure. Addressing these root causes prevents your replacement canister from suffering the same fate.
Your Prevention Action Plan:
- Stop at first click when refueling (non-negotiable)
- Tighten gas cap until 3 clicks (prevents EVAP codes)
- Address check engine lights promptly (don’t ignore them)
- Visual check vapor lines during routine maintenance (catch problems early)
Follow these four rules and your charcoal canister will likely outlast your ownership of the vehicle.
Safety Considerations
Before you grab your tools: Working with fuel systems is serious business. Not trying to scare you, but you need to know the real risks.
Working with any fuel system component demands respect for the serious hazards involved. Gasoline is simultaneously toxic, flammable, and under pressure in modern fuel systems.
Health Hazards
Gasoline vapors contain numerous toxic compounds, with benzene being among the most concerning. Benzene is a known human carcinogen associated with blood disorders and various cancers through chronic exposure. Other gasoline components cause neurological effects, respiratory irritation, and organ damage with sufficient exposure. These aren’t theoretical risks mentioned in warning labels—they represent genuine health threats when proper precautions aren’t followed.
When working on EVAP system components, you’ll inevitably encounter fuel vapors. Opening vapor lines releases concentrated fumes directly into your breathing zone. Removing a saturated canister exposes you to vapors continuously as long as the component remains in your workspace. Without adequate ventilation, these fumes accumulate to dangerous concentrations remarkably quickly, particularly when working in enclosed spaces like garages.
Always work in well-ventilated areas with doors open and fans running to maintain air circulation. Outdoor work provides the best ventilation, though this isn’t always practical. If working indoors, position a fan to blow air away from your work area, drawing fresh air from outside. Never work in your breathing zone—if you smell gasoline fumes strongly, ventilation is inadequate.
Avoid direct skin contact with fuel-contaminated components whenever possible. Gasoline readily absorbs through skin, carrying its toxic components into your bloodstream. Wear chemical-resistant gloves when handling any component that’s been exposed to fuel or fuel vapors. If fuel contacts your skin despite precautions, wash the affected area immediately with soap and water—don’t use harsh solvents that might enhance absorption of the gasoline components.
Symptoms of excessive gasoline vapor exposure include headache, dizziness, nausea, confusion, and in severe cases, loss of consciousness. If you experience any of these symptoms while working, immediately move to fresh air and rest. Severe symptoms or symptoms that don’t resolve quickly after exposure ends warrant medical evaluation. Don’t tough it out—vapor exposure causes real physiological effects that can worsen before improving.
Fire Safety
Gasoline’s flammability creates the most obvious and immediate danger when working with fuel systems. Gasoline vapors are heavier than air, so they settle and accumulate at ground level where they’re easily ignited by any spark, flame, or hot surface. The vapors remain flammable at much lower concentrations than you might expect—well below levels where you can even smell the gasoline.
Before beginning any work involving the charcoal canister or EVAP system, disconnect the battery negative cable and move it where it cannot accidentally contact the battery terminal. This eliminates the vehicle’s electrical system as a potential ignition source. Even something as simple as the courtesy light in your interior activating could provide enough spark to ignite vapors if you’re working with doors open.
Absolutely no smoking in the work area—this should go without saying but bears emphasizing given the severity of the consequences. Extend this ban to anyone else present in the vicinity. A lit cigarette, cigar, or even vaping device provides more than sufficient ignition energy to cause a catastrophic fire. Don’t assume gasoline vapors won’t reach you if you step a few feet away; remember they spread along the ground and can travel surprising distances.
Eliminate other ignition sources from the work area. Pilot lights on water heaters or furnaces, electric heaters, power tools that produce sparks during operation—all of these present unacceptable risks. If you’re working in a garage with a water heater or furnace, consider whether the appliance location relative to your work area creates danger. Natural gas appliances with pilot lights are particularly concerning since those flames operate continuously.
Keep a fully charged fire extinguisher readily accessible throughout the job. For fuel fires, use only extinguishers rated for Class B (flammable liquids) fires—most automotive shops use ABC-rated extinguishers that handle multiple fire types. Position the extinguisher where you can reach it instantly without having to navigate around vehicles or equipment. Know how to operate it before you need it; familiarize yourself with the pull pin, aim, squeeze, sweep technique.
If working indoors, realize that proper ventilation serves double duty—it protects both your health and safety by dissipating vapors before they accumulate to dangerous concentrations. Vapors don’t need to accumulate to levels you can smell to become flammable; the flammability range for gasoline vapors is surprisingly broad. Constant air circulation provides your best protection against reaching dangerous concentrations.
Electrical Safety
Modern vehicles integrate the EVAP system deeply into the powertrain control network. Vent solenoids, purge valves, and pressure sensors all connect electrically to the engine control module and other vehicle computers. While these low-voltage DC circuits don’t present shock hazards like household AC electricity, they can be damaged by short circuits, improper connections, or incorrect diagnostic procedures.
Before disconnecting any electrical connectors on EVAP components, ensure the ignition is off and ideally the battery is disconnected. This prevents potential short circuits that can damage expensive control modules. When working with scan tools for diagnosis, follow the tool’s instructions precisely regarding when to connect it, when to turn the ignition on, and what commands to send. Incorrect procedures can trigger fault codes, damage components, or confuse the vehicle’s computers.
Pay special attention to electrical connectors when reconnecting components. These connectors use specific orientations—they physically cannot connect incorrectly when properly aligned, but forcing them can break the connector body or bend pins inside. Always match connector shapes carefully and push straight in until you hear or feel the locking mechanism engage. Tugging gently on the connection after installation verifies it’s secure.
Static electricity, while rarely discussed in automotive contexts, can theoretically damage sensitive electronic components. While the robust design of automotive electronics makes damage unlikely, some technicians follow anti-static precautions when working with EVAP components containing electronic modules. At minimum, avoid shuffling your feet on carpets or wearing materials prone to building static charges when handling these components.
When Professional Service Required
Several situations absolutely demand professional service rather than DIY attempts, regardless of mechanical aptitude or cost considerations. If you lack confidence in your ability to safely raise and support a vehicle on jack stands, this single limitation should stop you from attempting charcoal canister replacement on vehicles where the canister mounts underneath. Injuries from vehicles falling off inadequate supports are catastrophic—save this job for professionals with proper equipment.
Similarly, if you’re uncomfortable working around fuel systems or have never performed fuel system repairs, the charcoal canister isn’t the ideal first learning experience despite its relatively straightforward replacement procedure. Gain experience with less critical repairs first, then graduate to fuel system work once you’ve developed confidence and competence with automotive repairs generally.
Complex diagnostic situations where multiple EVAP codes are present, intermittent problems occur unpredictably, or previous repair attempts haven’t resolved the issue all warrant professional diagnosis. Shops have access to technical service bulletins, factory repair procedures, and specialized diagnostic equipment that make solving these puzzles much faster and more reliable than trial-and-error parts replacement.
Finally, any situation where you’re uncertain about which component has failed should prompt professional diagnosis before purchasing parts. Modern EVAP systems have numerous components that can trigger similar codes, and replacing the wrong part wastes money while leaving the actual problem unaddressed. The cost of proper diagnosis often proves far less than the cumulative cost of replacing parts you didn’t actually need.
Conclusion: What You Need to Do Next
Let’s bring this home.
If you’re reading this because your gas pump keeps clicking off, your check engine light is on, or you smell gasoline around your car—don’t ignore it. These symptoms don’t get better on their own. They get more expensive.
If you take away only one thing from this guide:
Stop refueling at the first click.
That single habit prevents 90% of charcoal canister failures. It’s free. It’s easy. And it can save you $500+ down the road.
Your Next Steps Depend on Your Situation
If you’re experiencing symptoms right now:
- Get the check engine codes read (free at most auto parts stores)
- Decide: DIY diagnosis or professional help?
- Budget $150-$650 if the canister needs replacement
- Fix it before your next emissions test
If your car is fine and you’re here to prevent problems:
- Remember: first click = stop refueling
- Tighten your gas cap properly (3 clicks)
- Check vapor lines during routine maintenance
- Don’t panic if you see a check engine light—just address it promptly
If you’re a mechanic or serious DIYer:
- You now know the diagnostic path from symptoms → codes → component testing
- You understand why liquid fuel contamination is the #1 killer of these canisters
- You can explain to customers why overfilling damages their EVAP system
The Bottom Line
Your charcoal canister is one of those parts that works perfectly for years until it doesn’t. When it fails, you’ll know—usually at the most inconvenient time possible, standing at a gas station wondering why your tank won’t fill.
The good news? Now you know what’s happening, what it costs to fix, and most importantly—how to prevent it from happening in the first place.
Next time you refuel, remember this guide. Stop at the first click. Your wallet will thank you.
For questions about your specific vehicle or situation, this guide provides the foundation—but when in doubt, consult a qualified automotive technician. Some repairs are worth doing yourself. Others are worth paying someone who does them every day.
You’ve got this.
Related Emissions Control Systems
Want to understand your vehicle’s complete emissions system? Check out these related guides:
- How Catalytic Converters Work – The exhaust treatment system that works with your EVAP
- How EGR Systems Work – Another emissions component that reduces pollution
Each emissions system plays a specific role in keeping your vehicle clean, efficient, and legal to drive.