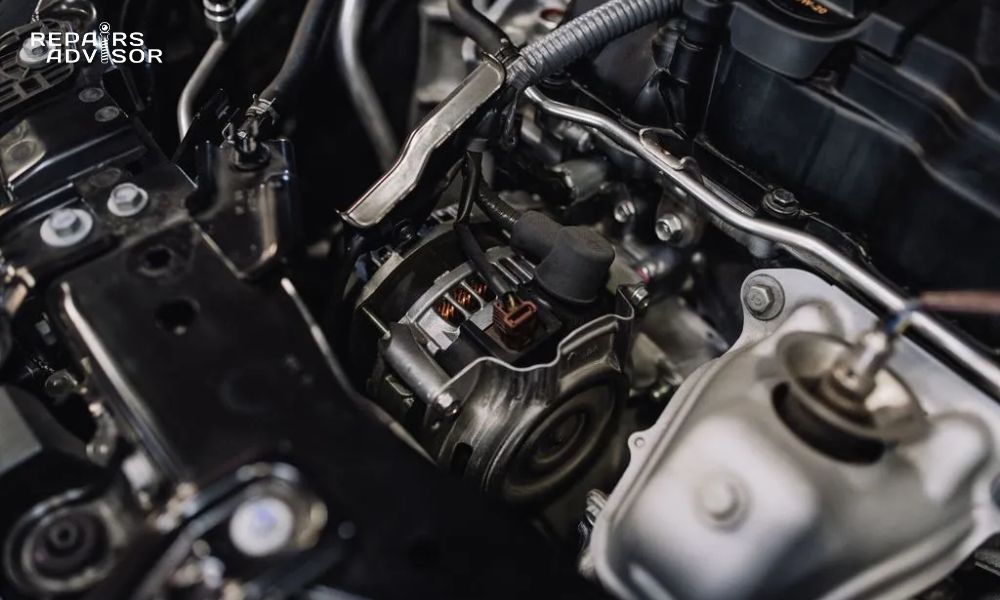
The alternator is a vital part of your car’s electrical system. Think of it as the main generator that keeps everything running when your engine is on. Not only does it recharge your car’s battery after you start the engine, but it also supplies all the electrical power your car needs while you’re driving – for lights, radio, wipers, air conditioning, and all the onboard computers. Without a working alternator, your car will run solely on battery power, which will quickly drain, causing your vehicle to stop.
When an alternator starts to fail or completely dies, your car will usually give you clear warnings.
What Is an Alternator and How Does It Work?
Alternator Definition and Core Function
The alternator is your vehicle’s primary electrical generator, responsible for producing the alternating current (AC) that gets converted to direct current (DC) to power your car’s electrical systems and charge the battery. Unlike the older generator systems used in vintage vehicles, modern alternators are more efficient and reliable, capable of producing electricity even at low engine speeds.
The alternator serves three critical functions in your vehicle’s electrical system:
- Supplies power to all electrical components while the engine runs
- Maintains battery charge to ensure reliable starting
- Regulates voltage output to prevent electrical component damage
This electrical workhorse operates on the principle of electromagnetic induction, where mechanical energy from the engine’s crankshaft is converted into electrical energy through a complex interplay of rotating magnetic fields and stationary wire coils.
Key Alternator Components
Understanding the alternator’s internal components helps you better diagnose problems and communicate effectively with repair technicians.
Rotor (Electromagnetic Field Creator) The rotor is the rotating electromagnet at the heart of your alternator. It consists of copper wire windings around an iron core, creating a magnetic field when electrical current flows through it. This rotating magnetic field is essential for electricity generation.
Stator (Electrical Output Generator) Surrounding the rotor, the stator contains three sets of copper wire windings positioned 120 degrees apart. As the rotor’s magnetic field passes these stationary windings, it induces electrical current through electromagnetic induction.
Slip Rings and Carbon Brushes These components provide the electrical connection between the stationary alternator housing and the rotating rotor. Carbon brushes make physical contact with slip rings, allowing current to flow to the rotor windings while accommodating the rotational movement.
Diode Assembly (Rectifier) The diode bridge assembly converts the three-phase AC output from the stator windings into DC current suitable for your vehicle’s electrical system. This rectification process is crucial because automotive systems operate on DC power.
Voltage Regulator Modern alternators include an integrated voltage regulator that monitors electrical system voltage and adjusts the alternator’s output accordingly. This prevents overcharging that could damage the battery or electrical components.
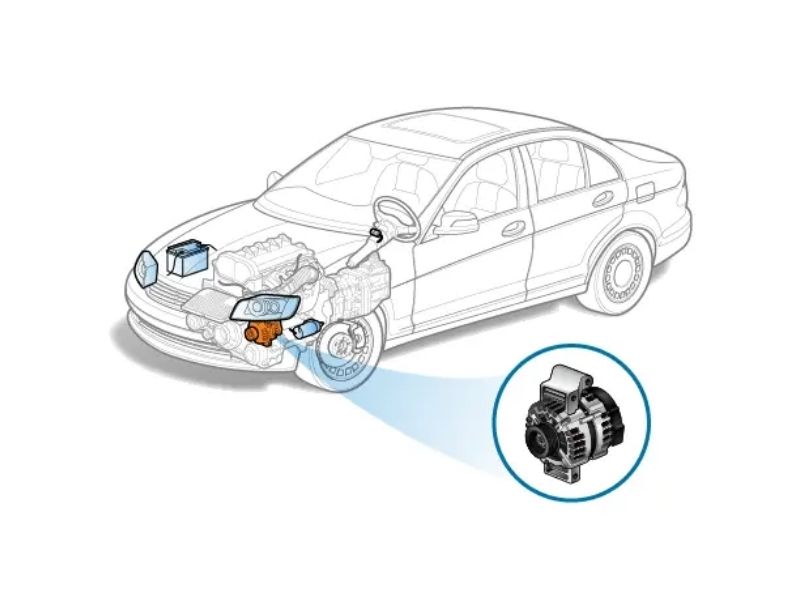
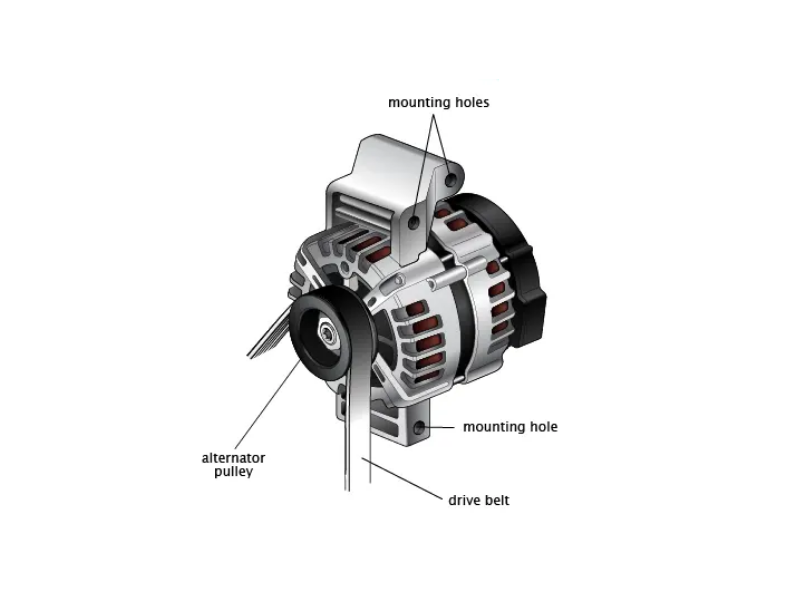
Pulley and Belt System The alternator pulley connects to the engine’s crankshaft via a drive belt, providing the mechanical energy needed for operation. The pulley ratio determines how fast the alternator spins relative to engine speed.
How the Charging System Works
The charging system operates as an integrated network where the alternator, battery, and voltage regulator work together to maintain electrical system health.
Engine-Driven Mechanical Input When your engine runs, the crankshaft drives the alternator pulley through the accessory drive belt. The alternator typically spins 2-3 times faster than the engine, thanks to the pulley ratio design.
Magnetic Field Generation Process Current from the battery initially energizes the rotor windings, creating an electromagnet. As this magnetic field rotates within the stator, it induces voltage in the three stator windings.
Three-Phase AC Generation The rotating magnetic field generates three separate AC waveforms in the stator windings, each phase offset by 120 degrees. This three-phase system provides smoother power output compared to single-phase generation.
DC Conversion and Voltage Regulation The diode assembly converts the AC output to pulsating DC, which is then filtered and regulated to provide stable 12-volt (or 24-volt in commercial vehicles) power to the electrical system.
Battery Charging Cycle Management The voltage regulator continuously monitors system voltage and battery charge state, adjusting alternator output to maintain proper charging without overcharging the battery.
Signs of a Bad or Failing Alternator
Recognizing alternator problems early can prevent complete electrical system failure and avoid being stranded with a dead battery. For detailed symptom identification, refer to our comprehensive guide on signs of a bad or failing alternator.
Electrical System Warning Signs
Dimming or Flickering Lights When your alternator begins to fail, you’ll often notice headlights, dashboard lights, or interior lights dimming, especially when you increase electrical load by turning on air conditioning, radio, or other accessories. This dimming occurs because the failing alternator cannot keep up with electrical demand.
Battery Warning Light Activation The battery warning light on your dashboard is actually an alternator warning indicator. When this light illuminates while driving, it typically means the alternator is not charging the battery properly, and you’re running on battery power alone.
Electrical Component Malfunctions Failing alternators often cause erratic behavior in electrical components. You might experience slow power window operation, weak air conditioning performance, or intermittent radio operation. Modern vehicles with extensive electronic systems are particularly sensitive to voltage fluctuations.
Dashboard Gauge Irregularities If your vehicle has a voltmeter, watch for readings consistently below 12 volts while driving or fluctuating readings that don’t stabilize. Some vehicles display alternator problems through erratic fuel gauge or temperature gauge behavior.
Radio and Electronic Device Issues Poor alternator performance often manifests as radio static, especially when revving the engine, or difficulty charging cell phones and other electronic devices through the vehicle’s power outlets.
Engine Performance Indicators
Difficulty Starting the Engine While starting problems often point to battery issues, a failing alternator prevents the battery from maintaining proper charge. If your vehicle starts fine in the morning but becomes progressively harder to start throughout the day, suspect alternator problems.
Engine Stalling or Rough Idling Modern engines rely heavily on electrical systems for fuel injection, ignition timing, and emission control. A failing alternator can cause these systems to malfunction, resulting in rough idling, hesitation during acceleration, or unexpected stalling.
Belt Squealing Noises A squealing noise from the alternator area often indicates belt problems, but it can also signal internal alternator bearing failure. The noise typically increases with engine speed and may be more noticeable during cold starts.
Burning Rubber or Electrical Smell Overheating alternator components can produce distinctive burning smells. Electrical component overheating creates an acrid odor, while overheated belt materials smell like burning rubber. These odors require immediate attention to prevent fire hazards.
Battery-Related Symptoms
Frequent Dead Battery If you’re frequently jump-starting your vehicle or replacing batteries, the alternator may not be maintaining proper charge. A good battery should hold its charge for weeks in a parked vehicle with minimal electrical drain.
Battery Won’t Hold Charge When a properly functioning battery loses charge quickly after being charged or jump-started, the alternator likely isn’t replenishing the power used for starting and electrical system operation.
Corrosion Around Battery Terminals Excessive corrosion around battery terminals can indicate overcharging from a faulty voltage regulator in the alternator. Proper charging systems maintain clean terminal connections with minimal corrosion buildup.
Swollen or Damaged Battery Case Chronic overcharging from alternator voltage regulator problems can cause battery case swelling, electrolyte loss, and premature battery failure. This physical damage indicates serious charging system problems requiring immediate attention.
Common Alternator Problems and Causes
Understanding common alternator failures helps you make informed repair decisions and recognize problems before they lead to complete system failure.
Mechanical Failures
Worn Carbon Brushes Carbon brushes naturally wear down through normal operation, typically lasting 100,000-150,000 miles. As brushes wear, electrical contact with slip rings becomes intermittent, causing voltage output fluctuations and eventual alternator failure.
Damaged Slip Rings Slip rings can develop grooves, burns, or oxidation that prevents proper brush contact. This damage often results from worn brushes not being replaced promptly, allowing metal-to-metal contact that damages the slip ring surface.
Bearing Failure and Noise Alternator bearings support the rotor shaft and allow smooth rotation. Bearing failure typically announces itself through grinding, whining, or squealing noises that increase with engine speed. Failed bearings can cause rotor shaft misalignment and internal component damage.
Pulley Misalignment Misaligned alternator pulleys cause belt wear, reduce charging efficiency, and can damage the alternator’s front bearing. Proper belt alignment is crucial for optimal alternator performance and longevity.
Drive Belt Issues Loose, worn, or glazed drive belts prevent the alternator from spinning at proper speeds, reducing electrical output. Belt problems often manifest as squealing noises and poor charging performance, especially during high electrical demand situations.
Electrical Component Failures
Diode Malfunction Failed diodes in the rectifier assembly prevent proper AC-to-DC conversion, causing reduced output and battery drain. Bad diodes often create a characteristic whining noise and can cause the alternator to overcharge or undercharge the electrical system.
Voltage Regulator Problems Internal voltage regulator failure can cause overcharging that damages the battery and electrical components, or undercharging that leaves you with a dead battery. Modern electronic voltage regulators are generally reliable but can fail due to heat or electrical surges.
Stator Winding Damage Stator windings can fail due to overheating, physical damage, or insulation breakdown. Shorted or open windings reduce alternator output and may cause overheating of remaining functional windings.
Rotor Coil Failure The rotor’s electromagnetic coil can develop shorts or opens that prevent proper magnetic field generation. Rotor problems typically result in little or no alternator output and often require complete alternator replacement.
Internal Short Circuits Internal shorts between windings or to ground can cause reduced output, overheating, and potential fire hazards. These problems often develop gradually but can cause sudden complete failure.
External Factors
Overheating Damage Excessive heat from engine bay temperatures, poor ventilation, or internal electrical problems can damage alternator components. Overheating often affects the voltage regulator first, followed by winding insulation breakdown.
Water and Corrosion Damage Water intrusion from washing engines, driving through deep water, or failed seals can cause internal corrosion and electrical shorts. Salt exposure in coastal areas accelerates corrosion problems.
Excessive Electrical Load Adding high-power accessories without upgrading the alternator can cause chronic overloading, leading to overheating and premature failure. Modern vehicles already operate near alternator capacity limits.
Poor Connections and Wiring Corroded or loose electrical connections reduce charging efficiency and can cause voltage spikes that damage alternator components. Regular connection maintenance prevents many alternator problems.
Alternator Troubleshooting and Diagnosis
Proper alternator diagnosis requires systematic testing to differentiate between alternator problems, battery issues, and other electrical system faults. For comprehensive electrical system diagnostics, explore our electrical and lights systems guide.
Visual Inspection Procedures
Safety Precautions and Preparation Before beginning any alternator inspection, ensure the engine is completely cool and disconnect the negative battery cable to prevent electrical shorts. Wear safety glasses and avoid loose clothing that could catch in moving parts.
Belt Condition and Tension Check Inspect the drive belt for cracks, fraying, glazing, or excessive wear. A properly tensioned belt should deflect no more than 1/2 inch when pressed firmly. Loose belts cause poor charging, while overtight belts stress alternator bearings.
Connection Inspection Protocol Examine all electrical connections for corrosion, looseness, or damage. Pay particular attention to the main output terminal, which carries high current and is prone to overheating if connections are poor.
Physical Damage Assessment Look for signs of overheating such as discolored housing, melted plastic components, or burned smells. Check for oil leaks that could contaminate internal components and cause electrical failures.
Pulley Alignment Verification Use a straightedge to verify that all pulleys in the accessory drive system are properly aligned. Misalignment causes belt wear and reduces alternator efficiency.
Electrical Testing Methods
Multimeter Voltage Testing With the engine running at approximately 2,000 RPM, measure voltage at the battery terminals. A properly functioning charging system should produce 13.5-14.5 volts. Readings below 13 volts indicate undercharging, while readings above 15 volts suggest overcharging.
Output Current Testing Current testing requires an inductive ammeter or load tester to measure actual alternator output. Most automotive alternators should produce at least 80% of their rated output when properly loaded.
Ripple Voltage Analysis AC voltage ripple testing reveals diode problems that might not show up in basic voltage tests. Connect an AC voltmeter to the battery terminals with the engine running – readings above 0.5 volts AC indicate rectifier problems.
Load Testing Procedures Load testing involves applying controlled electrical loads while monitoring alternator output. Turn on headlights, air conditioning, and other accessories while monitoring system voltage to verify the alternator can meet demand.
Ground Connection Verification Poor ground connections cause many charging system problems. Test voltage drop between the alternator case and battery negative terminal – readings above 0.2 volts indicate ground connection problems.
Professional Diagnostic Tools
Oscilloscope Analysis Professional technicians use oscilloscopes to analyze alternator output waveforms, revealing problems not detectable with basic voltage testing. Waveform analysis can identify specific failed diodes and predict impending failures.
Load Bank Testing Dedicated alternator load banks provide precise, controlled electrical loads for comprehensive output testing across the alternator’s entire RPM range.
Specialized Alternator Testers Professional alternator testers combine multiple testing functions, including output testing, ripple analysis, and diode testing in one integrated tool.
Computer Diagnostic Scans Modern vehicles often monitor charging system performance through the engine management computer. Diagnostic scan tools can reveal charging system fault codes and real-time data.
DIY Alternator Repair and Maintenance
While some alternator maintenance can be performed by experienced DIY enthusiasts, many repairs require specialized tools and expertise. For additional electrical system repair guidance, check our diagnostics and troubleshooting resources.
Tools and Equipment Required
Basic Hand Tools Checklist
- Socket set (metric and standard)
- Combination wrenches
- Screwdrivers (flathead and Phillips)
- Pliers (needle-nose and standard)
- Belt tension gauge or ruler
- Clean rags and degreaser
Electrical Testing Equipment
- Digital multimeter with DC/AC voltage and current capabilities
- Inductive ammeter for current testing
- Battery load tester
- Wire brushes for cleaning connections
- Electrical contact cleaner
Safety Equipment Requirements
- Safety glasses or face shield
- Work gloves
- Shop light or flashlight
- Jack stands if lifting the vehicle
- Wheel chocks for safety
Replacement Parts Selection When selecting replacement parts, consider OEM alternators for direct fit and reliability, or high-quality aftermarket units with appropriate amperage ratings for your vehicle’s electrical demands.
Step-by-Step Removal Process
Safety Preparation and Battery Disconnection Park on level ground, engage the parking brake, and allow the engine to cool completely. Disconnect the negative battery cable first, followed by the positive cable to prevent electrical shorts during removal.
Belt Removal and Pulley Access Locate the belt tensioner and relieve belt tension using the appropriate tool. Remove the belt from the alternator pulley, taking note of the belt routing for proper reinstallation.
Electrical Connection Disconnection Carefully disconnect all electrical connections from the alternator, labeling wires or taking photos for reference during reinstallation. The main output terminal typically requires a wrench for removal.
Mounting Bolt Removal Sequence Remove the alternator mounting bolts in the proper sequence, typically starting with the upper adjustment bolt, followed by the pivot bolt. Support the alternator while removing the final bolt to prevent dropping.
Alternator Extraction Techniques Carefully lift the alternator from its mounting location, avoiding contact with other components. Some installations require removing additional components for access.
Installation and Setup
New Alternator Preparation Compare the new alternator with the old unit to ensure proper fit and electrical connections. Check that all mounting ears and electrical terminals match the original configuration.
Mounting and Alignment Procedures Install the alternator in reverse order of removal, ensuring proper alignment with mounting brackets. Hand-tighten mounting bolts initially, then torque to specification once everything is aligned.
Electrical Connection Restoration Reconnect all electrical connections using your reference photos or labels. Ensure connections are clean and tight, applying dielectric grease to prevent corrosion.
Belt Installation and Tensioning Route the belt according to the decal under the hood or service manual specifications. Adjust belt tension to manufacturer specifications – typically 1/2 inch deflection under firm pressure.
System Testing and Verification Reconnect the battery cables (positive first, then negative) and start the engine. Verify proper charging voltage and test all electrical systems to ensure proper operation.
Maintenance Best Practices
Regular Inspection Schedule Inspect the charging system every 3-6 months, checking belt condition, connection tightness, and battery terminal condition. Early detection prevents major failures.
Belt Tension Monitoring Check belt tension regularly, as belts stretch with use. Proper tension ensures optimal alternator performance and extends belt life.
Connection Cleaning Procedures Clean battery terminals and alternator connections annually using baking soda solution and wire brushes. Apply protective spray to prevent corrosion.
Preventive Maintenance Tips
- Keep the alternator clean and free of oil contamination
- Address belt squealing immediately
- Monitor charging system performance with regular voltage checks
- Replace drive belts at recommended intervals
When to Call a Professional
While DIY maintenance can prevent many problems, certain situations require professional expertise and specialized equipment.
Complex Electrical Issues
Internal Component Replacement Rebuilding alternators requires specialized tools, technical knowledge, and replacement parts that are often not cost-effective for individual repairs. Professional rebuilders have the expertise and equipment for internal component replacement.
Charging System Integration Problems Modern vehicles with complex electrical systems and computer-controlled charging may require professional diagnosis to identify interactions between multiple systems.
Computer Module Programming Some vehicles require computer programming or adaptation procedures when installing new alternators, particularly in vehicles with intelligent charging systems.
Warranty Considerations Professional installation often includes warranty coverage that protects your investment and ensures proper system integration.
Safety Considerations
High-Voltage Hybrid Systems Hybrid and electric vehicles operate at dangerous voltage levels that require specialized training and safety equipment. Never attempt alternator work on these systems without proper training.
Advanced Electrical Systems Vehicles with complex electrical architectures may have charging system integration with multiple control modules that require professional diagnostic capabilities.
Specialized Tool Requirements Some alternator testing and repair procedures require expensive professional equipment that’s not practical for individual ownership.
Technical Expertise Needs Intermittent electrical problems often require professional diagnostic skills and experience to identify root causes effectively.
Alternator Replacement Options and Costs
Understanding your replacement options helps you make informed decisions about quality, cost, and reliability.
OEM vs. Aftermarket Alternatives
Quality Comparisons OEM (Original Equipment Manufacturer) alternators provide exact fit and specifications matching your vehicle’s original design. They typically offer the highest reliability and longest service life, though at premium pricing.
Aftermarket alternators vary widely in quality. Premium aftermarket brands often equal OEM quality at reduced cost, while budget alternatives may sacrifice longevity for affordability.
Warranty Differences OEM alternators typically include comprehensive warranties through the vehicle manufacturer or parts supplier. Aftermarket warranties vary from limited coverage on budget units to extensive warranties on premium brands.
Performance Specifications Ensure replacement alternators meet or exceed original amperage ratings. Upgrading to higher output alternators may be beneficial for vehicles with extensive electrical accessories.
Cost-Benefit Analysis Consider total cost of ownership, including initial purchase price, expected service life, and warranty coverage when comparing options.
Rebuilt vs. New Alternators
Rebuilding Process Overview Rebuilt alternators undergo complete disassembly, testing, and replacement of worn components. Quality rebuilds use new brushes, bearings, and voltage regulators while reusing serviceable cores.
Reliability Considerations High-quality rebuilds can provide excellent service life at reduced cost. However, rebuilt units may have shorter warranties and potential reliability concerns compared to new units.
Cost Savings Potential Rebuilt alternators typically cost 30-50% less than new units, making them attractive for older vehicles or budget-conscious repairs.
Quality Assurance Factors Choose rebuilders with good reputations, comprehensive testing procedures, and solid warranty coverage. Avoid units without proper quality control processes.
Cost Factors and Budgeting
DIY vs. Professional Installation DIY installation can save $100-300 in labor costs, but requires tools, time, and technical knowledge. Factor in potential complications that might require professional assistance.
Additional Component Needs Budget for related components that may need replacement, such as drive belts, battery, or electrical connections. Address these items during alternator replacement to prevent future problems.
Labor Time Estimates Professional alternator replacement typically requires 1-3 hours depending on vehicle complexity and accessibility. Some vehicles require extensive disassembly for alternator access.
Regional Price Variations Parts and labor costs vary significantly by geographic region. Obtain multiple quotes to ensure competitive pricing while maintaining quality standards.
Alternator Prevention and Longevity Tips
Proactive maintenance significantly extends alternator life and prevents unexpected failures. For comprehensive battery maintenance that supports charging system health, review our guide on why your car battery dies and what to do about it.
Electrical System Care
Battery Maintenance Impact A healthy battery reduces alternator workload and extends its service life. Maintain proper electrolyte levels, keep terminals clean, and replace batteries before they fail completely.
Connection Cleanliness Importance Clean, tight electrical connections ensure efficient current flow and prevent voltage drops that force the alternator to work harder. Use dielectric grease on connections to prevent corrosion.
Proper Charging Practices Avoid deep battery discharge cycles that stress the alternator during recharging. Use battery maintainers for vehicles stored long-term to prevent deep discharge.
Electrical Load Management Be mindful of total electrical load, especially when adding aftermarket accessories. Consider alternator upgrades if adding significant electrical demands like high-powered audio systems or auxiliary lighting.
Mechanical Protection
Belt Maintenance Requirements Replace drive belts at recommended intervals, typically 60,000-100,000 miles. Don’t wait for belt failure, as broken belts can damage alternator pulleys and cause sudden charging system failure.
Pulley Alignment Checks Verify pulley alignment when replacing belts or alternators. Misalignment causes premature belt wear and alternator bearing stress.
Environmental Protection Protect the alternator from water contamination during engine washing. Cover electrical connections and avoid high-pressure water near the alternator.
Vibration and Shock Prevention Ensure proper alternator mounting to minimize vibration and shock loads. Loose mounting can cause internal component damage and premature failure.
Early Problem Detection
Regular Inspection Routine Develop a monthly inspection routine that includes checking belt condition, connection tightness, and unusual noises. Early detection prevents major failures.
Performance Monitoring Methods Monitor charging system voltage regularly, especially before long trips. Many vehicles have built-in voltmeters or you can install aftermarket gauges for continuous monitoring.
Warning Sign Recognition Learn to recognize early warning signs like slight dimming of lights during high electrical load or minor belt squealing during cold starts.
Preventive Testing Schedule Have the charging system professionally tested annually or if you notice any performance changes. Load testing can reveal problems before complete failure occurs.
Understanding your vehicle’s alternator and maintaining it properly ensures reliable electrical system operation and prevents unexpected roadside failures. Whether you’re a DIY enthusiast performing basic maintenance or a professional technician diagnosing complex electrical problems, proper alternator care is essential for vehicle reliability.
For additional electrical system information and repair procedures, explore our comprehensive vehicle systems and parts explained resources. Remember that complex electrical problems or safety concerns should always be referred to qualified automotive technicians with proper training and equipment.
Safety Disclaimer: Working on vehicle electrical systems involves potential safety risks. Always disconnect the battery before beginning any repair work, use appropriate personal protective equipment, and consult professional mechanics for complex electrical issues. The information provided is for educational purposes only. Implement all procedures at your own risk and responsibility.
Professional Consultation Note: While many alternator issues can be diagnosed by experienced DIY enthusiasts, complex electrical problems and charging system integration require professional expertise. When in doubt, consult qualified automotive technicians to prevent damage and ensure safety.
Information Source Disclaimer: This information is compiled from industry-standard repair procedures and manufacturer guidelines. Always consult your vehicle’s specific service manual for model-specific procedures and specifications. Repairs Advisor provides informational resources only and does not offer direct repair services.