A clutch master cylinder converts your foot pressure on the clutch pedal into hydraulic pressure that disengages the clutch. When it fails, you’ll experience spongy pedal feel, difficulty shifting gears, and potential fluid leaks. Common symptoms include low brake fluid levels, soft clutch pedal response, gear grinding, and pedal sticking to the floor.
Key safety considerations: This repair involves hydraulic brake fluid and critical transmission components. While intermediate DIYers can handle basic diagnostics and simple repairs, complex internal failures often require professional consultation to prevent safety hazards or transmission damage.
Confidence marker: This repair is within reach for intermediate DIYers with proper preparation, safety equipment, and realistic assessment of their mechanical skills. Professional consultation is recommended for vehicles under warranty or when symptoms indicate complex hydraulic system failures.
Understanding the Clutch Master Cylinder Fundamentals
What Is a Clutch Master Cylinder?
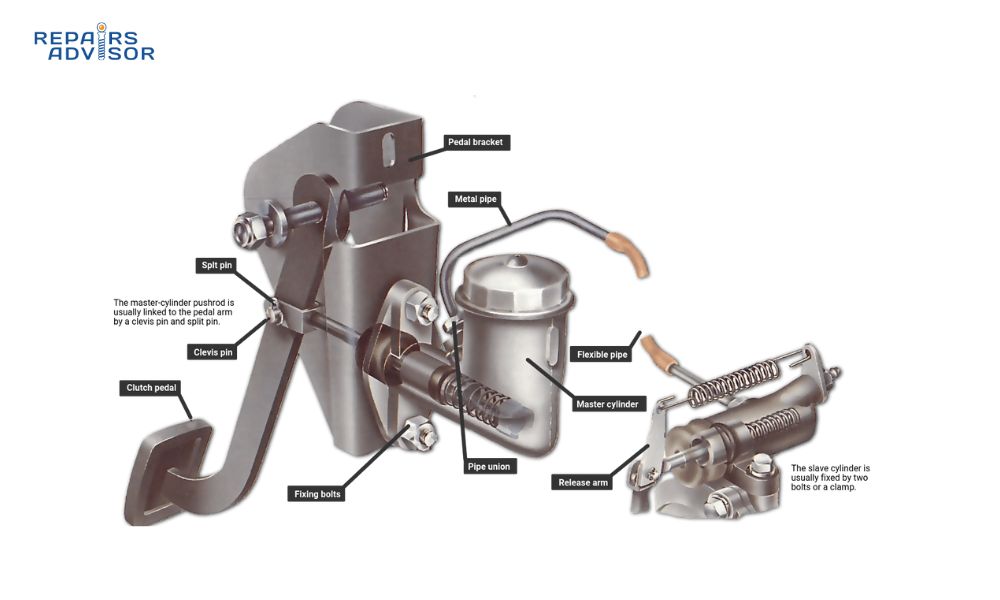
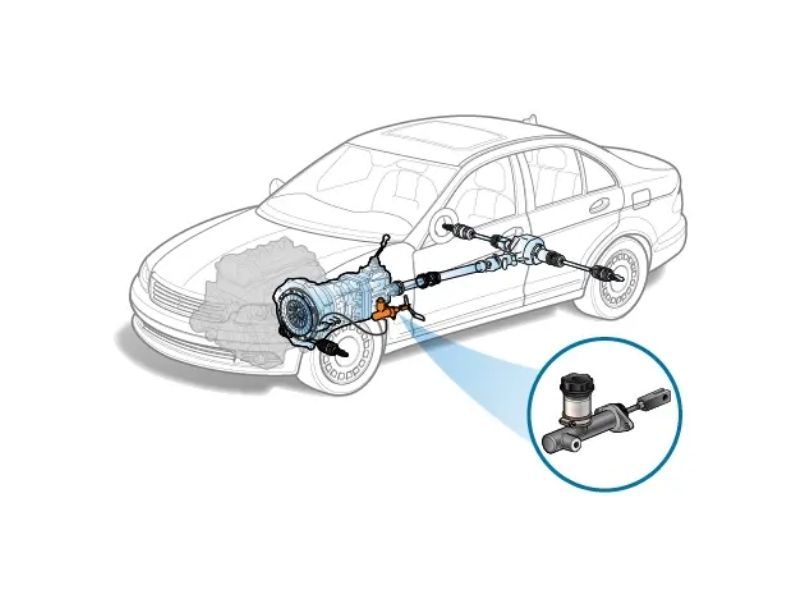
The clutch master cylinder is the heart of your vehicle’s hydraulic clutch system, transforming the mechanical force from your foot on the clutch pedal into hydraulic pressure that operates the clutch assembly. Located in the engine bay near the brake master cylinder, this critical component ensures smooth gear changes and proper clutch engagement.
The master cylinder contains several key components: a fluid reservoir, internal piston, rubber seals, pushrod connection to the clutch pedal, and hydraulic output connection to the slave cylinder. When you press the clutch pedal, the pushrod moves the internal piston, which pressurizes brake fluid and sends it through hydraulic lines to the clutch slave cylinder, ultimately disengaging the clutch from the engine.
Understanding this system helps intermediate DIYers recognize when problems occur and assess whether repairs are within their skill range. For beginners, knowing these basics helps communicate effectively with professional technicians and understand repair recommendations.
How the Hydraulic Clutch System Works
The hydraulic clutch system operates on Pascal’s Law, which states that pressure applied to a confined fluid is transmitted equally in all directions. This principle allows your foot pressure to be multiplied through the hydraulic system, making clutch operation much easier than mechanical linkage systems.
Here’s the step-by-step process: When you press the clutch pedal, the master cylinder piston compresses brake fluid in the reservoir. This pressurized fluid travels through hydraulic lines to the slave cylinder, which pushes against the clutch fork. The clutch fork then moves the release bearing, separating the clutch disc from the flywheel and allowing smooth gear changes.
This hydraulic advantage means you can easily disengage a clutch that might require hundreds of pounds of force with direct mechanical operation. However, this system’s effectiveness depends entirely on maintaining proper hydraulic pressure – any air bubbles, leaks, or component failures will compromise clutch operation and potentially leave you stranded.
Types of Clutch Master Cylinders
Modern vehicles use several clutch master cylinder designs. Traditional systems feature separate master and slave cylinders connected by hydraulic lines, while integrated systems combine the reservoir and cylinder in a single unit. Many newer vehicles include electronic sensors that monitor clutch position for advanced features like start/stop systems, cruise control, and hill-start assist.
Performance enthusiasts often upgrade to aftermarket master cylinders with adjustable bore sizes and improved materials. These upgrades can provide more precise pedal feel and increased durability under aggressive driving conditions. However, for most applications, OEM replacement components provide the best balance of reliability, cost, and integration with existing vehicle systems.
Understanding your vehicle’s specific system helps determine the appropriate replacement parts and repair procedures. Always consult your vehicle-specific manual before beginning any clutch system work.

Recognizing Clutch Master Cylinder Problems
Primary Warning Signs
For Beginners – Observation and Safety: Start with basic observations that don’t require tools or mechanical knowledge. Check the brake fluid reservoir regularly – it should maintain a consistent level between the minimum and maximum marks. If you notice the fluid level dropping or find wet spots under the dashboard on the driver’s side, stop driving and consult a professional immediately.
Pay attention to how the clutch pedal feels. A properly functioning clutch should have consistent resistance and return smoothly to its rest position. If the pedal feels unusually soft, spongy, or different from normal, document these changes and seek professional evaluation. Never continue driving if the clutch pedal sticks to the floor or if you have difficulty shifting gears.
For Intermediate DIYers – Diagnostic Confidence Building: Intermediate mechanics can perform more detailed symptom analysis while building diagnostic confidence. Start with systematic testing: press the clutch pedal multiple times and note any changes in resistance, travel distance, or return speed. Measure the free play – the distance the pedal travels before you feel resistance – which should typically be between 0.5 and 1.5 inches.
Check for external leaks by inspecting the master cylinder housing, hydraulic lines, and connections. Look under the dashboard carpet for signs of internal seal failure. Test clutch engagement by starting the engine in neutral, pressing the clutch, and shifting into first gear. The transmission should engage smoothly without grinding or difficulty.
For Professionals – Advanced Diagnosis: Experienced technicians can use pressure testing equipment and systematic elimination procedures to quickly isolate master cylinder problems. Professional diagnostics might include vacuum pump testing, bench testing of removed components, and electronic system integration verification for modern vehicles with clutch position sensors.
Cross-system analysis helps identify whether problems originate in the master cylinder, slave cylinder, or related components. Time-saving shortcuts include pressure hold tests with the output line blocked and systematic fluid quality analysis to determine seal condition and contamination sources.
Symptom Categories and Progression
Fluid-Related Symptoms: Low fluid levels in the brake fluid reservoir often indicate clutch master cylinder problems, especially if no external leaks are visible around the brake system. The clutch and brake systems typically share the same reservoir, so monitoring fluid levels helps identify hydraulic system issues early.
Contaminated fluid appears dark, cloudy, or contains floating debris, indicating internal seal breakdown. Fresh brake fluid should be clear and slightly amber in color. Dark or dirty fluid suggests that rubber seals are deteriorating and contaminating the hydraulic system, requiring immediate attention to prevent complete system failure.
External leaks might appear around the master cylinder housing, hydraulic line connections, or under the dashboard where the pushrod connects to the clutch pedal. Internal bypassing occurs when seals fail inside the master cylinder, allowing fluid to move past the piston without building pressure – this creates a soft pedal feel without visible external leakage.
Pedal Performance Issues: A spongy or soft clutch pedal typically indicates air in the hydraulic system or internal seal failure. Air compresses under pressure, unlike hydraulic fluid, so any air bubbles will cause the pedal to feel mushy and prevent proper clutch operation. This often requires professional bleeding procedures to remove all air from the system.
Changes in pedal travel or engagement point suggest internal wear or adjustment issues. If the clutch suddenly engages much higher or lower in the pedal travel, or if you must press the pedal to the floor to disengage the clutch, the master cylinder may be failing internally.
A sticking pedal that doesn’t return smoothly might indicate problems with the return spring, pushrod binding, or hydraulic system contamination. In severe cases, the pedal may stick to the floor, indicating complete hydraulic failure requiring immediate professional attention.
Transmission and Shifting Problems: Difficult gear engagement often results from incomplete clutch disengagement due to insufficient hydraulic pressure. You might notice grinding when shifting into gear, especially from neutral into first gear or when downshifting. This grinding can damage transmission synchronizers if not addressed promptly.
Gear slippage during acceleration might indicate that the clutch isn’t fully engaging due to partial hydraulic pressure. While this can also result from clutch disc wear, sudden onset often points to hydraulic system problems rather than gradual clutch wear.
Unusual transmission noises, particularly grinding or whining during gear changes, may indicate clutch system problems affecting transmission operation. These symptoms require immediate professional evaluation to prevent expensive transmission damage.
Diagnostic Procedures and Testing
Visual Inspection Protocol
Begin every diagnostic session with proper safety preparation. Park on level ground, engage the parking brake, and ensure you have adequate lighting and workspace. Wear safety glasses and nitrile gloves when working with brake fluid, as it’s corrosive to skin and paint. Have clean rags and a drain pan available to catch any spilled fluid.
Examine the brake fluid reservoir first, checking both fluid level and quality. The fluid should be clear and between the minimum and maximum marks. Dark, cloudy, or contaminated fluid indicates internal seal problems requiring immediate attention. Note any debris or floating particles, which suggest advanced seal deterioration.
Inspect the master cylinder housing for cracks, corrosion, or external leakage. Check all hydraulic line connections for signs of seepage or corrosion. Examine the pushrod connection area under the dashboard for signs of internal leakage – pull back the carpet and look for wet spots or dried fluid residue.
Functional Testing Methods
Basic Pedal Response Test: With the engine off, press the clutch pedal slowly and note the resistance. A healthy master cylinder should provide consistent, firm resistance throughout the pedal travel. The pedal should return smoothly and quickly when released, without sticking or hesitation.
Perform multiple activations to check for consistency. If the pedal feels different on successive presses – becoming softer or requiring more travel – this suggests internal seal problems or air in the system. Document any changes in pedal feel for comparison during repair procedures.
Measure the free play at the top of the pedal travel before you feel resistance. Most vehicles require 0.5 to 1.5 inches of free play. Too little free play can cause clutch slippage and premature wear, while excessive free play indicates adjustment problems or component wear.
Pressure Hold Test (Intermediate/Professional): For more advanced diagnosis, disconnect the hydraulic line at the master cylinder output and block it with a rubber cap or plug. With the output blocked, press the clutch pedal firmly and hold it. A functioning master cylinder should build solid pressure and hold the pedal position firmly.
If the pedal feels soft or gradually sinks toward the floor with the output blocked, the master cylinder has internal seal failure and requires replacement or rebuilding. This test isolates the master cylinder from the rest of the system, providing definitive diagnosis of internal problems.
Always ensure the output line is properly reconnected and the system is bled thoroughly after performing this test. Any air introduced during testing must be removed before returning the vehicle to service.
Advanced Diagnostic Techniques
Professional technicians often use vacuum pumps to test master cylinder function and system bleeding efficiency. These tools can quickly identify internal leakage and verify proper seal function without extensive disassembly.
Bench testing involves removing the master cylinder and testing it in a controlled environment with clean fluid and proper tools. This method provides the most accurate assessment of component condition and helps determine whether rebuilding or replacement is more cost-effective.
Modern vehicles with electronic clutch position sensors require additional diagnostic steps to verify sensor function and computer system integration. Scan tools may be necessary to check for fault codes and verify proper sensor calibration after repairs.Safety Protocols and Risk Assessment
Critical Safety Considerations
Brake fluid is highly corrosive and toxic, requiring careful handling and proper disposal. Always wear nitrile gloves and safety glasses when working with hydraulic components. Keep brake fluid away from painted surfaces, as it will remove paint and cause permanent damage. If brake fluid contacts your skin, flush immediately with cold water and seek medical attention if irritation persists.
Hydraulic systems operate under significant pressure, even when the engine is off. Before disconnecting any hydraulic lines, ensure the system pressure is relieved by pumping the clutch pedal several times with the engine off. Use proper line wrenches to prevent damage to hydraulic fittings and connections.
Never work under a vehicle supported only by a jack. Always use proper jack stands and ensure the vehicle is stable before beginning work. Keep your workspace clean and well-lit to prevent accidents and contamination of hydraulic components.
Dispose of used brake fluid and contaminated components according to local environmental regulations. Brake fluid is toxic to animals and humans and can contaminate groundwater if improperly disposed of.
Skill-Level Risk Assessment
When DIY is Appropriate: Simple maintenance tasks like fluid level checks and basic visual inspections are safe for all skill levels. Intermediate DIYers can handle external leak repairs, system bleeding with proper equipment, and basic component replacement on accessible systems.
System bleeding requires two people and proper equipment but is within the capabilities of intermediate mechanics with proper preparation. Ensure you understand the bleeding procedure completely before beginning, and have a backup plan if complications arise.
Basic troubleshooting and symptom documentation help all skill levels communicate effectively with professional technicians and avoid unnecessary repairs.
When Professional Consultation is Required: Complex internal repairs, including seal replacement and cylinder rebuilding, require specialized tools and experience. Modern vehicles with electronic integration often need professional calibration and programming after clutch system repairs.
Hydraulic line replacement may affect brake system operation and requires professional expertise to ensure safety. Any work involving brake system components should be verified by qualified technicians before returning the vehicle to service.
Warranty considerations often require professional installation to maintain coverage. Check your vehicle’s warranty terms before attempting DIY repairs that might void coverage.
Emergency Procedures
If you experience complete clutch failure while driving, safely pull over and stop the engine. Do not attempt to drive without proper clutch function, as this can damage the transmission and create safety hazards. Call for professional towing rather than attempting temporary repairs.
Fluid contamination requires immediate system flushing and component replacement. Do not attempt to drive with contaminated brake fluid, as this can cause brake system failure in addition to clutch problems.
If brake fluid leaks onto hot engine components, it may smoke or create unpleasant odors. This is normal but indicates the need for immediate cleanup and leak repair to prevent ongoing contamination.
Repair and Replacement Procedures
Repair vs. Replacement Decision Matrix
Repairable Conditions: Minor external leaks around connections can often be resolved with new seals and proper torque specifications. Surface corrosion on the housing might be cleaned and treated if the metal integrity remains sound. Adjustment issues, including pedal free play and engagement point problems, can often be corrected without component replacement.
Rebuild kits are available for many master cylinders and can be cost-effective for DIYers with appropriate skills and tools. However, rebuilding requires precise work and specialized knowledge to ensure proper seal installation and bore condition assessment.
Replacement Requirements: Internal bore damage, including scoring or corrosion, typically requires complete replacement rather than rebuilding. Housing cracks compromise structural integrity and cannot be safely repaired. Electronic sensor failures in modern systems often necessitate complete assembly replacement to ensure proper calibration.
Cost-effectiveness analysis should consider labor time, part availability, and reliability requirements. For vehicles with high mileage or severe contamination damage, replacement often provides better long-term value than rebuilding.
Component Removal Procedures
Preparation and Access: Position the vehicle on level ground with adequate workspace around the engine bay and dashboard area. Remove the negative battery cable to prevent electrical issues during repair. Cover painted surfaces near the work area to protect from brake fluid spills.
Document the existing installation with photos before beginning disassembly. This reference helps ensure proper reassembly and identifies any previous modifications or non-standard installations.
Drain the brake fluid reservoir using a turkey baster or fluid extraction pump. Clean the reservoir thoroughly to prevent contamination of the new system. Keep the reservoir covered to prevent moisture absorption during the repair process.
Disconnection Sequence: Begin by disconnecting the hydraulic line at the master cylinder output using proper line wrenches. Immediately cap or plug the line to prevent fluid loss and contamination. Support the line to prevent stress on connections.
Remove electrical connectors from any integrated sensors, taking care not to damage delicate wiring or connectors. Clean connections with electrical contact cleaner if corrosion is present.
Access the pushrod connection under the dashboard by removing necessary trim panels. The connection typically uses a clevis pin with a retaining clip. Document the orientation before removal to ensure proper reassembly.
Remove the mounting bolts securing the master cylinder to the firewall. Support the component during removal to prevent damage to connected components or vehicle surfaces.
Installation and System Setup
Component Installation: Install the new master cylinder in reverse order of removal, ensuring proper alignment and torque specifications. Use new sealing washers or gaskets as provided with the replacement component. Apply a thin coat of brake fluid to rubber seals to prevent damage during installation.
Connect hydraulic lines using proper torque specifications and ensure all connections are clean and free from contamination. Verify that all electrical connections are secure and properly seated.
Adjust the pushrod connection to provide proper pedal free play according to manufacturer specifications. This adjustment is critical for proper clutch operation and component longevity.
System Activation and Testing: Fill the brake fluid reservoir with fresh, manufacturer-specified brake fluid. Never reuse old fluid or mix different fluid types. Bleed the clutch system thoroughly to remove all air, following the specific procedure for your vehicle.
The bleeding process typically requires an assistant to operate the clutch pedal while you monitor the slave cylinder bleeder valve. Continue bleeding until all air bubbles are eliminated and the pedal feels firm and consistent.
Test clutch operation with the engine running, verifying smooth engagement and disengagement. Check all connections for leaks and ensure the fluid level remains stable after testing.
Maintenance and Prevention
Preventive Maintenance Schedule
Regular fluid monitoring prevents most clutch master cylinder problems. Check the brake fluid reservoir monthly, noting both level and fluid quality. Fresh brake fluid should be clear and light amber in color. Schedule fluid replacement every 24-30 months or according to manufacturer recommendations.
Inspect the clutch system during regular vehicle maintenance, looking for signs of leakage, corrosion, or wear. Early detection of problems prevents expensive failures and maintains vehicle reliability. Document any changes in clutch pedal feel or operation for trend analysis.
Professional inspection during major service intervals helps identify developing problems before they cause failures. Many clutch system problems develop gradually and can be prevented with proactive maintenance.
Fluid System Care
Use only manufacturer-specified brake fluid types. DOT 3 and DOT 4 fluids are not interchangeable in all applications, and using the wrong fluid can damage seals and compromise system operation. Store brake fluid in sealed containers away from moisture and contaminants.
Brake fluid is hygroscopic, meaning it absorbs moisture from the air. This moisture reduces fluid performance and promotes internal corrosion. Always use fresh fluid from sealed containers and replace opened containers that have been stored for extended periods.
Keep the brake fluid reservoir cap clean and properly sealed to prevent contamination. Dirt and debris in the hydraulic system can damage internal components and cause premature failure.
Driving Habits Impact
Proper clutch technique reduces stress on hydraulic components and extends system life. Avoid riding the clutch pedal, which maintains constant pressure on the hydraulic system and can cause premature wear. Rest your foot on the floor or dead pedal rather than the clutch when not shifting.
Smooth, deliberate clutch operation reduces shock loads and vibration that can accelerate component wear. Avoid aggressive clutch dumps or excessive slipping that generates heat and stress throughout the system.
Performance driving and racing applications may require upgraded components designed for high-stress operation. Consult with performance specialists to select appropriate parts for demanding applications.
Troubleshooting Common Issues
Persistent Problems After Repair
Air in System: Complete air removal requires proper bleeding technique and adequate time for bubbles to rise through the hydraulic lines. Some systems have multiple bleeder points that must be addressed in the correct sequence. Gravity bleeding over several hours may be necessary for complete air removal in some installations.
If air continues to enter the system after proper bleeding, check for loose connections, damaged seals, or worn components that allow air infiltration. Microscopic leaks can introduce air without visible fluid loss.
Component Compatibility: OEM replacement parts ensure proper fit and function, while some aftermarket components may require modifications or adjustments. Verify part numbers and specifications before installation to prevent compatibility issues.
Performance upgrades may change system characteristics and require adjustments to other components. Research thoroughly before installing non-standard parts to ensure proper system integration.
Installation Errors: Common mistakes include improper torque specifications, contaminated fluids, or incorrect adjustment procedures. Follow manufacturer procedures exactly and use proper tools to prevent installation problems.
Double-check all connections and adjustments before returning the vehicle to service. A systematic verification process prevents many common problems and ensures reliable operation.
Related System Problems
The clutch and brake systems often share fluid reservoirs and similar components. Problems in one system can affect the other, requiring comprehensive diagnosis to identify all affected components. Brake system problems may present similar symptoms to clutch issues.
Transmission problems can sometimes mimic clutch system failures. Proper diagnosis requires understanding the interaction between these systems and systematic testing to isolate the actual problem source.
Electronic integration in modern vehicles means that clutch system problems may trigger warning lights or affect other vehicle systems. Professional diagnostic equipment may be necessary to properly diagnose and repair these complex interactions.
Performance Optimization
System tuning for optimal pedal feel may require adjustments to multiple components, including pushrod length, pedal position, and hydraulic line routing. These adjustments should be made incrementally with testing between each change.
Upgraded components designed for performance applications can improve system response and durability. However, these modifications may affect other vehicle systems and should be researched thoroughly before installation.
Regular maintenance and high-quality fluids provide the best foundation for optimal performance. Preventive care is more effective and less expensive than reactive repairs.
Cost Analysis and Professional Services
Cost Breakdown
Component Costs: OEM master cylinders typically cost $80-$200 depending on vehicle make and complexity. Aftermarket alternatives may cost 30-50% less but should be evaluated carefully for quality and warranty coverage. Electronic-integrated units for modern vehicles command premium pricing due to complexity and calibration requirements.
Rebuild kits cost $25-$60 and can be economical for DIYers with appropriate skills, but require specialized tools and knowledge for proper installation. Consider the time investment and risk of improper installation when evaluating rebuild options.
Labor Requirements: Professional installation typically requires 2-4 hours depending on vehicle accessibility and complexity. Shops may charge $100-$150 per hour, making labor costs significant relative to part costs. DIY installation can save substantial money but requires proper tools and knowledge.
Additional costs may include system bleeding, fluid replacement, and related component inspection. Budget for these ancillary services when planning professional repairs.
Tool Investments: Basic DIY repairs require standard hand tools plus specialized items like line wrenches and bleeding equipment. A vacuum pump for professional-quality bleeding costs $50-$150 but provides excellent results and can be used for other automotive services.
Consider tool costs against anticipated use. Occasional DIYers might prefer professional service, while enthusiasts can justify tool investments across multiple projects.
Professional Service Selection
Choose shops with specific experience in hydraulic system repairs and your vehicle make. Ask about warranty coverage, completion timeframes, and included services like system bleeding and adjustment.
Verify that the shop uses proper bleeding equipment and follows manufacturer procedures. Improper service can create safety hazards and expensive comebacks.
Get detailed estimates including all necessary services and potential additional work. Transparent communication prevents surprises and builds confidence in the service provider.
Long-term Value
Quality components and proper installation provide years of reliable service and prevent expensive secondary damage. Cutting corners on parts or labor often leads to premature failure and higher total costs.
Regular maintenance and early problem detection maximize component life and minimize repair costs. Preventive care is always more economical than emergency repairs.
Professional consultation for complex problems prevents costly misdiagnosis and ensures proper repair procedures. The investment in expert advice often saves money and prevents safety hazards.
When to Call a Professional
Skill Level Boundaries
Beginner Limitations: New DIYers should focus on basic maintenance and symptom recognition rather than complex repairs. Learning proper fluid checking and basic troubleshooting provides valuable knowledge without safety risks. Professional consultation ensures proper diagnosis and prevents expensive mistakes.
Building mechanical skills through simpler projects prepares you for more complex work over time. Don’t attempt critical safety systems until you have adequate experience and proper tools.
Intermediate Challenges: Experienced DIYers can handle most clutch master cylinder replacements and system bleeding procedures. However, recognize when problems exceed your skill level or available tools. Professional consultation prevents dangerous mistakes and ensures proper repairs.
Modern vehicle complexity often requires specialized diagnostic equipment and procedures beyond typical DIY capabilities. Don’t hesitate to seek professional help when facing unfamiliar technology or integration issues.
Professional Advantages: Qualified technicians have specialized tools, training, and experience that ensure proper diagnosis and repair. They understand system interactions and safety requirements that may not be obvious to DIYers.
Professional warranty coverage provides protection against defective parts or improper installation. This coverage can be valuable for expensive repairs or critical safety systems.
Complex System Integration
Modern vehicles integrate clutch position sensors with engine management, transmission control, and safety systems. These electronic interactions require professional diagnostic equipment and calibration procedures beyond typical DIY capabilities.
ABS and stability control systems may interact with clutch operation in ways that require professional understanding and equipment. Improper repairs can affect these critical safety systems.
Warranty protection often requires professional installation and documentation. Check warranty terms before attempting DIY repairs that might void coverage. Professional service maintains warranty protection and provides recourse if problems develop.
Emergency Services
Complete clutch failure requires immediate professional attention and safe vehicle recovery. Don’t attempt to drive without proper clutch function, as this can damage expensive transmission components and create safety hazards.
Emergency roadside service can provide temporary assistance and safe towing to qualified repair facilities. Many auto clubs and insurance policies include this coverage as part of their services.
Professional emergency services understand the urgency of clutch failures and can prioritize repairs to minimize downtime. They also have access to parts and equipment that may not be readily available to DIYers.
Conclusion
The clutch master cylinder plays a vital role in your vehicle’s transmission system, converting pedal pressure into the hydraulic force needed for smooth gear changes. Understanding its function, recognizing early warning signs, and knowing when to seek professional help ensures safe and reliable vehicle operation.
Regular maintenance, including fluid monitoring and system inspection, prevents most clutch master cylinder problems. When issues do arise, proper diagnosis determines whether simple repairs or complete replacement are necessary. While many procedures are within the capabilities of intermediate DIYers, complex modern vehicles often require professional expertise for safe and effective repairs.
Whether you choose DIY repairs or professional service, prioritize safety and use quality components for reliable long-term performance. The investment in proper repairs and maintenance pays dividends in vehicle reliability and prevents expensive secondary damage to transmission components.
Remember that clutch system problems can create safety hazards and should be addressed promptly. When in doubt, consult with qualified professionals who have the knowledge and equipment to ensure proper diagnosis and repair. Your safety and your vehicle’s reliability are worth the investment in expert service when needed.
Key Takeaway: Successful clutch master cylinder maintenance combines technical knowledge with realistic skill assessment—know when to DIY and when to seek professional help for optimal safety and reliability.
For vehicle-specific repair manuals and detailed procedures, visit our automotive repair manual collection. Need immediate help? Contact our support team through our help center for technical guidance and manual recommendations.
Safety Disclaimer: This information is provided for educational purposes only. Clutch and brake system repairs involve critical safety components. Always consult qualified professionals for complex repairs, follow manufacturer procedures, and prioritize safety over cost savings. Repairs Advisor provides technical manuals and guidance but does not perform direct repair services.