When your steering feels loose, your vehicle pulls to one side, or you notice uneven tire wear, the culprit might be a failing inner tie rod end. This critical steering component connects your steering rack to the wheel assembly, making precise vehicle control possible. Understanding inner tie rod end symptoms, diagnostic procedures, and replacement considerations can save you time, money, and potentially prevent dangerous steering failures.
Key Takeaway: Inner tie rod end failure typically manifests through steering looseness, uneven tire wear, and unusual noises during turns. While replacement costs range from $150-$500, proper diagnosis is essential since symptoms can indicate multiple steering system issues.
Understanding Inner Tie Rod End Function and Location
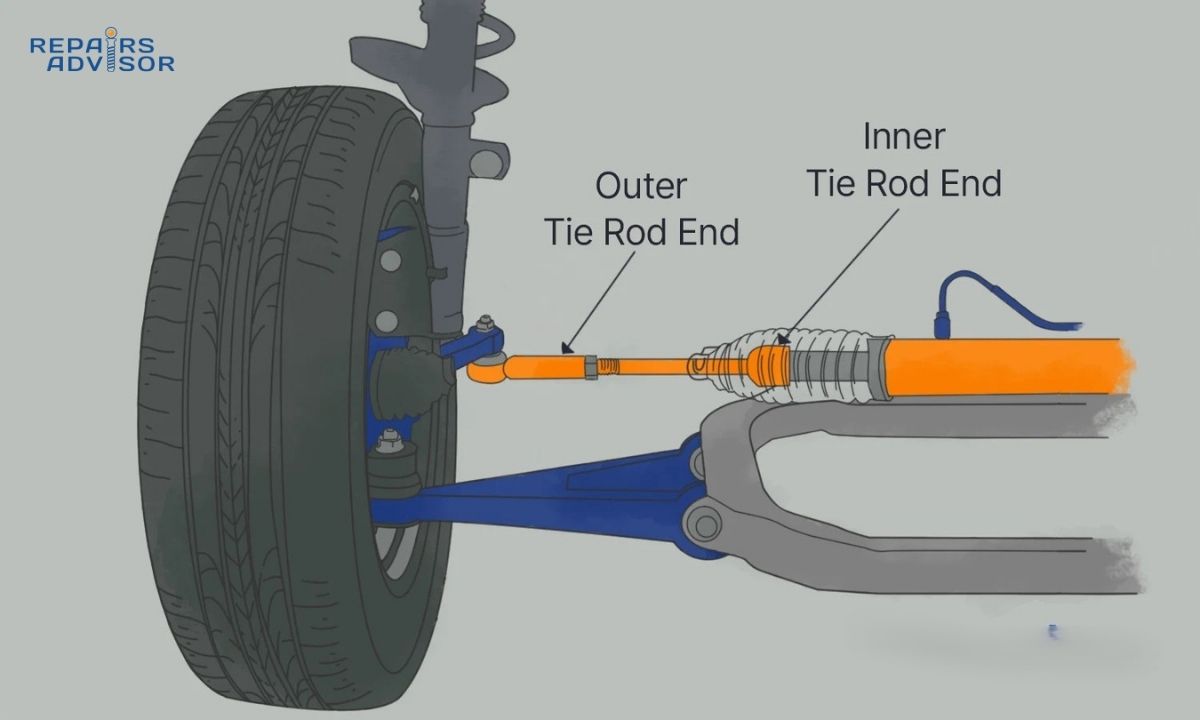
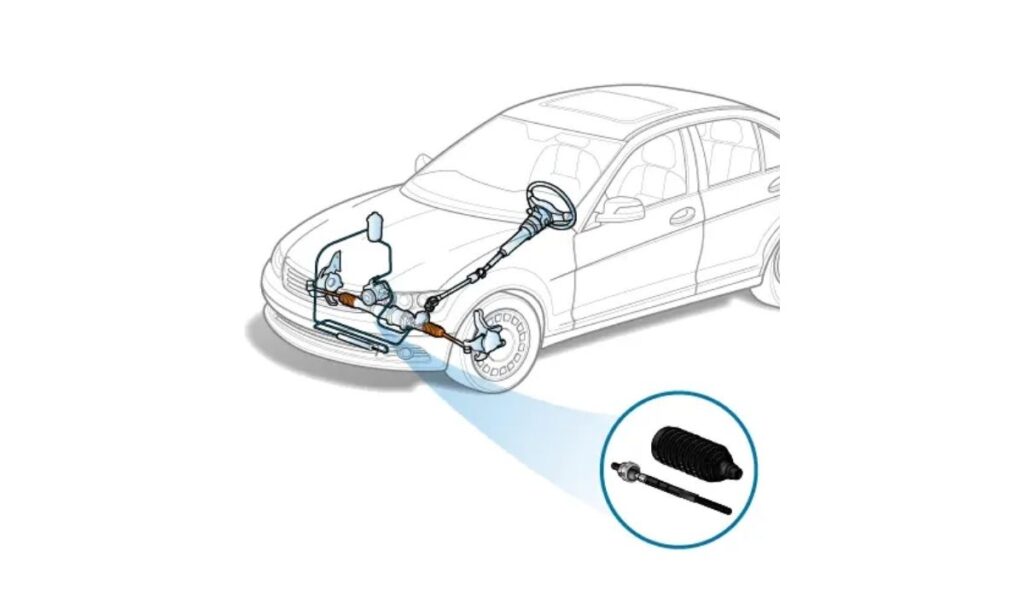
The inner tie rod end serves as a crucial pivot point in your vehicle’s steering system, connecting the steering rack to the outer tie rod assembly. Unlike the more accessible outer tie rod end, the inner component sits protected within the steering rack housing, making it less prone to damage but more challenging to service.
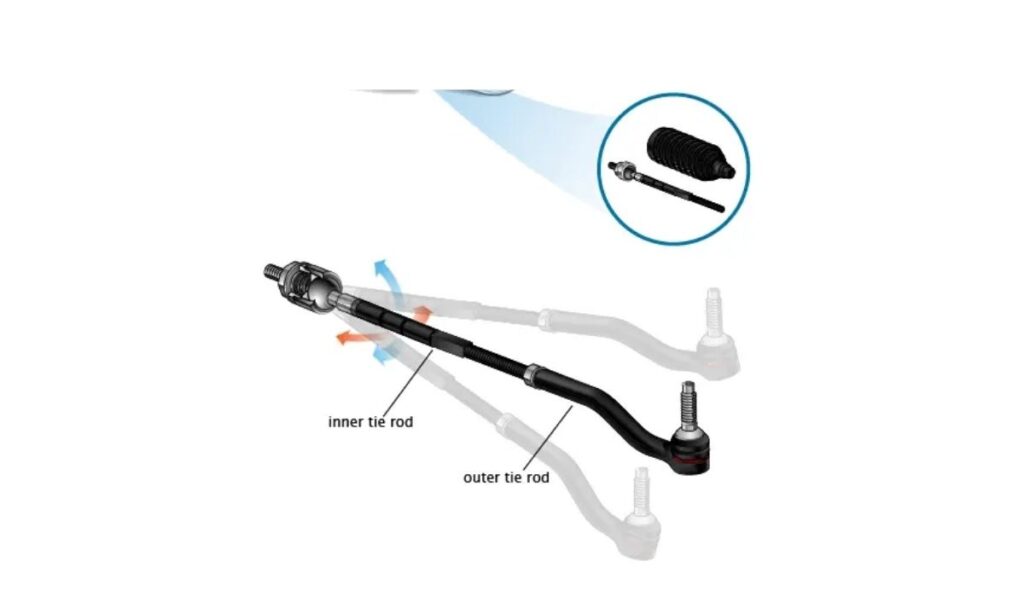
When you turn your steering wheel, rotational motion travels through the steering column to the rack and pinion assembly. The inner tie rod end transfers this linear motion from the steering rack to the outer tie rod, ultimately directing your wheels left or right. This component features a ball joint design that allows for the vertical movement needed as your suspension travels over uneven surfaces.
The inner tie rod differs significantly from its outer counterpart in both location and service requirements. While outer tie rod ends connect directly to the steering knuckle and experience more environmental exposure, inner tie rod ends remain protected by rubber bellows boots that keep contaminants out and lubrication in. This protection typically extends their service life compared to outer components.
Most vehicles feature rack and pinion steering systems where inner tie rod ends thread directly into the steering rack housing. These components undergo rigorous fatigue testing to avoid failure and have cataphoretic coating for superior rust protection, ensuring reliable performance under demanding conditions.
Critical Symptoms of Inner Tie Rod End Failure
Primary Warning Signs
Uneven Tire Wear Patterns
One of the early indicators of inner tie rod failure is uneven tire wear. When the inner tie rod wears out or becomes loose, it can cause the wheels to misalign. Inspect your tires regularly for excessive wear on the inner or outer edges. Compare both sides of each tire – if one edge shows significantly more wear than the other, this could indicate inner tie rod problems.
Steering Wheel Vibration and Looseness
If you notice unusual vibrations or shaking in your vehicle’s steering wheel, it could be a sign of inner tie rod failure. The worn-out tie rod may cause excessive play in the steering system, leading to vibrations transmitted through the steering column. This symptom becomes particularly noticeable during highway driving or when making turns.
Clunking or Knocking Sounds During Turns
A knocking or clunking sound from the front of the vehicle when turning at low speeds can be a symptom of bad tie rods. As they become loose, tie rods can rattle around at the joints and links, causing the new noises you’re hearing. These sounds typically occur when turning the steering wheel while stationary or during low-speed maneuvers.
Vehicle Pulling During Driving
Tie rods help you steer your vehicle and ensures that it tracks straight. While many different parts can cause your vehicle to come out of alignment, a worn tie rod can become loose, causing the front end of the vehicle to become misaligned. If your vehicle consistently pulls to one side while driving straight, suspect inner tie rod wear.
Advanced Diagnostic Symptoms
Excessive Play in Steering System
Inner tie rod failure can result in loose or imprecise steering. As the tie rod deteriorates, it loses its ability to provide stable and precise steering control. Test this by gently moving the steering wheel back and forth while stationary – excessive movement before the wheels respond indicates worn components.
Boot Damage and Grease Leakage
The inner tie rod is protected by rubber or polyurethane boots that keep dirt, debris, and moisture out. If these boots become damaged or torn, contaminants can enter and compromise the inner tie rod’s joints and components. Visible grease around the steering rack area or cracked boots signal potential inner tie rod problems.
Steering Unresponsiveness at Highway Speeds
Advanced inner tie rod wear can cause delayed steering response, particularly noticeable at highway speeds. The steering may feel “disconnected” or require more input to achieve the desired response. This symptom represents a significant safety concern requiring immediate attention.
Professional Diagnostic Procedures
Visual Inspection Protocol
Begin your diagnostic process with a comprehensive visual inspection. Inspect the inner tie rod boots for signs of damage, such as cracks, tears, or grease leaks. Any visible damage may indicate a failing tie rod. Look for grease residue around the steering rack area, which indicates boot failure and subsequent contamination.
Examine the steering rack housing for signs of impact damage or corrosion. Road salt and environmental exposure can accelerate component degradation, particularly in northern climates where winter road treatments are common.
Hands-On Testing Methods
Wheel Movement Testing
Raise the vehicle on a jack stand and grasp the tire at the 3 o’clock and 9 o’clock positions. Attempt to wiggle the wheel back and forth. Excessive movement or play could suggest a worn-out inner tie rod. This test helps distinguish between inner tie rod wear and other steering components like ball joints or wheel bearings.
Joint Play Detection
Lift the car. Remove the front wheels. Detach the outer tie rods from the steering knuckles. Now grab the tie rod assembly and feel for any looseness where it attaches to the steering rack (this joint is the inner tie rod). If it rotates freely or has any popping or play when you pull/push on it, it’s a bad inner tie rod.
Load Testing for Verification
Apply gentle force in different directions while monitoring the inner tie rod connection point. This can be done by applying gentle force in different directions and checking for any noticeable movement or looseness. Any perceptible movement at the ball joint indicates wear requiring replacement.
When to Suspect Inner vs. Outer Tie Rod Issues
Up/down play is usually wheel bearing or balljoints, left/right is tie rods. This simple diagnostic principle helps focus your troubleshooting efforts. Inner tie rod problems typically manifest as looseness in the horizontal plane, while vertical movement suggests other suspension components.
Outer tie rod issues often produce more pronounced symptoms since these components experience greater environmental exposure and mechanical stress. Inner tie rod problems tend to develop more gradually and may be less obvious until significant wear occurs.
Inner Tie Rod End Replacement: Technical Overview
Critical Safety Warning: Inner tie rod end replacement involves critical steering system components. Improper installation can result in complete loss of vehicle control. This procedure requires specialized tools, proper vehicle support, and professional-grade alignment equipment. If you’re not completely confident in your abilities, consult a qualified technician.
Required Tools and Equipment
Specialized Tools
- Inner tie rod removal tool (specific to your vehicle’s rack type)
- Tie rod end separator or ball joint puller
- Torque wrench with appropriate sockets
- Pipe wrench or suitable holding tool for rack stabilization
Standard Equipment
- Vehicle jack and jack stands rated for your vehicle’s weight
- Basic hand tools (wrenches, sockets, pliers)
- Safety glasses and work gloves
- Penetrating oil for seized components
Alignment Considerations Professional wheel alignment equipment is essential after inner tie rod replacement. A wheel alignment may be required afterward, which is another task that requires equipment that only a shop will have.
Safety Precautions and Warnings
Before beginning any work, ensure your vehicle is properly supported on level ground with appropriate jack stands. Never rely solely on a hydraulic jack for support during this procedure. Make sure to be thorough and careful during steering and suspension repairs. Wear safety glasses and gloves. Use approved jack stand and make sure to support steering components against their spring pressure.
Position the steering wheel to provide optimal access to the affected component. Most procedures require turning the steering wheel to full lock in the direction opposite the side being serviced.
Step-by-Step Replacement Process
Preparation Phase
First loosen your lug nuts, jack the car up and place on jack stands then remove the lug nuts and front wheels. Turn the steering wheel to the appropriate position for access to the inner tie rod end.
Outer Tie Rod Removal
Next we need to loosen the nut on the outer ball joint where it attaches to the knuckle. You do not need to hold the ball joint in place during this step. So using a 21mm deep socket or open ended wrench, we need to loosen the nut. Remove the cotter pin and castle nut, then use a proper tie rod separator to disconnect the outer tie rod from the steering knuckle.
Count the exact number of turns required to remove the outer tie rod from the inner assembly. This measurement is crucial for maintaining approximate alignment during reassembly.
Inner Tie Rod Access
Remove the clamp from the inner tie rod boot with pliers. Pry the boot up carefully with a flathead screwdriver and spray penetrating oil around the small end of the boot so it will slide off the inner tie rod more easily. Preserve the boot if possible, as replacement boots add to the total repair cost.
Critical Installation Point: Use a wrench on the rack teeth (flat) to resist rack rotation and prevent damage to the pinion during removal and installation. Allowing the rack and pinion to internally resist tightening or loosening torques may cause damage to the steering gear.
Replacement Installation
Install the new inner tie rod using proper torque specifications. Apply thread sealer to the new inner tie rod end where it attaches to the steering rack. Ensure the ball joint moves freely without binding or excessive play.
Reinstall the protective boot and secure with new clamps if the originals were damaged during removal. The clamps on the dust boot might need to be replaced if they are one-time use.
Critical Installation Considerations
Proper torque specification is essential for safe operation. The inner tie rods call for about 1 hour to replace when performed by experienced technicians, but DIY installations typically require additional time for careful measurement and verification.
Thread sealer application prevents loosening under operational stress while facilitating future service. Apply sealer sparingly to avoid contaminating the ball joint mechanism.
Cost Analysis and Planning
Professional Replacement Costs
The inner tie rods cost between $60-$80 each from most sources. Usually the boots are replaced at the same time and the boots are about $30. This labor time does not include time for an alignment afterwards. Total parts and labor for just the inner tie rods, I would estimate between $300-$500 at most shops.
Inner tie rod replacement costs $99-$211 on average, though this varies significantly based on vehicle type and regional labor rates. Luxury vehicles typically incur higher costs due to more expensive OEM components and increased labor complexity.
Cost Breakdown Components:
- Parts: $60-$120 per side (including boots)
- Labor: $80-$200 per side
- Alignment: $80-$150
- Total project cost: $220-$500 for single-side replacement
DIY vs. Professional Decision Factors
No, replacing a worn tie rod isn’t a DIY job. Tie rods are important parts of your steering system. If they’re not installed correctly, you could lose vehicle control, putting yourself and others at risk.
DIY replacement requires significant tool investment, including specialized inner tie rod removal tools that may cost $50-$150. While the work itself is fairly straightforward, between the specialized equipment required and the precision necessary to ensure a good alignment, we recommend letting a shop handle this job.
Consider DIY replacement only if you possess:
- Extensive suspension and steering experience
- Access to proper lifting equipment and specialized tools
- Ability to perform professional-quality wheel alignment
- Understanding of safety-critical installation requirements
Related Component Replacement Costs
Inner tie rod replacement often reveals additional steering system wear. A bad inner tie rod end can be a cause of a faulty steering rack and if the steering rack assembly is damaged, the cost of steering rack assembly can range from $100 to $1600.
Concurrent replacement of outer tie rod ends adds $40-$80 per side but may be cost-effective when performed simultaneously. Sometimes prolonged exposure to salt can cause the tie rod’s adjusting mechanism to freeze up, making it unable to move. In such a situation, it’s recommended to replace both the inner and outer tie rods together.
Prevention and Maintenance Strategies
Regular Inspection Schedules
Most mechanics recommend inspecting your tie rod ends for signs of wear and tear every 50,000 to 100,000 kilometers, and replacing them as needed. Include tie rod inspection in your regular maintenance routine, particularly during oil changes or seasonal tire rotations.
Visual inspection requires only basic tools and can identify problems before they become safety hazards. Look for boot damage, grease leakage, or unusual wear patterns that indicate developing problems.
Driving Habits and Component Longevity
Neglecting regular vehicle maintenance, such as failing to lubricate the tie rod ends or inspecting the boots for damage, can accelerate inner tie rod wear. Insufficient lubrication can cause increased friction and wear, leading to premature failure.
Avoid aggressive driving on rough terrain, as excessive wear from harsh road conditions (potholes, rough terrain, etc.) can significantly reduce component lifespan. When possible, avoid direct impacts with curbs or road debris that can damage steering components.
Road salt exposure accelerates corrosion and boot degradation. Regular undercarriage washing during winter months helps remove corrosive materials and extends component life.
When to Seek Professional Help
Mandatory Professional Service Situations
If you experience any of the symptoms outlined above, it is imperative that you make an appointment with a qualified technician right away. Being able to steer correctly is key to the safe operation of your vehicle. A failing tie rod can make it difficult to control your vehicle, which can compromise your safety and the safety of your passengers.
Seek immediate professional assistance if you experience:
- Complete loss of steering control
- Sudden changes in steering response
- Loud noises accompanied by steering difficulties
- Multiple symptoms suggesting system-wide failure
Professional Service Benefits
Professional technicians possess specialized diagnostic equipment that can identify problems not apparent during visual inspection. To accurately diagnose inner tie rod failure, it is recommended to consult a professional mechanic or automotive technician.
Professional service includes comprehensive system evaluation that may identify related problems before they become safety hazards. Warranty coverage on both parts and labor provides additional protection for your investment.
Access to OEM technical bulletins and manufacturer-specific procedures ensures proper installation and optimal component life. Professional shops maintain relationships with parts suppliers that can provide high-quality components at competitive prices.
Professional Resources and Support
Understanding inner tie rod end diagnosis and replacement requires technical expertise and proper tools. For comprehensive repair procedures, technical specifications, and professional-grade diagnostic information, Repairs Advisor provides detailed service manuals and technical documentation for virtually all vehicle makes and models.
Our extensive library includes manufacturer-specific procedures, torque specifications, and safety requirements that ensure proper repair execution. Whether you’re a professional technician or an experienced DIY enthusiast, access to accurate technical information is essential for safe and effective steering system service.
Remember: Information provided is for reference only. Always implement repair procedures at your own risk and responsibility, following manufacturer specifications and safety requirements. When in doubt, consult qualified professionals to ensure safe and proper repair execution.
For additional technical resources and detailed repair manuals, visit Repairs Advisor or contact our support team at [email protected].