Safety Notice: Working with cooling systems involves hot coolant under pressure. Always allow the engine to cool completely before removing the radiator cap. For complex cooling system repairs, consult a qualified automotive professional. This information is for reference only and carries no warranty on repair outcomes.
The radiator cap is a critical component that maintains proper cooling system pressure while preventing coolant loss and managing system safety. Understanding how radiator caps control cooling system pressure is essential for anyone working on vehicle maintenance, from DIY enthusiasts to professional mechanics.
Why Radiator Caps Are Critical for Engine Performance
The radiator cap serves as the pressure control valve for your vehicle’s entire cooling system, directly impacting engine performance and longevity. By maintaining optimal cooling system pressure, the radiator cap raises the coolant’s boiling point significantly above normal atmospheric conditions. At sea level, water boils at 212°F (100°C), but a properly functioning radiator cap maintaining 15 PSI raises this boiling point to approximately 250°F (121°C).
This pressure relief function prevents coolant from vaporizing under normal operating conditions, ensuring continuous liquid cooling throughout the engine block, cylinder heads, and heat exchangers. When cooling system pressure exceeds safe limits, the radiator cap’s pressure valve opens to vent excess pressure to the overflow reservoir, preventing dangerous system over-pressurization.
For intermediate DIY enthusiasts, understanding radiator cap operation helps identify cooling system problems early. Professional mechanics rely on pressure testing radiator caps to diagnose cooling system failures, while beginners should focus on recognizing when radiator cap replacement is necessary for safe vehicle operation.
Radiator Cap Parts and Construction Explained
Modern radiator caps contain several precision-engineered components working together to control pressure and vacuum conditions. The pressure valve forms the heart of the system, consisting of a spring-loaded mechanism that opens when cooling system pressure reaches the cap’s rated specification, typically between 13-16 PSI for most passenger vehicles.
The vacuum valve operates independently from the pressure valve, using a rubber diaphragm or secondary spring mechanism. When the engine cools and coolant contracts, this vacuum valve opens to draw coolant back from the overflow tank, preventing collapse of cooling system hoses and maintaining proper coolant levels.
Spring tension determines the exact pressure rating, with stronger springs maintaining higher pressures. The spring compresses against a sealing gasket that mates with the radiator neck, creating an airtight seal under normal conditions. Different spring ratings accommodate various engine designs and cooling requirements.
The sealing gasket provides the primary pressure seal, usually made from rubber compounds designed to withstand coolant chemicals and temperature extremes. Quality gaskets maintain their sealing properties through hundreds of heat cycles, while deteriorated gaskets allow pressure loss and coolant leakage.
Overflow tube connection directs vented coolant to the overflow reservoir rather than onto the engine bay. This tube connection includes internal passages that route both excess pressure and vacuum relief through separate channels, ensuring proper system operation during all temperature conditions.
Finally, the pressure rating stamped on the cap indicates maximum operating pressure in PSI. Common ratings include 13 PSI for older vehicles and 16 PSI for modern high-performance engines requiring elevated coolant temperatures for emissions compliance and efficiency optimization.
How Radiator Caps Work: Step-by-Step Operation
Step 1: System Pressurization During Heat-Up When the engine starts cold, the radiator cap seals the cooling system as coolant begins circulating through the engine cooling system. As combustion heat transfers to the coolant, thermal expansion increases system pressure gradually. The cap’s pressure valve remains closed while spring tension exceeds system pressure, maintaining a sealed environment that allows pressure to build systematically.
Step 2: Pressure Relief Valve Operation When cooling system pressure reaches the cap’s rated specification, hydraulic force overcomes spring tension and opens the pressure valve. Excess coolant flows through the overflow tube to the reservoir, preventing dangerous over-pressurization while maintaining optimal operating pressure. This pressure relief function occurs continuously during normal operation, with the valve modulating open and closed to maintain precise pressure control.
Step 3: Vacuum Valve Operation During Cool-Down As the engine cools, coolant contraction creates vacuum pressure that could collapse cooling system hoses. The vacuum valve opens automatically when internal pressure drops below atmospheric pressure, drawing coolant back from the overflow reservoir. This vacuum relief prevents system damage while ensuring the cooling system remains filled with coolant for the next operating cycle.
The radiator cap coordinates with other cooling components including the thermostat for temperature control and radiator fans for airflow management. Advanced cooling systems integrate multiple pressure sensors that monitor cap performance and overall system integrity for optimal engine protection.
Radiator Cap Location and Access Guide
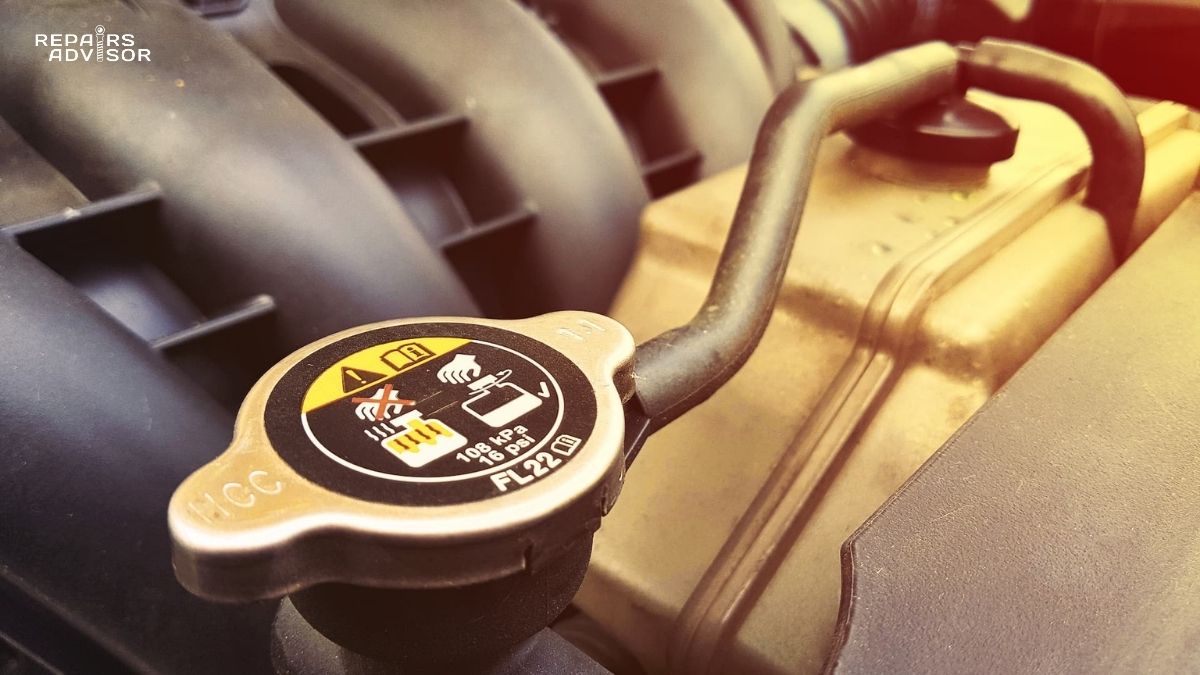
Standard Radiator Cap Location Most vehicles position the radiator cap directly on top of the radiator, accessible from the engine bay’s front section. The cap threads onto the radiator’s neck using a quarter-turn mechanism with locking tabs that align with radiator grooves. Look for a circular cap marked with pressure ratings and warning labels about high-temperature operation.
Remote Reservoir Cap Systems Many modern vehicles use remote reservoir caps instead of traditional radiator caps, particularly those with electric cooling fans that block radiator access. These systems place the pressurized cap on a separate coolant reservoir, usually mounted near the radiator or on the engine firewall. The reservoir cap performs identical pressure functions while providing easier access for maintenance.
Safety Access Procedures Never attempt to remove a radiator cap from a hot engine, as pressurized coolant can cause severe burns. Allow the engine to cool for at least 30 minutes after shutdown, then carefully press down on the cap while turning counterclockwise to the first stop. This releases any remaining pressure safely before full removal.
Maintenance Access Considerations For routine inspection, check the cap’s sealing surfaces and gasket condition without removal. Look for coolant residue around the cap threads, which indicates sealing problems. Professional mechanics use pressure testing equipment to verify cap operation without engine operation, ensuring accurate diagnosis of cooling system problems.
Professional Consultation Boundaries While radiator cap inspection and replacement is appropriate for most DIY skill levels, cooling system pressure testing requires specialized equipment and expertise. Complex cooling system diagnosis involving multiple components should be performed by qualified automotive professionals to ensure accurate problem identification and safe repair procedures.