Modern luxury and performance vehicles achieve their exceptional combination of ride comfort and precise handling through sophisticated multi-link suspension systems—but understanding how these complex assemblies work reveals why they’re becoming the suspension of choice across all vehicle segments.
Multi-link suspension represents the most advanced form of independent suspension, using three to five control arms per wheel to separately manage every aspect of wheel motion. First introduced by Mercedes-Benz on the 1982 190 sedan, these systems allow engineers to fine-tune handling characteristics without compromising ride quality, making them essential in vehicles where both comfort and performance matter.
Understanding multi-link suspension matters for several compelling reasons. Over 60% of new vehicles sold in premium segments now use multi-link suspension, making it increasingly common in the vehicles you drive or service. This knowledge helps diagnose handling issues and abnormal tire wear patterns that might otherwise seem mysterious. Understanding component relationships guides smarter maintenance decisions, potentially saving thousands in unnecessary repairs. Recognition of design advantages and limitations informs vehicle purchasing decisions, helping you understand what you’re actually paying for in premium suspension systems.
Whether you’re an intermediate DIY enthusiast trying to understand why your luxury sedan handles the way it does, a professional mechanic diagnosing complex suspension issues, or simply curious about automotive engineering, this comprehensive guide reveals how multi-link suspension works and why it matters. For context on how multi-link systems fit within broader suspension technology, see our guide on how your car’s suspension works. If you’re working on a specific vehicle, consult manufacturer-specific information in our Mercedes-Benz brand manuals section.
What Multi-Link Suspension Is and Why It Revolutionized Vehicle Dynamics
Multi-link suspension is an independent suspension system that uses three or more individual control arms (links) to connect each wheel to the vehicle’s chassis or subframe. Unlike simpler suspension designs where one arm controls multiple functions, each link in a multi-link system has a specific job—controlling lateral movement, longitudinal forces, or wheel alignment angles. This separation of functions allows engineers to optimize ride comfort and handling independently, eliminating the compromises inherent in traditional suspension designs.
The revolutionary aspect of multi-link suspension lies in what engineers call “orthogonal” design—the ability to adjust one suspension parameter without affecting others. In traditional double wishbone suspension designs, changing bushing compliance or relocating a hardpoint inevitably alters multiple geometric relationships simultaneously. Need better camber control? You’ll compromise toe characteristics. Want improved anti-squat? Ride quality suffers. Multi-link suspension breaks these chains of compromise, enabling precise tuning of each characteristic independently.
Historical Development and Industry Adoption
Mercedes-Benz engineers introduced the first production multi-link suspension on the W201 (190-series) in 1982, though the system was originally intended for the 1979 S-Class. Additional refinement delayed its debut, but the wait proved worthwhile. The innovative five-link rear suspension gave the compact 190 superior handling compared to BMW’s contemporary semi-trailing arm designs while maintaining Mercedes’ legendary ride quality—a combination previously thought impossible in a small, sporty sedan.
The C111 prototype series in the 1960s served as the testing ground for this technology. These striking gullwing experimental vehicles allowed Mercedes engineers to develop and refine multi-link concepts before committing to production. The learning from these prototypes proved invaluable when production engineering began in earnest for the W201.
The technology spread slowly at first, remaining exclusive to premium vehicles due to manufacturing complexity and cost. However, as computer-aided design tools improved and manufacturing costs decreased, multi-link suspension gradually migrated from flagship luxury cars to mainstream applications. Today, even mid-range vehicles increasingly adopt multi-link designs, particularly for rear suspensions where the performance advantages justify the modest cost increase over simpler torsion beam systems.
Why Multi-Link Systems Revolutionized Vehicle Performance
The fundamental innovation of multi-link suspension centers on its orthogonal design philosophy. Traditional suspensions force engineers into constant compromise—improving one characteristic inevitably degrades another. Multi-link systems eliminate these compromises through geometric separation of functions.
The system manages wheel motion across three orthogonal planes, each controlled by dedicated components. In plan view (looking down from above), longitudinally-separated lateral arms control toe angle and lateral compliance. These arms prevent unwanted steering input during acceleration and braking, maintaining predictable steering response. Unlike simpler suspensions where longitudinal forces cause toe changes, multi-link systems keep wheels pointed in the intended direction regardless of acceleration or braking forces.
In front view (looking at the vehicle from ahead), dedicated arms manage camber changes through suspension travel. These arms keep tires perpendicular to the road surface for maximum contact patch, even as the suspension compresses and extends. This camber control represents one of multi-link suspension’s most significant advantages over MacPherson strut designs, which show substantial camber variation through travel.
In side view (looking at the vehicle from the side), dedicated longitudinal links handle traction and braking forces while controlling caster angle. Secondary links react to brake torque, preventing geometry disruption during heavy braking. This separation of longitudinal force management from other functions enables sophisticated anti-dive and anti-squat tuning without compromising ride quality or handling.
Performance Advantages That Matter
Multi-link suspension delivers measurable performance improvements across multiple parameters. The system maintains optimal tire contact patch through body roll and suspension travel, maximizing available grip in all driving conditions. A tire generates maximum force when perpendicular to the road surface; multi-link suspension keeps tires in this optimal position through the full range of vehicle motion.
The design minimizes toe change during suspension movement, virtually eliminating roll steer—the unwanted steering input that occurs in simpler suspensions when body roll causes toe changes. Predictable steering response inspires driver confidence and enables more aggressive driving without sudden handling surprises.
Multi-link systems suppress minor wheelbase changes for improved straight-line stability. While small wheelbase variations might seem insignificant, they affect steering feel and high-speed stability. Multi-link geometry minimizes these changes, contributing to the planted, confidence-inspiring feel characteristic of vehicles using these systems.
The design enables sophisticated anti-dive and anti-squat geometry tuning. During braking, vehicles naturally pitch forward (dive). During acceleration, they pitch backward (squat). These motions disrupt tire contact patch geometry, reducing available grip. Multi-link suspension allows engineers to tune these characteristics precisely, maintaining optimal tire orientation during acceleration and braking for maximum traction and braking performance.
Packaging flexibility represents another significant advantage. Unlike MacPherson struts requiring substantial vertical space, multi-link designs work within tighter packaging constraints. Rear multi-link suspensions free up cargo area compared to strut designs. Front multi-link systems (when space allows) enable lower hood lines and better engine accommodation. For hybrid and electric vehicles, multi-link designs accommodate battery packaging more effectively than alternatives.
For SUVs and off-road vehicles, multi-link suspension provides greater suspension travel and better wheel articulation over obstacles. The independent control arms allow extreme wheel movements while maintaining control, improving traction on uneven terrain. This capability explains why premium SUVs almost universally adopt multi-link suspension despite the cost premium over simpler alternatives.
Understanding these fundamental advantages helps explain why multi-link suspension continues spreading throughout the automotive industry. The system’s ability to simultaneously optimize multiple performance characteristics—previously thought incompatible—represents genuine engineering innovation rather than marketing hype. For more details on how individual control arms function within this system, see our dedicated component guide.
Multi-Link Suspension Component Anatomy and System Architecture
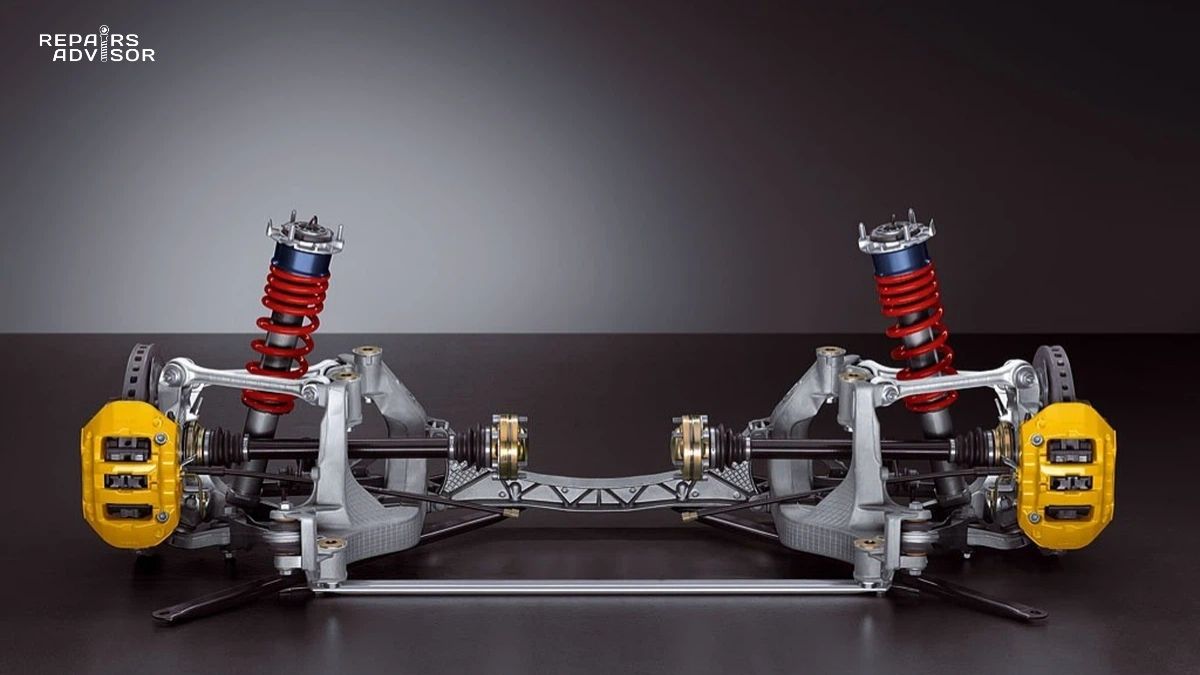
Multi-link suspension systems consist of numerous precisely-engineered components working together to manage wheel motion. Understanding this component architecture reveals how engineers achieve the system’s remarkable performance characteristics while also highlighting potential failure points requiring attention during maintenance.
Multiple Control Arms: The Defining Components
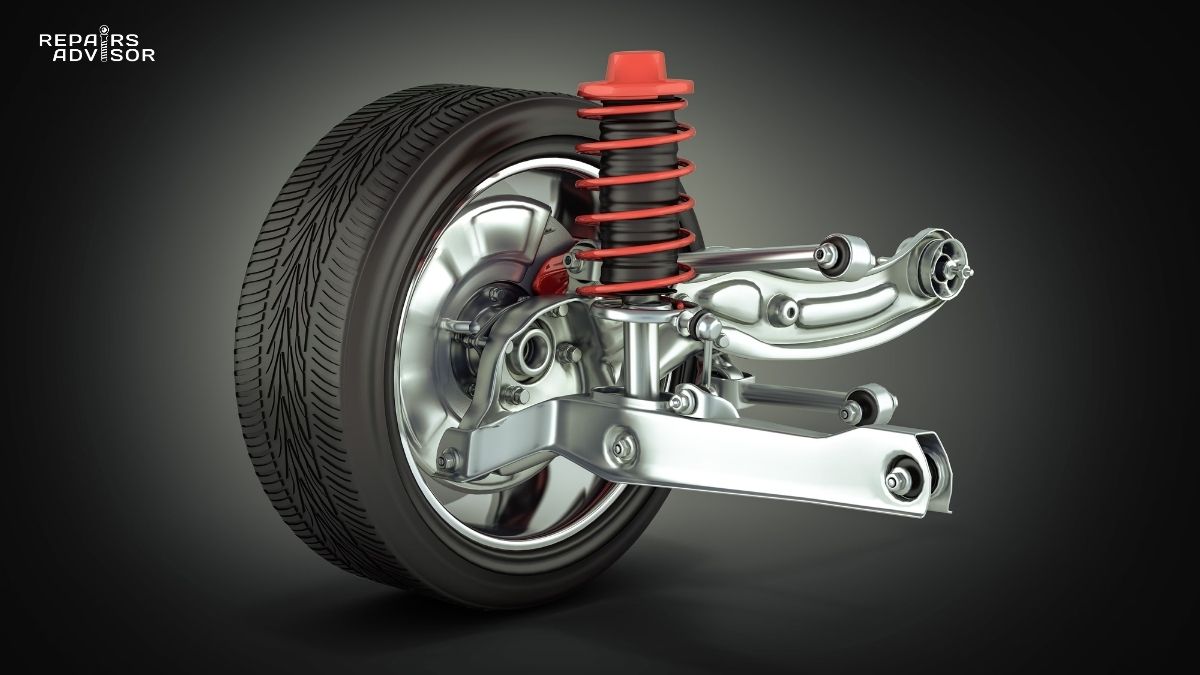
The multiple control arms give multi-link suspension its name and functionality. Unlike simpler suspensions using one or two arms per wheel, multi-link systems employ three to five separate control arms, each with specific responsibilities.
Upper control arms typically come in pairs—front and rear—mounted at different chassis heights and angles. These arms control upper steering knuckle movement and primarily manage camber characteristics. The specific lengths, mounting positions, and angles of upper control arms determine how camber changes as the suspension moves through its travel. Engineers carefully calculate these dimensions to maintain optimal tire orientation through compression and extension cycles.
Lower control arms also typically come in pairs, carrying most suspension loads while defining lower knuckle motion and providing secondary camber control. One lower arm usually carries the coil spring, making it the primary load-bearing component. The other lower arm works with the load-bearing arm to control wheel position precisely. The relationship between upper and lower arm lengths and mounting positions determines the suspension’s instant center—a critical parameter affecting handling characteristics.
Toe links represent dedicated components controlling toe angle changes through suspension travel. In simpler suspensions, toe changes occur as suspension moves—a phenomenon causing unpredictable handling. The dedicated toe link in multi-link designs prevents these unwanted changes, maintaining steering stability regardless of suspension movement. This single component contributes significantly to the confident, predictable steering feel characteristic of multi-link equipped vehicles.
Some designs incorporate trailing arms as part of the link count, particularly in rear suspensions. These arms handle longitudinal forces—acceleration and braking loads—while contributing to overall geometric control. Trailing arm designs vary significantly between manufacturers, with some using them as primary load-bearing members while others employ them purely for geometric control.
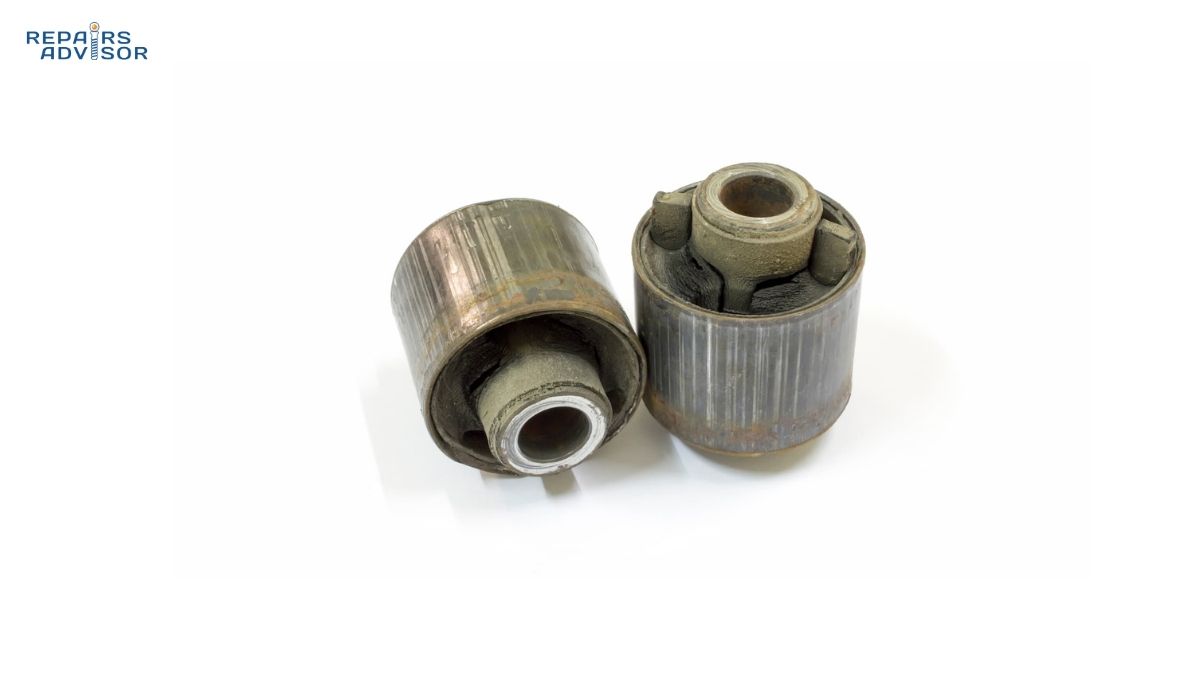
Lateral links position themselves side-to-side, controlling lateral wheel movement. These links prevent excessive lateral displacement while allowing controlled compliance for ride comfort. The bushing design at lateral link mounting points significantly affects ride quality and handling balance—stiffer bushings improve handling precision but transmit more vibration, while softer bushings enhance comfort but reduce handling crispness.
Each arm uses either ball joints or rubber/polyurethane bushings at mounting points. Ball joints allow rotation in multiple planes with minimal friction, providing precise control with zero compliance. Bushings provide controlled flexibility, allowing slight movements that improve ride comfort while maintaining adequate wheel control. The choice between ball joints and bushings at each location represents a key tuning parameter affecting the suspension’s overall character.
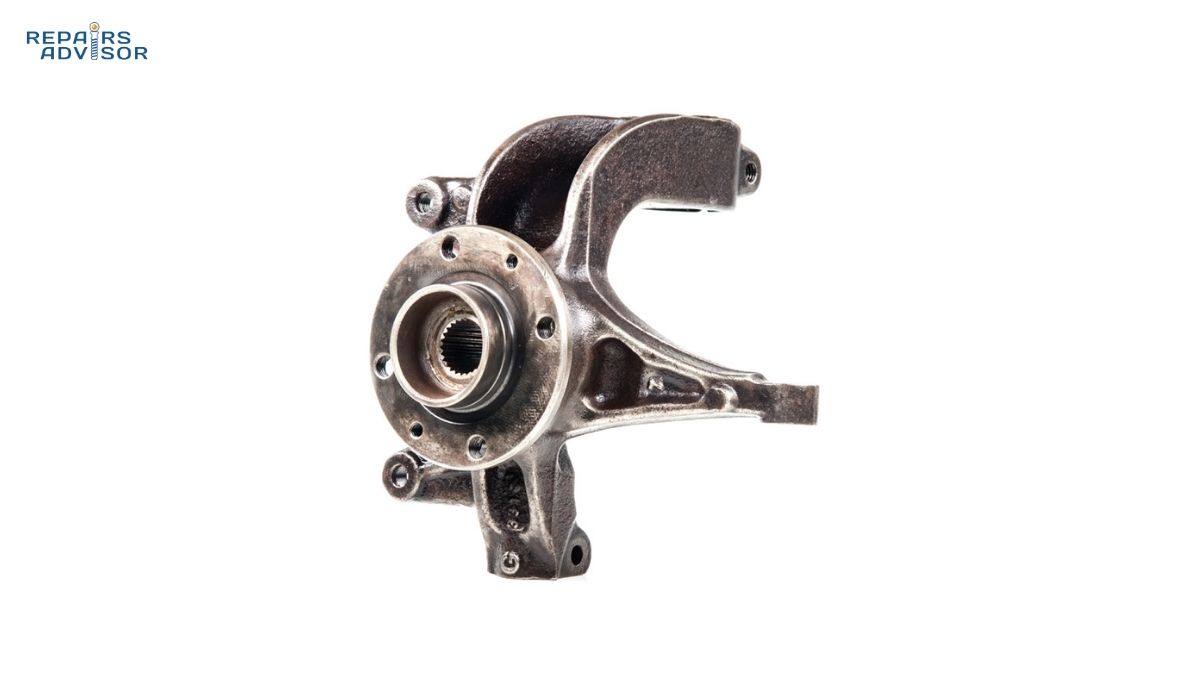
Steering Knuckle: The Central Hub
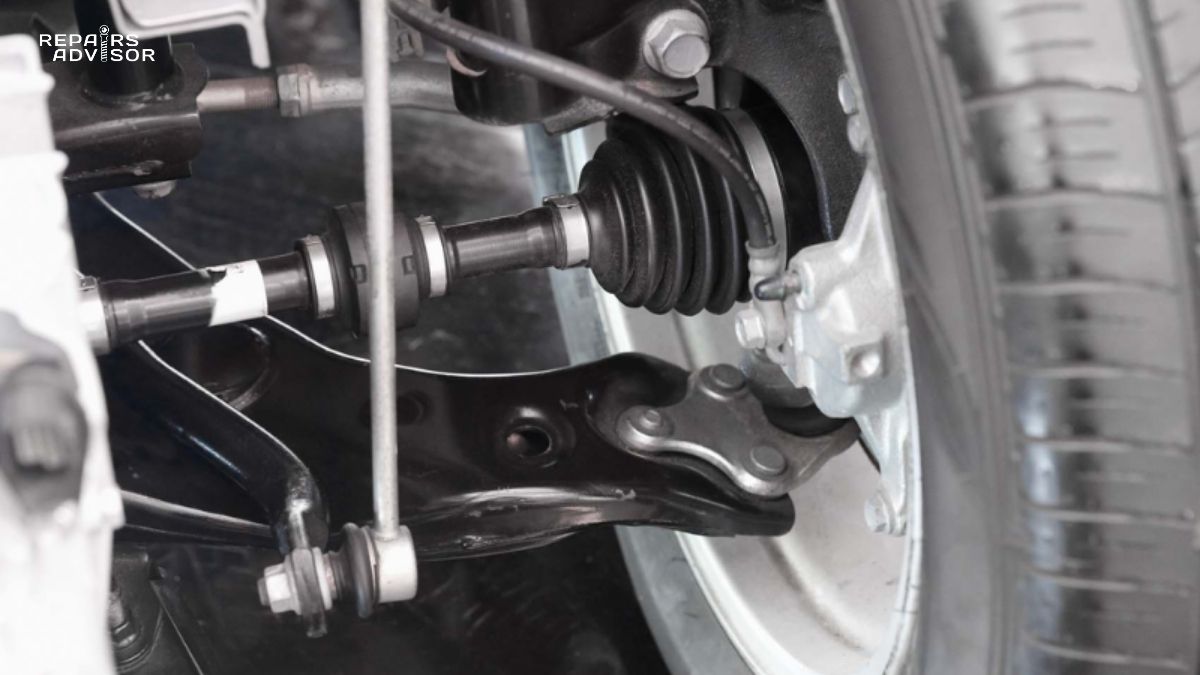
The steering knuckle (also called spindle or upright) serves as the central connection point where all control arms meet the wheel hub assembly. This component must withstand forces from all directions while maintaining precise geometric relationships between mounting points. On front suspensions, the knuckle includes steering connections through tie rod attachment points. Rear knuckles omit these connections since they don’t participate in steering.
Modern knuckles typically use cast aluminum or forged steel construction, optimizing strength while minimizing unsprung weight. Reducing unsprung weight—the mass of components that move with the wheel rather than being supported by the suspension—improves ride quality and handling response. Lighter knuckles allow suspensions to react more quickly to road irregularities, maintaining better tire contact.
The knuckle incorporates mounting points for the wheel hub assembly, brake caliper, and all control arms. Precise machining of these mounting points ensures accurate suspension geometry. Even small manufacturing variations can affect alignment angles, explaining why premium vehicles specify tight tolerances for these components. For details on knuckle function, see our guide on how steering knuckles work.
Springs and Dampers: Managing Vertical Motion
Coil springs in multi-link suspensions typically mount between one lower control arm and the chassis, carrying vehicle weight and maintaining design ride height. The spring acts as an energy storage device—compressing to absorb impacts and releasing stored energy to return the wheel to its normal position. Spring rate (stiffness) represents a critical tuning parameter affecting both ride quality and handling.
Progressive rate springs, featuring variable coil spacing, provide soft initial compression for small bumps while offering increased resistance for larger impacts. This progressive characteristic allows engineers to balance ride comfort with handling precision. The coils compress more easily initially, absorbing minor road irregularities, but become progressively stiffer to control body motion during aggressive driving.
Shock absorbers control suspension velocity, preventing oscillation and maintaining tire contact. While springs store and release energy, dampers dissipate it through hydraulic resistance. Without dampers, springs would oscillate continuously after each bump, creating a bouncing motion that would be both uncomfortable and dangerous. Dampers convert kinetic energy into heat through hydraulic fluid flow, quickly settling the suspension after disturbances.
Alternative spring systems include air springs on luxury vehicles and active suspension with electronically-controlled dampers on high-end performance cars. Air springs provide adjustable ride height and variable spring rates through air pressure control. Active suspension systems use electronically-controlled dampers or hydraulic actuators to modify suspension characteristics in real-time based on driving conditions. For more information on these advanced systems, see our guides on air suspension and active suspension.
Subframe Assembly: Isolation and Integration
Many multi-link suspensions mount to subframes rather than directly to the chassis. This subframe isolates road noise and vibration from the passenger compartment while allowing the complete suspension assembly to be installed or removed as a unit—a significant manufacturing advantage.
Rubber or hydraulic bushings connect the subframe to the chassis, providing compliance that filters vibration before it reaches the passenger compartment. The subframe itself typically uses cast aluminum construction, providing necessary strength and rigidity while minimizing weight. Some designs employ steel subframes when maximum strength takes priority over weight considerations.
The subframe provides rigid mounting points for all suspension components, creating a stable geometric reference that doesn’t flex under load. This rigidity ensures suspension geometry remains consistent, maintaining predictable handling characteristics. Without a rigid subframe, chassis flex would allow suspension mounting points to move relative to each other, disrupting carefully-calculated geometric relationships.
Anti-Roll Bar Integration
Stabilizer bars (also called anti-roll bars or sway bars) connect to one of the control arms via drop links. These torsion bars resist body roll during cornering while allowing independent wheel travel over bumps. When one wheel moves upward relative to the other (as in cornering), the anti-roll bar twists, creating a force that resists this motion. During straight-line driving over uneven surfaces, both wheels move together and the anti-roll bar doesn’t resist their motion.
Front suspensions usually connect anti-roll bars to lower control arms, where the geometry provides optimal leverage. Rear suspension connection points vary by design, with engineers selecting locations that provide desired roll resistance without compromising other characteristics. Anti-roll bar diameter and stiffness represent key tuning parameters affecting understeer/oversteer balance and body roll control. For more details, see our guide on how anti-roll bars work.
Bushings and Joints: Compliance and Control
Bushings represent critical components affecting both ride quality and handling precision. These seemingly simple rubber or polyurethane components provide controlled compliance—allowing limited movement in specific directions while resisting it in others.
Rubber bushings provide compliance for ride comfort, allowing limited rotational movement while damping vibration transmission. The rubber’s internal damping converts vibration energy into heat, preventing it from reaching the chassis and passenger compartment. However, rubber bushings can create vague steering feel if too soft, as they allow excessive movement under cornering loads.
Hydraulic bushings feature internal fluid chambers providing direction-specific compliance. These sophisticated designs remain soft under small inputs (improving ride quality) but become progressively stiffer under larger dynamic loads (maintaining handling precision). A membrane inside the bushing contains hydraulic fluid; under small movements, the fluid flows easily, providing compliance. Under larger or faster movements, the fluid can’t flow quickly enough, making the bushing effectively stiffer.
Hydraulic bushings commonly appear on rear lower control arm mounts, where they balance ride comfort with geometric stability. These bushings allow some fore-aft compliance for impact absorption while resisting lateral movement that would disrupt suspension geometry. The direction-specific compliance characteristics enable engineers to fine-tune suspension behavior in ways impossible with simple rubber bushings.
Ball joints allow rotation in multiple planes while transmitting high loads. Premium vehicles often integrate ball joints into control arms using pressed-in or bonded designs, eliminating separate bolted connections and reducing potential looseness. Less expensive designs use bolted ball joints that can be replaced separately—a design that increases initial cost but reduces repair expenses.
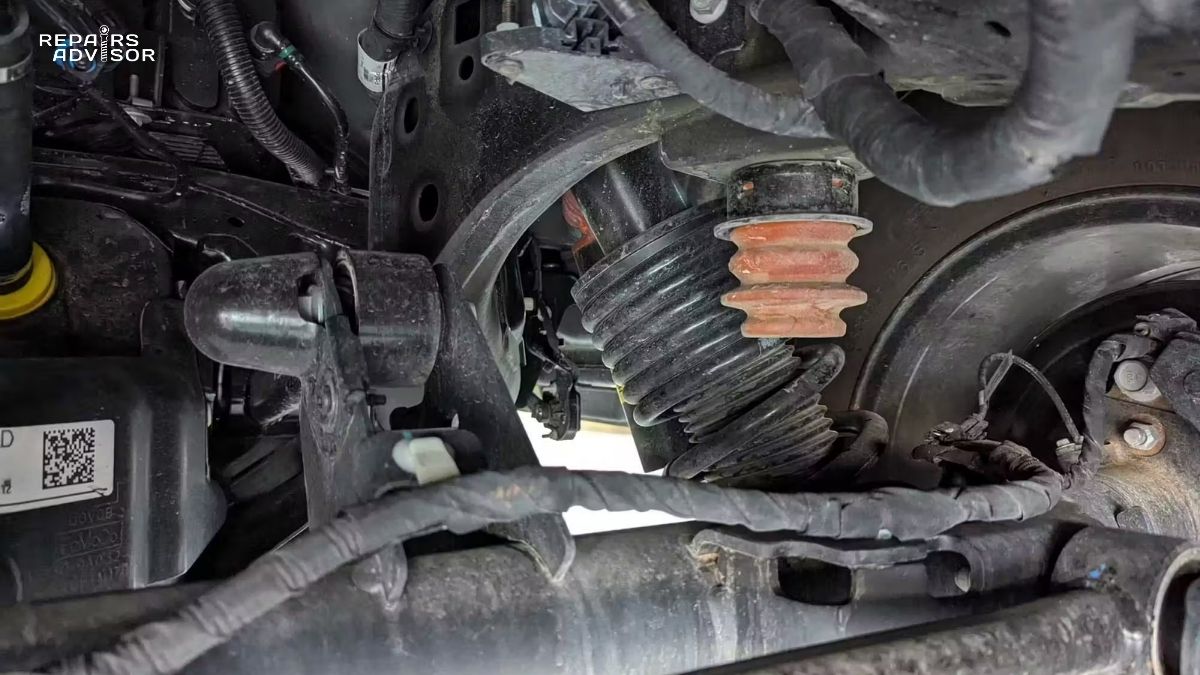
The boot protecting each ball joint represents a critical component. These rubber covers prevent water and contamination from entering the joint while retaining internal grease. A torn boot allows water and road salt to enter, rapidly corroding the bearing surfaces and leading to premature failure. Regular inspection of boot condition helps prevent expensive ball joint replacements. For additional information on bushing function, see our guide on control arm bushings.
Design Variations: Three-Link Through Five-Link Systems
Multi-link suspension designs vary from three to five links per wheel, with each configuration offering different balances of performance, complexity, and cost.
Three-link configurations represent the minimum for true multi-link classification. Using one longitudinal link plus two lateral links, these designs provide better geometric control than simpler suspensions while limiting cost and complexity. However, three-link systems offer limited tuning flexibility compared to more sophisticated designs. You’ll find three-link systems on economy vehicles transitioning from simpler suspensions to multi-link designs, providing improved handling without dramatic cost increases.
Four-link designs use two upper links and two lower links on front suspensions, or various arm configurations on rear suspensions. These systems balance performance and cost, providing most of multi-link suspension’s advantages while remaining more cost-effective than five-link designs. Four-link configurations appear widely on mid-range performance vehicles, offering handling precision that satisfies enthusiast drivers without premium luxury car pricing. Examples include Audi multi-link front suspensions and many Japanese performance cars.
Five-link systems represent the ultimate multi-link design, typically using two upper arms, two lower arms, and one toe link. This configuration provides maximum adjustment capability and superior geometric control. Five-link systems allow engineers to precisely tune every aspect of suspension behavior independently. The additional complexity and cost limit five-link designs primarily to luxury vehicles, though their gradual migration to mainstream applications continues. Mercedes-Benz, BMW 7-Series, and Audi A8 exemplify five-link suspension applications where cost takes secondary priority to ultimate performance.
Front vs. Rear Multi-Link Applications
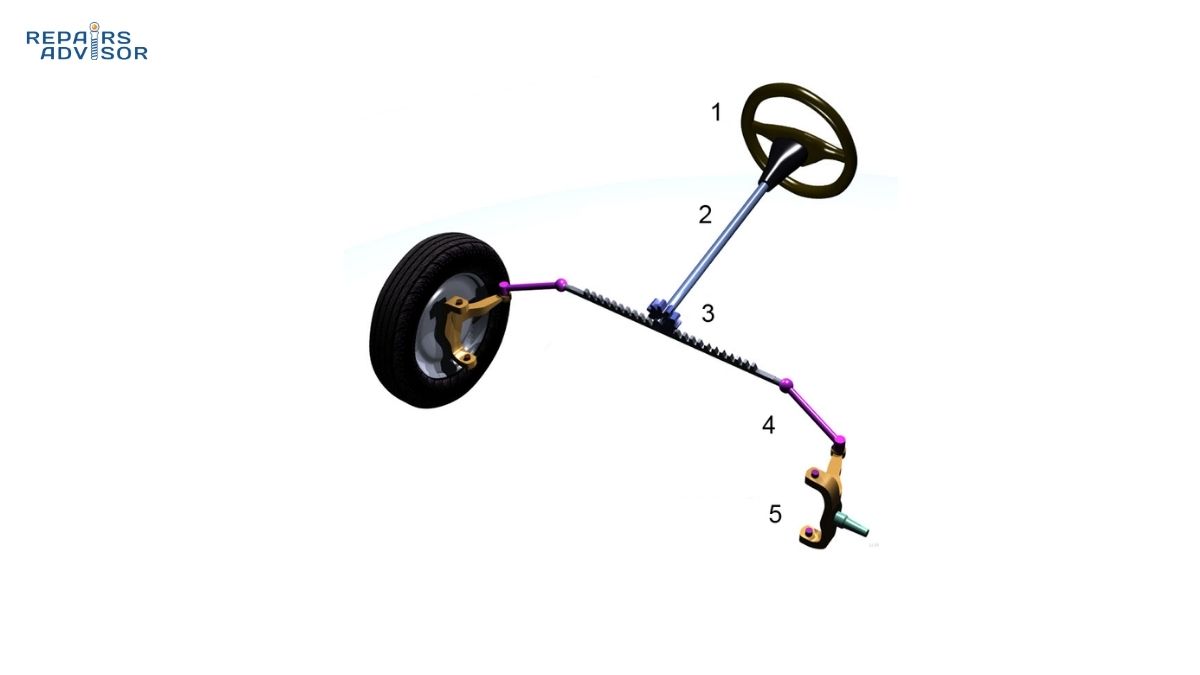
Front multi-link suspensions prove more complex than rear applications due to steering integration. One lateral arm must be replaced by a tie rod providing steering input from the rack-and-pinion or steering box. This constraint complicates geometric optimization while still delivering multi-link’s advantages. Front multi-link suspensions must also accommodate engine and transmission packaging, further constraining design freedom.
Despite these challenges, some manufacturers implement front multi-link suspension on flagship vehicles where ultimate handling precision justifies the complexity. Audi uses front multi-link on A4, A6, and A8 models. BMW employs it on the 7-Series. Mercedes-AMG SL represents a rare example of true five-link suspension at both ends, using a unique platform where cost considerations allowed this sophisticated approach.
Rear multi-link suspensions appear far more commonly than front applications. Without steering integration complexity, rear multi-link designs achieve better geometric optimization within more straightforward packaging. Compared to MacPherson struts, rear multi-link suspensions provide better packaging by eliminating the strut tower intrusion into cargo areas. This packaging advantage explains why crossovers and SUVs frequently adopt rear multi-link designs—they gain handling benefits while maintaining cargo capacity.
Premium SUVs almost universally specify rear multi-link suspension. Range Rover, Lexus RX, Audi Q7, and similar vehicles use sophisticated multi-link rear suspensions to deliver car-like handling despite substantial vehicle mass. Even mainstream vehicles increasingly adopt rear multi-link designs, with Honda Accord, Mazda CX-5, and Toyota RAV4 AWD (FWD versions retain torsion beam) demonstrating how this technology continues migrating to volume applications.
Understanding component architecture and design variations helps recognize multi-link suspension when encountered and appreciate the engineering sophistication these systems represent. The seemingly straightforward goal of controlling wheel motion proves remarkably complex when engineers pursue optimal performance across all driving conditions. For vehicle-specific information, consult manufacturer resources like our BMW brand manuals or Audi brand manuals sections.
How Multi-Link Suspension Works During Vehicle Operation
Understanding multi-link suspension theory provides foundation, but seeing how these systems function during actual driving reveals their true capabilities. Multi-link suspensions continuously manage complex forces while maintaining optimal wheel positioning across dramatically varying conditions.
Normal Driving Conditions: Straight-Line Motion
When the vehicle sits stationary, each multi-link suspension carries approximately 25% of vehicle weight (assuming equal front-rear weight distribution). Coil springs compress to design ride height, with springs positioned to react vertical loads through chassis mounting points. The multiple control arms share suspension loads across their mounting points, distributing forces throughout the chassis structure rather than concentrating stress at single points—a significant structural advantage over simpler suspension designs.
In static conditions, multi-link geometry maintains factory-specified wheel alignment. Camber typically shows slight negative values (top of tire tilted inward 0.5-2 degrees) for optimal cornering grip. Toe remains neutral to slightly toe-in (front of tires pointed slightly toward vehicle centerline) for straight-line stability. Caster angles positive (steering axis tilted rearward at top) provide self-centering steering feel. These baseline alignment settings provide the reference point from which dynamic changes occur during driving.
As the vehicle moves down smooth pavement, small road irregularities cause individual wheel movements. Each control arm reacts to forces along its length while bushings allow controlled compliance. This compliance absorbs minor impacts before they reach the chassis, improving ride quality without compromising wheel control. The multiple load paths through various control arms prevent any single component from experiencing excessive stress, contributing to component longevity.
Bump and Rebound Cycles: Independent Wheel Travel
Multi-link suspension demonstrates its advantages most clearly when individual wheels encounter obstacles. Consider what happens when one wheel hits a typical road bump—perhaps a raised manhole cover or small pothole edge.
At initial contact, the tire compresses against the obstacle, transmitting upward force through the wheel hub to the steering knuckle. This force vector typically doesn’t align perfectly with any single control arm’s axis, so all arms connected to that knuckle begin pivoting simultaneously on their chassis bushings. The multiple connection points distribute impact forces across numerous mounting locations, preventing the harsh single-point impact characteristic of simpler suspensions.
The coil spring begins compressing, storing energy while controlling vertical movement rate. Spring compression rate depends on spring stiffness (spring rate), with softer springs compressing more easily but providing less control over large movements. Progressive rate springs provide the best compromise—soft initial compression for comfort combined with increasing resistance for control.
Simultaneously, the shock absorber piston moves into its cylinder, encountering hydraulic resistance through fluid valving. This damping force prevents the spring from compressing too quickly, controlling impact harshness. Without adequate damping, the spring would compress and rebound violently, creating harsh ride quality and allowing the wheel to lose contact with the road surface.
As suspension compresses, the carefully-calculated relationships between control arm lengths and mounting positions maintain optimal wheel alignment. Upper and lower control arm geometry ensures camber remains within acceptable ranges throughout compression travel. Unlike MacPherson strut designs showing dramatic camber changes through travel, multi-link suspensions maintain more consistent wheel angles. This consistency keeps the tire’s contact patch optimally oriented, maximizing available grip even as the suspension compresses.
The longitudinally-separated lateral arms prevent toe changes during vertical movement—a critical distinction from simpler suspensions. In trailing arm or semi-trailing arm designs, vertical wheel movement inevitably causes toe angle changes because the arm’s pivot axis doesn’t align with the wheel’s vertical travel path. These unwanted toe changes create unpredictable steering response, requiring constant driver correction. Multi-link lateral arms’ specific geometry eliminates these changes, maintaining stable toe angles regardless of vertical wheel position.
Rubber bushings and subframe mounting prevent harsh impact transmission to the passenger compartment. The bushings’ internal damping converts vibration energy into heat rather than transmitting it to the chassis. Subframe-mounted suspensions gain additional isolation through the subframe mounting bushings, creating two stages of isolation between wheel and passenger compartment. This sophisticated isolation explains the refined ride quality characteristic of vehicles using subframe-mounted multi-link suspensions.
After clearing the bump, the compressed coil spring begins pushing the wheel back downward. The shock absorber now controls rebound speed through different valving, preventing excessive oscillation. Rebound damping typically exceeds compression damping—springs naturally want to rebound violently, and strong rebound control prevents bouncing. All control arms return to design positions through bushing elasticity, ready for the next disturbance.
Throughout this entire compression-rebound cycle, multi-link geometry maintains tire contact patch orientation better than simpler suspension designs. This superior wheel control translates directly into better ride quality (wheel maintains contact, reducing impact harshness) and handling (tire contact patch remains optimized for grip generation).
Cornering Dynamics: Body Roll and Load Transfer
Multi-link suspension reveals its greatest advantages during cornering, where body roll and load transfer create complex dynamic conditions. Consider entering a moderate-speed corner—perhaps a freeway on-ramp taken at 40 mph.
As the driver turns the steering wheel, front tires begin generating lateral force (cornering force), causing the vehicle to change direction. This lateral force acts at the tire contact patches—below the vehicle’s center of gravity. The resulting moment (force times distance) causes the vehicle body to roll toward the outside of the turn. Simultaneously, weight transfers from inside wheels to outside wheels as the center of gravity effectively shifts laterally.
Anti-roll bars provide initial resistance to body roll by transferring force between wheels. As the outside suspension compresses and inside suspension extends, the anti-roll bar twists, creating a force that resists this relative motion. However, anti-roll bars alone can’t prevent all body roll—eventually the body rolls to an angle determined by the suspension’s roll stiffness and the cornering forces involved.
During this roll, multi-link suspension’s sophisticated geometry actively manages wheel alignment to maximize cornering grip. On the outside wheels (loaded in compression), the upper control arms’ specific geometry induces slight additional negative camber. This camber increase keeps the tire perpendicular to the road despite chassis roll. Imagine the vehicle rolls 3 degrees outward—without camber compensation, the outside tire would tilt 3 degrees away from perpendicular, reducing its contact patch. Multi-link geometry adds negative camber as the suspension compresses, maintaining the tire’s perpendicular orientation despite body roll.
Lower control arms support increased vertical loads while maintaining their geometric relationships with upper arms. The result: outside wheels remain optimally positioned for maximum grip generation. This dynamic camber control represents one of multi-link suspension’s most significant advantages. Steering geometry principles explain how alignment angles affect handling, but multi-link suspensions actually maintain these optimal angles dynamically rather than accepting the compromise angles forced by simpler suspension designs.
Inside wheels (unloaded in extension) experience reduced vertical loading, allowing their suspensions to extend. Even with reduced loading, multi-link control arm geometry maintains appropriate camber angles. While inside tires contribute less to cornering force due to reduced loading, maintaining their optimal orientation extracts maximum available grip and contributes to overall vehicle stability.
The dedicated toe link provides critical stability during these dynamic conditions. In simpler suspensions, lateral forces and suspension movement can cause toe angle changes—a phenomenon called bump steer or roll steer. These unwanted toe changes create unpredictable steering response, requiring constant driver correction and creating nervous handling. Multi-link toe links maintain consistent toe angles regardless of suspension position or lateral loading, ensuring steering response remains linear and predictable. This consistency allows drivers to commit to corners confidently, knowing the vehicle will respond predictably to steering inputs.
Acceleration and Braking: Longitudinal Force Management
Multi-link suspension demonstrates sophisticated behavior during acceleration and braking through its anti-squat and anti-dive geometry capabilities. These characteristics represent another area where multi-link designs outperform simpler suspensions.
During full-throttle acceleration, weight transfers rearward due to the longitudinal force acting below the vehicle’s center of gravity. Rear suspension compresses under increased loading while front suspension extends with reduced loading. This pitching motion—called squat—disrupts tire contact patch geometry and wastes suspension travel.
Multi-link suspension’s longitudinal control arm angles create anti-squat forces that counteract this natural squatting tendency. The control arms’ specific orientation means acceleration forces create moments that tend to extend the rear suspension, opposing the squat from weight transfer. Engineers can tune anti-squat percentage through control arm positioning—100% anti-squat would completely prevent squatting, though most designs use 50-80% for optimal balance between controlled squat and ride quality over bumps.
Proper anti-squat geometry maintains rear tire contact during hard acceleration, maximizing traction. The rear wheels remain in optimal position relative to the road surface rather than compressing excessively. This geometric advantage contributes noticeably to acceleration performance, particularly in rear-wheel-drive performance vehicles where rear tire traction limits acceleration capability.
During emergency braking, weight transfers forward dramatically. Front suspension compresses while rear suspension extends, creating forward pitch called dive. Excessive dive disrupts braking effectiveness by altering tire contact patches and weight distribution. It also degrades driver confidence, as the vehicle’s nose-down attitude creates an unstable sensation.
Multi-link front suspensions (when present) incorporate anti-dive geometry through similar principles to anti-squat. The control arms’ specific angles create moments that resist dive, maintaining more consistent suspension position during braking. Even rear multi-link suspensions contribute to brake stability through their geometric control, maintaining optimal rear wheel position as weight shifts forward.
Lower control arms and optional secondary longitudinal links react to brake torque without disrupting suspension geometry. When brakes apply, the caliper generates force trying to rotate the wheel backward—brake torque. This torque tries to rotate the steering knuckle, which would disrupt suspension geometry if not properly controlled. Multi-link designs distribute these forces across multiple control arms and dedicated torque links, maintaining geometric stability even under heavy braking.
Integration with Modern Electronic Systems
Multi-link suspension’s precise wheel positioning enables more effective operation of modern electronic safety systems. Electronic Stability Control (ESC) depends on predictable tire behavior to function effectively. When ESC applies individual wheel braking to correct vehicle trajectory, it assumes each wheel will generate predictable force based on the brake pressure applied. Multi-link suspension’s consistent tire contact patches enable this predictability.
Consider an ESC intervention during aggressive cornering. The system detects excessive rotation (oversteer or understeer) through yaw rate sensors and applies individual wheel braking to generate corrective moments. These braking forces only work predictably when tire contact patches remain consistent. Multi-link suspension maintains these optimal contact patches throughout the ESC intervention, allowing the system to function as designed.
Adaptive damping systems work optimally with multi-link designs through their multiple mounting points and sophisticated geometry. Active or semi-active suspension systems using electronically-controlled dampers can provide different damping characteristics at each wheel based on driving conditions. Multi-link architecture accommodates these systems well, with the rigid geometric control from multiple control arms complementing the variable damping from active dampers.
Individual wheel control becomes possible with electronically-controlled dampers at each wheel. The system can soften the outside front damper during corner entry (allowing controlled body roll for better weight transfer and front grip) while stiffening the inside rear damper (preventing excessive extension that would further unload the inside rear tire). These sophisticated control strategies require the baseline geometric control that multi-link suspension provides.
All-wheel drive systems benefit significantly from multi-link rear suspension. AWD vehicles require rear differential and drive shaft packaging, which multi-link designs accommodate better than alternatives. The suspension must maintain wheel control while forces transfer through drive axles—a challenging requirement. Multi-link geometry handles these additional force vectors without compromising wheel positioning.
Sophisticated torque vectoring systems (which can vary power distribution between rear wheels) demand precise wheel control for effectiveness. When the system sends more power to one rear wheel for tighter cornering, that wheel must maintain optimal contact patch orientation to use the additional power effectively. Multi-link suspension’s superior wheel control enables torque vectoring systems to function as designed.
Understanding multi-link suspension operation reveals why these sophisticated systems justify their complexity and cost. The engineering challenges of maintaining optimal wheel positioning through all driving conditions prove substantial—multi-link suspension’s ability to meet these challenges explains its continued spread throughout the automotive industry.
Advantages, Disadvantages, and Real-World Applications
Multi-link suspension’s widespread adoption stems from genuine performance advantages, though the design’s complexity introduces notable disadvantages. Understanding both sides helps evaluate whether multi-link suspension justifies its cost premium in specific applications.
Key Advantages of Multi-Link Suspension
Independent Parameter Tuning: The primary engineering advantage—orthogonal design—allows engineers to adjust individual suspension parameters without affecting others. Need to increase camber change rate for better cornering grip? Adjust upper control arm geometry without disrupting toe characteristics. Want more anti-squat for better acceleration traction? Modify longitudinal control arm angles without compromising ride quality over bumps. Traditional suspensions force constant compromise between competing objectives; multi-link designs eliminate these compromises through geometric separation of functions.
This tuning freedom proves particularly valuable during vehicle development. Engineers can optimize one characteristic at a time rather than endlessly chasing interactions between coupled parameters. The development time savings alone justify multi-link suspension’s additional cost for premium vehicles where ultimate performance matters.
Superior Wheel Control: Multi-link systems maintain optimal tire contact patch through all driving conditions—straight-line cruising, aggressive cornering, hard acceleration, and emergency braking. The tire generates maximum force when perpendicular to the road surface with its entire contact patch evenly loaded. Multi-link suspension achieves this ideal orientation far more consistently than simpler designs.
During cornering, multi-link suspension’s dynamic camber control keeps outside tires perpendicular despite body roll. This capability translates directly into higher cornering speeds and more predictable handling. The difference becomes obvious when comparing similar vehicles with different suspension types—multi-link equipped vehicles corner harder with less drama.
The virtual elimination of roll steer (unwanted toe changes during suspension movement) provides predictable steering response that inspires driver confidence. When the driver turns the steering wheel, the vehicle responds linearly and predictably regardless of suspension position or road conditions. This predictability allows more aggressive driving without sudden handling surprises that might cause accidents.
Exceptional Ride Quality: Multiple mounting points and sophisticated bushing designs allow better vibration isolation than MacPherson struts. Impact harshness absorption improves through the multiple load paths and compliant bushings. Road noise remains lower due to the sophisticated isolation, particularly in subframe-mounted designs where two stages of isolation (control arm bushings plus subframe bushings) prevent vibration transmission.
The combination of superior wheel control and excellent isolation creates the refined ride quality characteristic of luxury vehicles. Multi-link suspension allows vehicles to feel both sporty and comfortable—previously contradictory objectives. This capability explains why premium manufacturers accept multi-link suspension’s cost and complexity.
Enhanced Handling Performance: Maximum cornering grip through dynamic camber control enables higher cornering speeds with better stability. Predictable steering response allows precise vehicle placement and confident driving at the limit. Improved traction under acceleration (through anti-squat geometry) delivers better performance without electronic intervention. Better braking stability (through anti-dive geometry and precise wheel positioning) provides shorter stopping distances with better control.
These advantages compound during aggressive driving. Multi-link suspension supports advanced chassis control systems more effectively, enabling sophisticated stability control and torque vectoring strategies. The baseline geometric control from multi-link design allows electronic systems to function as designed rather than fighting suspension-induced geometry changes.
Packaging Flexibility: Unlike MacPherson struts requiring significant vertical space, multi-link designs work within tighter constraints. Rear multi-link suspensions free up cargo area compared to strut designs—particularly important for crossovers and SUVs where cargo capacity represents a key selling point. Front multi-link systems (when space allows) enable lower hood lines and better engine accommodation, contributing to aerodynamic efficiency and styling flexibility.
For hybrid and electric vehicles, multi-link designs accommodate battery packaging more effectively than alternatives. The multiple control arms can route around battery packs, whereas MacPherson strut towers create immovable packaging obstacles. As electrification spreads, this packaging advantage becomes increasingly important.
Increased Articulation: For SUVs and off-road vehicles, multi-link suspension provides greater suspension travel and better wheel articulation over obstacles. The independent control arms allow extreme wheel movements while maintaining control—critical for off-road traction. When one wheel drops into a depression, it can extend significantly while the other wheels maintain ground contact. This capability improves traction on extremely uneven terrain, explaining why serious off-road vehicles frequently adopt multi-link designs despite the complexity.
Notable Disadvantages and Limitations
Increased Complexity: More components than MacPherson struts or double wishbones create design and manufacturing challenges. Multi-link suspensions require sophisticated 3D computer-aided design for optimal geometry—trial-and-error development proves impractical due to the numerous interacting parameters. Tuning difficulty without proper analysis tools limits multi-link suspension to manufacturers with substantial engineering resources. More potential failure points increase warranty costs and long-term reliability concerns.
This complexity explains why multi-link suspension initially remained limited to premium manufacturers. Only companies with sophisticated engineering capabilities could design these systems effectively. As CAD tools improved and knowledge spread, complexity concerns diminished, enabling multi-link suspension’s migration to mainstream applications.
Higher Manufacturing Costs: Multiple control arms require complex manufacturing through precision casting, forging, or fabrication. Each arm needs accurate mounting points and dimensions for proper geometry. Sophisticated bushing designs (particularly hydraulic bushings) cost more than simple rubber mounts. Subframe assemblies add substantial expense through their precision casting requirements and mounting hardware. Quality control complexity increases with more components requiring tolerance verification.
These cost pressures traditionally limited multi-link suspension to luxury vehicles where customers accepted premium pricing. However, manufacturing advances and economies of scale continue reducing these cost penalties. Today’s mainstream vehicles increasingly adopt multi-link designs as cost differences narrow.
Maintenance Challenges: More components mean more items requiring inspection. Difficult access in tightly-packaged designs complicates service work. Individual control arm replacement often becomes necessary when integrated ball joints wear, rather than replacing just the ball joint. Diagnosis proves difficult—visual inspection alone can’t identify worn bushings or slightly bent arms. Professional alignment equipment becomes mandatory for proper service, eliminating DIY repair for most owners.
These maintenance challenges particularly affect vehicles outside warranty coverage. Owners accustomed to simpler suspension maintenance discover multi-link systems require professional service even for inspection. The specialized knowledge and equipment requirements mean finding qualified service becomes critical.
Increased Repair Costs: More expensive replacement parts multiply when multiple arms need replacement. Higher labor costs reflect the complexity and access difficulties. Wheel alignment complexity (five links requiring individual adjustment and iterative testing) increases alignment service costs. Specialized tools often become necessary for bushing replacement and control arm service. Tighter service access dramatically increases labor time compared to simpler suspensions.
A complete multi-link suspension refresh (replacing all bushings and worn components) can cost $2,000-5,000 or more, depending on the vehicle. Simpler suspensions typically cost half this amount for equivalent work. These cost differences matter significantly for older vehicles where repair costs approach vehicle value.
Reduced Interior/Cargo Space: Multiple links require more packaging space than torsion beam alternatives (for rear suspensions). Mercedes A-Class and C-Class, BMW 1-Series and 3-Series, and similar vehicles sacrifice rear legroom compared to competitors using simpler rear suspensions. Subframes add weight despite aluminum construction, affecting fuel economy and performance. Underfloor storage options may be limited by suspension component placement.
These space compromises prove particularly significant in compact vehicles where interior volume represents a key competitive factor. Some manufacturers accept these compromises for handling advantages; others prioritize space and use simpler suspensions. The choice reflects different corporate priorities and target customer preferences.
Higher Ownership Costs: Wheel alignments cost more due to adjustment complexity and time requirements. More bushings wear over time, requiring periodic replacement. Ball joint replacements multiply when four or five links use ball joints rather than two. Access difficulties increase labor costs for any suspension service. Premium parts pricing (particularly for luxury vehicles) multiplies these cost differences.
Long-term ownership economics favor simpler suspensions for budget-conscious owners. However, enthusiast drivers often accept higher maintenance costs for the performance and refinement advantages multi-link suspension provides. The value proposition depends entirely on individual priorities and usage patterns.
Comparison with Other Suspension Types
Multi-Link vs. MacPherson Strut: Multi-link suspension offers better camber control throughout suspension travel, improved ride quality through more sophisticated isolation, and rear packaging flexibility (no strut tower intrusion). However, MacPherson struts cost significantly less, prove simpler to manufacture and service, and remain lighter weight. For front suspensions, MacPherson struts don’t intrude into engine bays like multi-link systems might. The winner depends entirely on priorities—multi-link for performance and luxury applications, MacPherson for cost-effectiveness and front packaging simplicity. See our MacPherson strut guide for detailed comparison.
Multi-Link vs. Double Wishbone: Multi-link provides independent parameter tuning without coupling between adjustments, making development faster and optimization more thorough. However, double wishbone suspension remains simpler with fewer components, often proves lighter weight, and performs adequately for most applications. Race cars frequently prefer double wishbones due to their simplicity and adequate performance in controlled conditions. Street vehicles increasingly favor multi-link designs for their superior adaptability to varying conditions. Compare features in our double wishbone suspension guide.
Multi-Link vs. Torsion Beam (Rear): Multi-link offers independent wheel travel, dramatically better ride quality, superior handling, and accommodation for AWD systems. Torsion beam suspension costs far less, weighs less, requires less packaging space, and provides adequate performance for economy vehicles. Multi-link wins for premium applications; torsion beam makes sense for cost-sensitive vehicles where handling performance takes lower priority than affordability.
Vehicle Applications and Examples
Luxury Sedans Leading the Way: Mercedes-Benz pioneered multi-link suspension with the 190 and continues using sophisticated five-link designs across E-Class, S-Class, and other models. BMW employs five-link rear suspension throughout its lineup, with four-link front suspension on the flagship 7-Series. Audi uses five-link front and rear suspension on A6 and A8 models, demonstrating commitment to ultimate handling. Lexus LS features multi-link suspension at all four wheels, contributing to its renowned refinement. Genesis G90 adopts multi-link rear suspension to compete with established luxury brands. These applications demonstrate how multi-link suspension has become expected in luxury segments.
Performance Sports Cars: Porsche Macan uses multi-link rear suspension for precise handling despite SUV packaging. Nissan GT-R combines multi-link rear with double wishbone front for world-class handling capability. Chevrolet Corvette used five-link rear suspension through C5-C7 generations, only switching to double wishbones for the mid-engine C8. Acura NSX employs multi-link rear suspension for its supercar dynamics. Lotus Evora demonstrates multi-link rear suspension in pure sports car applications. Performance vehicles adopt multi-link designs when ultimate handling justifies the complexity and cost.
Premium SUVs Requiring Handling and Space: Range Rover uses multi-link suspension at all four wheels, combining it with air suspension for ultimate capability. Audi Q7 and Q8 employ five-link rear suspension for car-like handling despite substantial mass. Volvo XC90 features multi-link rear suspension as standard equipment. Toyota RAV4 AWD models use multi-link rear suspension (FWD versions retain cost-effective torsion beam). Ford Explorer adopts multi-link rear suspension for improved handling and cargo space compared to strut designs. Premium SUV applications demonstrate how multi-link suspension enables car-like dynamics in larger vehicles.
Mainstream Applications (Growing Rapidly): Honda Accord returned to multi-link rear suspension after briefly using torsion beam, recognizing customer preference for refined handling. Mazda CX-5 offers multi-link rear suspension on higher trims, positioning it above competitors. Hyundai Sonata uses multi-link rear suspension even in this midsize mainstream sedan. VW Passat employs multi-link suspension front and rear, bringing premium technology to volume applications. These mainstream adoptions demonstrate how multi-link suspension continues migrating from luxury-only applications to broader market segments as costs decrease.
The variety of applications—from luxury sedans to mainstream SUVs—demonstrates multi-link suspension’s versatility. While cost once limited these systems to premium vehicles, manufacturing advances and customer expectations continue driving adoption across wider vehicle ranges. For manufacturer-specific information on multi-link suspension applications, consult resources like our Volvo brand manuals section.
Common Problems, Maintenance, and Professional Service Requirements
Multi-link suspension’s complexity creates specific failure modes and maintenance requirements. Understanding these issues helps recognize problems early and make informed service decisions.
Typical Multi-Link Suspension Failure Modes
Bushing Wear and Deterioration: Bushing failure represents the most common multi-link suspension problem due to the system’s numerous bushings and their constant flexing under load. Failed bushings create multiple symptoms that often seem unrelated, complicating diagnosis for inexperienced technicians.
Symptoms of worn bushings include clunking or knocking sounds over bumps (the metal control arm hitting its mounting point without bushing cushioning), increased road noise and vibration (reduced isolation allows more transmission to the chassis), vague or wandering steering feel (excessive compliance allows wheel position changes), uneven tire wear especially inner or outer edge wear (alignment angles change as bushings allow movement), vehicle pulling to one side (asymmetric bushing wear creates unequal geometry), and excessive body movement during cornering (worn bushings allow more suspension deflection).
Lower control arm rear bushings fail most frequently due to their high stress levels. These bushings handle both vertical forces from bumps and longitudinal forces from acceleration and braking. Hydraulic bushings on rear control arms also fail relatively frequently, losing their fluid and reverting to simple rubber bushing behavior. Toe link bushings prove critical—their failure allows toe angle changes that severely affect handling and tire wear. Subframe mount bushings rarely fail but create dramatic symptoms when they do, allowing the entire suspension to shift position relative to the chassis.
Bushing failure causes include age and heat cycling causing rubber degradation, road salt and chemical exposure attacking rubber compounds, aggressive driving increasing stress levels, and poor quality aftermarket replacements that fail prematurely. Bushings naturally degrade over time even without abuse—expect bushing replacement intervals of 60,000-100,000 miles depending on driving conditions and bushing quality.
Ball Joint Failure: Ball joint failure represents a critical safety concern requiring immediate professional attention. Unlike bushing wear which gradually worsens, ball joints can fail catastrophically with little warning once they reach a certain wear level. A completely failed ball joint allows the control arm to separate from the steering knuckle—a potentially catastrophic suspension failure.
Symptoms include clunking noise when turning or driving over bumps (worn bearing surfaces rattling inside the joint), excessive play in steering (worn ball joints allow unintended wheel movement), wandering or instability especially at highway speeds (loose ball joints allow wheel position changes), uneven tire wear particularly if accompanied by impossible-to-correct alignment, and visible boot damage or grease leakage (torn boots indicate imminent failure).
Ball joint inspection requires specific procedures because wear isn’t visually obvious. Specifications typically require zero play—any detectable movement indicates replacement necessity. Boot condition proves critical for inspection—torn boots allow contamination that rapidly destroys bearing surfaces. Proper inspection must check under loaded and unloaded conditions, as some play only appears under specific load conditions. Steering angle variation testing reveals wear that might not appear during static inspection.
Professional diagnosis strongly recommended: ball joint wear assessment proves difficult for DIYers even with proper equipment. Technicians use specific leverage techniques and dial indicators to detect play that hands might not feel. Given the safety implications, professional inspection justifies its cost. Learn more about ball joint function in our ball joints guide.
Control Arm Damage: Physical damage to control arms occurs from curb strikes, deep pothole impacts, severe off-road use beyond design limits, and corrosion weakening in northern climates with road salt exposure. Bent or damaged control arms create dangerous geometry changes that make proper alignment impossible.
Symptoms include immediate handling deterioration after an impact, severe alignment issues that can’t be corrected, visible arm deformation when inspecting underneath the vehicle, abnormal tire wear patterns appearing quickly after damage, and alignment specifications showing impossible-to-achieve values. Even slight control arm bending (invisible to casual inspection) can create significant geometry problems.
Bent control arms represent a serious safety concern requiring immediate professional inspection and replacement. Never attempt straightening bent control arms—the heating required weakens the metal and proper geometric restoration proves impossible without specialized equipment. Modern control arms use aluminum or cast iron construction that doesn’t respond well to straightening attempts. Replacement with OEM or quality aftermarket arms represents the only safe repair.
Spring and Damper Wear: Springs and dampers gradually wear, creating performance degradation that owners might not notice due to its gradual progression. Spring sag occurs as springs permanently compress from constant loading, causing vehicles to sit lower than specification, creating uneven ride height side-to-side (often rear lower than front), increasing suspension bottoming frequency, and altering suspension geometry away from design specifications. Sagged springs should be replaced in pairs (both fronts or both rears) to maintain equal ride height.
Shock absorber failure shows through excessive bouncing after bumps (more than one bounce indicates insufficient damping), wallowing in turns (body motion not adequately controlled), fluid leakage visible on damper body (oil film or dripping indicates seal failure), uneven tire wear from poor wheel control, and reduced braking performance (suspension motion during braking affects weight distribution). Failed dampers allow springs to oscillate freely, degrading ride quality and handling while accelerating other component wear. See our shock absorbers guide for more information.
Maintenance and Inspection Requirements
Regular Visual Inspections (Every Oil Change): Performing basic visual inspections during every oil change catches problems early. Check all boots for tears or damage—torn boots require immediate replacement before joint contamination occurs. Look for grease leakage from ball joints—any visible grease indicates boot failure and imminent joint failure. Inspect bushings for visible cracking or separation—rubber splitting away from metal indicates imminent failure. Check for control arm damage or corrosion—look for bends, cracks, or heavy rust. Verify no fluid leakage from dampers—oil film or dripping indicates seal failure requiring replacement.
These basic checks take minutes but prevent expensive failures. Most suspension problems show early warning signs that visual inspection detects. Don’t ignore minor symptoms—multi-link suspension component wear accelerates once it begins, as failed components overload adjacent parts.
Professional Inspection Schedule: Annual comprehensive suspension inspection by qualified technicians remains essential for multi-link suspension longevity. Professional inspections should check for play in all ball joints using proper procedures (zero tolerance specifications), test bushing condition under load using lever techniques, measure ride height at all corners comparing to specifications, inspect subframe mount condition (often overlooked but critical), and test shock absorber performance through bounce testing and inspection.
Professional inspection proves particularly important because many multi-link suspension problems show no obvious symptoms until they become severe. Experienced technicians recognize subtle signs that indicate developing issues. Annual inspection costs far less than emergency repairs after component failure, making it worthwhile preventive maintenance.
Wheel Alignment Critical Importance: Multi-link suspensions require wheel alignment after any suspension component replacement (even simple parts like bushings affect alignment), hitting significant potholes or curbs (impact can bend components or shift positions), at minimum annually for verification (alignment gradually drifts even without obvious problems), upon detecting uneven tire wear, and when experiencing steering pull or handling changes.
Alignment complexity varies dramatically—five-link systems may require individual adjustment of each link, making alignment labor-intensive. Iterative testing often proves necessary as adjusting one link affects others. Camber, caster, and toe interactions require expertise to optimize. Vehicle-specific procedures prove essential—generic alignment procedures don’t work well for complex multi-link designs. Professional alignment equipment provides the accuracy necessary for proper multi-link suspension setup.
Alignment costs for multi-link suspensions typically run $150-300, compared to $80-120 for simpler suspensions. The additional cost reflects genuine labor intensity rather than inflated pricing. Consider alignment part of regular maintenance rather than optional service—proper alignment prevents premature tire wear and suspension component damage while maintaining safety and handling performance. For more context, see our steering geometry guide.
When to Consult a Professional
SAFETY CRITICAL – Immediate Professional Inspection Required: Certain symptoms demand immediate professional attention due to safety implications. Any clunking or knocking sounds from the suspension indicate loose or worn components that could fail catastrophically. Sudden changes in steering feel or handling suggest significant component damage requiring immediate diagnosis. Vehicle pulling strongly to one side indicates severe alignment problems or component failure. Visible damage to suspension components from inspection requires professional assessment before continued driving. Rapid or unusual tire wear patterns indicate alignment or component problems requiring immediate correction. After any significant impact—curb strike, deep pothole, or accident—have suspension professionally inspected even if no obvious damage appears.
These symptoms indicate problems that could lead to loss of vehicle control. Don’t risk continued driving when safety-critical suspension components show failure symptoms. The cost of inspection and repair pales compared to accident costs or personal injury risk.
Professional Service Strongly Recommended: Multi-link suspension repair requires specialized capabilities beyond most DIY facilities: hydraulic presses for bushing replacement (bushings press into control arms with tons of force), specialized tools for ball joint removal (separators and pullers prevent component damage), professional alignment equipment (home equipment lacks necessary accuracy), technical service information (procedures and specifications vary by vehicle), understanding of suspension geometry (improper installation creates dangerous conditions), and proper torque specifications and procedures (suspension bolts require specific torque in specific sequences).
While some DIY mechanics successfully service multi-link suspensions, the specialized equipment and knowledge requirements put most repairs beyond amateur capabilities. Component damage during improper installation often exceeds professional service costs. Insurance and liability concerns also favor professional service—improperly repaired suspension creates significant accident liability.
DIY Inspection Capabilities: Beginners can safely perform basic visual inspections for obvious damage, boot condition checks, tire wear monitoring, and ride height comparison between sides. These inspections catch obvious problems requiring professional service. However, never rely solely on DIY inspection—professional annual inspection remains essential for component longevity and safety.
Advanced DIY Warning: Even experienced DIYers face significant challenges with multi-link suspension: access difficulties in tight packaging complicate work, specialized tool requirements create cost barriers, alignment procedure complexity exceeds typical home capabilities, safety implications of improper repair create significant liability, and risk of additional component damage during service proves substantial.
Consider professional service even if you possess necessary skills and equipment. Multi-link suspension complexity makes mistakes easy and their consequences severe. The confidence that professional service with warranty provides often justifies the cost even for capable DIYers.
Cost Considerations and Planning: Understanding typical repair costs helps budget for multi-link suspension maintenance. Individual control arm replacement typically costs $300-800 per arm including parts and labor—multiply by potentially five arms per wheel for complete replacement. Complete bushing refresh (replacing all bushings without replacing arms) runs $800-2000 depending on bushing count and access difficulty. Wheel alignment for five-link systems costs $150-300 due to adjustment complexity. Ball joint replacement runs $200-500 per joint depending on whether integrated into control arms. Complete suspension overhaul (all components) can reach $2000-5000+ per axle.
These costs reflect genuine complexity rather than inflated pricing. Budget for suspension maintenance as part of vehicle ownership costs, particularly for vehicles exceeding 60,000 miles. Setting aside funds for anticipated suspension work prevents financial surprises when wear requires attention.
Preventive Maintenance Best Practices
For Vehicle Owners: Several practices extend multi-link suspension component life significantly. Avoid curbs and deep potholes whenever safely possible—multi-link components prove more susceptible to impact damage than simpler suspensions. Address issues promptly when symptoms appear—one failed bushing accelerates wear on others by changing load distribution. Schedule annual professional inspection even without obvious symptoms—catch problems before catastrophic failure. Drive gently on rough roads when unavoidable—reduce stress on multiple components simultaneously. Use quality replacement parts (OEM or premium aftermarket)—cheap components fail prematurely. Maintain proper wheel alignment—prevents premature component wear and tire replacement costs.
These practices seem obvious but require consistent application. The temptation to defer suspension maintenance until symptoms become severe creates false economy—early attention costs far less than emergency repairs.
Warning Signs Never to Ignore: Any new suspension noise requires immediate investigation—clunks, knocks, or squeaks indicate developing problems. Changes in steering response suggest component wear or damage affecting wheel control. Uneven tire wear indicates alignment or suspension geometry problems requiring correction. Vehicle handling differently than normal suggests developing suspension issues. Pulling or wandering during driving indicates asymmetric suspension condition requiring diagnosis. Excessive body motion during normal driving suggests damper failure or bushing wear.
These warning signs allow early intervention before problems become severe. Multi-link suspension component wear accelerates once it begins—early attention prevents cascading failures that multiply repair costs.
For specific symptoms and diagnostic procedures, see our guides on control arm bushing problems, control arm issues, and ball joint problems.
Conclusion
Multi-link suspension represents the pinnacle of independent suspension design, offering unmatched tunability and performance for vehicles where both ride quality and handling excellence matter. The system’s ability to simultaneously optimize multiple performance characteristics—previously thought incompatible—explains its continued spread from luxury vehicles into mainstream applications despite higher complexity and cost.
The engineering sophistication becomes apparent when examining how multi-link suspensions work: three to five control arms per wheel provide independent control of all wheel movements, allowing engineers to tune parameters without the compromises inherent in simpler designs. Mercedes-Benz pioneered production multi-link suspension in 1982, and the fundamental advantages identified then remain valid today—orthogonal design eliminating parameter coupling, superior wheel control maintaining optimal tire contact, and exceptional ride quality through sophisticated isolation.
Multi-link suspension proves superior to MacPherson struts and double wishbones for street applications where varying conditions demand adaptability. The system maintains wheel alignment through body roll, suspension travel, acceleration, and braking more effectively than alternatives. This consistent wheel control translates directly into higher cornering speeds, better traction, shorter braking distances, and improved ride quality—measurable benefits justifying the cost premium for enthusiast drivers and luxury car buyers.
However, multi-link suspension’s complexity creates real disadvantages requiring consideration. Higher manufacturing and repair costs, increased maintenance requirements, and specialized service needs affect long-term ownership economics. Professional alignment equipment and suspension knowledge become essential rather than optional. Component replacement costs multiply due to the numerous arms and bushings. These factors make multi-link suspension most appropriate for applications where performance and refinement justify the additional complexity.
Key Takeaways for DIY Enthusiasts: Understanding multi-link suspension helps diagnose handling issues and make informed maintenance decisions. However, recognize that most repairs exceed DIY capabilities due to specialized tool requirements and alignment complexity. Focus on preventive maintenance—regular inspections, prompt attention to symptoms, and professional service when needed. Quality replacement parts prove essential for longevity and safety. Don’t defer suspension maintenance until problems become severe—early intervention costs far less than emergency repairs.
Key Takeaways for Professional Mechanics: Multi-link suspension demands systematic diagnostic approaches due to symptom similarity across different failure modes. Proper inspection procedures prove essential—visual inspection alone misses many developing problems. Alignment procedures require patience and methodical approach due to adjustment interactions. Investment in proper tools and training pays dividends through efficient service and customer satisfaction. Educate customers about maintenance needs before problems develop rather than explaining expensive repairs after failure.
Professional Consultation Recommendation: Multi-link suspension diagnosis and repair requires specialized knowledge, tools, and alignment equipment beyond most amateur capabilities. While visual inspections remain DIY-appropriate, any repair work should be performed by qualified technicians familiar with these complex systems. The safety implications of incorrect suspension repairs—particularly alignment errors—justify professional service even when costs seem high. Improper repairs create liability exposure and safety risks far exceeding professional service costs.
Suspension problems don’t improve with time—they worsen as failed components overload adjacent parts. Address symptoms promptly through professional diagnosis to minimize ultimate repair costs and maintain safety. Consider suspension maintenance part of vehicle ownership responsibility rather than optional expense.
Further Resources: For vehicle-specific multi-link suspension information, consult manufacturer repair manuals through our brand-specific sections. Professional alignment specifications and torque procedures prove essential for proper service—generic procedures don’t provide adequate guidance for complex multi-link designs. Understanding suspension springs, bump stops, and related components provides additional context for complete suspension system understanding.
Multi-link suspension technology continues evolving as manufacturers refine designs and reduce costs. The fundamental principles established by Mercedes-Benz in 1982 remain valid, but implementation details improve continuously. Expect multi-link suspension to remain the technology of choice for applications demanding both comfort and performance, with continued migration into mainstream vehicle segments as manufacturing advances make the technology more accessible. The engineering elegance of independently controlling all aspects of wheel motion ensures multi-link suspension will remain relevant as long as vehicles need to balance competing performance objectives.