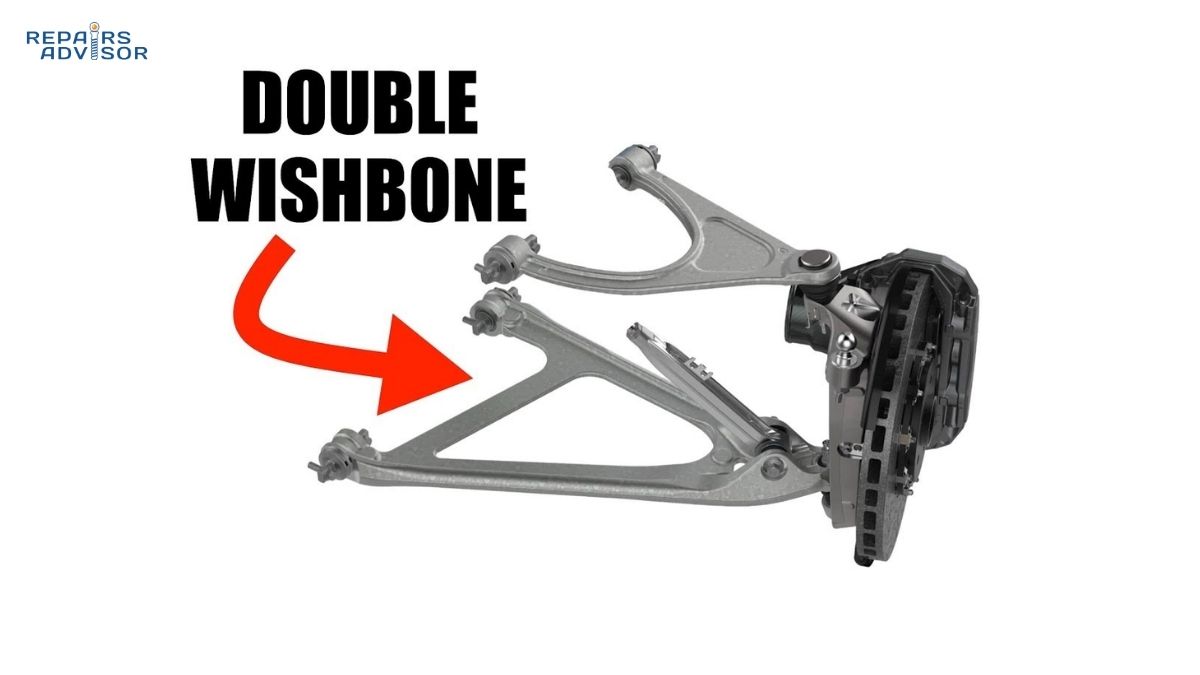
Double wishbone suspension represents the gold standard in automotive suspension design, chosen by Formula 1 teams, high-performance sports cars, and engineering enthusiasts worldwide. This sophisticated independent suspension system uses two wishbone-shaped control arms to achieve unmatched precision in wheel control, making it the preferred choice when handling performance truly matters.
Whether you’re a DIY enthusiast trying to understand your vehicle’s suspension, a professional mechanic seeking deeper technical knowledge, or simply curious about automotive engineering, this comprehensive guide will explain exactly how double wishbone suspension works, why it delivers superior performance, and when its added complexity is worth the investment.
Unlike simpler suspension designs, double wishbone systems offer engineers exceptional control over critical parameters like camber angle, roll center height, and anti-dive characteristics. This design flexibility explains why manufacturers like Mercedes-Benz, Honda, and Lotus have built their reputations on vehicles equipped with this suspension architecture. The system’s ability to maintain optimal tire contact during aggressive cornering isn’t just marketing hype—it’s fundamental physics that translates directly into measurable grip advantages on both street and track.
In this article, we’ll explore the core components that make double wishbone suspension work, examine how the system responds during cornering and over bumps, compare it with MacPherson strut and multi-link alternatives, investigate its dominance in racing applications, and provide practical guidance on maintenance and whether this suspension type is right for your driving needs.
Understanding the Core Components
Double wishbone suspension derives its name from the two wishbone-shaped control arms that connect each wheel to the vehicle’s chassis. Understanding these components and how they interact is essential to appreciating the system’s sophisticated engineering.
The Upper Control Arm: Precision Geometry Control
The upper control arm, also called the upper wishbone or upper A-arm, connects the top of the steering knuckle to the vehicle chassis through two pivot points. This triangular structure typically measures shorter than the lower control arm—a critical design feature that enables the system’s superior camber control during suspension compression.
Modern upper control arms are constructed from stamped steel, forged aluminum, or even carbon fiber in racing applications. The arm features rubber or polyurethane bushings at the chassis mounting points, which allow controlled rotation while isolating road vibration and noise from entering the passenger cabin. At the wheel end, a ball joint provides the connection to the steering knuckle, allowing the wheel assembly to pivot for steering while maintaining precise vertical positioning.
The shorter length of the upper control arm compared to the lower creates what engineers call a Short-Long Arm (SLA) suspension. This unequal length configuration produces increasing negative camber as the suspension compresses during cornering, keeping the tire more perpendicular to the road surface when lateral forces would otherwise tilt the vehicle body. Professional racing teams often use adjustable upper control arms with threaded inserts or shims, allowing precise camber angle tuning to match specific track conditions and tire characteristics.
The Lower Control Arm: Primary Load Bearer
The lower control arm serves as the suspension system’s primary structural member, bearing the majority of forces generated during braking, acceleration, and cornering. Substantially larger and more robust than its upper counterpart, the lower arm connects to the chassis through two pivot points and to the steering knuckle via a lower ball joint.
This component faces tremendous stress during operation. During hard braking, the lower control arm resists the forward-pushing forces trying to rotate the wheel assembly. During acceleration, it manages rearward forces. In cornering, lateral forces attempt to deflect the wheel outward, while the control arm’s geometry resists this movement to maintain precise wheel positioning. These multiple load paths require the lower control arm to be engineered with substantial strength while minimizing weight—a balance that separates economy cars from performance vehicles.
The lower control arm typically provides the mounting location for the coil spring and shock absorber assembly. In most passenger vehicle applications, the spring seats on a perch integrated into the lower arm structure, while the shock absorber mounts through a bushing to control vertical wheel motion. Racing applications sometimes relocate these components inboard, using pushrods or pullrods connected to the lower arm, which transfers forces to springs and dampers mounted inside the vehicle structure for aerodynamic and weight distribution benefits.
Ball Joints: Critical Pivot Points
Ball joints serve as the crucial connection points between the control arms and the steering knuckle, functioning like human hip joints to allow rotational movement in multiple directions while maintaining structural integrity under enormous loads. A typical automotive ball joint consists of a hardened steel ball stud housed within a bearing socket, with the entire assembly protected by a rubber or polyurethane dust boot.
The upper ball joint experiences primarily tension forces as the suspension compresses, pulling the ball stud within its socket. The lower ball joint, by contrast, faces compression forces that attempt to push the ball deeper into the housing. Both joints must accommodate steering rotation while simultaneously handling lateral cornering forces, longitudinal braking and acceleration loads, and vertical bump forces—often all simultaneously during aggressive driving.
Ball joint failure represents one of the most dangerous suspension failures possible. When a ball joint separates, the control arm no longer maintains wheel position, allowing the wheel to fold under the vehicle with catastrophic results. This safety-critical nature requires regular inspection and immediate replacement at the first sign of excessive play or wear. Symptoms include clunking noises over bumps, steering wander, and uneven tire wear patterns. Professional mechanics test ball joints by grasping the tire at top and bottom while the vehicle is safely supported, feeling for movement that indicates worn ball sockets.
Control Arm Bushings: Compliance Meets Control
Control arm bushings provide the interface between the steel control arms and the vehicle chassis, serving the dual purpose of allowing controlled rotation while isolating vibration and noise. These rubber or polyurethane components appear deceptively simple but play a crucial role in suspension performance and refinement.
Original equipment rubber bushings feature sophisticated void patterns—strategically placed gaps within the rubber material that create different compliance characteristics in different directions. A bushing might be relatively soft in the vertical direction to absorb road impacts while being much firmer laterally to maintain wheel alignment under cornering loads. This directional compliance tuning allows suspension engineers to optimize both ride quality and handling precision.
Performance enthusiasts often upgrade to polyurethane bushings, which offer reduced deflection and longer service life at the cost of some comfort. Polyurethane’s greater stiffness transmits more road feel to the driver and maintains tighter alignment control during aggressive driving. Racing applications sometimes eliminate rubber bushings entirely, using spherical bearings (also called Heim joints or rod ends) that allow rotation without any compliance. While these provide ultimate precision, they transmit every road irregularity directly to the chassis, making them unsuitable for street vehicles.
Springs, Dampers, and Anti-Roll Bars
The suspension springs support the vehicle’s weight and determine ride height, while shock absorbers control the rate at which the springs compress and extend. In most double wishbone applications, coil springs surround the shock absorbers in a coilover configuration, with both components mounted to the lower control arm.
Spring rates—measured in pounds per inch or Newtons per millimeter—determine how much force is required to compress the spring a given distance. Softer springs provide better ride comfort by easily absorbing small road irregularities, while stiffer springs reduce body roll during cornering and better support heavier vehicles. Progressive rate springs, which become stiffer as they compress, offer a compromise by providing comfortable ride quality over small bumps while resisting bottoming over larger impacts.
Shock absorbers contain hydraulic fluid forced through precisely calibrated orifices, converting suspension motion into heat. Adjustable racing shocks allow tuning of compression and rebound damping separately, with multiple clicks of adjustment enabling suspension setup optimization for specific track conditions. Modern adaptive damping systems use electronically controlled valves to vary damping force in real-time based on road conditions and driving inputs, providing both comfort and performance.
Anti-roll bars, also called sway bars or stabilizer bars, connect the left and right suspension assemblies, resisting body roll during cornering. When the vehicle corners, the outside suspension compresses while the inside extends. The anti-roll bar twists as it tries to keep both sides at equal height, effectively transferring some of the outside wheel’s load to the inside wheel. This load transfer reduces body roll angle while affecting handling balance—stiffer front anti-roll bars increase understeer, while stiffer rear bars induce oversteer.
How Double Wishbone Suspension Operates
Understanding the static components provides foundation, but the true elegance of double wishbone suspension emerges during dynamic operation as the system responds to cornering forces, road irregularities, and driver inputs.
During Aggressive Cornering
When a vehicle enters a corner, centrifugal force pushes the vehicle body outward, causing it to roll toward the outside of the turn. This body roll compresses the outside suspension while extending the inside suspension. In a conventional suspension with equal-length upper and lower control arms, this compression would cause the wheel to tilt outward with the body, creating positive camber that reduces the tire’s contact patch with the road surface.
The double wishbone system’s Short-Long Arm (SLA) design elegantly solves this problem. Because the upper control arm is shorter than the lower arm, the two arms rotate through different arcs as the suspension compresses. The shorter upper arm’s arc causes the top of the wheel to move inward relative to the bottom, tilting the wheel into negative camber—meaning the top of the tire leans toward the vehicle centerline.
This negative camber gain proves critical for maintaining optimal tire contact during cornering. While the vehicle body rolls several degrees outward, the wheel simultaneously tilts several degrees inward, largely canceling the body roll’s effect on the tire’s contact patch. A well-designed double wishbone suspension might gain 2-3 degrees of negative camber through full compression travel, maintaining near-optimal tire contact angle even when the vehicle body shows significant roll.
Compare this to a MacPherson strut suspension, which typically gains negative camber only in the initial portion of compression travel before reversing to positive camber gain as compression continues. This reversal reduces grip precisely when the driver needs it most—during maximum cornering force. The double wishbone’s consistent negative camber gain throughout the entire compression range translates to 10-15% more lateral grip in hard cornering, a difference easily felt by drivers and measured in lap times.
The system’s roll center location—the theoretical point around which the vehicle body rolls during cornering—also remains more consistent through suspension travel compared to MacPherson struts. Lower, more stable roll center positions reduce the moment arm between the roll center and the vehicle’s center of gravity, minimizing body roll without excessively stiff springs. This characteristic allows double wishbone suspensions to achieve both comfort over bumps and controlled body motions during aggressive driving maneuvers.
Absorbing Bumps and Road Irregularities
When a wheel encounters an upward road irregularity—a pothole edge, expansion joint, or general road roughness—the double wishbone suspension’s four-bar linkage mechanism guides the wheel through a carefully controlled path designed to maintain optimal wheel alignment throughout the suspension travel.
As the tire strikes the bump, the impact force travels through the wheel bearing into the steering knuckle. This force simultaneously pushes upward on both the upper and lower ball joints, causing both control arms to rotate on their chassis mounting bushings. The four-bar linkage formed by the upper arm, lower arm, steering knuckle, and chassis section creates an instantaneous center of rotation—a virtual pivot point that determines the wheel’s path as it moves upward.
Engineers carefully position the control arm pivot points to optimize this wheel path. The goal is maintaining the tire as perpendicular to the road surface as possible while minimizing scrub—the tendency of the tire to drag sideways across the pavement as the suspension compresses. By angling the control arm pivot axes and carefully selecting arm lengths, designers can create a near-vertical wheel path that maximizes tire contact and minimizes unwanted friction.
The spring absorbs the bump’s energy by compressing, while the shock absorber controls the compression rate to prevent the suspension from violently bottoming or bouncing back excessively. The shock’s valving determines how quickly the suspension can compress (compression damping) and extend (rebound damping), with stiffer damping preventing excessive body motion but potentially reducing ride comfort over sharp impacts.
Critically, the independent suspension design means one wheel hitting a bump doesn’t directly affect the opposite wheel. The suspension system isolates each corner, allowing three wheels to maintain optimal contact even when the fourth encounters a significant irregularity. This characteristic proves particularly valuable on uneven surfaces where maintaining traction at all four corners simultaneously improves both ride quality and handling precision.
Managing Braking and Acceleration Forces
During hard braking, weight transfers forward as the vehicle decelerates, compressing the front suspension while extending the rear. Without geometric compensation, this forward pitch motion would dive the front end downward, potentially causing instability and reducing driver confidence. Double wishbone suspension addresses this through anti-dive geometry—carefully angled control arm pivot points that create rearward-pushing forces on the chassis as the brakes apply.
The anti-dive effect works through the control arms’ reaction to braking torque. As the brakes apply force to slow the wheels, this torque attempts to rotate the control arms around their pivot points. By angling these pivot axes, engineers create a component of force that pushes rearward and upward on the chassis, partially counteracting the forward weight transfer. Typical anti-dive values range from 20-40%, meaning the geometric effect reduces front end dive by that percentage compared to a suspension with no anti-dive geometry.
Similar principles apply during acceleration, where rear suspension anti-squat geometry resists the rearward weight transfer that would otherwise compress the rear suspension. Rear-wheel-drive vehicles benefit most from anti-squat geometry, as the driving wheels’ torque creates substantial forces trying to squat the rear suspension. The geometric optimization maintains more consistent suspension positioning through acceleration, improving traction and reducing pitch motion that can unsettle the vehicle.
The lower control arm typically bears the majority of braking and acceleration forces, as it mounts lower on the steering knuckle closer to the wheel center. This positioning creates a more direct load path from the tire contact patch through the ball joint into the control arm structure. The upper control arm contributes to load management but generally experiences lower magnitude forces due to its higher mounting position and resulting greater moment arm.
Engineering Advantages and Design Flexibility
Double wishbone suspension’s reputation as a premium design stems from the exceptional control it provides engineers over suspension kinematics—the geometric relationships that determine wheel movement throughout the suspension’s range of motion.
Precise Kinematic Control
Unlike MacPherson strut suspensions where the shock absorber’s angle constrains many design parameters, double wishbone systems allow engineers to independently optimize numerous suspension characteristics. By adjusting the length, angle, and mounting position of each control arm, designers can fine-tune camber curves, roll center location, anti-dive and anti-squat characteristics, scrub radius, kingpin inclination, and caster angle—all while packaging the suspension within available space constraints.
This design freedom proves particularly valuable because suspension requirements vary dramatically between vehicle types. A luxury sedan prioritizes ride comfort, requiring softer springs and greater bushing compliance to isolate road irregularities. A sports car emphasizes handling precision, benefiting from stiffer springs, minimal bushing deflection, and aggressive camber curves that maximize cornering grip. An off-road vehicle needs exceptional suspension travel with geometry optimized to maintain wheel alignment through extreme articulation. Double wishbone suspension can be optimized for any of these applications through geometric tuning.
Computer simulation software like ADAMS (Automatic Dynamic Analysis of Mechanical Systems) or Lotus Shark allows engineers to model suspension geometry and predict performance before manufacturing physical prototypes. These programs calculate instantaneous centers, camber curves, toe change characteristics, and roll center migration throughout suspension travel. Engineers can iterate through hundreds of geometric variations, optimizing the design to meet specific targets for handling, comfort, and tire wear characteristics.
The ability to easily calculate load paths through the suspension structure also enables lightweight component optimization. By understanding exactly which portions of each control arm experience the highest stresses, engineers can add material only where needed for strength while removing weight from less-critical areas. This optimization explains why high-performance control arms often feature complex shapes with varying cross-sections rather than simple constant-thickness stampings.
Camber Curve Optimization
The relationship between suspension travel and wheel camber angle—the camber curve—represents one of the most critical parameters affecting handling performance. Optimal camber curves maintain the tire as perpendicular to the road surface as possible throughout the suspension’s operating range, maximizing the contact patch area and thus available grip.
In a properly designed SLA suspension, static camber might be set at -0.5 degrees (slightly negative), increasing to -3.0 or even -3.5 degrees at full compression. This progression ensures that as the vehicle body rolls outward during cornering, the wheel simultaneously tilts inward, maintaining near-zero effective camber at the tire contact patch. The result is maximum lateral grip when the driver needs it most—at the limit of the tire’s adhesion.
The upper control arm’s length relative to the lower arm directly controls camber curve aggressiveness. A very short upper arm creates rapid camber gain, while a longer upper arm produces more gradual camber change. This relationship allows engineers to tune camber curves to match specific tire characteristics and intended use. Street tires with relatively flexible sidewalls benefit from moderate camber gain, while racing slicks with stiff sidewalls may require more aggressive camber curves to optimize the contact patch shape under load.
Adjustable upper control arms, popular in racing and performance street applications, feature threaded rod ends or slotted mounting points that allow precise camber curve modification. By changing the effective length of the upper arm, tuners can dial in optimal camber characteristics for different tracks, tire compounds, or driving styles. This adjustability represents a significant advantage over fixed-geometry suspensions where camber curves are permanently determined by the original design.
Roll Center Control and Location
The roll center—the theoretical point around which the vehicle body rolls during cornering—critically affects handling characteristics, yet remains invisible and often misunderstood. The roll center’s vertical location determines the moment arm between it and the vehicle’s center of gravity, directly influencing how much the body rolls for a given cornering force.
Double wishbone suspension allows precise roll center positioning through control arm angle optimization. The instantaneous centers of the upper and lower control arms—the virtual pivot points where each arm’s extended lines intersect—determine roll center location. By adjusting control arm angles in side view and their lengths, engineers can place the roll center at optimal heights for specific applications.
Lower roll centers generally provide better handling by reducing the moment arm that creates body roll. With less roll, weight transfer happens more gradually, improving driver control and maintaining more consistent tire loading. However, roll centers positioned too low or, worse, below ground level, can create undesirable handling characteristics including poor transient response and excessive geometric weight transfer. Most performance vehicles target roll center heights between 2-6 inches above ground level at ride height.
Roll center migration—how the roll center location changes as the suspension compresses and extends—also matters significantly. MacPherson strut suspensions typically experience substantial roll center migration through suspension travel, with the roll center moving downward as the suspension compresses. Double wishbone suspensions can be designed to maintain more consistent roll center heights, providing predictable handling characteristics throughout the full range of suspension motion. This consistency allows drivers to better predict vehicle response as weight transfers during cornering, braking, and acceleration.
Anti-Dive and Anti-Squat Geometry
Vehicle pitch motion during braking and acceleration affects both driver confidence and actual performance. Excessive front-end dive under braking can make the vehicle feel unstable, reduce brake effectiveness as weight shifts forward, and potentially cause the front suspension to bottom harshly. Similarly, rear squat during acceleration wastes available suspension travel and can reduce traction on bumpy surfaces.
Double wishbone suspension addresses these concerns through geometric optimization of control arm angles. Anti-dive geometry for the front suspension involves angling the control arm pivot axes so that braking forces create an upward component that partially counteracts forward weight transfer. The exact angles depend on brake proportioning, weight distribution, and desired handling characteristics, but typical values provide 30-40% anti-dive—meaning the geometric effect reduces nose dive by that percentage compared to a suspension with parallel control arm axes.
The optimization requires balancing competing objectives. Excessive anti-dive can create harsh ride quality over bumps encountered while braking, as the braking force preloads the suspension in a partially compressed state. Too little anti-dive allows excessive pitch motion that reduces driver confidence and wastes suspension travel. Most performance vehicles target moderate anti-dive values that reduce pitch without compromising ride quality.
Rear suspension anti-squat geometry works similarly, with control arm angles designed to create forces that resist rear-end squat during acceleration. Rear-wheel-drive vehicles particularly benefit from anti-squat optimization, as driving torque creates substantial forces trying to rotate the rear suspension. Values typically range from 0-30% anti-squat depending on vehicle type and power delivery characteristics. Front-wheel-drive vehicles often use minimal rear anti-squat since the rear suspension doesn’t transmit driving forces.
Scrub Radius and Kingpin Inclination
Scrub radius—the distance between the steering axis and the tire contact patch center point when viewed from the front—significantly affects steering feel, stability, and torque steer characteristics. Zero scrub radius, where the steering axis intersects the ground at the tire contact patch center, provides the most neutral steering feel with minimal feedback from road irregularities. Positive scrub radius places the steering axis inboard of the contact patch, while negative scrub radius positions it outboard.
Most modern vehicles use small amounts of negative scrub radius for improved stability during asymmetric braking conditions. If one front brake is applying significantly more force than the other (due to brake fade or failure), negative scrub radius creates forces that help the vehicle track straight rather than pulling toward the stronger brake. This safety benefit comes at the cost of slightly heavier steering effort and more feedback of road irregularities through the steering wheel.
Double wishbone suspension allows scrub radius optimization independent of other suspension parameters by adjusting ball joint positions and steering knuckle geometry. MacPherson struts face greater constraints because the strut angle affects both scrub radius and other geometric parameters simultaneously. This independence provides double wishbone systems with an advantage for front-wheel-drive applications where minimizing torque steer requires careful scrub radius optimization.
Kingpin inclination (KPI) angle—the inward tilt of the steering axis when viewed from the front—creates self-centering forces that help the steering wheel return to center after a turn. As the wheel turns, the kingpin angle causes the vehicle to rise slightly, with gravity creating a torque that returns the steering to center. Typical KPI angles range from 5-15 degrees, with the exact value balanced between adequate self-centering force and minimal scrub radius. Double wishbone suspension’s separate upper and lower ball joints allow independent optimization of both parameters.
Comparing Suspension Architectures
Understanding double wishbone suspension’s position among alternative suspension designs requires examining the strengths and limitations of each approach in specific applications.
Double Wishbone versus MacPherson Strut
The MacPherson strut represents the most common alternative to double wishbone suspension, particularly in front-wheel-drive passenger vehicles. The strut combines the shock absorber and a structural member into a single unit that mounts directly to the steering knuckle, with only a single lower control arm managing horizontal wheel position. This simpler architecture offers significant packaging and cost advantages while delivering adequate performance for most applications.
MacPherson struts require less horizontal space than double wishbone suspensions, making them ideal for transverse-engine front-wheel-drive layouts where engine bay width is limited. The simpler design uses fewer components—one control arm versus two, one ball joint versus two or three, and fewer mounting bushings—directly reducing manufacturing costs by 30-40% compared to equivalent double wishbone systems. For mainstream passenger vehicles where handling precision takes secondary priority to cost and packaging efficiency, MacPherson struts provide an excellent compromise.
However, the strut’s geometric constraints limit performance potential. Because the shock absorber serves as an upper suspension link, its angle affects camber curves, roll center location, scrub radius, and kingpin inclination simultaneously. This coupling prevents independent optimization of each parameter. More problematically, MacPherson struts typically gain negative camber only through the initial compression range before reversing to positive camber gain at higher compression levels. This reversal occurs precisely when the vehicle needs maximum grip—during hard cornering when suspension compression is greatest.
The friction generated as the strut’s piston rod slides through the bearing mount also affects small-bump compliance compared to double wishbone systems’ ball joints. While modern struts use sophisticated bearings to minimize friction, the sliding motion inherently creates more resistance than the purely rotational movement of ball joints. This difference proves most noticeable over small, sharp irregularities where minimal suspension movement makes friction’s percentage impact greatest.
Nonetheless, dismissing MacPherson struts as inferior would be incorrect. Many excellent-handling vehicles use strut-based front suspension, including all Porsche 911 models except the GT3 and GT3 RS, every generation of BMW M3, and the Honda Civic Type R. Modern engineering, advanced computer simulation, and careful detail optimization allow struts to deliver impressive performance when properly executed. The choice between strut and double wishbone often comes down to priorities: ultimate performance and design flexibility favor double wishbone, while cost efficiency and packaging simplicity favor MacPherson struts.
Multi-Link Suspension: Maximum Complexity
Multi-link suspension represents the most sophisticated common suspension architecture, using three to five separate control arms—called links—to locate each wheel. This approach provides even greater geometric freedom than double wishbone designs, allowing independent control over camber, toe, caster, and other parameters throughout suspension travel. Each link can be optimized for its specific load path, enabling lightweight construction with exceptional geometric precision.
The additional links enable engineers to control toe angle changes during suspension compression and droop, providing another parameter for handling optimization. Strategic toe curve design can enhance stability, improve turn-in response, or reduce tire scrub depending on application requirements. This toe control capability proves particularly valuable in rear suspension applications where small toe changes significantly affect vehicle stability and handling balance.
However, the added complexity brings challenges. More links mean more pivot points, requiring additional bushings or spherical bearings. Each bushing adds potential deflection under load, potentially compromising the geometric precision that motivated the complex design. More joints also increase maintenance requirements and manufacturing costs. The packaging space required for multiple links in various orientations can constrain design flexibility in tight chassis environments.
Multi-link suspension predominates in rear suspension applications for luxury and high-performance vehicles, where the combination of ride quality and handling precision justifies the additional complexity and cost. Mercedes-Benz E-Class and S-Class models, BMW 5-Series and 7-Series vehicles, and various high-end sports cars use sophisticated multi-link rear suspensions to achieve both supple ride quality and precise handling characteristics. Front multi-link applications are less common due to packaging constraints with steering components and drive axles in front-wheel-drive layouts.
Double wishbone suspension occupies a middle ground: more sophisticated and capable than MacPherson struts, but simpler and lighter than multi-link systems. For applications requiring exceptional handling with reasonable cost and complexity, double wishbone often provides the optimal balance. Formula 1 teams’ universal adoption of double wishbone suspension—where complexity and cost are essentially unlimited—demonstrates that additional links don’t necessarily provide proportional performance benefits once the basic double wishbone architecture is properly optimized.
Cost and Complexity Trade-offs
Manufacturing cost comparisons reveal the economic pressure driving suspension design choices. A typical MacPherson strut corner requires: one stamped lower control arm, one ball joint, two control arm bushings, one strut mount bearing, and the strut assembly itself. A double wishbone corner requires: two control arms (upper and lower), two to three ball joints (two connecting control arms to knuckle, potentially one for steering linkage), four to six mounting bushings, and a separate shock absorber and spring assembly.
This component count difference translates directly to manufacturing costs. Raw material costs, machining time, assembly labor, and inventory management all scale with part count. For a four-wheel vehicle, the additional components for double wishbone suspension versus MacPherson struts might add $500-800 in manufacturing costs—a significant burden for mainstream vehicles produced in volumes of 100,000+ units annually. This economic reality explains why most economy and mid-market vehicles use MacPherson strut front suspension despite double wishbone’s performance advantages.
The maintenance burden also scales with complexity. Each ball joint represents a potential wear item requiring periodic inspection and eventual replacement. Each bushing will eventually deteriorate from age, heat, and stress cycling. More components mean more opportunities for failure and higher lifetime maintenance costs. For consumers prioritizing long-term ownership costs over ultimate performance, simpler suspension architectures offer practical advantages.
Performance and luxury vehicle manufacturers justify the additional cost through differentiated handling characteristics and brand positioning. When a vehicle’s purchase price exceeds $60,000-80,000, the incremental cost of sophisticated suspension becomes negligible as a percentage of total vehicle cost. Premium brands like Mercedes-Benz, BMW (in many models), and various sports car manufacturers use double wishbone or multi-link suspension as a tangible differentiator that justifies higher transaction prices.
Racing Applications and Advanced Configurations
Motorsports environments demand maximum performance regardless of cost or comfort considerations, making racing applications the ultimate proving ground for suspension technologies. Double wishbone suspension’s complete dominance in professional racing validates its performance advantages and demonstrates the design’s potential when fully optimized.
Formula 1 Universal Adoption
Every Formula 1 team uses double wishbone suspension at all four corners—a universal consensus unprecedented in racing where teams compete to find any possible performance advantage. This uniformity stems from the suspension architecture’s unmatched ability to meet F1’s extreme requirements: controlling 900-kilogram cars traveling above 200 mph while experiencing over five tons of peak aerodynamic downforce and absorbing impacts from aggressive kerb use.
F1 suspension geometry is optimized with millimeter-level precision using computational analysis that would be excessive for road cars. Teams employ dozens of engineers working full-time on suspension design, development, and optimization. The suspension must maintain precise wheel alignment under forces that would destroy conventional components, adapt to varying aerodynamic loads as downforce increases with speed, and provide sufficient compliance over kerbs and track irregularities without sacrificing geometric control.
The carbon fiber control arms used in F1 showcase extreme engineering optimization. These components weigh mere hundreds of grams while withstanding forces exceeding 10,000 pounds during peak loading conditions. The hollow, variable-thickness construction places material only where structural analysis predicts maximum stress, removing every unnecessary gram. Manufacturing these components requires aerospace-grade autoclaving processes and costs thousands of dollars per piece—acceptable in F1’s budget environment but impractical for road vehicles.
F1 teams extensively adjust suspension geometry for specific circuits, changing control arm lengths, mounting points, and spring rates to optimize performance for each track’s unique characteristics. High-downforce circuits like Monaco demand different setup than low-downforce venues like Monza. This setup flexibility represents a crucial performance advantage, allowing teams to dial in optimal handling characteristics for each race weekend.
Pushrod versus Pullrod Configurations
Traditional double wishbone suspension mounts springs and shock absorbers directly between the control arms, typically on or near the lower arm. Formula 1 and prototype racing cars instead use pushrod or pullrod systems where springs and dampers are relocated inside the vehicle body, connected to the suspension via rods and rocker arms (also called bellcranks).
Pushrod configuration mounts a rod from the lower portion of the steering knuckle angling upward to a pivot point on the chassis. As the wheel encounters a bump, pushing upward on the suspension, this motion pushes the rod which rotates a rocker arm inside the vehicle. The rocker arm connects to the spring and damper unit, transferring the wheel’s vertical motion to these components through mechanical advantage determined by the rocker’s geometry. This arrangement keeps the heavy spring and damper assemblies away from the wheel, reducing unsprung mass and improving suspension response.
Pullrod configuration mounts the rod from the upper portion of the steering knuckle angling downward to the chassis pivot. Upward wheel motion pulls on this rod, again actuating internal springs and dampers through a rocker mechanism. Pullrod systems offer a lower center of gravity compared to pushrods since the springs mount lower in the chassis, but they create more challenging packaging constraints and potentially compromise aerodynamics by placing the rod in a less favorable airflow region.
Mercedes F1 team sparked technical debates by switching from pullrod to pushrod front suspension in recent seasons, demonstrating that both configurations remain viable at the highest competition levels. The choice depends on specific chassis design, aerodynamic considerations, and desired suspension kinematics. Pushrod systems typically provide easier component access during pit stops—a practical consideration when seconds matter. Pullrod systems offer marginally better center of gravity but require more complex chassis structures to accommodate internal spring mounting points.
The aerodynamic benefits of inboard mounting prove substantial at racing speeds. Conventional suspension with exposed coilover assemblies creates significant drag and disturbs airflow around the wheel and underbody. Relocating these components inside the bodywork allows cleaner airflow management, reducing drag and improving downforce generation. In F1, where lap time differences measure in hundredths of seconds, these marginal gains aggregate into meaningful competitive advantages.
Sports Car and GT Racing Applications
Endurance racing categories like IMSA WeatherTech SportsCar Championship, FIA World Endurance Championship, and GT3 competition universally adopt double wishbone suspension for similar reasons as Formula 1: the design provides unmatched control over suspension kinematics combined with robust durability for multi-hour races.
These categories often permit adjustable suspension components, allowing teams to optimize setup for specific tracks and conditions. Adjustable control arm lengths enable camber curve tuning, while adjustable rocker ratios change spring and damper motion ratios to fine-tune handling balance. Teams maintain detailed databases tracking suspension settings for different circuits, using this accumulated knowledge to quickly establish baseline setups that can be refined during practice sessions.
The materials and construction techniques in top-tier sports car racing approach F1 levels of sophistication. Carbon fiber control arms are standard in prototype classes, while GT3 cars typically use forged aluminum components that balance strength, weight, and cost. Spherical bearings replace rubber bushings to eliminate deflection, though this creates harsh ride quality that would be unacceptable in street vehicles. Titanium fasteners, aerospace-grade aluminum, and extensive finite element analysis optimization all contribute to suspension systems that maximize performance while meeting durability requirements.
Unlike F1’s sprint race format, endurance racing demands components survive 6, 12, or even 24 hours of continuous high-load operation. Suspension components must withstand not just peak forces during maximum-grip cornering but also the fatigue loading from millions of stress cycles. This durability requirement adds margin to component designs compared to F1’s more aggressive weight optimization, though sports car racing suspension still represents cutting-edge engineering.
Off-Road and Trophy Truck Applications
High-speed off-road racing presents suspension challenges unlike circuit racing. Trophy trucks competing in events like the Baja 1000 require 20-30 inches of suspension travel to absorb jumps at speeds exceeding 100 mph, landing impacts generating forces over 10 G, and articulation over terrain that would destroy conventional vehicles. Double wishbone suspension’s geometric control proves essential even with these extreme travel requirements.
The control arms in trophy truck applications measure several feet long to achieve required travel while maintaining geometric precision. Massive tube construction—often 2-inch diameter chromoly steel—provides strength to survive brutal impacts. The lower control arms may incorporate multiple mounting points for spring and shock assemblies, spreading loads across the structure. Upper control arms sometimes feature adjustable mounting points allowing quick geometry changes to adapt to different race course characteristics.
Shock absorbers in trophy truck applications represent sophisticated technological components. Remote reservoir units with multiple adjustment parameters allow tuning of low-speed compression, high-speed compression, low-speed rebound, and high-speed rebound damping independently. Bypass valves provide position-sensitive damping that changes characteristics based on where the shock is in its stroke. Some trucks use multiple shock absorbers per corner—up to three on the front axle—to provide both high-frequency damping and bottoming resistance.
Despite the extreme application requirements differing dramatically from street vehicles or circuit racing, trophy trucks retain the fundamental double wishbone architecture. The unequal-length control arm design maintains camber control through the massive suspension travel, keeping tires properly oriented to the ground even as the suspension extends to maximum droop or compresses to full bump. This geometric capability that works equally well in Formula 1’s precision environment and off-road racing’s chaos demonstrates double wishbone suspension’s fundamental engineering excellence.
Maintenance, Common Issues, and Practical Considerations
While double wishbone suspension delivers performance advantages, the additional complexity compared to MacPherson struts creates specific maintenance requirements and potential failure modes that owners and mechanics must understand.
Component Inspection Requirements
Proper double wishbone suspension maintenance begins with regular visual inspection accessible to intermediate DIY enthusiasts. With the vehicle safely raised and supported on jack stands and wheels removed, inspect control arms for visible damage including bending, cracks (particularly near welds or mounting points), and signs of impact. Aluminum control arms especially are vulnerable to bending from pothole strikes or curb contact, and bent arms cannot be straightened—replacement is mandatory.
Ball joints require testing for excessive play indicating worn sockets. The proper technique involves grasping the tire at top and bottom (12 and 6 o’clock positions) and attempting to rock it while watching for movement at the ball joint. Movement visible without tools indicates significant wear requiring immediate replacement. Professional mechanics may use dial indicators measuring vertical and horizontal play in thousandths of an inch, comparing measurements to manufacturer specifications.
Control arm bushings deteriorate gradually from heat, age, oil contamination, and stress cycling. Visible cracking in rubber bushings, torn or separated rubber material, or excessive visible deflection during suspension loading indicate replacement necessity. Polyurethane bushings typically last longer but can still deteriorate from UV exposure and stress. The rubber dust boots protecting ball joints should be intact without tears—boot failure allows water and contaminant intrusion that rapidly destroys the ball joint.
Alignment checks should occur annually or after any suspension component replacement, impact event, or observation of uneven tire wear. While professional alignment equipment is required for corrections, watching for symptoms indicating alignment problems costs nothing. Uneven tire wear—especially edge wear on front tires—often indicates camber misalignment. The vehicle pulling to one side during straight-line driving suggests toe misalignment. Steering wheel not centered when driving straight also indicates toe problems.
Common Failure Modes and Symptoms
Ball joint failure represents the most dangerous potential suspension failure. A separated ball joint allows the control arm to detach from the steering knuckle, causing complete loss of wheel position control. At speed, this catastrophic failure typically results in the wheel folding under the vehicle with crash consequences. Early symptoms include clunking noises over bumps as the worn ball moves within its socket, steering wander as play allows uncontrolled wheel position changes, and vibration transmitted through the steering wheel.
Lifespan for ball joints varies dramatically with driving conditions, vehicle weight, and component quality. Light-duty passenger vehicles with gentle driving might achieve 150,000 miles on original ball joints. Heavier vehicles, aggressive driving, or exposure to road salt and contaminants may require replacement at 60,000-80,000 miles. Some modern ball joints incorporate wear indicators—grooves or measurements visible when the protective boot is retracted—allowing assessment without disassembly. When in doubt about ball joint condition, replacement provides cheap insurance against catastrophic failure.
Bushing deterioration manifests through excessive noise, vibration, and alignment instability. Clunking sounds during suspension articulation, rattling over rough roads, or squeaking noises during turns all potentially indicate bushing failure. More subtly, the vehicle may feel less precise, wandering slightly within the lane rather than tracking straight, or requiring constant steering corrections. These symptoms result from excessive bushing deflection allowing wheel position changes during driving forces.
Control arm damage, typically from impact with potholes, curbs, or road debris, creates alignment problems that cannot be fully corrected through adjustment. A bent control arm changes the effective distance between mounting points, fundamentally altering suspension geometry. Attempting to align a vehicle with bent control arms results in compromised settings—achieving correct camber may require toe settings outside specification, or achieving proper toe may leave excessive camber. The correct solution is control arm replacement.
Professional Service Requirements
While intermediate DIY mechanics can safely perform suspension inspection and some maintenance tasks, certain operations absolutely require professional service with proper equipment. Wheel alignment represents the most common professional-only task. Alignment machines costing $50,000-100,000 measure camber, caster, and toe angles with precision impossible using basic tools, displaying real-time readings as technicians make adjustments. Attempting alignment without proper equipment wastes time while potentially creating dangerous handling characteristics.
Ball joint and control arm replacement requires specific tools, torque specifications, and procedures. Many ball joints are press-fit into control arms or steering knuckles, requiring hydraulic presses generating several tons of force. Installation torque specifications for control arm mounting bolts and ball joint castle nuts must be precisely followed—under-torquing risks component loosening, while over-torquing can damage threads or create stress risers causing premature failure. Professional mechanics possess these tools and knowledge.
Suspension geometry modifications—aftermarket adjustable control arms, camber plates, or suspension lowering—should absolutely involve professional expertise. Well-intentioned but misguided modifications can create dangerous handling characteristics, excessive bump steer, or accelerated tire wear. Suspension engineers spend years understanding the complex relationships between geometric parameters. Installing aftermarket components without professional guidance or validation invites problems ranging from annoying to dangerous.
For vehicles regularly driven in performance environments—track days, autocross, or spirited mountain driving—consider periodic professional suspension inspections beyond routine maintenance. Race shops or performance specialists can identify developing problems and wear patterns before they become failures, potentially saving expensive repairs or preventing dangerous on-track incidents.
Cost Considerations and Replacement Economics
Budget appropriately for double wishbone suspension maintenance understanding the component count drives costs. Front suspension ball joint replacement typically costs $150-400 per side including parts and labor, with costs varying based on vehicle complexity and whether ball joints can be replaced separately or require complete control arm assembly replacement. Some vehicles use pressed-in ball joints replaceable independently, while others integrate ball joints into control arms requiring complete assembly replacement.
Control arm replacement runs $300-800 per side depending on vehicle and whether upper or lower arm requires replacement. Luxury and performance vehicles often specify expensive OEM components—a Mercedes-Benz or BMW control arm might cost $400-600 for the part alone, while installation adds 1-2 hours labor. Aftermarket alternatives typically cost 30-50% less than OEM but may compromise quality or fitment. For daily drivers prioritizing longevity, OEM components often prove most cost-effective despite higher initial price.
Complete bushing replacement for all four corners typically costs $400-1,200 including parts and labor. This operation is generally performed when bushings show significant deterioration or during other suspension work when components are already disassembled. Some enthusiasts upgrade to polyurethane bushings during this service, accepting slightly firmer ride quality in exchange for reduced deflection and longer service life.
Professional alignment after suspension work typically costs $80-150 depending on location and whether four-wheel or front-wheel-only alignment is needed. High-end alignment shops may charge $200-300 for comprehensive services including suspension inspection, before-and-after alignment reports, and detailed adjustment notes. This premium is often worthwhile for performance vehicles or after extensive suspension modifications.
Is Double Wishbone Suspension Right for Your Vehicle?
Making informed decisions about suspension type, maintenance, or potential upgrades requires understanding when double wishbone suspension’s advantages justify its complexity and cost.
Performance Driving Justification
Double wishbone suspension makes most sense for vehicles regularly experiencing conditions where its superior geometry control provides tangible benefits. Track day enthusiasts, autocross competitors, and spirited canyon drivers exploit the system’s ability to maintain optimal camber during aggressive cornering. The consistent negative camber gain keeps tires properly loaded through hard turns, providing the additional grip allowing faster cornering speeds and improved driver confidence at the handling limit.
Off-road applications similarly benefit from double wishbone suspension’s articulation capabilities and geometry control. Rock crawling, desert racing, or serious trail driving expose suspension to extreme angles and travel where maintaining wheel alignment proves critical for traction and control. The system’s ability to keep tires properly oriented through massive suspension articulation—20+ inches in some applications—cannot be matched by simpler designs.
For vehicles prioritizing comfort alongside performance—luxury sport sedans, high-end touring cars—double wishbone suspension delivers refinement benefits justifying increased complexity. The system’s geometric flexibility allows engineers to optimize both impact harshness over rough roads and controlled body motions during spirited driving, achieving dual objectives that simpler suspensions compromise.
When Simpler Systems Suffice
Daily commuting in normal traffic conditions rarely exploits double wishbone suspension’s advantages. The average driver on typical roads never approaches grip limits where camber control becomes critical, never achieves lateral accelerations where precise roll center positioning matters, and generally prioritizes ride comfort and reliability over ultimate handling precision. For these applications, MacPherson strut suspension delivers completely adequate performance while offering packaging efficiency, lower cost, and simpler maintenance.
Budget considerations often rationally prioritize simpler suspension. If purchasing decisions balance transportation needs against financial constraints, the money saved choosing a MacPherson strut-equipped vehicle might be better allocated to more critical features, emergency savings, or other priorities. The performance delta between good MacPherson strut suspension and double wishbone matters primarily to enthusiast drivers willing to pay premiums for marginal improvements.
Weight-conscious applications including fuel efficiency priorities may favor MacPherson struts’ reduced component count. While unsprung mass differences between well-designed strut and double wishbone systems are small (potentially 5-15 pounds per corner), the cumulative 20-60 pound difference multiplied by millions of vehicles annually represents significant environmental and economic impact. For mainstream transportation where performance takes secondary importance, simpler solutions make rational sense.
OEM Design Decisions and Market Realities
Understanding manufacturers’ suspension choices requires recognizing the economic pressures in modern automotive production. A mass-market vehicle produced in 500,000-unit annual volumes faces cost pressure where every dollar matters. The additional manufacturing cost of double wishbone suspension—possibly $800-1,200 per vehicle considering all four corners—translates to $400-600 million annually across production volume. This massive expense must be justified through either higher transaction prices or demonstrated competitive advantage in customer-valued attributes.
Premium brands like Mercedes-Benz successfully position double wishbone or multi-link suspension as luxury differentiators justifying higher prices. Marketing materials emphasize sophisticated suspension design, and brand reputation for engineering excellence supports these claims. When vehicle prices exceed $70,000-100,000, the incremental suspension cost becomes negligible percentage-wise while providing tangible differentiation from mainstream competitors.
Mainstream manufacturers increasingly adopt platform sharing strategies where multiple vehicle models share suspension components, drivetrain elements, and chassis structures. These platforms often standardize on MacPherson strut front suspension for cost efficiency even when some variants might benefit from double wishbone architecture. The Toyota RAV4 and Lexus RX, for example, share platforms and both use strut suspension despite Lexus’s luxury positioning.
Performance-oriented brands like Mazda, Alfa Romeo, and some Cadillac models buck mainstream trends by featuring double wishbone or sophisticated multi-link suspension in competitively-priced vehicles. These manufacturers differentiate through driving dynamics, accepting lower profit margins or offsetting suspension costs through savings elsewhere. This strategy serves niche markets valuing handling precision over mainstream priorities.
Aftermarket Modification Considerations
Converting existing MacPherson strut suspension to double wishbone architecture generally proves impractical for street vehicles. The chassis structure lacks mounting points for upper control arms, requiring extensive modifications approaching ground-up redesign scope. Custom fabrication shops can perform such conversions for racing applications where cost constraints are relaxed, but typical project costs exceed $10,000-20,000 and require extensive expertise in suspension geometry, fabrication, and engineering.
For vehicles with factory double wishbone suspension, aftermarket upgrades offer meaningful performance improvements at more reasonable costs. Adjustable upper control arms ($400-800 per pair) enable precise camber adjustment and camber curve tuning, particularly valuable for track-focused applications. These components typically feature spherical bearings or poly bushings replacing rubber bushings, reducing deflection at the cost of some street comfort.
Performance bushing upgrades ($200-600 for complete sets) replace compliant rubber bushings with firmer polyurethane or delrin alternatives. This modification tightens suspension response, improves alignment stability under load, and extends service life. However, increased noise and vibration transmission make aggressive bushing upgrades questionable for daily-driven vehicles. Street-track compromise bushings with moderate firmness increases provide better balance.
Coilover suspension kits ($1,500-4,000+) replace factory springs and shock absorbers with adjustable-height, adjustable-damping components. These comprehensive systems allow ride height adjustment, spring rate optimization, and damping tuning across multiple parameters. For serious performance driving, coilovers provide capability approaching professional racing components while maintaining street usability. However, installation requires expertise, proper corner-balancing, and professional alignment.
Conclusion: Engineering Excellence Within Context
Double wishbone suspension deserves its reputation as premium suspension architecture, offering superior geometric control, exceptional design flexibility, and capability to deliver both performance and comfort when properly engineered. The system’s universal adoption in Formula 1, prevalence in high-performance sports cars, and use in luxury vehicles demonstrates genuine engineering advantages over simpler alternatives.
These advantages manifest through superior camber control maintaining optimal tire contact during cornering, precise roll center positioning enabling controlled body motions, extensive anti-dive and anti-squat tuning capability, and independent optimization of critical parameters including scrub radius, kingpin inclination, and suspension kinematics. Engineers can tune double wishbone suspension to achieve virtually any desired handling characteristic, making it the choice when performance truly matters.
However, appreciating double wishbone suspension’s strengths requires acknowledging its complexity and cost. Additional components create manufacturing expenses 30-40% higher than MacPherson strut alternatives, more maintenance requirements from increased wear items, greater packaging space demands potentially constraining vehicle design, and weight penalties from additional components despite individual optimization. For mainstream transportation where cost efficiency and simplicity drive decisions, simpler suspension architectures make rational sense.
The MacPherson strut’s dominance in modern passenger vehicles doesn’t indicate engineering compromise but rather appropriate technology selection for typical use cases. Most drivers never approach handling limits where suspension geometry optimization becomes critical. For daily commuting, grocery shopping, and typical family transportation, well-designed strut suspension delivers completely adequate performance while offering real advantages in cost, packaging efficiency, and maintenance simplicity.
Ultimately, suspension choice should align with actual driving requirements and priorities. Track day enthusiasts, canyon carving aficionados, and performance driving competitors benefit meaningfully from double wishbone suspension’s superior geometry control. Their driving styles actually exploit the system’s capabilities, justifying complexity and cost through tangible performance advantages. Conversely, drivers prioritizing cost efficiency, simple maintenance, and adequate everyday performance find MacPherson struts deliver better value for their specific needs.
Professional Consultation for Safety-Critical Decisions
Suspension systems directly affect vehicle safety and control. Component failures, especially ball joint separation, can cause catastrophic loss of control resulting in serious crashes. When experiencing any suspension symptoms—unusual noises, steering wander, vibration, or uneven tire wear—seek immediate professional inspection. Don’t delay addressing potential suspension problems hoping they’ll resolve themselves or remain manageable. Early intervention typically costs less than delayed repairs and dramatically reduces safety risks.
Suspension modifications affect handling characteristics in complex, sometimes non-obvious ways. Well-intentioned modifications can create dangerous handling issues including excessive bump steer, unpredictable limit behavior, or alignment problems causing rapid tire wear. Before modifying suspension components, consult experienced suspension specialists or alignment shops familiar with your specific vehicle and modifications. Their expertise prevents expensive mistakes while optimizing results.
For vehicles used in competitive driving—track days, autocross, time trials—consider consulting professional race engineers for suspension optimization. These specialists understand the complex relationships between geometric parameters, tire characteristics, and handling behavior. Their expertise developing optimal setup saves trial-and-error time while achieving better results than amateur tuning attempts.
This article provides comprehensive educational information about double wishbone suspension design, operation, and maintenance. However, suspension work requires proper equipment, knowledge, and procedures. Always follow manufacturer specifications, use correct torque values, and seek professional assistance for tasks beyond your skill level and equipment capability. Safety must remain the paramount consideration in all suspension-related decisions.