Your cooling system’s unsung hero that prevents overheating disasters
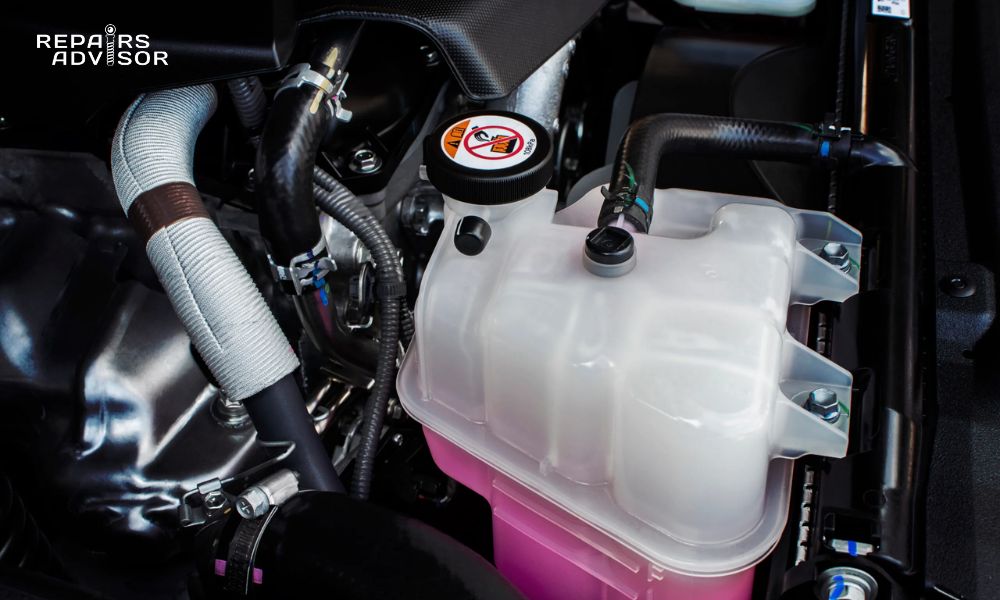
When you lift the hood of your car, you’ll likely notice a translucent plastic tank with minimum and maximum level markings—this is your coolant expansion tank. While it might look like a simple container, this component plays a critical role in preventing catastrophic engine damage from overheating. Understanding how your expansion tank works and recognizing early warning signs of failure can save you thousands of dollars in engine repairs and keep you safe on the road.
What is a Coolant Expansion Tank?
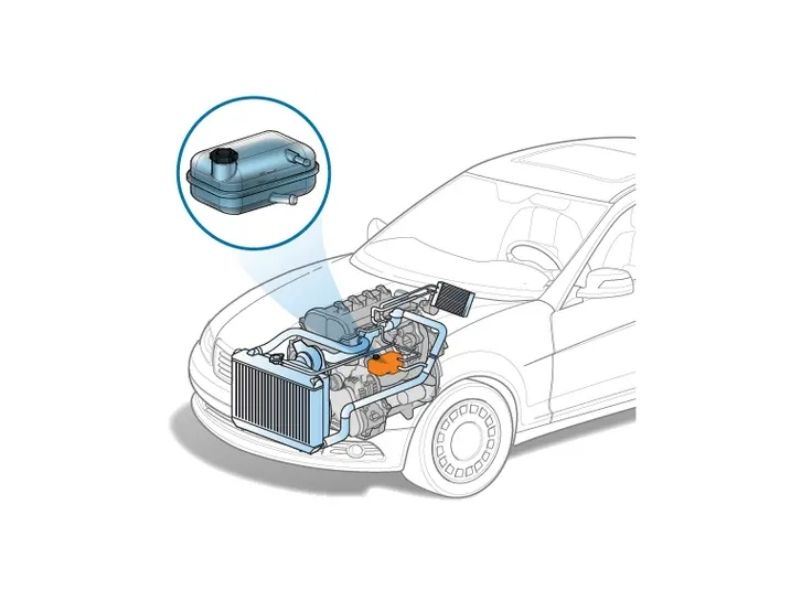
A coolant expansion tank is a pressurized reservoir that manages coolant volume changes as your engine heats up and cools down. Unlike a simple overflow tank that merely catches spilled coolant, an expansion tank is an integral part of your cooling system that maintains proper pressure and coolant circulation.
The tank serves as a crucial safety buffer in your vehicle’s cooling system. When coolant heats up, it expands significantly—up to 6% of its volume at operating temperature. Without a proper expansion tank, this thermal expansion would create dangerous pressure spikes that could rupture hoses, damage the radiator, or cause coolant to spray onto hot engine components.
Key identification features of an expansion tank include:
- Translucent plastic construction allowing visual coolant level inspection
- Pressure-rated cap (typically 13-16 PSI) located on the tank itself
- “Cold” and “Hot” level markings for proper coolant monitoring
- Direct connection to the cooling system through bypass or heater hoses
- Mounting at the highest point in the cooling system for optimal air bleeding
Modern vehicles use expansion tanks because they provide several advantages over older overflow systems. The tank maintains consistent pressure throughout the cooling system, eliminates air pockets more effectively, and allows for easier coolant level monitoring without removing the radiator cap.
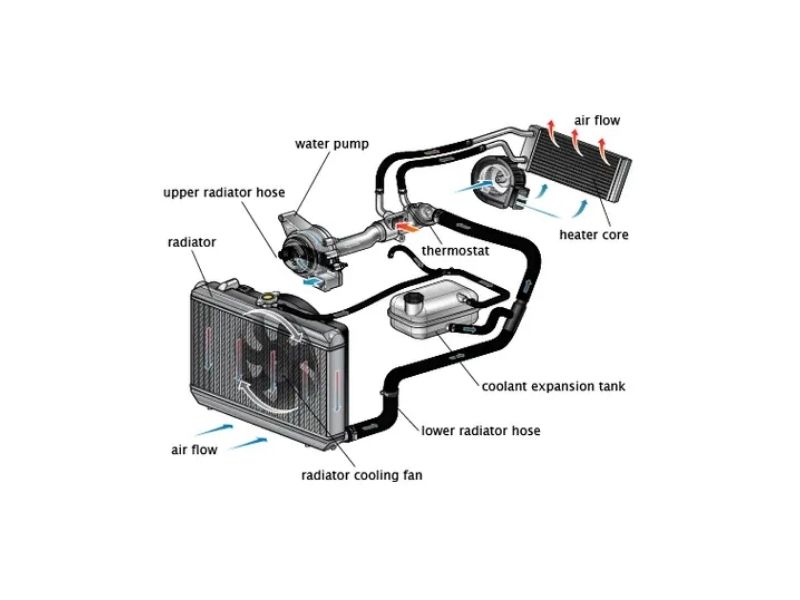
How Does a Coolant Expansion Tank Work?
The expansion tank operates on fundamental principles of thermal dynamics and pressure management. Understanding this process helps you appreciate why proper maintenance is crucial for your vehicle’s cooling system performance.
The thermal expansion cycle works as follows:
When your engine starts cold, the coolant occupies its minimum volume. As the engine reaches operating temperature (typically 195-220°F), the coolant expands and creates pressure within the system. The expansion tank accommodates this increased volume while maintaining system pressure through its pressurized cap.
Pressure management is critical because it serves two vital functions. First, pressurization raises the coolant’s boiling point from 212°F to approximately 265°F, providing a crucial safety margin against overheating. Second, the pressure differential ensures proper coolant circulation through the engine block, radiator, and heater core.
The air cushioning effect represents one of the expansion tank’s most important functions. The tank contains both coolant and air space. As coolant expands, it compresses the air cushion above it, creating a spring-like effect that absorbs pressure fluctuations without causing system damage.
Coolant circulation through the tank occurs continuously during operation. Unlike overflow tanks that only receive coolant during pressure release events, expansion tanks have coolant flowing through them constantly. This circulation helps maintain even pressure distribution and facilitates air removal from the system.
The radiator cap relationship is essential to understand. In expansion tank systems, the pressurized cap is located on the tank rather than the radiator. This design allows the radiator to remain completely full of coolant while the tank manages pressure and volume changes.
When you shut off the engine, the cooling process reverses. As coolant contracts during cooling, the air cushion in the expansion tank expands, maintaining slight pressure in the system and preventing vacuum formation that could collapse hoses or draw air into the system.
Expansion Tank vs. Overflow Tank: Understanding the Difference
Many vehicle owners confuse expansion tanks with overflow tanks, but these systems operate very differently and serve distinct purposes in cooling system design. Understanding these differences helps you properly maintain your specific system.
Overflow tank systems use a vented radiator cap and a non-pressurized reservoir. When coolant expands and pressure exceeds the cap’s rating, excess coolant flows into the overflow tank. As the system cools, atmospheric pressure pushes coolant back into the radiator through the cap’s vacuum valve. The overflow tank acts primarily as a storage container for expelled coolant.
Expansion tank systems maintain constant pressure throughout the entire cooling circuit. The pressurized cap is located on the tank itself, and coolant circulates continuously through the tank during operation. The tank is plumbed into the cooling system through bypass hoses or heater circuit connections, making it an active component rather than a passive reservoir.
Key operational differences include:
- Pressure management: Expansion tanks maintain constant system pressure, while overflow tanks operate at atmospheric pressure
- Coolant flow: Expansion tanks have continuous coolant circulation, while overflow tanks only receive coolant during pressure relief events
- Air handling: Expansion tanks actively remove air from the system, while overflow tanks simply store displaced coolant
- Cap location: Expansion tank caps are pressurized and located on the tank; overflow tank caps are typically vented and the pressure cap remains on the radiator
Manufacturer preferences vary significantly. European manufacturers like BMW, Mercedes-Benz, and Volkswagen predominantly use expansion tank systems for their superior pressure management and air bleeding capabilities. Many Japanese manufacturers favor overflow tank designs for their simplicity and lower cost. American manufacturers use both systems depending on the specific vehicle application.
Understanding your system type is crucial for proper maintenance. Adding coolant to an overflow tank when the system is hot can cause spillage, while expansion tanks can typically be filled when warm (though never when hot for safety reasons).
Signs Your Coolant Expansion Tank is Failing
Recognizing early warning signs of expansion tank failure can prevent catastrophic engine damage and costly repairs. Most expansion tank failures develop gradually, giving you time to address the problem before it becomes critical.
Visual inspection reveals the most obvious symptoms:
Cracks and physical damage typically appear first around stress points. Look for hairline cracks near hose connections, mounting points, or along seam lines where plastic halves are joined. Even small cracks can rapidly expand under pressure and temperature cycling.
Bulging or swelling indicates the tank has been subjected to excessive pressure, often from overheating events or internal blockages. A warped expansion tank loses its ability to maintain proper pressure and should be replaced immediately.
Coolant leaks and puddles under your vehicle often originate from a failing expansion tank. Check the ground where you park for signs of colored fluid—coolant is typically green, orange, yellow, or pink and has a distinctive sweet smell.
Performance-related symptoms include:
Engine overheating occurs when the expansion tank can no longer maintain proper coolant circulation. If your temperature gauge reads higher than normal or warning lights illuminate, stop driving immediately and inspect the cooling system.
Low coolant warning lights activate when coolant levels drop due to leaks. Modern vehicles monitor coolant levels electronically and will alert you to potential problems before they become critical.
Frequent coolant loss without visible leaks may indicate internal tank deterioration or microscopic cracks that allow coolant to seep out slowly.
Advanced diagnostic symptoms:
Discolored coolant appearing rusty, muddy, or contaminated suggests internal tank deterioration. The plastic may be breaking down and contaminating the coolant, reducing its effectiveness and potentially damaging other cooling system components.
Pressure cap problems often accompany tank failure. If the cap doesn’t maintain proper pressure due to tank deformation, the entire cooling system becomes compromised.
Air in the cooling system manifests as gurgling sounds, heater performance problems, or temperature fluctuations. A failing expansion tank may not properly separate air from coolant, leading to air pockets that impede circulation.
Critical warning signs requiring immediate attention:
- Steam or coolant vapor from the engine bay
- Rapid coolant loss (more than normal evaporation)
- Temperature gauge in the red zone
- Coolant contamination with oil or other fluids
- Expansion tank that feels hot to the touch when the engine is cold
If you notice any combination of these symptoms, have your cooling system inspected by a qualified technician immediately. Continuing to drive with a failing expansion tank risks severe engine damage from overheating.
Common Causes of Expansion Tank Failure
Understanding why expansion tanks fail helps you prevent problems and extend your cooling system’s lifespan. Most failures result from a combination of factors rather than a single cause.
Age and material degradation represent the most common failure mechanism. Expansion tanks are typically manufactured from high-density polyethylene or similar plastics designed to withstand temperature extremes and chemical exposure. However, after 5-10 years of service, even the best materials begin to deteriorate.
Pressure cycling stress occurs every time your engine heats up and cools down. Each cycle subjects the tank to expansion and contraction forces. Over thousands of cycles, this repeated stress causes microscopic cracks that eventually grow into visible failures. High-performance vehicles and those subjected to frequent temperature extremes experience accelerated stress cycling.
Chemical corrosion happens when coolant chemistry becomes unbalanced. Old coolant becomes acidic and attacks plastic components from the inside. Using incorrect coolant types or mixing different coolant formulations can accelerate this process.
Physical damage from road debris, accidents, or improper handling during service can compromise tank integrity. Even minor impacts can create stress concentrations that lead to future cracks.
Manufacturing defects occasionally cause premature failures. Poor plastic molding, inadequate stress relief, or substandard materials can result in tanks that fail well before their expected service life.
Poor maintenance practices significantly reduce expansion tank lifespan:
- Never changing coolant allows acids and contaminants to build up
- Overfilling the system creates excessive pressure
- Using water instead of proper coolant mixture promotes corrosion
- Ignoring small leaks allows problems to worsen
Environmental factors also play a role. Vehicles operated in extreme climates, dusty conditions, or areas with poor air quality may experience accelerated tank degradation.
Preventive maintenance including regular coolant changes, proper system bleeding, and periodic inspection can significantly extend expansion tank life and prevent unexpected failures.
How to Diagnose Expansion Tank Problems
Proper diagnosis requires systematic inspection and testing to differentiate expansion tank problems from other cooling system issues. Safety first: Always allow the engine to cool completely before beginning any cooling system inspection.
Visual inspection checklist:
Start with the tank itself. Look for obvious cracks, particularly around mounting points and hose connections. Check for signs of coolant seepage, which often appears as crusty deposits or discoloration around leak points. Examine the tank’s shape—any bulging or distortion indicates pressure problems.
Inspect all hoses connected to the expansion tank. Look for cracks, bulges, or soft spots that indicate deterioration. Check hose clamps for tightness and corrosion. A loose connection can cause pressure loss and coolant leaks.
Coolant level and condition assessment:
With the engine cold, check coolant level against the tank’s minimum and maximum markings. The level should be between these marks when cold and may rise toward the maximum when hot (but never check when the system is hot).
Examine coolant color and clarity. Fresh coolant should be clear and brightly colored. Rusty, muddy, or contaminated coolant indicates system problems that may be affecting the expansion tank.
Pressure testing procedures:
Professional-grade pressure testing provides the most accurate diagnosis. This involves connecting a pressure tester to the expansion tank and pressurizing the system to its rated pressure (typically 13-16 PSI). A properly functioning system should hold pressure for at least 15 minutes without significant loss.
Temperature monitoring:
Use an infrared thermometer to check temperature distribution across the cooling system. Uneven temperatures may indicate circulation problems related to expansion tank failure.
Professional diagnostic tools:
Advanced diagnostics may include coolant system chemical testing to check for combustion gases (indicating head gasket problems) or electronic leak detection using specialized dyes and UV lights.
When to seek professional help:
If pressure testing reveals significant pressure loss, coolant contamination testing shows concerning results, or you’re not comfortable performing the inspection safely, consult a qualified technician. Professional diagnosis can save money by identifying the root cause and preventing unnecessary part replacement.
Remember that professional-quality diagnostic procedures require specialized tools and knowledge. While basic visual inspection can identify obvious problems, complex issues may require professional expertise to diagnose accurately.
Safety Precautions When Working with Expansion Tanks
Working with pressurized cooling systems requires strict adherence to safety protocols. The consequences of improper procedures can include severe burns, scalding, and personal injury. Every cooling system inspection or repair must begin with proper safety considerations.
Never remove pressure caps when hot: This is the most critical safety rule. Pressurized coolant can reach temperatures exceeding 250°F and will instantly cause severe burns if released. Always wait until the engine has cooled to ambient temperature before removing any pressure caps.
Proper pressure release procedures:
When the engine is cool, place a thick cloth over the expansion tank cap and slowly turn it counterclockwise to the first stop. This allows any residual pressure to escape safely. If you hear hissing or see steam, retighten the cap immediately and wait longer for cooling. Only remove the cap completely when no pressure remains in the system.
Personal protective equipment:
Always wear safety glasses when working around cooling systems to protect against coolant splashes. Use chemical-resistant gloves when handling coolant, as prolonged skin contact can cause irritation. Wear long sleeves to protect your arms from hot surfaces and potential splashes.
Coolant handling safety:
Coolant is toxic and must be handled properly. Never dispose of coolant down drains or onto the ground—it’s harmful to the environment and animals are attracted to its sweet taste. Always use proper containment when draining systems and dispose of used coolant at recycling centers.
Environmental considerations:
Modern coolants contain chemicals that can harm the environment if improperly disposed. Many auto parts stores and service centers accept used coolant for recycling. Some areas have specific disposal requirements, so check local regulations.
Emergency procedures:
If coolant contacts your skin, flush immediately with large amounts of cool water. If coolant is ingested, seek immediate medical attention. Keep a first aid kit and emergency contact numbers readily available when working on vehicles.
Remember that general maintenance safety principles apply to all automotive work. Take your time, use proper tools, and never take shortcuts that compromise safety.
Maintenance Tips for Your Coolant Expansion Tank
Regular maintenance prevents most expansion tank failures and extends cooling system life. Implementing a systematic maintenance routine is far less expensive than dealing with emergency repairs or engine damage from overheating.
Regular inspection schedule:
Perform monthly visual inspections of your expansion tank. Check coolant level, look for signs of leakage, and examine the tank for cracks or damage. Monthly inspections catch problems early when they’re easier and less expensive to address.
Conduct detailed inspections every six months. This includes checking all hose connections, verifying proper coolant color and clarity, and ensuring the pressure cap seals properly.
Coolant level monitoring:
Check coolant level when the engine is cold, preferably before starting the vehicle in the morning. The level should consistently remain between the minimum and maximum marks. Sudden drops in coolant level indicate leaks that require immediate attention.
Never add plain water to your cooling system except in emergencies. Use the proper coolant mixture specified by your vehicle manufacturer to maintain corrosion protection and optimal heat transfer properties.
Cleaning procedures:
External cleaning involves removing dirt and debris that can hide developing cracks or leaks. Use a soft brush and mild detergent to clean the tank exterior during regular washing.
Internal cleaning requires system flushing during coolant changes. This removes scale, corrosion products, and contaminants that can accelerate tank deterioration.
Replacement intervals:
Most expansion tanks should be replaced every 7-10 years as preventive maintenance, regardless of apparent condition. This timing coincides with major cooling system overhauls and prevents unexpected failures.
High-performance vehicles or those operated in severe conditions may require more frequent replacement. Consult your vehicle’s service documentation for specific recommendations.
Seasonal considerations:
Before winter, verify that your coolant mixture provides adequate freeze protection for your climate. Frozen coolant can crack expansion tanks and other cooling system components.
Before summer, ensure your cooling system can handle increased heat loads. Check that coolant concentration isn’t too high, which reduces heat transfer efficiency.
Connection maintenance:
Inspect hose clamps regularly and retighten as needed. Vibration and temperature cycling can loosen connections over time. Replace corroded clamps before they fail.
Check rubber hoses for signs of deterioration including cracks, bulges, or soft spots. Replace questionable hoses during scheduled maintenance rather than waiting for failure.
Following these comprehensive maintenance practices helps ensure reliable cooling system operation and prevents costly emergency repairs.
When to Replace Your Expansion Tank
Knowing when to replace your expansion tank prevents emergency breakdowns and protects your engine from overheating damage. Replacement timing depends on several factors including age, condition, and operating history.
Age-based replacement guidelines:
Most automotive professionals recommend replacing expansion tanks every 7-10 years regardless of apparent condition. Plastic degradation occurs gradually and may not be visible until failure is imminent. Preventive replacement during major cooling system service is cost-effective insurance against unexpected breakdowns.
High-mileage vehicles (over 100,000 miles) should receive particular attention. Even if the tank appears functional, age-related deterioration makes failure increasingly likely.
Symptom-based replacement criteria:
Replace immediately if you observe:
- Any visible cracks, regardless of size
- Bulging or distortion of the tank shape
- Persistent coolant leaks from the tank area
- Contaminated or discolored coolant that doesn’t clear with flushing
- Pressure cap problems that can’t be resolved with cap replacement
Preventive replacement timing:
The optimal time for expansion tank replacement is during major cooling system service. This typically includes:
- Radiator replacement
- Water pump replacement
- Thermostat replacement
- Complete cooling system overhaul
Combining these services reduces labor costs and ensures all cooling system components have similar remaining service life.
Cost vs. risk analysis:
Consider the cost of a new expansion tank (typically $50-150) versus the potential cost of engine damage from overheating (often $3,000-8,000 or more). The mathematical decision is clear—preventive replacement offers exceptional value compared to emergency repairs.
Factor in additional costs like towing, rental vehicles, and lost productivity when weighing replacement decisions. These hidden costs make preventive maintenance even more attractive.
Professional recommendations:
Experienced technicians often recommend expansion tank replacement based on their assessment of overall cooling system condition. If multiple components show wear, replacing the entire system ensures reliability and prevents repeated failures.
Trust professional judgment when technicians recommend preventive replacement. Their experience with similar vehicles and failure patterns provides valuable insight into optimal replacement timing.
Professional vs. DIY Replacement Considerations
Deciding whether to replace an expansion tank yourself or hire a professional depends on your skill level, available tools, and comfort with cooling system work. Understanding the requirements helps you make an informed decision.
Skill level requirements:
Basic expansion tank replacement requires moderate mechanical ability. You must be comfortable working with pressurized systems, handling coolant safely, and properly bleeding air from the cooling system after reassembly.
Advanced skills become necessary if the replacement involves extensive disassembly to access the tank or if complications arise during the work. Some vehicles require removal of other components to reach the expansion tank.
Tool requirements:
Essential tools include:
- Basic hand tools (wrenches, screwdrivers, pliers)
- Coolant drain pan (adequate capacity for your system)
- Funnel for refilling
- Safety equipment (glasses, gloves)
Specialized tools may include:
- Pressure testing equipment
- Coolant vacuum filling equipment
- Specific tools for hose clamp removal
Time investment:
Simple expansion tank replacement typically requires 1-3 hours for experienced DIY mechanics. Factor in additional time for coolant disposal, parts acquisition, and potential complications.
Complex replacements may require 4-6 hours or more if extensive disassembly is needed. Consider whether this time investment fits your schedule and availability.
Safety considerations:
DIY replacement requires strict adherence to safety procedures. You must be confident in your ability to work safely with hot, pressurized systems and handle potentially toxic coolant properly.
If you’re not completely comfortable with these safety requirements, professional service is the wiser choice.
Professional advantages:
Experienced technicians bring several advantages:
- Proper diagnostic equipment to verify the problem
- Access to high-quality parts and warranties
- Expertise in system bleeding and testing
- Ability to identify and address related problems
- Professional disposal of used coolant
Cost comparisons:
DIY replacement costs include parts ($50-150) plus coolant ($20-40). Professional service typically costs $200-400 depending on labor rates and vehicle complexity.
Consider the value of professional warranty coverage, proper disposal services, and the peace of mind that comes with expert installation when comparing costs.
For those interested in learning more about proper procedures, consult the comprehensive guides available in our Tools & Equipment section.
Finding the Right Parts and Documentation
Selecting quality parts and accessing proper documentation ensures reliable repairs and optimal cooling system performance. The source and quality of replacement components significantly impact longevity and reliability.
OEM vs. aftermarket considerations:
Original Equipment Manufacturer (OEM) parts offer guaranteed fit and performance but typically cost more than aftermarket alternatives. OEM parts are manufactured to the same specifications as the original components and often include updated designs that address known weaknesses.
Quality aftermarket parts can provide excellent value while maintaining reliability. Look for parts from established manufacturers with good reputations and warranty coverage. Avoid extremely low-priced parts that may use inferior materials or manufacturing processes.
Part number identification:
Locate your vehicle’s exact part number using the VIN (Vehicle Identification Number) or by consulting the existing expansion tank. Part numbers are often molded into the plastic or printed on attached labels.
Cross-reference part numbers through multiple sources to ensure compatibility. Some vehicles use different tanks depending on engine options, production dates, or market destinations.
Quality considerations:
Examine parts carefully before installation. Quality expansion tanks feature:
- Uniform plastic thickness without thin spots
- Smooth, professional molding with no flash or rough edges
- Proper thread quality on cap interfaces
- Clear, accurate level markings
- Appropriate pressure ratings
Technical documentation importance:
Access to proper service documentation ensures correct installation and system bleeding procedures. Vehicle-specific manuals provide critical information including:
- Coolant capacity specifications
- Proper bleeding procedures
- Torque specifications for connections
- System pressure ratings
Manufacturer specifications:
For comprehensive technical documentation, consult vehicle-specific repair manuals available through Repairs Advisor. Our extensive collection includes detailed specifications for major manufacturers:
- FORD Manuals for Ford vehicles with detailed cooling system procedures
- TOYOTA Manuals providing comprehensive Toyota-specific technical information
- BMW Manuals offering detailed BMW cooling system specifications
- Car category for access to manuals across all automotive brands
Professional parts sourcing:
Establish relationships with reputable parts suppliers who can provide technical support and warranty coverage. Quality suppliers offer:
- Expert application assistance
- Technical support for installation questions
- Warranty coverage for defective parts
- Access to updated part numbers and supersessions
Having access to proper documentation and quality parts ensures your expansion tank replacement provides years of reliable service and protects your engine investment.
Conclusion
Your coolant expansion tank plays a vital role in preventing catastrophic engine damage from overheating. This seemingly simple plastic container manages complex pressure and volume changes that occur during normal engine operation, protecting expensive engine components from thermal stress and coolant loss.
Key takeaways for optimal expansion tank maintenance:
- Regular inspection catches problems early when repairs are simpler and less expensive
- Understanding the symptoms of failure allows prompt action before engine damage occurs
- Safety must always come first when working with pressurized cooling systems
- Quality parts and proper installation ensure reliable long-term performance
- Preventive replacement offers exceptional value compared to emergency repairs
Remember that cooling system failures can cause severe engine damage within minutes. If you notice any signs of expansion tank problems—including leaks, overheating, or unusual coolant loss—address them immediately. When in doubt, consult a qualified technician who can provide expert diagnosis and ensure safe, proper repairs.
The investment in proper expansion tank maintenance and timely replacement is minimal compared to the cost of engine rebuilding or replacement. By following the guidelines in this article and staying proactive about cooling system care, you can avoid costly breakdowns and keep your vehicle running reliably for years to come.
Disclaimer: The information provided in this article is for reference purposes only. Always implement cooling system repairs and maintenance at your own risk and responsibility. When working with pressurized cooling systems, safety must be your top priority. Consult qualified automotive professionals for complex repairs or when you’re not completely confident in your abilities. Repairs Advisor provides technical information and documentation but does not offer direct repair services